Page 577 of 625

98-68 1973 OPEL SERVICE MANUAL
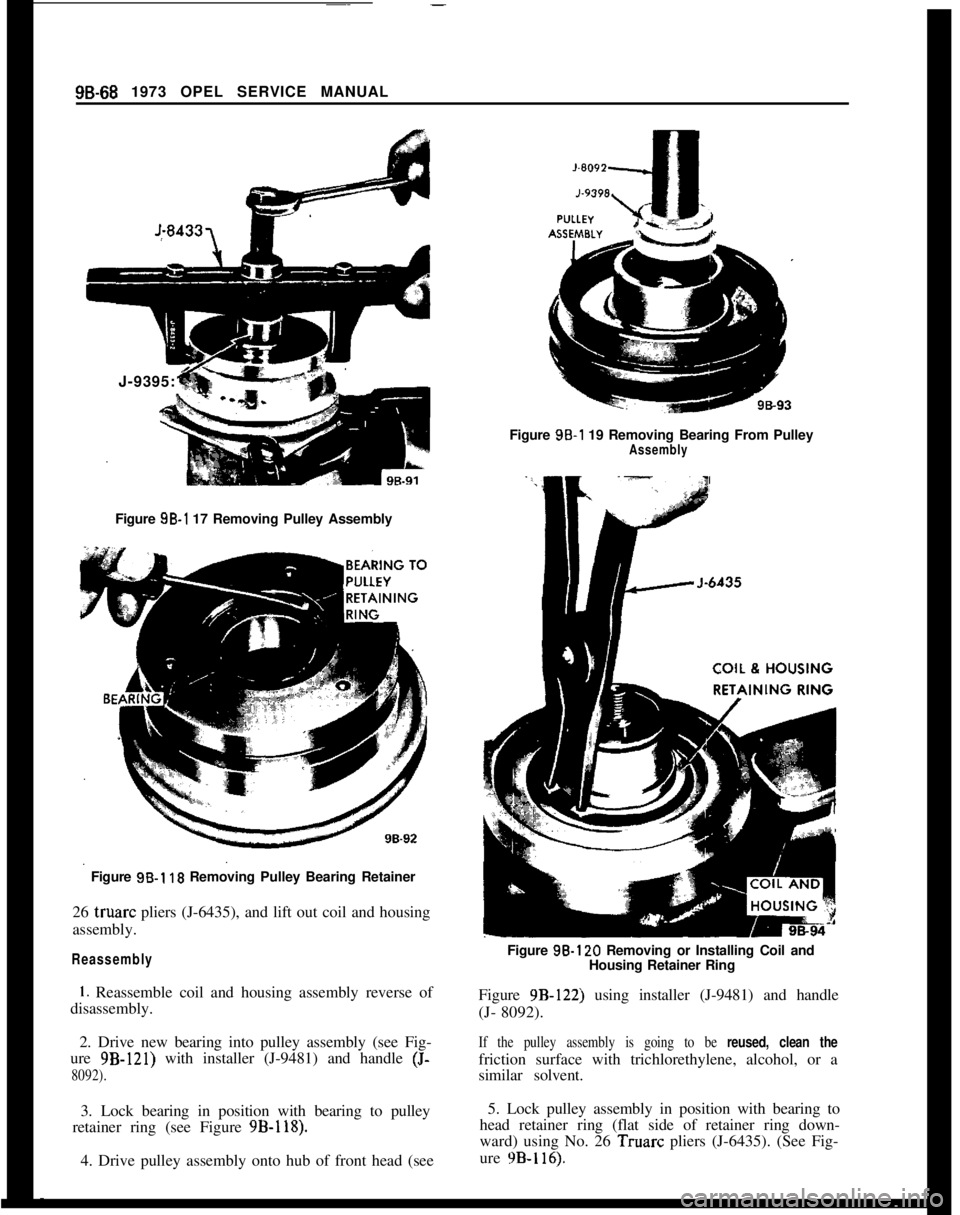
J-9395:
Figure 9B-1 17 Removing Pulley Assembly
Figure
9B-1 10 Removing Pulley Bearing Retainer
26 truarc pliers (J-6435), and lift out coil and housing
assembly.
Reassembly
1. Reassemble coil and housing assembly reverse of
disassembly.
2. Drive new bearing into pulley assembly (see Fig-
ure 9B-121) with installer (J-9481) and handle
(J-
8092).3. Lock bearing in position with bearing to pulley
retainer ring (see Figure 9B-118).
4. Drive pulley assembly onto hub of front head (seeFigure 99-l 19 Removing Bearing From Pulley
AssemblyFigure 9B-120 Removing or Installing Coil and
Housing Retainer Ring
Figure 9B-122) using installer (J-9481) and handle
(J- 8092).
If the pulley assembly is going to be reused, clean thefriction surface with trichlorethylene, alcohol, or a
similar solvent.
5. Lock pulley assembly in position with bearing to
head retainer ring (flat side of retainer ring down-
ward) using No. 26 Truarc pliers (J-6435). (See Fig-
ure
9B-116).
Page 578 of 625

REFRIGERANT COMPONENTS ALL MODELS96.69
J-9481\J-8092
/BEARING
Disassembly of Rear Head, Oil Pump, Rear
Discharge Valve Plate, and Rear Suction Valve
Reed Disc
If compressor is not going to be disassembled any
further than removal of rear head, oil pump, rear
discharge valve plate, or rear suction valve reed disc,
omit Steps “1, 2 and
4”.
1. Disassemble clutch drive plate and shaft seal.
2. Disassemble pulley assembly, and coil and hous-
ing assembly.
3. Clean surface of compressor shell and dry with
compressed air.
4. Remove compressor from holding fixture
(J-
9396), unscrew drain screw. Drain, measure and re-
cord amount of oil in compressor.
Figure
98-121 Installing Bearing into Pulley Assembly 5. Reinstall compressor in holding fixture (J-9396)
positioned as shown in Figure 9B-123.
Figure SB-122 Installing Pulley Assembly
6. Reassemble clutch drive plate.
DISASSEMBLY AND REASSEMBLY OF INTERNAL
PARTS OF COMPRESSOR AND LEAK TESTING
COMPRESSOR
A clean work area and a place for each part removed
is required to properly disassemble and reassemble compressor. The internal parts of the compressor
must be kept free of dirt or foreign material.
When working with compressor, under no circum-
stances should compressor be rested on pulley end.
PRESSURE
Figure 96.123 Compressor Installed in Holding
Fixture
6. Unscrew and discard four lock nuts from rear of
compressor, and lift off rear head by tapping it with
a mallet. If Teflon sealing surface is damaged (see
Figure
9B-124), replace rear head. Clean or replace
suction screen as necessary.
7. Pencil mark top side of both oil pump rotors and
lift out rotors. Replace both oil pump inner and outer
rotors if one or both are damaged or worn.
Page 579 of 625

9B-70 1973 OPEL SERVICE MANUAL
SUCTION
SCREENTEFLON Iut 98-98
Figure 96-l 24 Rear Head Removal
8. Take out and discard shell to head
“0” ring.
9. Carefully pry out rear discharge valve plate and
rear suction valve reed disc with screwdrivers (seeFigures 9B-125 and
9B-126). Check both pieces and
replace as necessary.During disassembly, the disc generally adheres to the
plate and both pieces lift out together.
Figure 96-l 25 Removing Rear Discharge Valve Plate
Removing Cylinder Assembly, and Disassembly of
Front Suction Valve Reed Disc, Front Discharge
Valve Plate, and Front Head1. Pull out oil inlet tube (see Figure 9B-127) and oil
inlet tube
“0” ring using Remover (J-6586).Figure 96-l 26 Removing Rear
SfJction Valve ReedDiscFigure 98-127 Removing Oil Inlet Tube
2. Push shaft upward from front head and lift out
cylinder assembly (see Figure 9B-128), front suction
valve reed disc, and front discharge valve plate.
When lifting out the cylinder assembly, the front
suction valve reed disc and the front discharge valve
plate generally adhere to the cylinder assembly and
lift out with it. Check and replace if necessary.
Depending on wear or damage to cylinder assembly,
it may be advisable to replace complete cylinder as-
sembly. If service replacement cylinder is used omit
following steps and continue on with subparagraph
entitled “FINAL REASSEMBLY OF CYLINDER
ASSEMBLY”.
3. Disassemble front head from shell by tapping
front head with a mallet to unseat head, and lifting
straight out through rear of shell the front head and
shell to head
“0” ring (see Figure 9B-130). Discard
“0” ring.
Page 580 of 625

REI:RIGERANT COMPONENTS ALL MODELS9s. 71
/Figure 9%128 Removing Internal Cylinder Assembly
Figure 9B-130 Removing Front Head
If sealing surfaces of front head (see Figure 9B- 13 1)
are damaged, replace front head. There is no Teflon
on front head sealing surface.
Disassembly of Cylinder Assembly1. Pry off suction pass cover using screwdriver (see
Figure
9B-132).2. Placevzylinder assembly (front end downward)
on top of compressing fixture (J-9397), number pis-
tons and cylinders “1, 2 and 3” to facilitate reassem-
bly (see Figure
9B-133), and separate cylinder halves
using a hard rubber mallet or hammer and wood
block.
SEALINGFigure 96.131 Front Head Sealing Surfaces
SUCTION
PASS COVERFigure 98-132 Removing Suction Pass Cover
3. Disassemble rear cylinder half and discharge
tube from cylinder assembly and discard discharge
tube.Depending on whether or not discharge tube comes
out with rear cylinder half or remains in front cylin-
der half it may be necessary to rotate shaft and wash
plate assembly (using a 9/16 inch opened wrench on
shaft seal portion of shaft) to achieve necessary clear-kl”Ct?.
4. Carefully disassemble from cylinder assembly
(see Figure 9B-134) and lay in respective place on
Page 581 of 625

96-72 1973 OPEL SERVICE MANUALRUBBER
MALLET\
Figure 98-133 Separating Cylinder Halves
parts tray (J-9402) the following: number “1, 2 and
3” pistons, piston drive balls, and (if service pistons)
piston rings. To disassemble rotate wash plate until
piston is at highest point, raise wash plate approxi-
mately
l/2 inch and lift out piston and related parts
one at a time. Discard shoe discs and rear needle
thrust bearing and races.
Figure 98-134 Disassembly of Cylinder Assembly
-Service Pistons Shown
Examine piston drive balls and replace if necessary.
The front end of the piston may be identified by a
recessed notch (see Figure
9B-135).5. Lift out shaft and wash plate assembly and front
needle thrust bearing races. Discard front needle
thrust bearing and races.Figure 98-135 Piston Identification
RinglessExamine shaft and wash plate assembly and replace
as necessary.
6. Wash all salvaged parts of cylinder assembly in
bath of trichlorethylene, alcohol, or similar solvent
and dry parts with filtered, dry compressed air.
Examine front and rear cylinder halves, front and
rear main shaft bearings, and replace as necessary. If
bearings are to be replaced, drive out of cylinder
halves with suitable socket or punch. Install new
bearing (lettering on bearing edge facing outward)
using bearing installer (J-9432). See Figure
9B-136.Figure 98.136 Installing Main Shaft Bearing
Partial Reassembly of Cylinder Assembly, and
Gaging of Piston Play and Shaft End Play1. Obtain from parts stock four “zero” thrust races,
two needle thrust bearings, and three “zero” shoe
discs.2. Place front cylinder on top ofcompressing fixture
(J-9397) as shown in Figure
9B-137).
Page 582 of 625

REFRIGERANT COMPONENTS ALL MODELS9B- 73
F
Figure 9B-137 Shaft and Front Needle Thrust BEin Cylinder Half
I1
:igure 98.138 Installing Piston Into Cylinder Half
Service Piston Sliown
3. Generously coat with clean petroleum jelly two
“zero” thrust races, and a new needle thrust bearing.
Assemble races and bearing to front end of shaft and
wash plate assembly and insert assembly into front
cylinder ‘(see Figure
9B-137).
8. Repeat preceding step for reassembly of pistons
No. “2” and No. “3”.
9. Reassemble rear cylinder onto front cylinder
us-
ing wood block and mallet (see Figure 9B-140).
4. Assemble two additional “zero” thrust races and
a new needle thrust bearing to rear end of shaft and
wash plate assembly.
5. Lightly coat ball pockets of the three pistons with
clean petroleum jelly and place a piston drive ball in
each pocket.
6. Lightly coat the three “zero” shoe discs with
clean petroleum jelly and place a disc on only the
piston drive ball at the front of each piston.
Do not place shoe discs on rear piston drive balls. Do
not reassemble piston rings on pistons (if service pis-
tons) at this time. Use lubricant in
sufEcient quantity
so that piston drive balls and shoe discs stick to
piston.
7. Rotate shaft and
wash plate assembly until high
point of wash plate is over No. “1” cylinder bore.
Position No. “1” piston onto
wash plate (see Figure
9B-137) and lower the piston and wash plate so the
front end (notched end
- see Figure 9B-138) of the
piston enters the cylinder bore.
In
order’to tit the piston onto the stiash plate, the
shaft and
wash plate assembly must be raised ap-
proximately
l/2 inch, and also the front needle
thrust
bearing and races must be held up against the
hub of the
wash plate.
Figure 98.140 Assembling Rear Cylinder Half
10. Remove cylinder assembly from on top of com-
pressing fixture (J-9397), position assembly inside
fixture so that discharge tube opening in cylinder
halves is located between fixture legs, and front of
cylinder assembly is downward. Install and torque
fixture nuts to 15 lb. ft.
11. Gage piston play as follows:
Page 583 of 625

98.74 1973 OPEL SERVICE MANUAL
(a) Using a feeler gage, select a leaf or combination
of leaves which result in satisfactory “feel” when
inserted between rear piston drive ball and wash
plate (see Figures 9B-141 and 9B-142).CHECi(lNG?OR
SHAFT END PLAY
CHE&NG FOR
PISTON PLAY
98113Figure 98-141 Checking Piston and Shaft End Play
Figure 98-142 Checking Clearance Between Rear
Piston Drive Ball and Swash Plate(b) Remove selected leaf or leaves from feeler gage
and attach end of spring scale that is calibrated in
ounces. (A generator brush spring scale (J-5 184) or
the spring scale for checking distributor point setting
may be used for this step).
(c) Reinsert feeler gage leaf or leaves between rearpiston drive ball and wash plate and draw leaf or
leaves out again, simultaneously measuring “drag”
on leaf or leaves (see Figure
9B-143). If correct leaf
(leaves) has been selected, spring
:scale will read be-
tween 4 to 8 ounces pull (the higher reading is
desired). To perform this step correctly, feeler gage
leaf (leaves) must be withdrawn straight out with a
steady even motion, and all surfaces involved must
be coated with No. 525 viscosity oil. Record gage
dimension.
Y
i15Figure 98.143 Checking Drag
on Selected Feeler
Gage Leaf with Spring Scale
Use of the spring scale establishes a standard of
measurement of the amount of feeler gage leaf
“drag” required.
(d) Rotate the shaft and wash plate assembly 120
degrees and perform a second check (Steps “a, b and
c”) between same piston drive ball and wash plate.
Record gage dimension.
(e) Rotate shaft and wash plate again approximately
120 degrees and repeat third check (Steps “a, b and
c”) between same piston drive ball and wash plate.
Record gage dimension.(0 From the three recorded checks (Steps
“c, d and
e”) select minimum feeler gage reading and obtain
from
stock (ref. to the Shoe Disc Table for part num-
ber of shoe disc) one shoe disc corresponding to the
minimum gage reading (ref. example below). Place
shoe disc in respective position on parts tray
(J-
9402).
Page 584 of 625

REFRIGERANT COMPONENTS ALL MODELS9B- 75Shoe Disc TableSERVICEID. NO.
PART NO. STAMPED
6557000
6556175
6556180
65561856556190
65561956556200
65562056556210
65562156556220
EXAMPLESHOE
DISC
0
(“ZSXO”Shoe
Disc)
17
l/218%
1919
l/2202&2
2121
l/2
22
Piston’
1st2nd3rdNo.
CheckCheckCheck
1,019,020,019(Select
No.19 -ShoeDisc)
2,020,020,019(Select
No.19-ShoeDisc)
3
.021,020.021(Select
No.20ShoeDisc)
(g) Repeat Steps “c, d, e and f’ for other two pistons
and obtain two more selected shoe discs for other
two pistons. In the rebuilt cylinder assembly, each
piston will have one selected shoe disc and one
“zero” shoe disc.
12. Gage shaft end play as follows:
(a) Using a feeler gage, select a leaf or combination
of leaves which result in satisfactory “feel” when
inserted between rear needle thrust bearing and outer
rear thrust race (see Figure
9B-144).
(b) Remove selected leaf or leaves from feeler gage.
Attach to end of spring scale calibrated in ounces. (A
generator brush spring scale (J-5184) or the spring
scale for checking distributor point setting may be
used for this step).(c) Reinsert feeler gage leaf (leaves) between rear
needle thrust bearing and outer rear thrust race and
draw leaf (leaves) out again, this time simultaneously
noting the “drag” or pull on the leaf (leaves) as mea-
sured by the spring scale (see Figure
9B-145). If
correct leaf (leaves) have been selected, spring scale
will read between 4 to 8 ounces pull (the higher
reading is desired). To perform this step correctly,
the feeler gage leaf (leaves) must be withdrawn
straight out with a steady, even motion. All contact-Figure 98.144 Gaging Clearance Between Rear
Needle Thrust Bearing and Outer Rear Thrust Race
ing surfaces involved in gaging operation must be
coated with No. 525 viscosity oil.
Figure 98.145 Checking Drag on Selected
FeeletGage Leaf with Spring Scale
The measurement for selection of the thrust race
needs to be performed at only one place on the shaft
and wash plate assembly.
(d) Select from stock one thrust race (ref. Thrust
Race Table for part number of thrust race) corre-
sponding to the feeler gage reading determined in
step
“C”,and place the selected thrust race in the
parts tray slot designated for the outer rear thrust