Page 217 of 625
13E. 50 1973 OPEL SERVICE MANUALPART
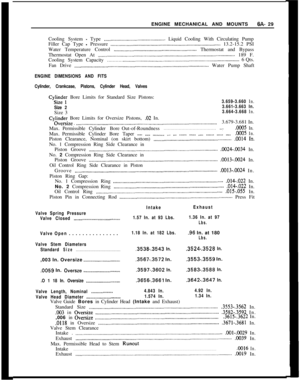
Bolt
BoltLOCATION
Steering WheelUpper Universal Joint
- Lower Clamp
Upper Universal Joint
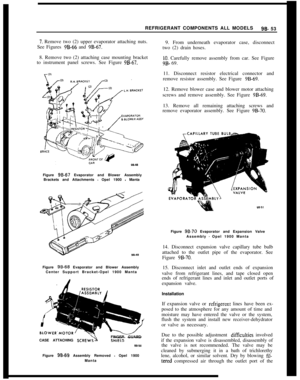
- Hex Head
Lower Universal Joint
TORQUE
LB.FT.
15
14
Page 218 of 625

REAR SUSPENSION3F- 51
REAR SUSPENSION
CONTENTS
Subject
DESCRIPTION AND OPERATION:
Description and Operation of Rear Suspension. . . . . .DIAGNOSIS: (Not Applicable)
MAINTENANCE AND ADJUSTMENTS: (Not
Applicable)
MAJOR REPAIR:
Rear Shock Absorber Removal and Replacement . .
Rear
SpringRemovalandInstallation. . . . . . . . . . . . . . . . . . . . . . . .LowerControlArmReplacement
. . . . . . . . . . . . . . . . . . . . . . . . . . . . . . . .Stabilizer
RodReplacement. . . . . . . . . . . ~ . . . . . . . . . . . . . . . . . . . . . ..-....Track Rod Replacement
. . . . . . . . . . . . . . . . . . . . . . . . . . . . . . . . . . . . . . . . . . . . . . . .SPECIFICATIONS:
Rear
SuspensionSpecifications. . . . . . . . . . . . . . . . . . . . . . . . . . . . . . . . . . . .Page No.3F-5
13F-513F-523F-533F-533F-533F-53
DESCRIPTION AND OPERATIONDESCRIPTION AND OPERATION OF REAR
SUSPENSIONAll Opels utilize the three link rear suspension ar-
rangement. This rear suspension consists of coil
springs, track rod, shock absorbers and lower control
arms.The coil springs set between two seats which arc
situated ahead of the rear axle housing.
The track rod is utilized on all models to control the
lateral stability of the rear axle assembly. It is of
tubular design. A stabilizer rod is used on all Wagons
as well as Fast Backs and Sedans. The GT is not
equipped with a stabilizer rod.
The lower control arms are of tubular design and
function as two links of the three link suspension
system. They are attached to the underbody through
brackets welded to the side rails and to the rear axle
assembly through the front portion of the spring seat
bracket. The lower control arms control the fore and
aft movement of the rear axle assembly.
The third link in this suspension system is the torque
tube which is connected to the differential carrier
and also to the underbody through rubber bushings
in the central joint support bracket.The torque tube in conjunction with the lower con-
trol arms absorb all acceleration and braking torque.
MAJOR REPAIR
REAR SHOCK ABSORBER REMOVALAND INSTALLATION
RemovalNOTE: The trim panel under the spare tire must be
removed on the GT to gain access to attaching nuts.
1. Remove upper attaching nut, retainer and rubber
grommet.
2. Remove lower attaching nut and rubber grommet
retainer, compress shock absorber and remove from
lower mounting pin.
Installation1. Replace upper and lower rubber grommets, if
necessary, before installing shock absorber.
2. Extend shock absorber and position in car. Attach
at lower end first, torque nut to 15 lb.ft. on the GT,
and torque to 47 lb.ft. on the Opel 1900
- Manta.
Page 219 of 625

3F. 521973 OPEL SERVICE MANUAL
3. Install rubber grommet, retainer and self-locking
nut at top of shock absorber. Torque to 10 lb. ft.
Always use new self-locking nuts.
REAR SPRING REMOVAL AND INSTALLATION
Rear Spring Removal1. Raise rear of car with floor jack under differential
carrier and support with jack stands positioned un-
der side jack brackets. See Figure
3F-2.Figure 3F-3 Removing Coil
SpringFigure 3F-2 Raising Rear of Car
2. Remove rear wheels.3. Disconnect shock absorbers from rear axle.
4. Disconnect stabilizer and shackles, if equipped,
from frame.
5. Lower rear axle assembly as far as possible withoutputting the brake hose under stress.
6. If necessary, tilt the rear axle assembly to remove
springs. See Figure
3F-3. Note the upper and lower
rubber damper rings.
Rear Spring Installation
1. Make certain the lower damper rings are properly
positioned in the spring seats and position the springsin their respective position in the damper rings. See
Figure
3F-4.2. Properly install upper damper rings on springs.
CAUTION: Fasteners are important attaching parts in
that they could affect the performance of vital corn-
ponents and systems, and/or could result in major
repair expense. They must be replaced with one of
the same part number or with an equivalent part if
replacement becomes necessary. Do not use a
re-
placement part of lesser
qua/ity or substitute designFigure 3F-4 Installing Coil Spring
Torque values must be used as specitied during reas-
sembly to assure proper retention of these parts.3. Raise rear axle assembly to compress springs in
their seats.
4. Attach shock absorbers and tighten retaining nuts
to 15 Ib.ft. For the GT and 47 lb.ft. for the Opel 1900
- Manta.
5. Attach stabilizer shackles, if equipped, to axle
brackets and tighten bolts to 25 lb. ft. with vehicle at
curb weight.
6. Install rear wheels torquing lug nuts to 65 lb.ft.
Page 220 of 625

REAR SUSPENSION3F- 53
7. Remove jack stands.
LOWER CONTROL ARM REPLACEMENTRemovalThis operation can be performed with the vehicle
standing at curb height or elevated.
1. Disconnect parking brake cable from support
bracket on control arm.
2. Loosen and remove front and rear control arm
attaching bolts and remove control arm.
installation1. On
1900’s and Manta’s place a load of approxi-
mately 350 lbs. in luggage compartment or on the
GT, place a load of approximately 150
Ibs. on dri-
ver’s seat. Torque control arm attaching nut and
bolts to 18 lb.ft on
GT’s and 23 Ib.ft. on the 1900 -Manta.
2. Connect parking brake cable to support bracket on
control
ranI.
STABILIZER ROD REPLACEMENT
Removal1. Raise and support rear of vehicle.
2. Disconnect stabilizer rod to shackle bolts.
3. Disconnect stabilizer rod to underbody retainers
and work stabilizer rod out from under vehicle.
SPECIFICATIONS
REAR SUSPENSION SPECIFICATIONS
Tightening SpecificationsInstallation1. Work stabilizer rod into position and loosely at-
tach stabilizer to underbody retainers.
2. Connect stabilizer rod to shackles.
3. With the vehicle standing on its wheels or the rear
axle assembly lifted, tighten stabilizer rod to under-
body bracket bolts to 15 lb. ft.
4. Remove jack stands and lower vehicle.
TRACK ROD REPLACEMENT
Removal1. Lift rear of car and suitably support.
2. Disconnect track rod from rear axle and frame
side member.
Installation
1. Loosely connect track rod first to side member and
then to the rear axle.
2. On the
1900 - Manta, load luggage compartment
of vehicle with approximately 350 lbs. or on the GT,
place a load of approximately 150 lbs. on driver’s
seat and tighten track rod attaching bolts to specified
torque.
3. Remove supports (jack stands) and lower vehicle.
Use a reliable torque wrench. Specifications are for clean and lightly-oiled
threads.
Part
Nut
Nut
Nut
Bolt
Nut
Nut
Nut
BoltName
WheelNuts.
.._.._......._........................................................
Control Arm Attaching (GT) .._.._.,,,........,,.,,.......,,......,,,,......
Control Arm Attaching (1 900 - Manta) .,,...._...,,,,_.....,,.,...
Stabilizer Rod to Underbody Retainers ,....._.,.,,.,.....,,,....
Shock Absorber Lower Attachment (GT) . .._.....,._.._.,,,...
Shock Absorber Lower Attachment (1900 Manta) ,,.,
Shock Absorber Upper Attachment. .._.....................
Stabilizer Shackle to Axle Bracket .._._.._,...._..,,.,,.......,,,...
Torque
Lb.Ft.
65
16
23
15
1,5
47
1025
Page 221 of 625
3F- 541973 OPEL SERVICE MANUAL/UPPER RUBBER
DAMPER
RINGCOIL SPRINGTRACK ROD
LOWER RUBBER
’DAMPER RING
REAR AX;E ASSEMBLY
COIL SPRING SEAT
STABILIZER ROD
$3SHOCK ABSORBER
LOWER CONTROLARM
Figure 3F.5 Exploded View Rear Suspension
Page 222 of 625

WHEELS AND TIRES3G- 55
WHEELS AND TIRES
CONTENTS
Subject
DESCRIPTION AND OPERATION: (Not Applicable)
DIAGNOSIS:
Car
RoughnessandVibration. . . . . . . . . . . . . . . . . . . . . . . . . . . . . . . . . . . . . . . .AbnormalTireWear
. . . . . . . . . . . . . . . . . . . . . . . . . . . . . . . . . . . . . . . . . . . . . . . . . . . . . . . . . .MAINTENANCE AND ADJUSTMENTS:
Demounting and Mounting Tubeless Tires
. . . . . . . . . . . . . .Wheel
andTireBalance. . . . . . . . . . . . . . . . . . . . . . . . . . . . . . . . . . . . . . . . . . . . . . . . . .MAJOR REPAIR: (Not Applicable)
SPECIFICATIONS:
Specifications
. . . . . . . . . . . . . . . . . . . . . . . . . . . . . . . . . . . . . . . . . . . . . . . . . . . . . . . . . . . . . . . . . . . . . .Page No.
3G-55
3G-58
3G-6136-6236-62
DIAGNOSIS
CAR ROUGHNESS AND VIBRATIONinflation pressures and perform tire inspection, in-
cluding removal of any foreign material on tire tread
or wheel large enough to upset balance.
Possible Causes
To assist in the diagnosis and correction of some of
the more stubborn cases of tire vibration and rough-
ness conditions that may be encountered, the follow-
ing information is offered:Tire inflation pressure recommendations are very
important at all times and particularly so on all ride
complaints. Raising or lowering tire pressures to
“improve” mileage or traction should not be at-
tempted.
VIBRATION, or a quivering motion condition, no-
ticeable by feel through the steering column, steering
wheel, floor
p&n, or by hood and fender shake, usu-
ally originates from the front wheels and tires. Front
end vibration, when caused by unbalanced front
wheels, can be generally felt as steering wheel “nib-ble”.Next, road-test the car with the owner, if possible,
and have the owner explain the specific ride disturb-
ance.After road-testing, raise car on hoist and proceed to
isolate the offending tire/wheel assembly.
Reproducing the Disturbance
A vibration felt through the seats as a side-to-side
disturbance can usually be attributed to the rearIn an attempt to reproduce the disturbance ex-
wheels and tires.perienced in the ride, a wheel spinner can be used on
the front wheels of the car.
Both front and rear vibration can be noticed mainly
at highway speeds, usually over 60 mph.The rear wheels may be spun by placing car in
“Drive” with engine running.
ROUGHNESS, noticeable primarily at speeds be-
tween 40 and 65 mph, can be felt (and occasionally
heard), and is due to certain irregularities in the tire.
Roughness usually sets up a “trembling” feel or a
shuddering effect.When spinning rear wheels, never exceed a speedom-
eter speed of 35 mph with a standard rear axle assem-
bly, or 75 mph on one with a positive traction rear
axle. Excessive speeds may cause damage to the rear
axle assembly.
Road-Test With Owner
When a ride complaint is encountered, first checkJack up both rear wheels by placing the jack under
the differential housing. Spin one wheel and tire with
the opposite wheel held from rotating by holding the
Page 223 of 625

3G- 561973 OPEL SERVICE MANUAL
parking brake cable. Spin the other wheel using the
same procedure.
By spinning the wheels, the offending tire will cause
vibration that may be felt by touching the bumper or
fender. By the process of elimination, proceed on
STATIC UNBALANCEDYNAMIC UNBALANCE‘\I....;,’30-i
Figure 3G-2 Static and Dynamic Unbalancetires that cause vibration as follows:
UnbalanceCheck for tire/wheel unbalance An unbalanced
wheel assembly that is causing a vibration can, in
most cases, be reduced to an acceptable level by
static and dynamic wheel and hub balancing. Correct
by rebalancing, Figure
3G-2. It is recommended that
an on-the-car balancer be used for balancing.
A tire/wheel assembly that is in balance may still be
causing a vibration when the car is driven, but may
not set up a vibration when the wheel is off the
ground and submitted to the spinner test. In such
cases, the next step is to check radial and lateralrunout.
RunoutA runout gauge should be used to determine the
amount of total radial and lateral runout at the tire
that causes the vibration. See Figures
3G-3 and
3G-4.A guide to runout maximum totals is as follows:
,035 inch Radial - Wheel
,050 inch Radial - Tire/Wheel Assembly
,045 inch Lateral - Wheel
Figure 3G-3 Checking Radial
Runout
Page 224 of 625

WHEELS AND TIRES3G- 57
Figure 3G-4 Checking Lateral Runout
,050 inch Lateral - Tire/Wheel Assembly
If the tire and wheel runouts are beyond any of the
maximum totals above, the tire should be reposi-
tioned 180 degrees opposite its original location on
the wheel. Refer to Figure
3G-5. This will, in most
cases, reduce the runout and vibration to a satisfac-
tory level.
ASSEMBLY CAUSING REPOSITION TIRE/WHEEL
IISTURBING VIBRATIONS MOUNTING BY 1 80°=%IFigure
3G-5 Repositioning Tire on Wheel
There is no more work involved in repositioning a
tire on a wheel than there is in putting on a new tire,
and repositioning has a better chance of correcting
the difficulty.
It is important that only the tire/wheel assemblies
that are causing the disturbances be repositioned.
Since normally only one, and occasionally two, tire/-
wheel assemblies per vehicle could be causing the
disturbing vibration, it is recommended that reposi-
tioning be performed only when required. Reposi-tioning of non-disturbing assemblies could cause
these assemblies to create vibration or roughness
problems.
After repositioning, balancing the tire/wheel assem-
bly is always necessary. It is very important that the
tire/wheel assembly be balanced accurately.
At this point, the car should be road-tested again to
assure that the disturbance has been corrected.
Tire GrindingTire grinding is
.very effective in eliminating tire
complaints due to excessive tire runout. Grinding
can be accomplished on or off the car. Grinding is
approved by Opel, if done as recommended by the
equipment manufacturer
Figure
3G-6 Tire Rotation