1968 DATSUN 510 trunk
[x] Cancel search: trunkPage 5 of 252
CHAPTER
TWELVE
DIFFERENTIAL
REAR
AXLE
AND
REAR
SUSPENSION
149
DIfferentIal
Rear
axle
and
suspension
Codspnng
Shock
absorber
Rear
suspensIOn
arm
Rear
axle
shaft
Wheel
beanngs
Seals
Rear
spnng
Axle
case
SpecificatIons
CHAPTER
THIRTEEN
FRONT
AXLE
FRONT
SUSPENSION
AND
STEERING
168
Wheel
hub
and
bearmg
StabilIzer
TenSion
rod
Spnng
and
strut
assembly
Transverse
lInk
Lower
ball
Jomt
Front
suspension
adjustment
Wheel
alignment
Posture
adJustment
Steenng
system
SpeCificatIons
CHAPTER
FOURTEEN
BRAKES
187
Brake
pedal
Master
cylInder
Front
diSC
brakes
Rear
brakes
Front
drum
brakes
Wheel
cylInders
Brake
system
bleedIng
Handbrake
Service
data
and
speCificatIons
CHAPTER
FIFTEEN
BODY
ELECTRICAL
SYSTEM
Wmng
SWitches
and
fuses
Instrument
meters
and
panels
Heater
205
Wmdshleld
wipers
Wmdslueld
washers
Headlamps
WIrIng
diagrams
CHAPTER
SIXTEEN
BODY
223
Front
body
trIm
Bumpers
Hood
lock
control
Doors
Door
locks
and
regulators
Trunk
lId
and
rear
bumper
Seats
Tad
gate
INDEX
235
I
Page 81 of 252
76
CHAPTER
SEVEN
Carburetor
Assembly
Assembly
is
the
reverse
of
dISassembly
Make
certam
all
gaskets
are
mounted
flat
Be
careful
not
to
use
force
In
assembly
Make
certam
that
all
Interlock
lInks
operate
smoothly
FUEL
TANK
Description
FIgures
15
16
17
and
18
are
exploded
views
of
the
fuel
tanks
used
on
the
sedan
and
wagons
Figure
15
IS
for
sedans
through
model
year
1969
Figure
16
applIes
to
sedans
from
1970
With
evaporative
control
system
F
q
nre
17
shows
the
statIon
wagon
through
1969
Figure
18
applIes
to
the
statIon
wagon
WIth
evaporative
control
system
f
m
1970
The
fuel
tank
for
the
pIck
up
is
shown
m
Figure
19
A
fuel
return
system
from
the
carburetor
to
the
fuel
tank
keeps
fuel
from
becommg
over
heated
m
the
carburetor
float
chamber
When
the
normal
level
m
the
float
chamber
IS
exceeded
a
pressure
valve
opens
and
returns
the
excess
fuel
to
the
tank
Removal
Sedans
1
Remove
drain
plug
m
bottom
of
fuel
tank
and
drain
the
fuel
into
a
suitable
safe
contamer
2
Detach
rear
seat
and
seat
back
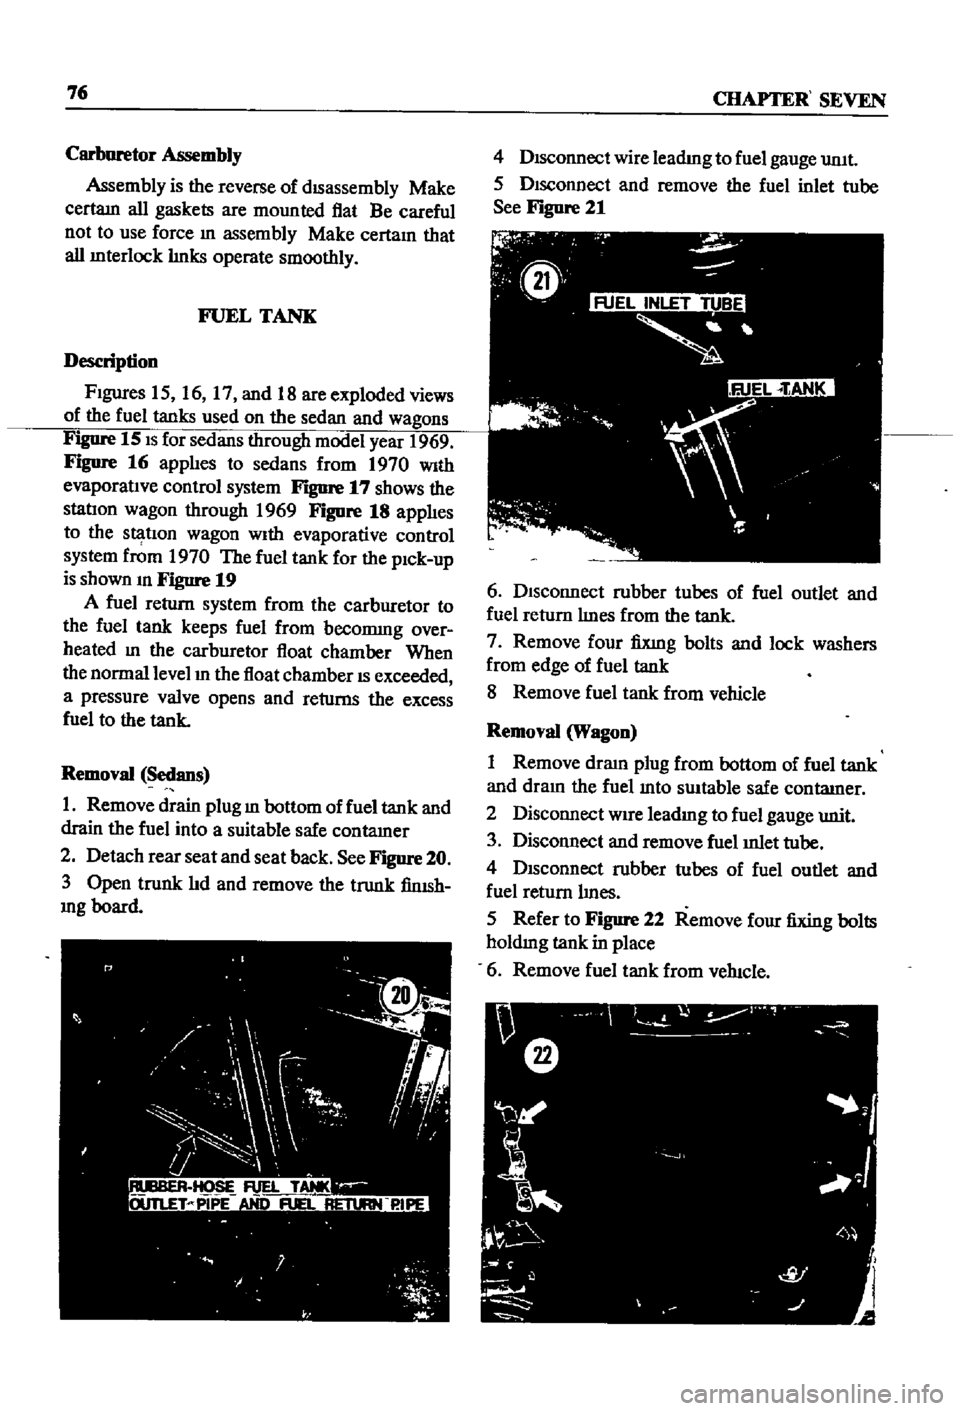
See
Figure
20
3
Open
trunk
lId
and
remove
the
trunk
finISh
mg
board
4
DIsconnect
wire
leadmg
to
fuel
gauge
umt
5
DIsconnect
and
remove
the
fuel
inlet
tube
See
Figure
21
6
DIsconnect
rubber
tubes
of
fuel
outlet
and
fuel
return
lInes
from
the
tank
7
Remove
four
fixmg
bolts
and
lock
washers
from
edge
of
fuel
tank
8
Remove
fuel
tank
from
vehicle
Removal
Wagon
1
Remove
draIn
plug
from
bottom
of
fuel
tank
and
dram
the
fuel
mto
swtable
safe
contatner
2
Disconnect
WIre
leadIng
to
fuel
gauge
unit
3
Disconnect
and
remove
fuel
mlet
tube
4
DISconnect
rubber
tubes
of
fuel
outlet
and
fuel
return
lInes
5
Refer
to
Figure
22
Remove
four
fixing
bolts
holdmg
tank
in
place
6
Remove
fuel
tank
from
veh1c1e
Page 159 of 252
154
CHAPTER
tWELVE
move
two
nuts
attachmg
dtfferenual
suspension
member
to
the
body
7
Gently
lower
the
suspension
assembly
from
the
body
by
10wermg
the
jack
Support
the
suspension
so
It
does
not
fall
off
of
the
Jack
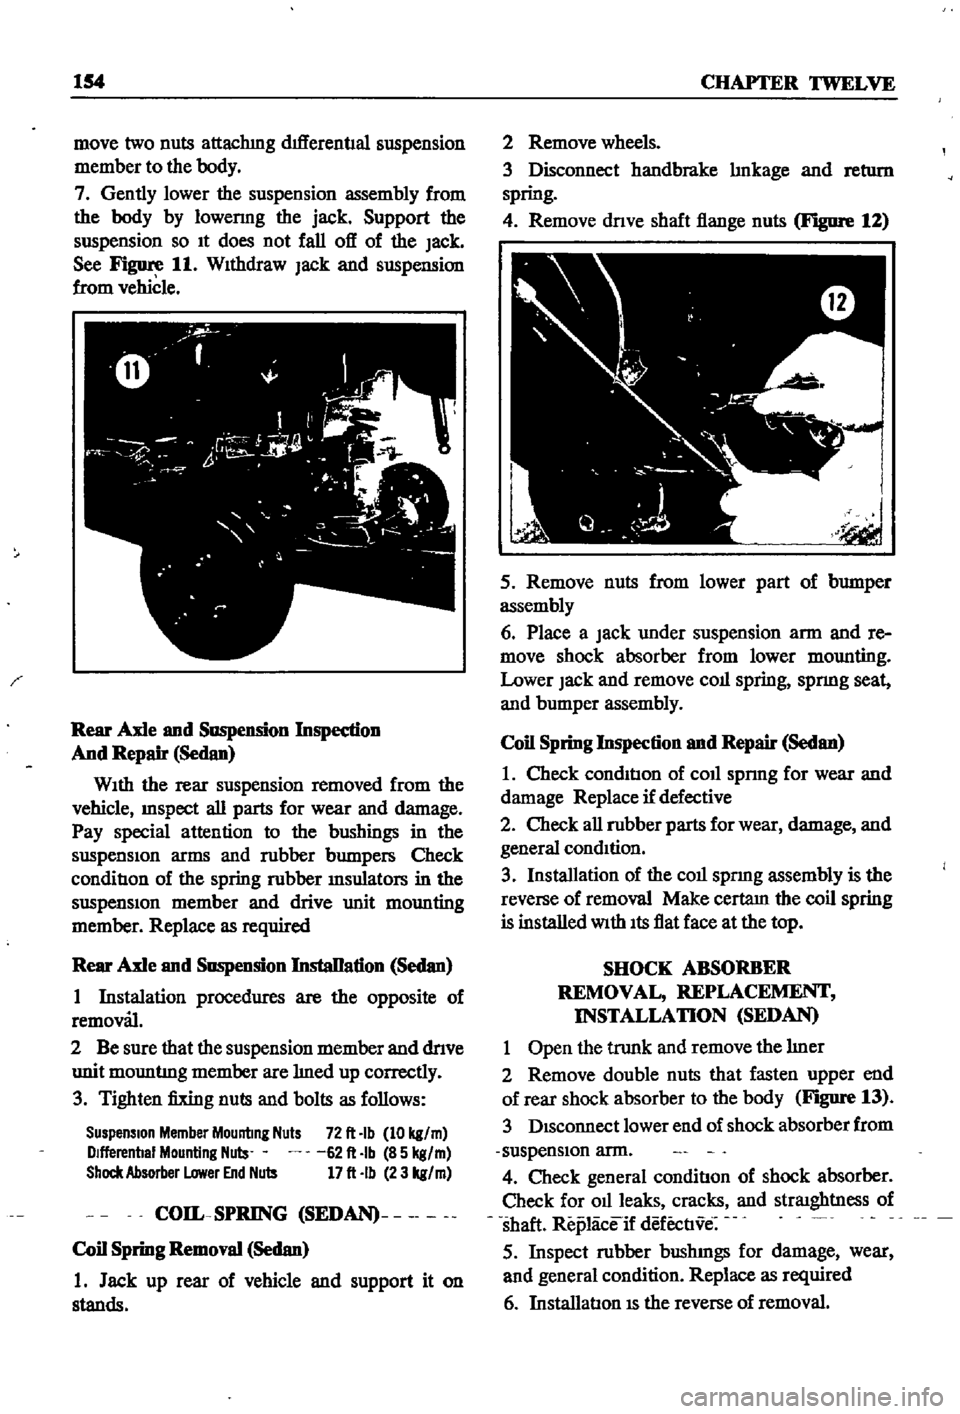
See
Figure
11
WIthdraw
Jack
and
suspension
from
vehicle
Rear
Axle
and
Suspension
Inspedion
And
Repair
Sedan
WIth
the
rear
suspension
removed
from
the
vehicle
InSpect
all
parts
for
wear
and
damage
Pay
special
attention
to
the
bushings
in
the
suspensIon
arms
and
robber
bumpers
Check
conditIon
of
the
spring
robber
msulators
in
the
suspensIOn
member
and
drive
unit
mounting
member
Replace
as
required
Rear
Axle
and
Suspension
InstaDation
Sedan
1
Instalation
procedures
are
the
opposite
of
removal
2
Be
sure
that
the
suspension
member
and
dnve
unit
mountmg
member
are
med
up
correctly
3
Tighten
fixing
nuts
and
bolts
as
follows
Suspension
Member
Mounting
Nuts
72
It
Ib
10
kg
m
Dlfferenbal
Mounting
Nuls
62
It
Ib
85
kg
m
Shock
Absorber
Lower
End
Nuts
17
It
Ib
23
kg
m
COIL
SPRING
SEDAN
Coil
Spring
Removal
Sedan
1
Jack
up
rear
of
vehicle
and
support
it
on
stands
2
Remove
wheels
3
Disconnect
handbrake
mkage
and
retl1rn
spring
4
Remove
dnve
shaft
flange
nuts
Figure
12
5
Remove
nuts
from
lower
part
of
bumper
assembly
6
Place
a
Jack
under
suspension
arm
and
re
move
shock
absorber
from
lower
mounting
Lower
Jack
and
remove
coll
spring
spnng
seat
and
bumper
assembly
Coil
Spring
Inspection
and
Repair
Sedan
1
Check
condItIon
of
coll
sprmg
for
wear
and
damage
Replace
if
defective
2
Check
all
robber
parts
for
wear
damage
and
general
condItion
3
Installation
of
the
coll
spnng
assembly
is
the
reverse
of
removal
Make
certam
the
coil
spring
is
installed
With
Its
flat
face
at
the
top
SHOCK
ABSORBER
REMOVAL
REPLACEMENT
INSTALLATION
SEDAN
1
Open
the
trunk
and
remove
the
mer
2
Remove
double
nuts
that
fasten
upper
end
of
rear
shock
absorber
to
the
body
Figure
13
3
DIsconnect
lower
end
of
shock
absorber
from
suspensIon
arm
4
Check
general
conditIon
of
shock
absorber
Check
for
011
leaks
cracks
and
straIghtness
of
shaft
Replaceif
defectIve
5
Inspect
robber
bushmgs
for
damage
wear
and
general
condition
Replace
as
required
6
InstallatIon
IS
the
reverse
of
removal
Page 235 of 252

228
CHAPTER
SIXTEEN
1
lock
knob
2
lock
installation
bolt
3
Bell
crank
installation
bolt
4
Door
lock
remote
control
assembly
5
Door
lock
assembly
6
OutsIde
handle
lever
7
InSide
lock
knob
IOstallatJon
bolt
CD
CD
D
00
TRUNK
LID
AND
BUMPER
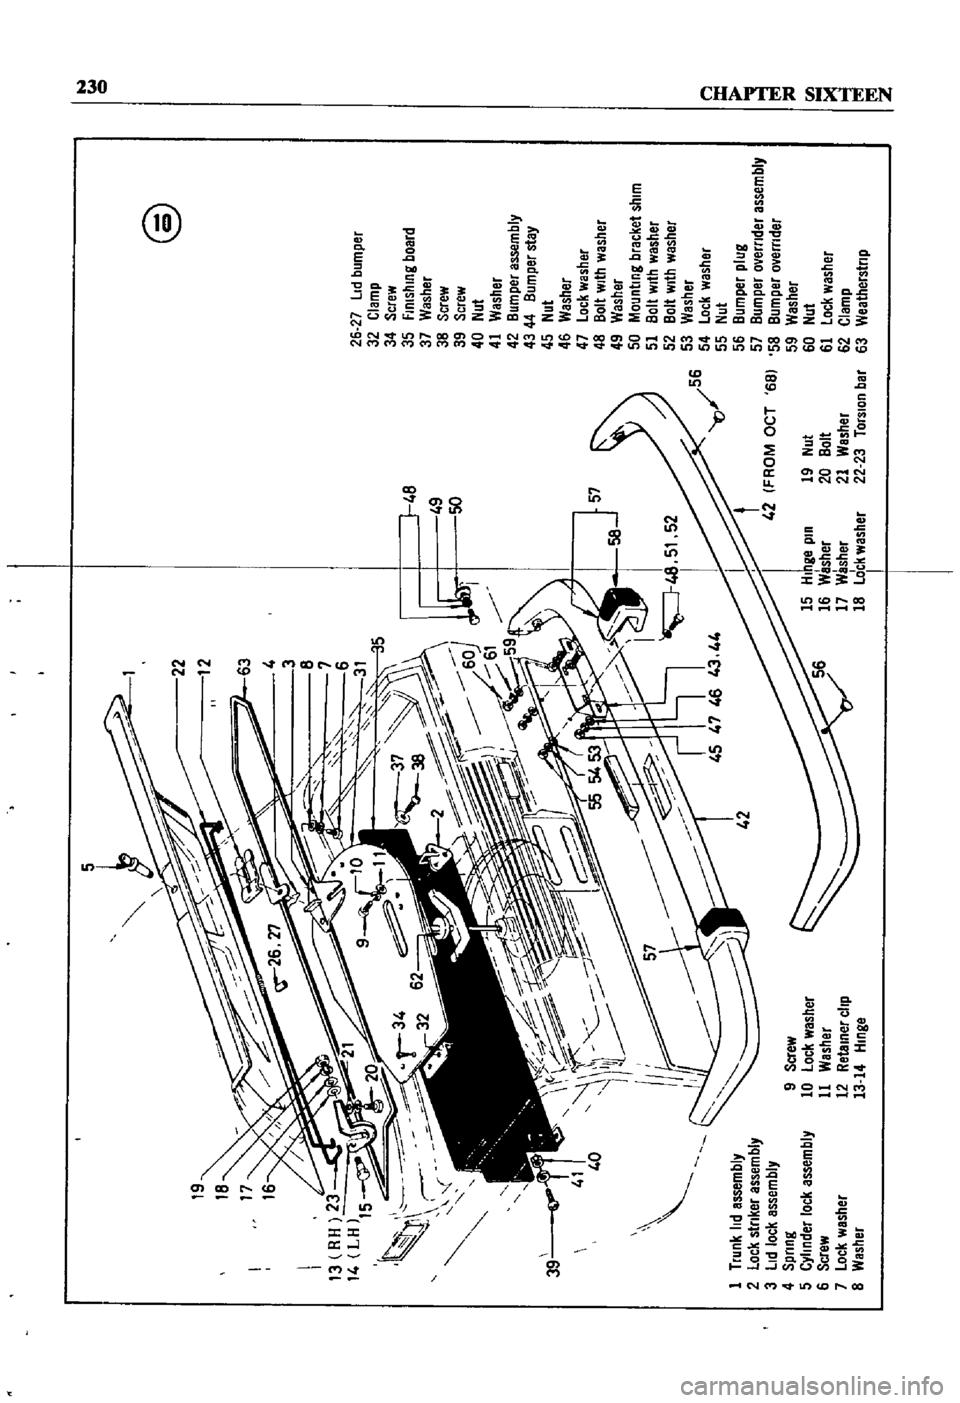
Figure
10
page
230
shows
the
constructIon
details
of
the
sedan
trunk
lid
and
bumper
Figure
11
page
231
Illustrates
the
wagon
bumper
assembly
SEATS
Fre
12
page
232
IS
an
exploded
View
of
the
front
seat
and
mountIng
brackets
used
m
the
1
Door
panel
assembly
2
Door
Window
ventJlator
assembly
3
Door
Window
glass
4
Glass
run
5
Door
wmdow
weather
stnp
6
Door
outsIde
handle
7
Door
lock
key
cylinder
8
Door
lock
and
remote
control
assembly
9
Door
WIndow
regulator
10
InSIde
handle
11
Regulator
handle
12
Door
fimsh
13
Sealing
screen
14
Sealing
screen
15
Sealing
screen
16
Support
cushIon
@
FRONT
SEAT
FOR
PICK
UP
four
door
sedan
The
front
seats
and
mountmg
brackets
for
the
two
door
sedan
and
station
wagon
are
the
same
Figure
13
shows
the
seat
for
the
pIck
up
TAIL
GATE
Refer
to
Figure
14
page
233
for
details
of
the
statIon
wagon
tail
gate
Page 237 of 252
48
49
I
SO
57
1
Trunk
lid
assembly
2
lock
sinker
assembly
3
lid
locI
assembly
4
Spnng
5
Cyhnder
lock
assembly
6
Screw
7
lock
washer
8
Washer
I
42
FROM
OCT
68
15
Hinge
pin
19
Nul
16
Washer
20
Boll
17
Washer
21
Washer
18
LOck
washer
22
23
TorsIon
bar
I
9
Screw
10
lock
washer
11
Washer
12
Retainer
chp
13
14
Hinge
@
26
27
Lid
bumper
32
Clamp
34
Screw
35
FinIshing
board
37
Washer
38
Screw
39
Screw
40
Nut
41
Washer
42
8umper
assembly
43
44
Bumper
stay
45
Nut
46
Washer
47
lock
washer
48
Bolt
wllh
washer
49
Washer
50
Mounting
bracket
shim
51
Boll
With
washer
52
Bolt
With
washer
53
Washer
54
lock
washer
55
Nut
56
Bumper
plug
57
Bumper
overnder
assembly
58
Bumper
overnder
59
Washer
60
Nut
61
lock
washer
62
Clamp
63
Weatherstnp
N
l
I
l
a
l
l
fIJ
Page 241 of 252
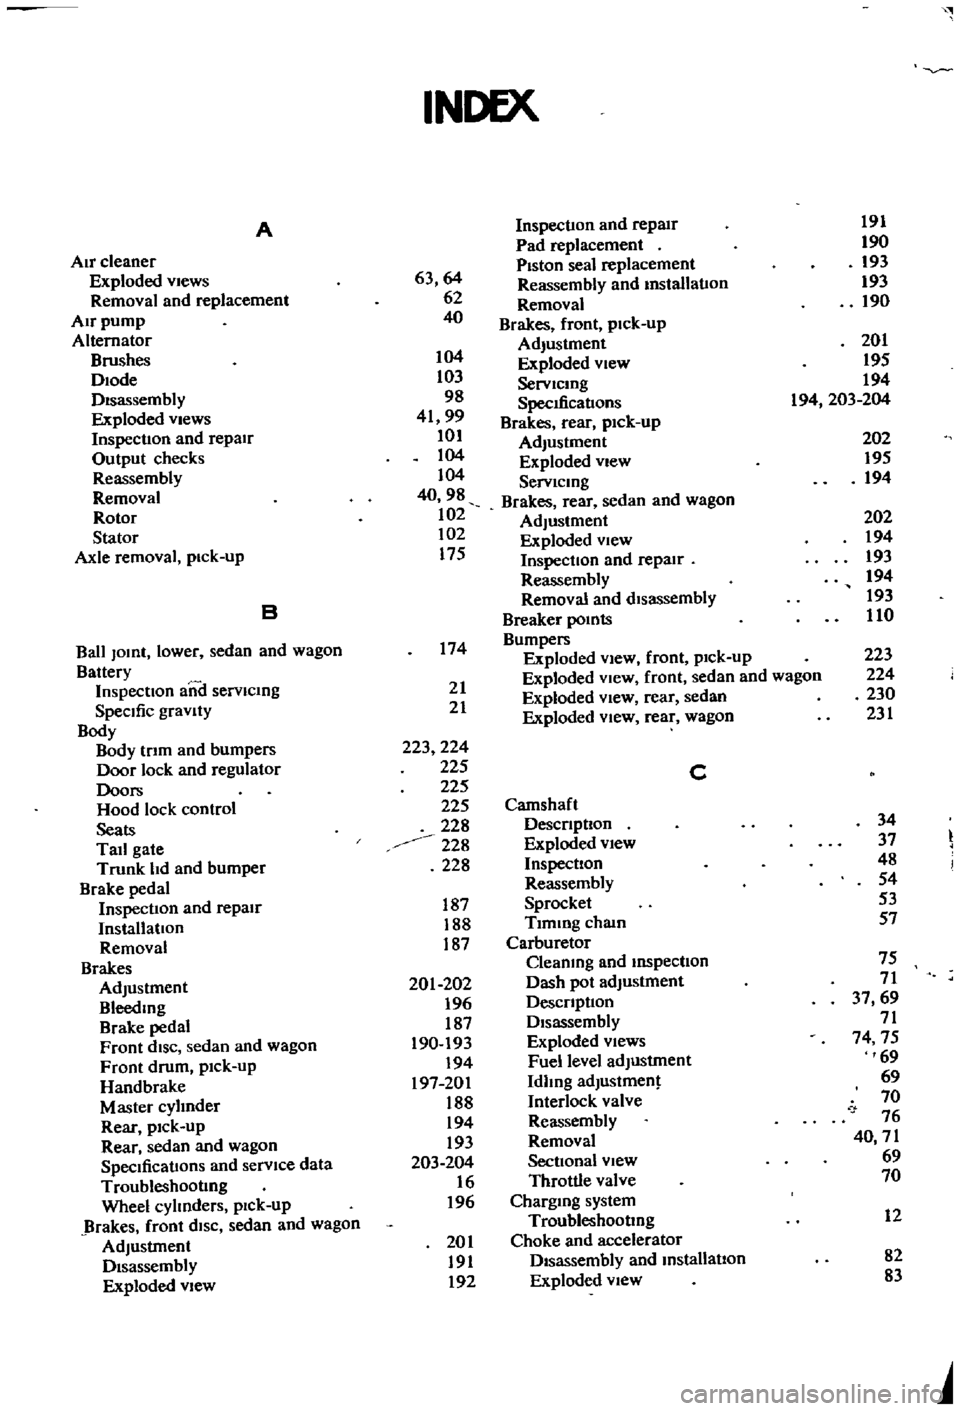
INDEX
A
Inspection
and
repair
191
Air
cleaner
Pad
replacement
190
Exploded
views
63
64
Piston
seal
replacement
193
Removal
and
replacement
62
Reassembly
and
installation
193
Removal
190
Air
pump
40
Brakes
front
pick
up
Alternator
Brushes
104
Adjustment
201
Diode
103
Exploded
View
195
Disassembly
98
ServiCing
194
SpecdicatIons
194
203
204
Exploded
Views
41
99
Brakes
rear
pick
up
Inspection
and
repair
101
Adjustment
202
Output
checks
104
Exploded
View
195
Reassembly
104
Servicing
194
Removal
40
98
Brakes
rear
sedan
and
wagon
Rotor
102
Adjustment
202
Stator
102
Exploded
view
194
Axle
removal
pick
up
175
Inspection
and
repair
193
Reassembly
194
B
Removal
and
disassembly
193
Breaker
points
110
Ball
JOint
lower
sedan
and
wagon
174
Bumpers
Battery
Exploded
view
front
pick
up
223
Inspecllon
aiii
I
servicing
21
Exploded
View
front
sedan
and
wagon
224
SpeCific
gravity
21
Exploded
view
rear
sedan
230
Body
Exploded
view
rear
wagon
231
Body
Irlm
and
bumpers
223
224
Door
lock
and
regulator
225
C
Doors
225
Hood
lock
control
225
Camshaft
Seats
228
DeSCription
34
Tail
gate
228
Exploded
view
37
Trunk
hd
and
bumper
228
Inspection
48
Brake
pedal
Reassembly
54
Inspection
and
repair
187
Sprocket
53
Installation
188
Tlmmg
chain
57
Removal
187
Carburetor
Brakes
Cleaning
and
inspection
75
Adjustment
201
202
Dash
pot
adjustment
71
Bleeding
196
DesCription
37
69
Brake
pedal
187
Disassembly
71
Front
diSC
sedan
and
wagon
190
193
Exploded
Views
74
75
Front
drum
pick
up
194
Fuel
level
adjustment
69
Handbrake
197
201
Idhng
adjustment
69
Master
cyhnder
188
Interlock
valve
70
Rear
pick
up
194
Reassembly
76
Rear
sedan
and
wagon
193
Removal
40
71
SpeCifications
and
service
data
203
204
Sectional
view
69
Troubleshooting
16
Throttle
valve
70
Wheel
cyhnders
pIck
up
196
Charging
system
Brakes
front
diSC
sedan
and
wagon
Troubleshooting
12
Adjustment
201
Choke
and
accelerator
Disassembly
191
Disassembly
and
installation
82
Exploded
view
192
Exploded
view
83
Page 246 of 252
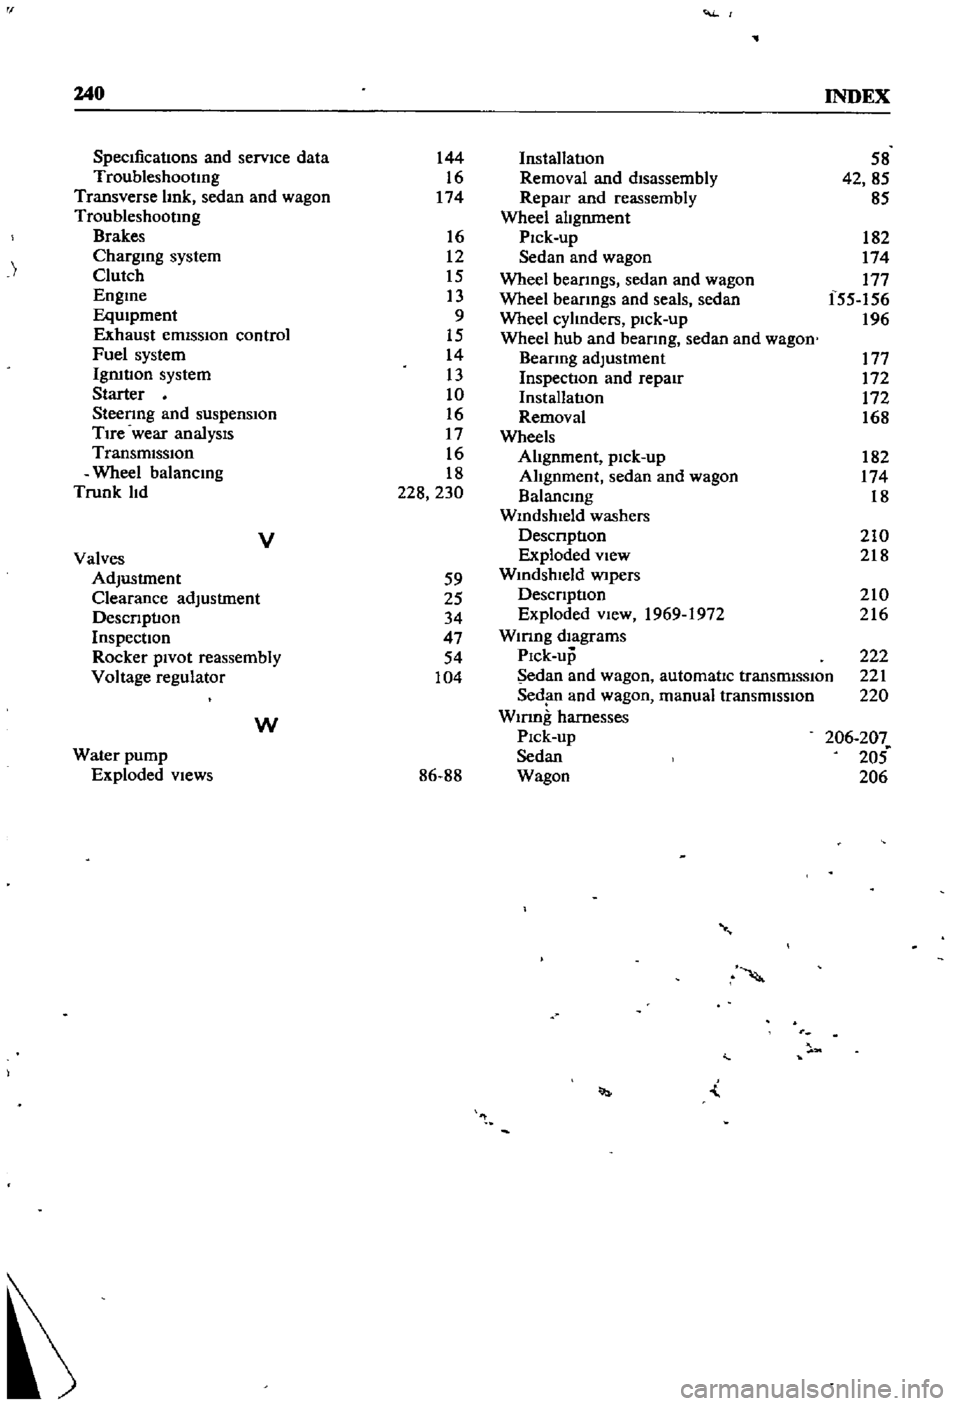
240
INDEX
SpecIfications
and
service
data
144
Installation
58
Troubleshootmg
16
Removal
and
disassembly
42
85
Transverse
hnk
sedan
and
wagon
174
Repair
and
reassembly
85
Troubleshootmg
Wheel
ahgnment
Brakes
16
Pick
up
182
Chargmg
system
12
Sedan
and
wagon
174
Clutch
15
Wheel
bearIngs
sedan
and
wagon
177
Engme
13
Wheel
bearIngs
and
seals
sedan
f55
156
EqUipment
9
Wheel
cyhnders
pick
up
196
Exhaust
emiSSIOn
control
15
Wheel
hub
and
bearIng
sedan
and
wagon
Fuel
system
14
BearIng
adjustment
177
Igrutlon
system
13
InspectIOn
and
repair
172
Starter
10
Installation
172
SteerIng
and
suspension
16
Removal
168
Tire
wear
analysIs
17
Wheels
TransmiSSion
16
Ahgnment
pick
up
182
Wheel
balancmg
18
Ahgnment
sedan
and
wagon
174
Trunk
hd
228
230
Balancmg
18
Wmdshleld
washers
V
Descnptlon
210
Valves
Exploded
view
218
Adjustment
59
Wmdshleld
WIperS
Clearance
adjustment
25
DeSCrIption
210
DesCrIption
34
Exploded
view
1969
1972
216
Inspection
47
Wmng
diagrams
Rocker
pivot
reassembly
54
Pick
up
222
Voltage
regulator
104
Sedan
and
wagon
automatic
transmiSSIOn
221
Sediln
and
wagon
manual
transmission
220
W
Wmng
harnesses
Pick
up
206
207
Water
pump
Sedan
205
Exploded
views
86
88
Wagon
206
l