1968 DATSUN 510 ground clearance
[x] Cancel search: ground clearancePage 9 of 252

4
CHAPTER
ONE
chassIs
number
Write
the
numbers
down
and
carry
them
ill
your
wallet
Service
Hints
Throughout
thIs
manual
keep
two
conven
bons
ill
mmd
Front
refers
to
the
front
of
the
vehicle
The
left
and
nght
sides
of
the
ve
hicle
refer
to
a
person
sittIng
ill
the
car
facing
forward
For
example
the
steenng
wheelIS
on
the
left
hand
Side
All
dimensIOns
and
capacities
are
expressed
ill
units
fanuhar
to
a
Umted
States
mechaniC
such
as
illches
and
pounds
Metric
measurements
are
also
given
Metnc
tools
are
reqUITed
to
work
on
the
Datsun
CD
DATSUN
IENGINE
CAPACITY
IMAX
HP
RPM
IWHEELBASE
IENGINE
NUMBER
FAR
NO
NlSSAN
MOTOR
co
LTD
YOKOHAMA
JAPAN
TYPEI
510
1595
cc
961P
6600
rpm
mm
L
1
00988
P61
l
O
1
l
M
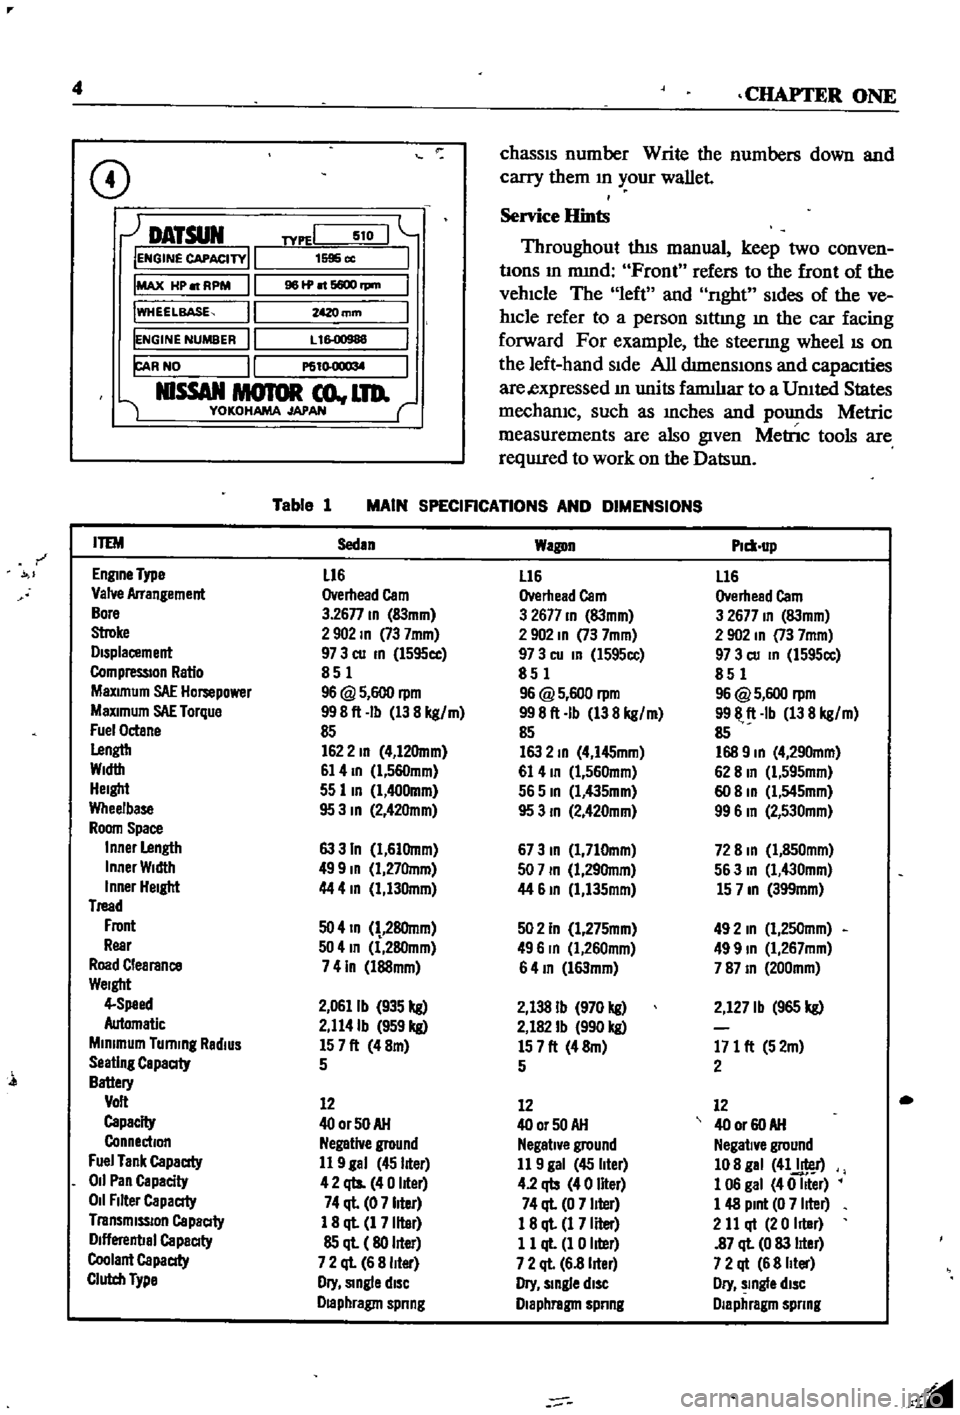
Table
1
MAIN
SPECIFICATIONS
AND
DIMENSIONS
r
ITEM
Sedan
Wagon
Plm
up
EnglDe
Type
L16
L16
L16
Valve
Arrangement
Overhead
Cam
Overhead
Cam
Overhead
Cam
Bore
3
26n
ID
83mm
3
2677
ID
83mm
3
2677
ID
83mm
Stroke
2902
ID
73
7mm
2
902
ID
73
7mm
2
902
In
73
7mm
Displacement
97
3
cu
ID
l595cc
97
3
cu
In
l595cc
97
3
cu
ID
1595cc
CompressIOn
Ratio
851
851
851
MaXimum
SAE
Hompower
96
@
5
600
rpm
96
@
5
600
rpm
96
@
5
600
rpm
MaXimum
SAE
Torque
998ft
Ib
138
kg
m
998ft
Ib
138
kg
m
9911
ft
Ib
138
kg
m
Fuel
Octane
85
85
85
Lengtb
1622
ID
4
12Omm
163
2
ID
4
I45mm
168
9
ID
4
290mm
Width
61
4
ID
l
560mm
61
4
ID
1
560mm
62
8
In
Cl
595mm
Height
55
lID
1
400mm
565
ID
Cl
435mm
60
8
ID
Cl
545mm
Wheelbase
95
3
ID
2
42Omm
95
3
ID
2
420mm
99
6
In
2
530mm
Room
Space
Inner
Length
63
3
In
1
61Omm
673
ID
1
710mm
72
8
ID
1
850mm
Inner
Width
499
ID
1
27Omm
507
ID
1
29Omm
563
In
1
430mm
Inner
Height
44
4
In
1
130mm
44
61D
1
135mm
15
7
ID
399mm
Tread
Front
50
4
ID
28Omm
502
In
1
275mm
492
In
1
250mm
Rear
504
In
1
280mm
496
In
Cl
260mm
499
ID
1
267mm
Road
Clearance
741n
l88mm
64
ID
l63mm
787
ID
200mm
Weight
4
Speed
2
0611b
935
kg
2
138
Ib
970
kg
2
127
Ib
965
kg
Automatic
2
114Ib
959
kg
2
182
Ib
990
kg
Minimum
Turning
RadiUS
157ft
48m
157ft
48m
171
ft
52m
Seating
Capaaty
5
5
2
Battery
Volt
12
12
12
Capacity
400rSOAH
400r50AH
40
or
60
AH
Connection
Negative
ground
Negative
ground
Negative
ground
Fuel
Tank
Capaaty
11
9
gal
45
liter
11
9
gal
45
liter
108
gal
41J
r
011
Pan
Capacity
42
qts
40
liter
4
2
qb
40
liter
1
06
gal
40
Iller
011
Filter
Capaaty
74
ql
07
liter
74
ql
0
7
liter
1
48
Pint
0
7
liter
Transmission
Capaaty
1
8
ql
1
7
liter
18
ql
1
7
Iller
2
11
qt
20
Iller
Dlflerenbal
Capaaty
85
ql
80
liter
11
ql
1
0
liter
87
ql
0
83
lIter
Coolant
Capaaty
7
2
ql
6
8
liter
7
2
ql
6
8
lIter
7
2
qt
6
8
Iller
Clutch
Type
Dry
Single
diSC
Dry
slDgle
diSC
Dry
slDgle
diSC
Draphragm
spnng
Diaphragm
spnng
Diaphragm
spnng
l
Page 26 of 252

ENGINE
AND
IGNITION
TUNE
UP
21
many
types
of
test
eqUipment
and
may
be
used
as
a
gUide
If
the
manufacturer
s
mstructioQs
are
not
aVailable
Connections
shown
in
Figure
1
are
as
follows
1
Voltmeter
a
PosItive
lead
to
resistor
side
of
COli
b
Negative
1
ead
to
ground
2
Tlmmg
Light
a
PosItive
lead
to
posItive
battery
termmal
b
Tngger
lead
to
number
1
spark
plug
c
Negative
lead
to
ground
3
Tachometer
a
PosItive
lead
to
dlstnbutor
Side
of
coil
b
Negative
lead
to
ground
4
Dwell
Meter
a
PosItive
lead
to
dlstnbutor
Side
of
COlI
b
Negative
lead
to
ground
BAlTERY
INSPECTION
AND
SERVICE
1
Check
the
level
of
the
electrolyte
m
battery
cells
If
necessary
replemsh
with
distilled
water
Do
not
overfill
2
Measure
the
speCific
gravity
of
the
battery
electrolyte
Refer
to
the
followmg
table
2
Use
the
proper
size
socket
and
wrench
to
remove
spark
plugs
from
the
cyhnder
head
Make
certam
that
the
gaskets
are
removed
from
the
spark
plug
holes
3
Wipe
off
the
msulator
With
a
clean
rag
to
remove
grease
and
dirt
4
Carefully
mspect
the
msulator
and
body
of
each
plug
for
signs
of
cracks
or
chips
Replace
If
faulty
5
Inspect
spark
plug
threads
and
electrodes
for
damage
or
excessive
wear
Replace
as
requrred
Figure
2
shows
the
cond1t
J
on
of
normal
and
de
fectIVe
spark
plugs
along
with
an
explanation
of
the
causes
of
the
abnormal
conditions
6
If
the
spark
plugs
are
still
serviceable
clean
them
thoroughly
With
a
stiff
brush
or
preferably
With
a
sand
blasting
type
of
cleaner
7
File
the
center
electrode
so
that
It
has
a
fiat
surface
8
File
the
surfaces
of
the
outer
electrode
so
that
all
surfaces
are
fiat
and
smooth
9
Usmg
a
feeler
gauge
adjust
clearance
be
tween
the
electrodes
to
0
031
to
0
035
m
0
8
to
0
9mm
as
shown
m
Figure
3
Full
Charge
Value
CD
68
degrees
F
PermiSSIble
Value
20
degrees
C
3
Frigid
chmates
Tropical
chmates
Other
climates
Over
1
22
Over
118
Over
1
20
128
123
126
3
Clean
top
of
battery
and
termmals
With
a
solutIOn
of
bakmg
soda
and
water
Rmse
off
and
dry
thoroughly
Top
of
battery
must
be
clean
to
prevent
current
leakage
between
termmal
and
from
pOSitive
termmal
to
hold
down
clamp
Pro
longed
accumulatIOn
of
aCid
and
dirt
on
top
of
battery
may
cause
blIstenng
of
the
matenal
cov
enng
on
the
connector
straps
and
detenoration
of
the
straps
themselves
4
Tighten
the
cable
connectors
to
the
termmal
securely
5
Coat
the
termmals
lIghtly
With
petrolatum
to
protect
them
from
corrosion
SPARK
PLUGS
INSPECTION
AND
SERVICE
1
Remove
spark
plug
WIres
Mark
them
to
fi
sure
correct
replacement
J
J
I
I
j
j
10
Remstall
spark
plugs
Make
certam
to
use
a
new
gasket
for
each
plug
Use
a
torque
wrench
to
tighten
spark
plugs
from
11
0
to
150
ft
lb
1
5
to
2
0
kg
m
11
Remstall
WIres
DISTRIBUTOR
INSPECTION
AND
SERVICE
Dependmg
on
the
model
year
velucles
have
a
smgle
pomt
or
a
dual
pomt
dlstnbutor
system
Page 56 of 252

ENGINE
51
8
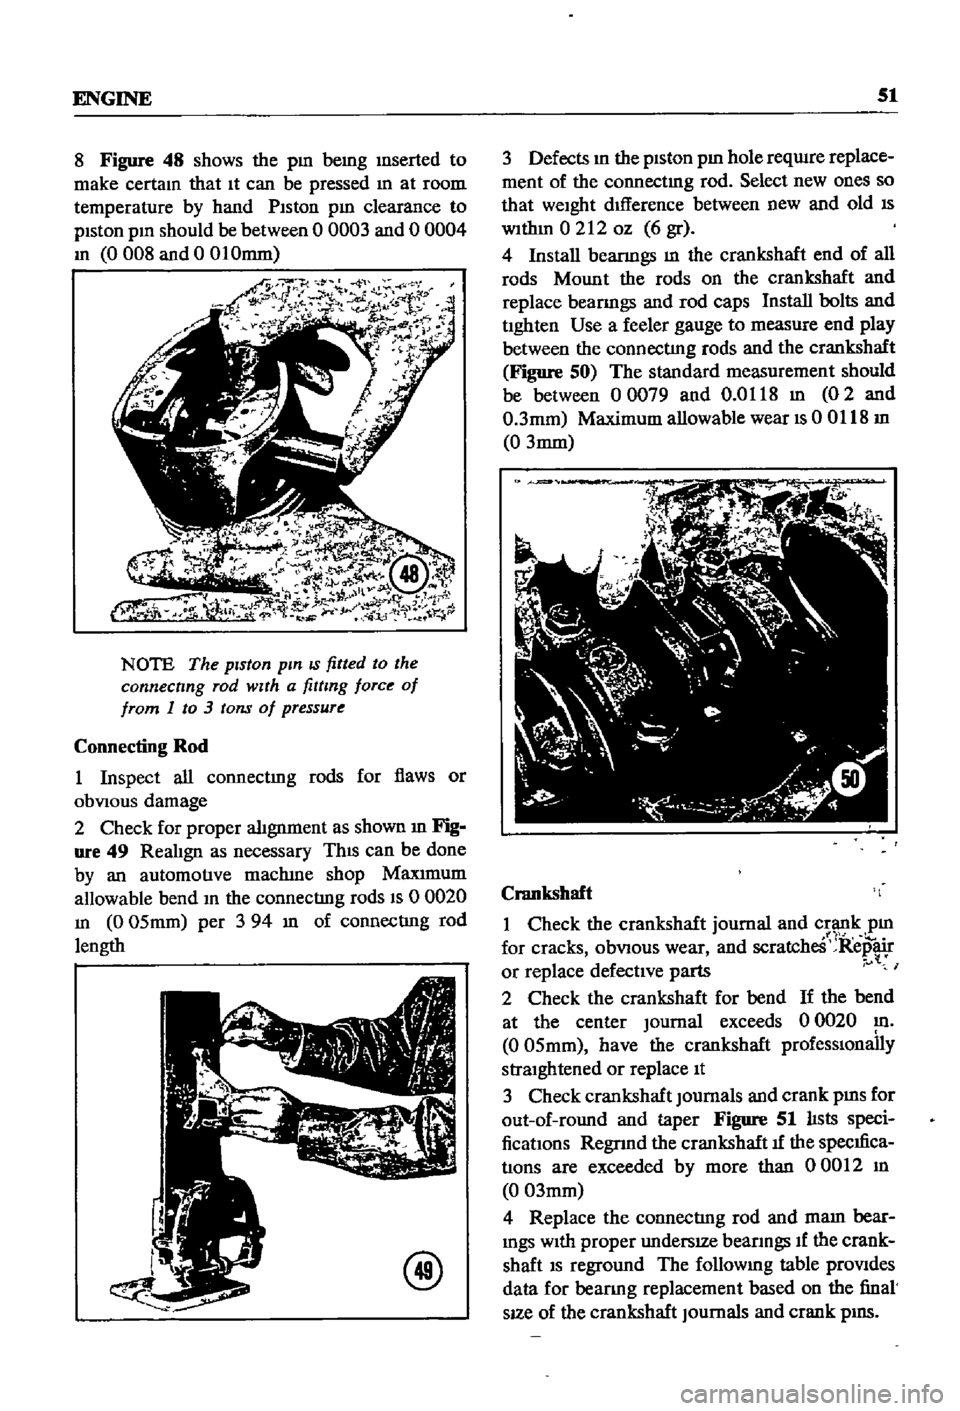
Figure
48
shows
the
pm
bemg
mserted
to
make
certam
that
It
can
be
pressed
m
at
room
temperature
by
hand
Piston
pm
clearance
to
piston
pm
should
be
between
0
0003
and
0
0004
m
0008
and
0
01Omm
NOTE
The
piston
pin
IS
fitted
to
the
connecting
rod
with
a
fitting
force
of
from
1
to
3
tons
of
pressure
Connecting
Rod
1
Inspect
all
connectmg
rods
for
flaws
or
obVIOUS
damage
2
Check
for
proper
alignment
as
shown
m
Fig
ure
49
RealIgn
as
necessary
ThIS
can
be
done
by
an
automotive
maclune
shop
Maxrmum
allowable
bend
m
the
connecting
rods
IS
0
0020
m
0
05mm
per
3
94
m
of
connecting
rod
length
@
3
Defects
m
the
piston
pm
hole
reqwre
replace
ment
of
the
connectmg
rod
Select
new
ones
so
that
weight
dIfference
between
new
and
old
IS
wlthm
0212
oz
6
gr
4
Install
beanngs
m
the
crankshaft
end
of
all
rods
Mount
the
rods
on
the
crankshaft
and
replace
beanngs
and
rod
caps
Install
bolts
and
tighten
Use
a
feeler
gauge
to
measure
end
play
between
the
connecting
rods
and
the
crankshaft
Figure
50
The
standard
measurement
should
be
between
00079
and
0
0118
m
02
and
0
3mm
Maximum
allowable
wear
IS
00118
m
0
3mm
Crankshaft
1
Check
the
crankshaft
journal
and
crank
pm
1
1
for
cracks
obVIOUS
wear
and
scratcheS
Repair
or
replace
defective
parts
I
2
Check
the
crankshaft
for
bend
If
the
bend
at
the
center
Journal
exceeds
0
0020
m
0
05mm
have
the
crankshaft
prOfeSSIOnally
straightened
or
replace
It
3
Check
crankshaft
Journals
and
crank
pms
for
out
of
round
and
taper
Figure
51
lIsts
speci
fications
Regnnd
the
crankshaft
1f
the
specIfica
tions
are
exceeded
by
more
than
00012
m
0
03mm
4
Replace
the
connecting
rod
and
mam
bear
mgs
With
proper
undersIZe
beanngs
If
the
crank
shaft
IS
reground
The
followmg
table
prOVides
data
for
beanng
replacement
based
on
the
final
sIZe
of
the
crankshaft
Journals
and
crank
pIllS
Page 101 of 252

96
CHAFTER
NINE
@
EK
lle
Correct
Incorrect
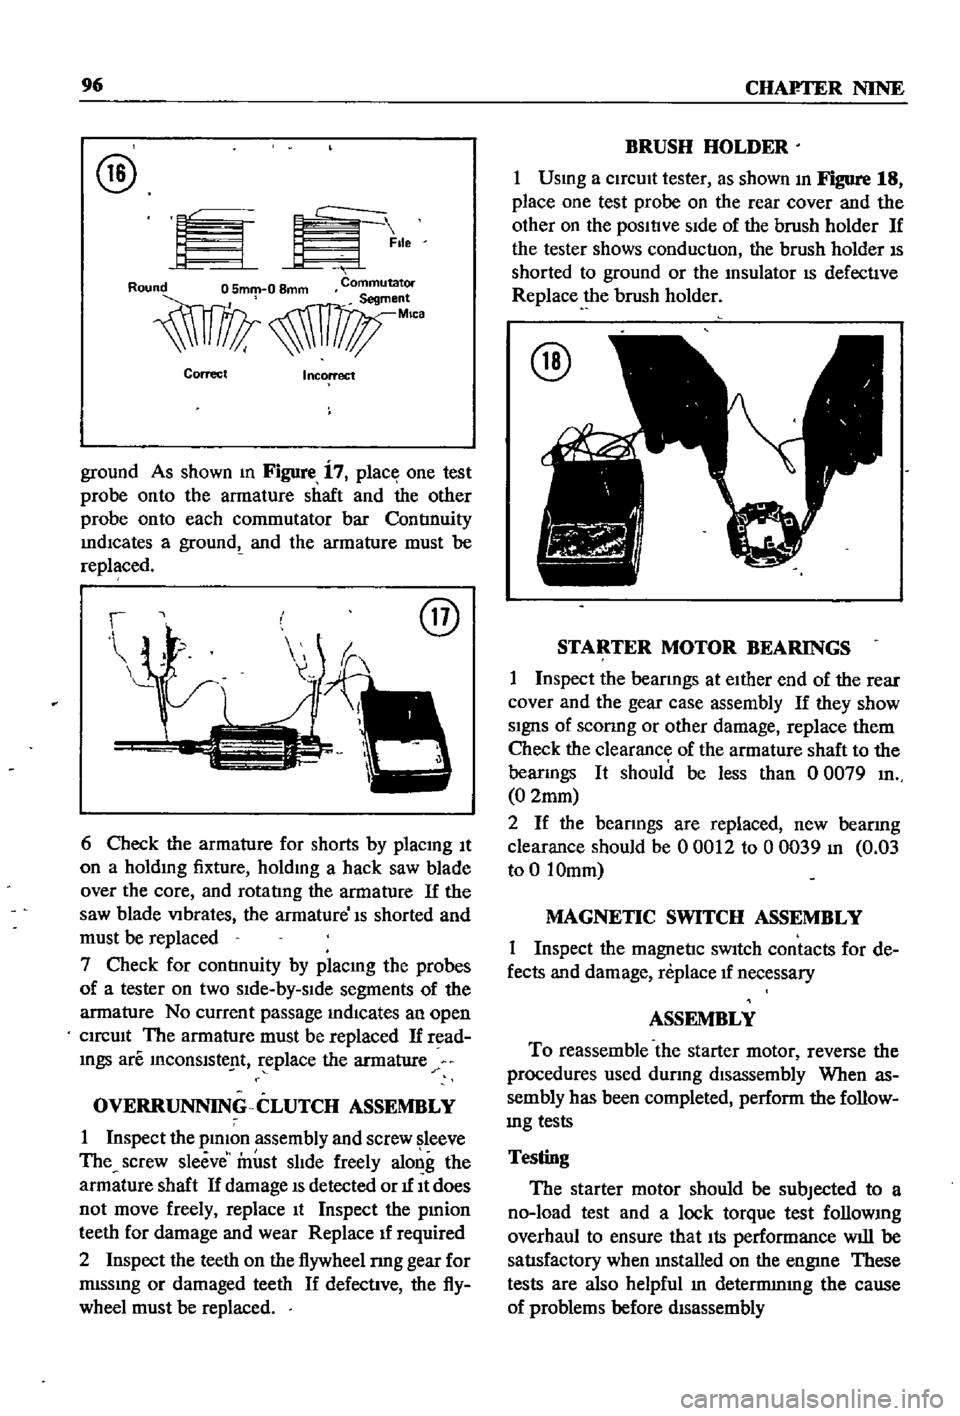
ground
As
shown
m
Figure
i
7
place
one
test
probe
onto
the
armature
shaft
and
the
other
probe
onto
each
commutator
bar
ContInuity
IndICates
a
groundt
and
the
armature
must
be
replaced
@
6
Check
the
armature
for
shorts
by
placmg
It
on
a
holdmg
fixture
holdmg
a
hack
saw
blade
over
the
core
and
rotatIng
the
armature
If
the
saw
blade
VIbrates
the
armature
Is
shorted
and
must
be
replaced
7
Check
for
contInuity
by
placmg
the
probes
of
a
tester
on
two
sIde
by
slde
segments
of
the
armature
No
current
passage
mdlcates
an
open
CIrcUIt
The
armature
must
be
replaced
If
read
mgs
are
InCOnslste
t
replace
the
armature
OVERRUNNING
CLUTCH
ASSEMBLY
1
Inspect
the
plmon
assembly
and
screw
leeve
The
screw
sleeve
must
slIde
freely
along
the
armature
shaft
If
damage
IS
detected
or
1f
It
does
not
move
freely
replace
It
Inspect
the
pmion
teeth
for
damage
and
wear
Replace
1f
required
2
Inspect
the
teeth
on
the
flywheel
nng
gear
for
mlssmg
or
damaged
teeth
If
defective
the
fly
wheel
must
be
replaced
BRUSH
HOLDER
1
Usmg
a
CirCUIt
tester
as
shown
In
Figure
18
place
one
test
probe
on
the
rear
cover
and
the
other
on
the
posltlve
SIde
of
the
brush
holder
If
the
tester
shows
conduction
the
brush
holder
IS
shorted
to
ground
or
the
msulator
IS
defective
Replace
the
brush
holder
@
STARTER
MOTOR
BEARINGS
1
Inspect
the
bearmgs
at
eIther
end
of
the
rear
cover
and
the
gear
case
assembly
If
they
show
SignS
of
sconng
or
other
damage
replace
them
Check
the
clearance
of
the
armature
shaft
to
the
bearmgs
It
should
be
less
than
0
0079
In
0
2mm
2
If
the
bearings
are
replaced
new
bearing
clearance
should
be
00012
to
00039
In
0
03
to
0
10mm
MAGNETIC
SWITCH
ASSEMBLY
1
Inspect
the
magnetic
sWItch
contacts
for
de
fects
and
damage
replace
1f
necessary
ASSEMBLY
To
reassemble
the
starter
motor
reverse
the
procedures
used
dUring
disassembly
When
as
sembly
has
been
completed
perform
the
follow
mg
tests
Testing
The
starter
motor
should
be
subjected
to
a
no
load
test
and
a
lock
torque
test
follOWIng
overhaul
to
ensure
that
Its
performance
will
be
satIsfactory
when
mstalled
on
the
engme
These
tests
are
also
helpful
In
detennmIng
the
cause
of
problems
before
dIsassembly
Page 117 of 252

112
Table
1
CHAPTER
NINE
DISTRIBUTOR
SPECIFICATIONS
POint
gap
POint
pressure
Shaft
diameter
lower
part
HOUSing
Inner
diameter
Clearance
between
shaft
and
hOUSing
Ammendment
limit
ot
clearance
Shaft
diameter
upper
part
Cam
Inner
diameter
Clearance
between
shaft
and
cam
Weight
piVOt
dIameter
Weight
hole
dIameter
Clearance
between
piVOt
and
hole
Inches
Millimeters
00177
00217
1
10
143
Ibs
o
4902
0004
0008
o
4902
0
0007
o
00004
00015
00031
03150
0002
0006
03150
0
0006
o
00002
00011
o
1969
00004
00010
01969
0
0007
o
o
0004
0
0018
o
45
0
55
o
50
0
65
kg
1245
010
0020
1245
0
018
o
OlD
O
038
008
8
005
014
8
0
015
o
o
005
0
029
5
010
028
5
0
018
0
001
0046
@
@
r
COllIS
not
pOSSIble
and
It
must
be
replaced
1f
found
defectIve
Inspect
the
connectIons
to
the
coll
to
make
certaIn
they
are
clean
and
tIght
Inspect
the
top
of
the
coIl
for
SIgnS
of
cracks
or
damage
and
replace
1f
necessary
The
Ignluon
COllIS
located
on
the
left
SIde
wall
of
the
engme
compartment
and
is
held
In
place
by
two
screws
and
washers
SPARK
PLUGS
The
followmg
spark
plugs
or
then
equivalent
are
recommended
for
the
L16
engme
ChampIon
No
NlOY
AutolIte
No
AG32A
AC
No
44XL
and
NGK
No
BP
6E
Figure
66
shows
spark
plug
constroctIon
They
should
be
re
RING
CENTER
ELECTRODE
TERMINAL
NUT
IS
r
1
n
f
INSULATOR
moved
penodlcally
and
inspected
for
general
condItIon
cleanmg
or
replacement
anl
regap
pmg
Figure
67
IS
a
senes
of
photos
that
show
the
appearance
of
and
pOSSIble
causes
of
spark
plug
problems
If
the
spark
plugs
are
still
usable
they
should
be
cleaned
thorougWy
with
a
sand
blast
Ing
type
cleaner
The
electrodes
should
then
be
filed
flat
and
the
plug
regapped
The
proper
gap
IS
0
031
to
0035
m
0
8
to
0
9mm
Never
use
a
spark
plug
that
has
a
damaged
or
cracked
msulator
Use
extreme
care
when
remOVIng
and
mstallmg
spark
plugs
to
keep
from
crackIng
the
msulator
Always
bend
the
ground
electrode
when
settmg
the
plug
gap
Never
bend
the
center
electrode
Page 149 of 252

144
CHAPTER
ELEVEN
TAANSMISSlON
SERVICE
DATA
AND
SPECIRCATIONS
Table
2
r
General
SpecificatIOns
Gear
Ratlo
1st
2nd
3rd
4th
Reverse
011
capacity
Detail
SpeCIfications
Gear
backlash
Replacement
standard
Gear
end
play
Balk
ring
cone
clearance
Replacement
standard
5
tl
viV
t
O
5
0
If
3657
2558
1419
1000
3638
3
6
pints
Tightening
Torque
ft
Ib
kg
m
Engine
transmission
installation
bolt
Front
cover
transmission
installation
bolt
Rear
extensIon
transmIssion
installation
bolt
Main
shaft
tlghtel
lng
bolt
Companion
flange
tightening
nut
Rear
engine
mount
installation
bolt
Filler
plug
Drain
plug
Back
up
lamp
sWItch
Bottom
cover
bolt
Speedometer
pinion
bolt
Interlock
plug
Operating
lever
Reverse
check
Control
lever
installatIOn
bolt
00020
to
0
0039
In
005
to
0
10mm
o
0079
In
0
20mm
o
0020
to
0
0059
In
0
05
to
0
15mm
00472
to
0
0630
In
1
2
to
1
6mm
00315
In
08mm
174
to
20
2
24
to
2
8
5
8
to
7
2
0
8
to
1
0
10
1
to
130
1
4
to
1
8
57
8t079
5
80to
11
0
72
3
to
101
2
100
to
140
239
to
27
5
3
3
to
38
18
1
to
25
3
25
to
3
5
14
5
to
21
7
20
to
3
0
14
5
to
21
7
2
0
to
3
0
5
8
to
7
2
0
8
to
1
0
2
2
to
2
9
03
to
0
4
123
to
15
2
1
7
to
2
1
22
to
2
9
0
3
to
0
4
14
5
to
21
7
20
to
3
0
13
7
to
15
9
1
9
to
2
2
DRIVE
SHAFf
Descripti
ll
TIie
dnve
shaft
on
the
sedan
and
wagon
is
a
smgle
plece
tubular
steel
unit
The
pick
up
uses
a
two
pIece
umt
Joined
by
a
Journal
assembly
unIversal
Joint
UnIversal
Jomts
connect
the
drive
shaft
ends
to
the
transmissIOn
and
d1f
ferentIal
The
Jomts
consist
of
the
Journal
as
sembly
yoke
sleeve
and
yoke
flange
Figure
40
is
an
explOded
VIew
of
the
dnve
shaft
used
on
the
sedan
and
agon
Figure
41
page
146
shows
the
dnve
shaft
used
on
the
pIck
up
The
pIck
up
has
a
grease
mpple
on
the
dnve
shaft
to
lubncate
the
dnve
shaft
spline
The
sedan
and
wagon
are
not
so
equipped
The
uni
versal
Jomts
shouldebe
removed
and
lubncated
every
24
000
rmles
Removal
1
Release
the
handbrake
j
2
Jack
up
the
rear
of
the
vehIcle
and
support
on
stands
3
Loosen
the
end
clamps
on
the
exhaust
pipe
and
turn
the
exhaust
pIpe
and
premuffier
to
the
left
so
that
dnve
shaft
can
be
removed
sedan
4
Remove
handbrake
rear
cable
adjustIng
nut
from
the
adjuster
DIsconnect
left
hand
cable
from
the
adjuster
sedan
5
DIsconnect
rear
flange
yoke
from
the
com
panIon
flange
by
removmg
the
nuts
and
bolts
See
Figure
42
CAUTION
Be
careful
not
to
let
end
of
dnve
shaft
drop
to
ground
Lower
It
gently
6
Pull
the
dnve
shaft
backwards
away
from
the
transmISSIon
Remove
the
dnve
shaft
as
soon
as
It
IS
clear
of
the
transmISSIon
Make
cert
n
to
support
both
ends
of
the
shaft
duriftgi
mb
sedan
and
wagon
v
4
1tr
l
t
t