2024 FORD F650/750 warning light
[x] Cancel search: warning lightPage 239 of 386
3.Rotate the drain counterclockwise untilthe O-ring is visible. Allow the dieselfuel conditioner module to drain forapproximately 25 seconds or untilclean fuel is observed. Rotate the drainclockwise to tighten it. If no liquiddrains, there may be a clog in the drain.Have the conditioner module servicedby an authorized dealer.
4.Make sure that you fully tighten thedrain valve and then remove thecontainer from under your vehicle.
5.Restart the engine. If the Water in FuelDrain Filter message and lightcontinues to illuminate, have the fuelsystem checked and repaired.
ENGINE COOLANT CHECK -
6.7L DIESEL
WARNING: Do not remove thecoolant reservoir cap when the engine ison or the cooling system is hot. Wait 10minutes for the cooling system to cooldown. Cover the coolant reservoir capwith a thick cloth to prevent thepossibility of scalding and slowly removethe cap. Failure to follow this instructioncould result in personal injury.
WARNING: To reduce the risk ofpersonal injury, make sure the engine iscool before unscrewing the coolantpressure relief cap. The cooling systemis under pressure. Steam and hot liquidcan come out forcefully when you loosenthe cap slightly.
When the engine is cold, check theconcentration and level of the coolant atthe intervals listed in the scheduledmaintenance information. See ScheduledMaintenance (page 325).
Note:Make sure that the coolant level isbetween the MIN and the MAX marks onthe coolant reservoir.
Note: Coolant expands when it is hot. Thelevel may extend beyond the MAX mark.
Maintain coolant concentration within48% to 50%, which equates to a freezepoint between -30°F (-34°C) and -34°F(-37°C). Coolant concentration should bechecked using a refractometer. We do notrecommend the use of hydrometers orcoolant test strips for measuring coolantconcentration.
Adding Coolant
WARNING: Do not put coolant inthe windshield washer reservoir. Ifsprayed on the windshield, coolant couldmake it difficult to see through thewindshield.
WARNING: Do not add coolantfurther than the MAX mark.
WARNING: Do not add coolantwhen the vehicle is on or the coolingsystem is hot. Failure to follow thisinstruction could result in personal injury.
WARNING: Do not remove thecoolant reservoir cap when the engine ison or the cooling system is hot. Wait 10minutes for the cooling system to cooldown. Cover the coolant reservoir capwith a thick cloth to prevent thepossibility of scalding and slowly removethe cap. Failure to follow this instructioncould result in personal injury.
Note: Automotive fluids are notinterchangeable. Do not use coolant orwindshield washer fluid outside of itsspecified function and vehicle location.
235
2024 F-650/750 (TBC) , enUSA, Edition date: 202210, First-PrintingMaintenance
Page 243 of 386
WARNING: To reduce the risk ofpersonal injury, make sure the engine iscool before unscrewing the coolantpressure relief cap. The cooling systemis under pressure. Steam and hot liquidcan come out forcefully when you loosenthe cap slightly.
WARNING: Do not add coolantfurther than the MAX mark.
When the engine is cold, check theconcentration and level of the coolant atthe intervals listed in the scheduledmaintenance information. See ScheduledMaintenance (page 325).
Note:Make sure that the coolant level isbetween the MIN and MAX marks on thecoolant reservoir.
Note: Coolant expands when it is hot. Thelevel may extend beyond the MAX mark.
Maintain coolant concentration within48% to 50%, which equates to a freezepoint between -30°F (-34°C) and -34°F(-37°C). Check the coolant concentrationusing a refractometer. We do notrecommend the use of hydrometers orcoolant test strips for measuring coolantconcentration.
Adding Coolant
WARNING: Do not add enginecoolant when the engine is on or thecooling system is hot. Failure to followthis instruction could result in personalinjury.
WARNING: Do not remove thecoolant reservoir cap when the engine ison or the cooling system is hot. Wait 10minutes for the cooling system to cooldown. Cover the coolant reservoir capwith a thick cloth to prevent thepossibility of scalding and slowly removethe cap. Failure to follow this instructioncould result in personal injury.
Note: Automotive fluids are notinterchangeable. Do not use coolant orwindshield washer fluid outside of itsspecified function and vehicle location.
Note: Do not use stop leak pellets, coolingsystem sealants, or non-specified additivesas they can cause damage to the enginecooling or heating systems. Resultingcomponent damage may not be covered bythe vehicle Warranty.
It is very important to use predilutedcoolant approved to the correctspecification in order to avoid plugging thesmall passageways in the engine coolingsystem. See Cooling System Capacityand Specification (page 302). Do not mixdifferent colors or types of coolant in yourvehicle. Mixing of engine coolants or usingan incorrect coolant may harm the engineor cooling system components and maynot be covered by the vehicle Warranty.
Note: Coolants marketed for all makes andmodels may not be approved to ourspecifications and may cause damage tothe cooling system. Resulting componentdamage may not be covered by the vehicleWarranty.
If the coolant level is at or below theminimum mark, add prediluted coolantimmediately.
239
2024 F-650/750 (TBC) , enUSA, Edition date: 202210, First-PrintingMaintenance
Page 250 of 386
For detailed interval information, seeScheduled Maintenance in your Owner'sManual or your local maintenance guide.
POWER STEERING FLUID
CHECK
Check the power steering fluid. SeeScheduled Maintenance (page 325). Ifadding fluid is necessary, use onlyMERCON LV ATF
Check the fluid level when it is at ambienttemperature.
1.Check the fluid level in the reservoir. Itshould be between the MIN and MAXrange. Do not add fluid if the level iswithin this range.
2.If the fluid level is low, add fluid to bringthe fluid level up to between the MINand MAX range.
3.Switch the engine on.
4.While the engine idles, turn the steeringwheel left and right several times.
5.Switch the engine off.
6.Recheck the fluid level in the reservoir.Do not add fluid if the level is betweenthe MIN and MAX range.
7.If the fluid is low, add the proper typeof fluid in small amounts, continuouslychecking the level until it is betweenthe MIN and MAX range. SeeHydraulic Power Steering FluidCapacity and Specification (page312). Be sure to put the cap back on thereservoir.
CHANGING THE 12V BATTERY
WARNING: This vehicle may beequipped with more than one battery,removal of cable from only one batterydoes not disconnect the vehicleelectrical system. Be sure to disconnectcables from all batteries whendisconnecting power. Failure to do somay cause serious personal injury orproperty damage.
WARNING: Batteries normallyproduce explosive gases which cancause personal injury. Therefore, do notallow flames, sparks or lightedsubstances to come near the battery.When working near the battery, alwaysshield your face and protect your eyes.Always provide proper ventilation.
WARNING: When lifting aplastic-cased battery, excessive pressureon the end walls could cause acid to flowthrough the vent caps, resulting inpersonal injury and damage to thevehicle or battery. Lift the battery with abattery carrier or with your hands onopposite corners.
WARNING: Keep batteries out ofreach of children. Batteries containsulfuric acid. Avoid contact with skin,eyes or clothing. Shield your eyes whenworking near the battery to protectagainst possible splashing of acidsolution. In case of acid contact with skinor eyes, flush immediately with water fora minimum of 15 minutes and get promptmedical attention. If acid is swallowed,call a physician immediately.
Note:If your battery has a cover/shield,make sure it is reinstalled after the batteryhas been cleaned or replaced.
246
2024 F-650/750 (TBC) , enUSA, Edition date: 202210, First-PrintingMaintenance
Page 253 of 386

4.On the wall or screen you will observea flat zone of high intensity lightlocated at the top of the right handportion of the beam pattern. If the topedge of the high intensity light zone isnot at the horizontal reference line, theheadlamp will need to be adjusted.
5.Locate the vertical adjuster on eachheadlamp. Using a Phillips #2screwdriver, turn the adjuster eitherclockwise or counterclockwise in orderto adjust the vertical aim of theheadlamp.
6.Repeat Steps 3 thru 5 to adjust theother headlamp.
7.Close the hood and turn off the lamps.
Horizontal Aim Adjustment
Horizontal aim is not required for thisvehicle and is not adjustable.
WASHER FLUID CHECK
WARNING: If you operate yourvehicle in temperatures below 40°F(5°C), use washer fluid with antifreezeprotection. Failure to use washer fluidwith antifreeze protection in coldweather could result in impairedwindshield vision and increase the riskof injury or accident.
Add fluid to fill the reservoir if the level islow. Only use a washer fluid that meetsFord specifications. See Capacities andSpecifications (page 291).
State or local regulations on volatileorganic compounds may restrict the useof methanol, a common windshield washerantifreeze additive. Washer fluidscontaining non-methanol antifreezeagents should be used only if they providecold weather protection without damagingthe vehicle’s paint finish, wiper blades orwasher system.
FUEL FILTER - 7.3L
Your vehicle is equipped with a lifetimefuel filter that is integrated with the fueltank. Regular maintenance or replacementis not needed.
CHECKING THE WIPER
BLADES
249
2024 F-650/750 (TBC) , enUSA, Edition date: 202210, First-PrintingMaintenanceE142465 E163806 E142463
Page 255 of 386

Headlamp bulbs must be marked with anauthorized D.O.T. marking for NorthAmerica to make sure they have the properlamp performance, light brightness, lightpattern and safe visibility.
Install in the reverse order unless otherwisestated.
Headlamp Bulbs
1.Switch all of the lamps and the ignitionoff.
2.Remove the headlamp. SeeRemoving a Headlamp (page 250).
3.Release the clip and remove the bulb.
Note:Do not touch the bulb glass.
Note:If the bulb is accidentally touched, itshould be cleaned with rubbing alcoholbefore being used.
Front Clearance and IdentificationLamp (If Equipped)
1.Switch all of the lamps and the ignitionoff.
2.Remove the screw and lens from thelamp assembly.
3.Press the bulb in and turn the bulbcounterclockwise to remove it.
Brake Lamp, Rear Lamp, RearDirection Indicator, License PlateLamp and Reverse Lamp
1.Switch all of the lamps and the ignitionoff.
2.Remove the four screws and the lamplens from lamp assembly.
3.Remove the bulb by pulling it straightout.
CHANGING THE ENGINE-
MOUNTED AND DIESEL FUEL
CONDITIONER MODULE FUEL
FILTERS - 6.7L DIESEL
WARNING: Do not dispose of fuelin the household refuse or the publicsewage system. Use an authorized wastedisposal facility.
Your vehicle has two fuel filters. The firstfilter mounts on top of the engine on theleft-hand side. The second filter is insidethe diesel fuel conditioner module. Themodule is mounted between the inboardside of the fuel tank and the frame rail.
251
2024 F-650/750 (TBC) , enUSA, Edition date: 202210, First-PrintingMaintenanceE163825 E163828
Page 269 of 386
•Never wash or rinse the engine while itis hot or running; water in the runningengine may cause internal damage.
•Never wash or rinse any ignition coil,spark plug wire or spark plug well, orthe area in and around these locations.
•Cover the battery, power distributionbox, and air filter assembly to preventwater damage when cleaning theengine.
CLEANING THE WINDOWS AND
WIPER BLADES
Car wash chemicals and environmentalfallout can result in windshield and wiperblade contamination. Dirty windshield andwipers will result in poor windshield wiperoperation. Keep the windshield and wiperblades clean to maintain windshield wiperperformance.
To clean the windshield and wiper blades:
•Clean the windshield with anon-abrasive glass cleaner. Whencleaning the interior of the windshield,avoid getting any glass cleaner on theinstrument panel or door panels. Wipeany glass cleaner off these surfacesimmediately.
•For windshields contaminated withtree sap, chemicals, wax or bugs, cleanthe entire windshield using steel wool(no greater than 0000 grade) in acircular motion and rinse with water.
•Clean the wiper blades with isopropylrubbing alcohol or windshield washerconcentrate.
Note: Do not use razor blades or othersharp objects to clean or remove decalsfrom the inside of the heated rear window.The vehicle warranty does not coverdamage caused to the heated rear windowgrid lines.
CLEANING THE INTERIOR
WARNING: Do not use cleaningsolvents, bleach or dye on the vehicle'sseatbelts, as these actions may weakenthe belt webbing.
WARNING: On vehicles equippedwith seat-mounted airbags, do not usechemical solvents or strong detergents.Such products could contaminate theside airbag system and affectperformance of the side airbag in a crash.
For fabric, carpets, cloth seats and seatsequipped with side airbags:
•Remove dust and loose dirt with avacuum cleaner.
•Remove light stains and soil withMotorcraft Professional StrengthCarpet & Upholstery Cleaner.
•If grease or tar is present on thematerial, spot-clean the area first withMotorcraft Spot and Stain Remover. InCanada, use Motorcraft Multi-PurposeCleaner.
•If a ring forms on the fabric after spotcleaning, clean the entire areaimmediately (but do not oversaturate)or the ring will set.
•Do not use household cleaningproducts or glass cleaners, which canstain and discolor the fabric and affectthe flame retardant abilities of the seatmaterials.
Mirrors
Do not clean the housing or glass of anymirror with harsh abrasives, fuel or otherpetroleum or ammonia-based cleaningproducts.
265
2024 F-650/750 (TBC) , enUSA, Edition date: 202210, First-PrintingVehicle Care
Page 276 of 386
*Traction: The traction grades,from highest to lowest are AA, A,B, and C. The grades represent thetire's ability to stop on wetpavement as measured undercontrolled conditions on specifiedgovernment test surfaces ofasphalt and concrete. A tiremarked C may have poor tractionperformance.
*Temperature: The temperaturegrades are A (the highest), B andC, representing the tire'sresistance to the generation ofheat and its ability to dissipateheat when tested under controlledconditions on a specified indoorlaboratory test wheel.
M.Maximum InflationPressure: Indicates the tiremanufacturers' maximumpermissible pressure or thepressure at which the maximumload can be carried by the tire. Thispressure is normally higher thanthe vehicle manufacturer'srecommended cold inflationpressure which can be found onthe Safety ComplianceCertification Label. The coldinflation pressure should never beset lower than the recommendedpressure on the vehicle label.
The tire suppliers may haveadditional markings, notes orwarnings such as standard loador radial tubeless.
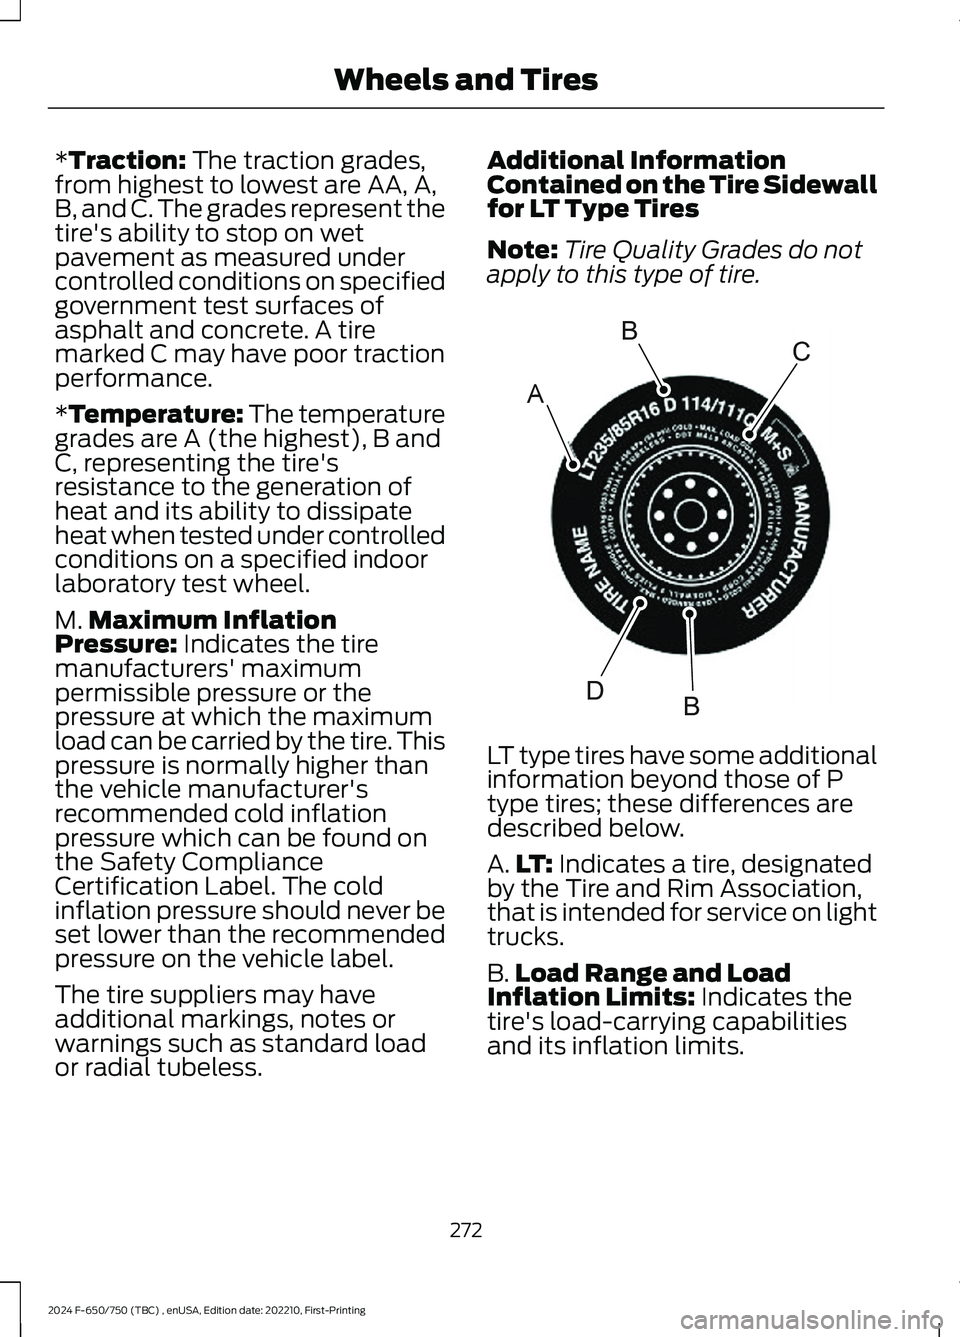
Additional InformationContained on the Tire Sidewallfor LT Type Tires
Note:Tire Quality Grades do notapply to this type of tire.
LT type tires have some additionalinformation beyond those of Ptype tires; these differences aredescribed below.
A.LT: Indicates a tire, designatedby the Tire and Rim Association,that is intended for service on lighttrucks.
B.Load Range and LoadInflation Limits: Indicates thetire's load-carrying capabilitiesand its inflation limits.
272
2024 F-650/750 (TBC) , enUSA, Edition date: 202210, First-PrintingWheels and TiresABCBDE142544
Page 332 of 386
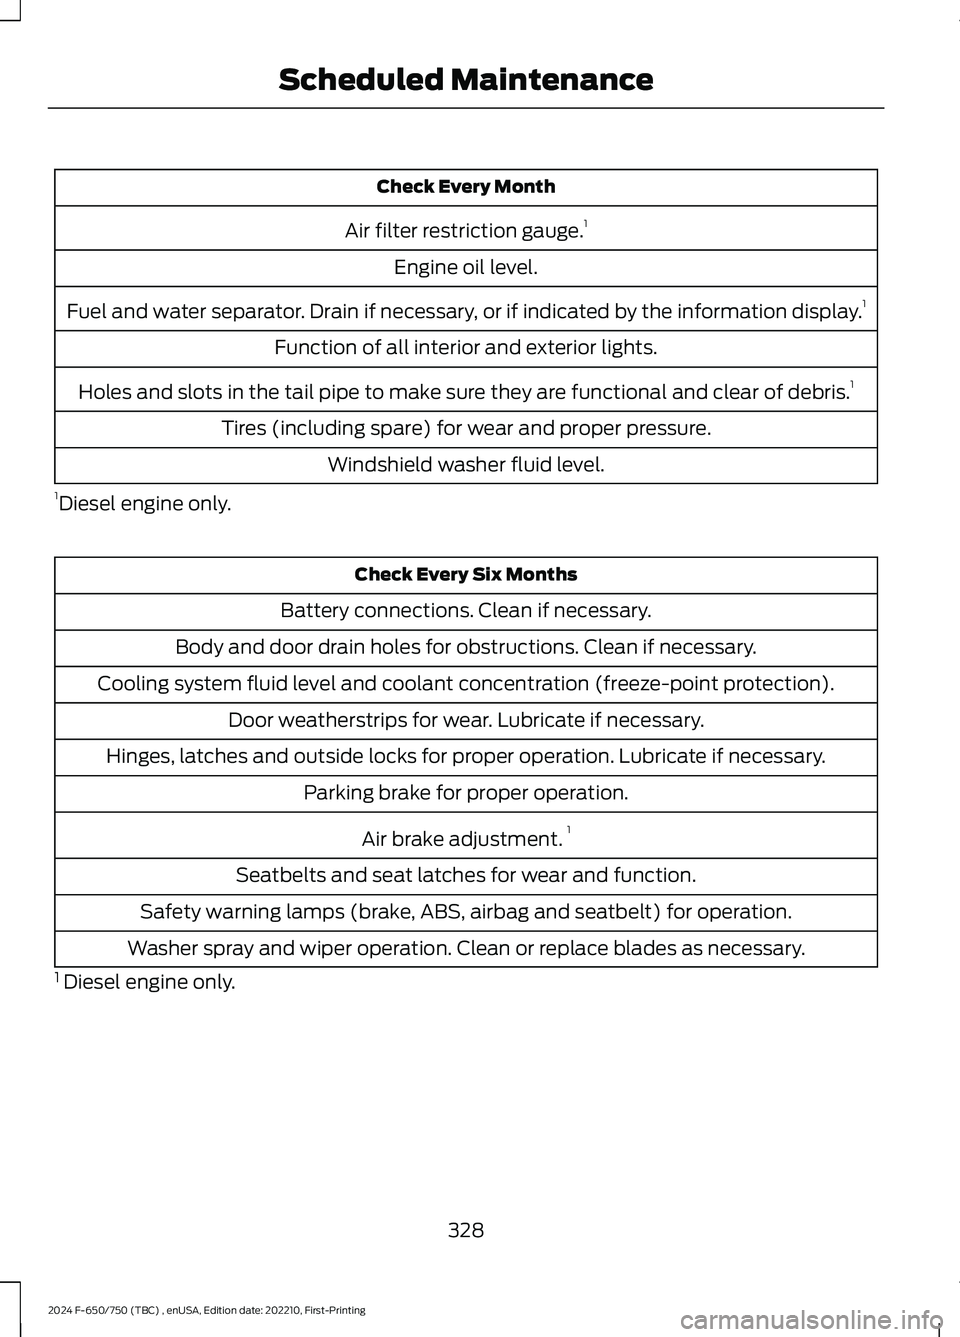
Check Every Month
Air filter restriction gauge.1
Engine oil level.
Fuel and water separator. Drain if necessary, or if indicated by the information display.1
Function of all interior and exterior lights.
Holes and slots in the tail pipe to make sure they are functional and clear of debris.1
Tires (including spare) for wear and proper pressure.
Windshield washer fluid level.
1Diesel engine only.
Check Every Six Months
Battery connections. Clean if necessary.
Body and door drain holes for obstructions. Clean if necessary.
Cooling system fluid level and coolant concentration (freeze-point protection).
Door weatherstrips for wear. Lubricate if necessary.
Hinges, latches and outside locks for proper operation. Lubricate if necessary.
Parking brake for proper operation.
Air brake adjustment.1
Seatbelts and seat latches for wear and function.
Safety warning lamps (brake, ABS, airbag and seatbelt) for operation.
Washer spray and wiper operation. Clean or replace blades as necessary.
1 Diesel engine only.
328
2024 F-650/750 (TBC) , enUSA, Edition date: 202210, First-PrintingScheduled Maintenance