2024 FORD F650/750 stop start
[x] Cancel search: stop startPage 143 of 386
GENERAL INFORMATION
Note: Occasional brake noise is normal. Ifa metal-to-metal, continuous grinding orcontinuous squeal sound is present, thebrake linings may be worn-out. Have thesystem checked as soon as possible. If thevehicle has continuous vibration or shudderin the steering wheel while braking, have thesystem checked as soon as possible.
All standard equipment brakes areself-adjusting. Automatic adjustment,when required, occurs whenever you applyand release the brakes during forward orreverse operation.
Know the required stopping distances forall driving conditions you may encounter.For longer brake lining life, take fulladvantage of engine braking power whencoming to a stop.
Wet brakes result in reduced brakingefficiency. Gently press the brake pedal afew times when driving from a car wash orstanding water to dry the brakes.
If the brakes do not grip well:
•Check brake adjustment.
•Check the brake linings for excessivewear.
•Check the system air pressure onvehicles with air brakes.
•Let the brakes cool if you have beenusing them excessively, as in mountaindriving or after several fast, high-speedstops.
•If you have been driving through deepwater, gently apply the brakes severaltimes while your vehicle is movingslowly.
Brake Over Accelerator
In the event the accelerator pedalbecomes stuck or entrapped, apply steadyand firm pressure to the brake pedal toslow the vehicle and reduce engine power.If you experience this condition, apply thebrakes and bring your vehicle to a safestop. Move the transmission to park (P),switch the engine off and apply the parkingbrake. Inspect the accelerator pedal forany interference. If none are found and thecondition persists, have your vehicle towedto the nearest authorized dealer
Anti-lock Brake System
This system helps you maintain steeringcontrol during emergency stops by keepingthe brakes from locking.
If the light does not illuminateduring start up, remains on orflashes, the system may bedisabled. It also momentarily illuminateswhen you switch the ignition on to confirmthe lamp is functional. If it does notilluminate when you switch the ignition on,or begins to flash at any time, have thesystem checked.
If you connect a PLC trailer withthe ignition on, the trailer ABSlight also illuminates. If the lightfails to illuminate, if it remains on after youstart the vehicle or continues to flash, havethe system serviced immediately.
See Warning Lamps and Indicators(page 67).
139
2024 F-650/750 (TBC) , enUSA, Edition date: 202210, First-PrintingBrakesE67020 E210335
Page 148 of 386
Vehicles with Automatic Transmission
When you switch the ignition on, thesystem automatically turns on. You cannotturn the system on or off.
AIR BRAKES
WARNING: Failure to maintainproper air brake adjustment can resultin reduction or loss of braking ability.
WARNING: Do not drive or continueto drive if the low air pressure buzzer issounding or the brake warning light is lit.These warnings indicate that air pressureis not to normal operating level.Continued use of the vehicle could resultin loss of braking ability.
WARNING: Avoid repeated lightapplication of the brake pedal. Thisdepletes air pressure faster and couldresult in loss of braking capability.
WARNING: Do not move thevehicle when the air pressure isinsufficient because the brake systemmay be inoperative.
After starting the engine, allow time for theair compressor to build air pressure to60 psi (414 kPa) before moving yourvehicle.
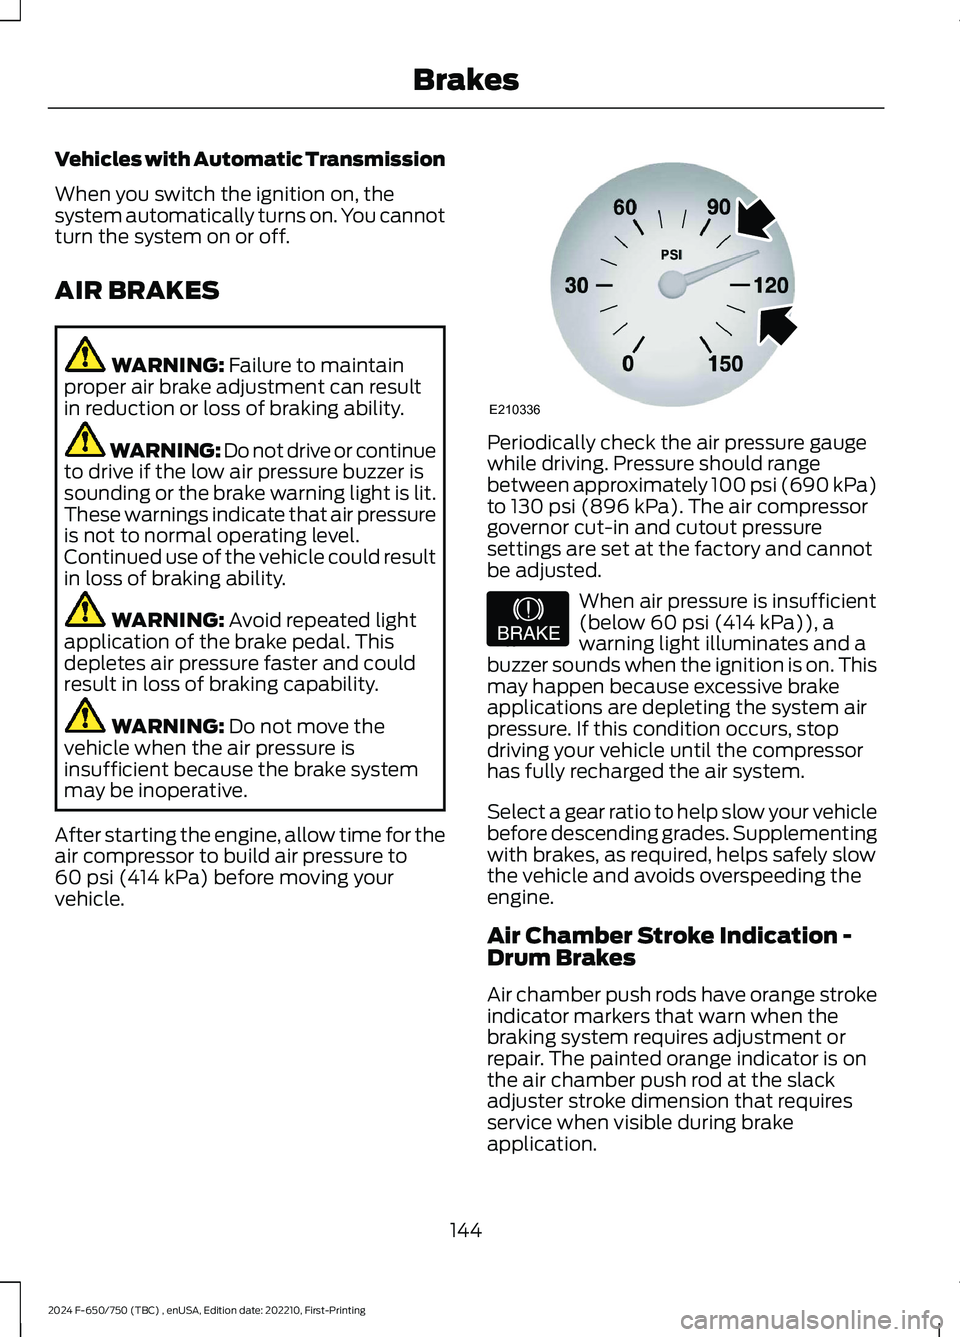
Periodically check the air pressure gaugewhile driving. Pressure should rangebetween approximately 100 psi (690 kPa)to 130 psi (896 kPa). The air compressorgovernor cut-in and cutout pressuresettings are set at the factory and cannotbe adjusted.
When air pressure is insufficient(below 60 psi (414 kPa)), awarning light illuminates and abuzzer sounds when the ignition is on. Thismay happen because excessive brakeapplications are depleting the system airpressure. If this condition occurs, stopdriving your vehicle until the compressorhas fully recharged the air system.
Select a gear ratio to help slow your vehiclebefore descending grades. Supplementingwith brakes, as required, helps safely slowthe vehicle and avoids overspeeding theengine.
Air Chamber Stroke Indication -Drum Brakes
Air chamber push rods have orange strokeindicator markers that warn when thebraking system requires adjustment orrepair. The painted orange indicator is onthe air chamber push rod at the slackadjuster stroke dimension that requiresservice when visible during brakeapplication.
144
2024 F-650/750 (TBC) , enUSA, Edition date: 202210, First-PrintingBrakesE210336 E206772
Page 187 of 386
ESSENTIAL TOWING CHECKS
See Load limits in the Load Carryingchapter for load specification terms foundon the tire label and Safety Compliancelabel and instructions on calculating yourvehicle's load.
Remember to account for the trailertongue weight as part of your vehicle loadwhen calculating the total vehicle weight.
Hitches
Do not use a hitch that either clamps ontothe bumper or attaches to the axle. Youmust distribute the load in your trailer sothat 10-15% of the total weight of thetrailer is on the tongue.
Safety Chains
Note:Do not attach safety chains to thebumper.
Always connect the safety chains to theframe or hook retainers of your vehiclehitch.
To connect the safety chains, cross thechains under the trailer tongue and allowenough slack for turning tight corners. Donot allow the chains to drag on the ground.
Trailer Brakes
WARNING: Do not connect atrailer's hydraulic brake system directlyto your vehicle's brake system. Yourvehicle may not have enough brakingpower and your chances of having acollision greatly increase.
Electric brakes and manual, automatic orsurge-type trailer brakes are safe if youinstall them properly and adjust them tothe manufacturer's specifications. Thetrailer brakes must meet local and federalregulations.
The rating for the tow vehicle's brakingsystem operation is at the gross vehicleweight rating, not the gross combinedweight rating.
Trailer Lamps
WARNING: Never connect anytrailer lamp wiring to the vehicle's taillamp wiring; this may damage theelectrical system resulting in fire. Contactyour authorized dealer as soon aspossible for assistance in proper trailertow wiring installation. Additionalelectrical equipment may be required.
Trailer lamps are required on most towedvehicles. Make sure all running lights, brakelights, turn signals and hazard lights areworking.
Before Towing a Trailer
Practice turning, stopping and backing upto get the feel of your vehicle-trailercombination before starting on a trip.When turning, make wider turns so thetrailer wheels clear curbs and otherobstacles.
When Towing a Trailer
•Check your hitch, electrical connectionsand trailer wheel lug nuts thoroughlyafter you have traveled 50 mph(80 km/h).
•When stopped in congested or heavytraffic during hot weather, place thetransmission in park (P) or neutral (N)to aid engine and transmission coolingand to help air conditioningperformance.
•Turn off the speed control with heavyloads or in hilly terrain. The speedcontrol may turn off automaticallywhen you are towing on long, steepgrades.
183
2024 F-650/750 (TBC) , enUSA, Edition date: 202210, First-PrintingTowing
Page 190 of 386

GENERAL DRIVING POINTS
General Information
•Accelerate smoothly and evenly. Rapidacceleration increases fuelconsumption without increasing engineperformance.
•When approaching a hill, press theaccelerator smoothly to start theincline at full power, and then shiftdown as needed to maintain vehiclespeed.
•When going down a hill, or long steepgrades, prevent overspeeding of theengine. Normally, choose the samegear to descend the hill that you use toascend the hill. The engine governorhas no control over engine speed whenit is being pushed by a loaded vehicle.
•Do not operate in a gear that permitsan engine speed more than themaximum governed speed or high-idleRPM (no load).
•Always shift to a lower gear at highaltitudes to prevent engine smoking.
Backing Up
WARNING: All vehicles have blindspots. To reduce the risk of severe injuryor property damage, never move yourvehicle to the side or rear or change laneswithout being sure your way is clear onboth sides and to your rear.
WARNING: To reduce the risk ofthe possibility of personal injury whilebacking up the vehicle, always be sureyour vehicle’s path is clear.
Before backing up your vehicle, be sure youcan do so safely. If anything behind the cablimits your view, do not rely on mirrorsalone to make sure that your intended pathis clear. If other people are in the vicinity,have someone standing well behind yourvehicle and outside of your intended path(visible through an exterior mirror) guideyou as you back up.
Although OSHA or some governmentalregulations may require the use of anelectrical or mechanical back up alarm towarn bystanders, such an alarm does notguarantee that the intended path is clear.When in doubt, get out of your vehicle andvisually check the intended path is clear.Back up slowly as to allow others time tomove, if necessary.
If you install an electrical back up alarm,connect it to the backup lamp circuit.
Parking
WARNING: When parking yourvehicle, do not leave the transmission ingear; if the key is in the on position andthe vehicle rolls, the engine could start.Failure to follow these instructions couldresult in an unattended vehicle moving,possibly causing personal injury orproperty damage.
Always use the parking brake. Whenparking on a grade, block the wheels andturn the front wheels to one side so that ifyour vehicle rolls, the front tires act againstthe curb to stop your vehicle. The frontwheels are more effective at stopping arolling vehicle than the rear wheels.
186
2024 F-650/750 (TBC) , enUSA, Edition date: 202210, First-PrintingDriving Hints
Page 193 of 386
DRIVING THROUGH WATER
WARNING: Do not drive throughflowing or deep water as you may losecontrol of your vehicle.
Note:Driving through standing water cancause vehicle damage.
Note:Engine damage can occur if waterenters the air filter.
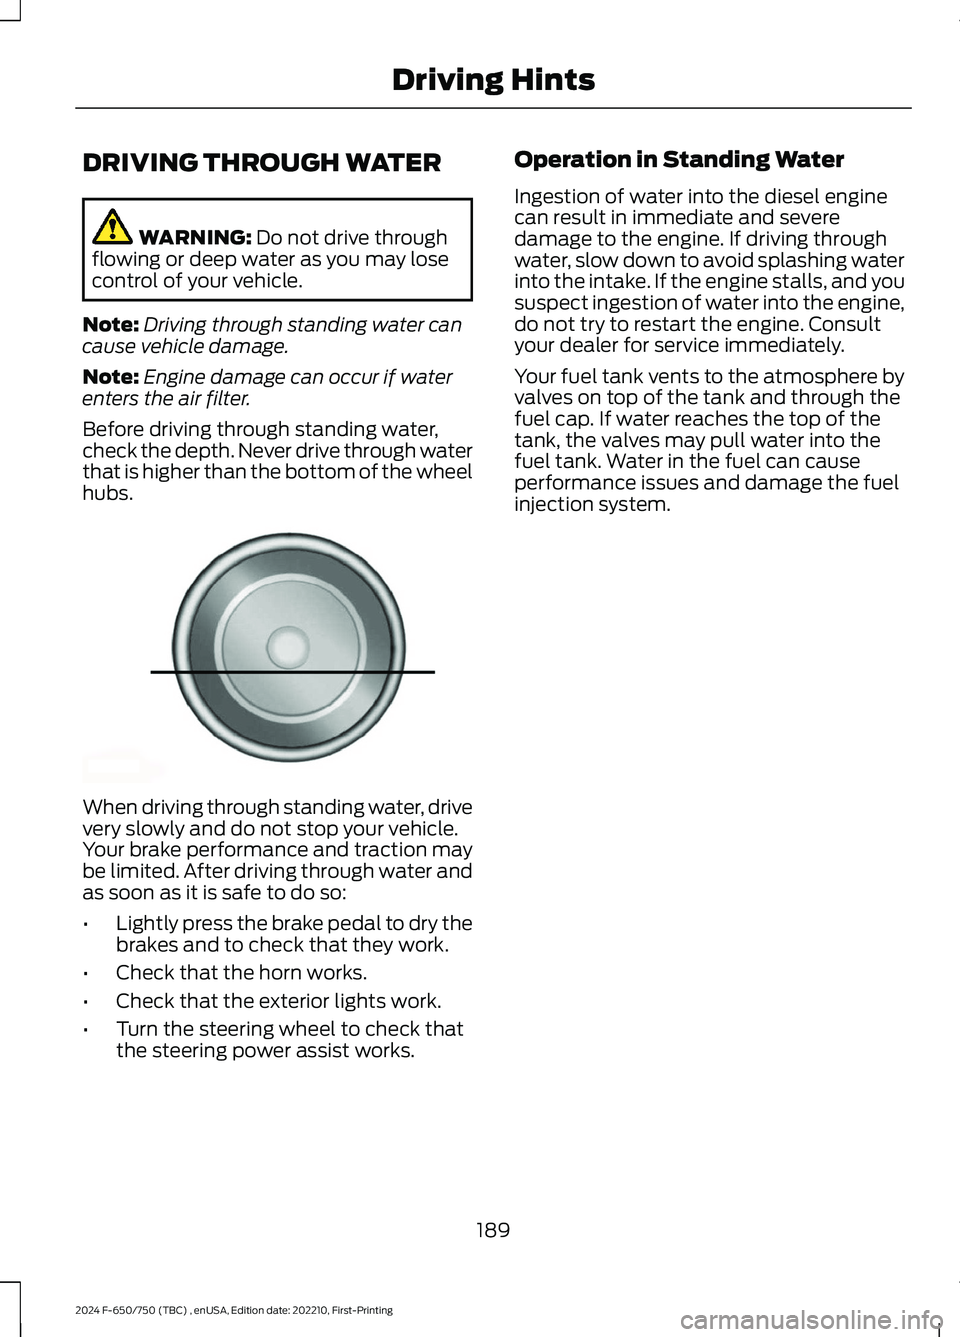
Before driving through standing water,check the depth. Never drive through waterthat is higher than the bottom of the wheelhubs.
When driving through standing water, drivevery slowly and do not stop your vehicle.Your brake performance and traction maybe limited. After driving through water andas soon as it is safe to do so:
•Lightly press the brake pedal to dry thebrakes and to check that they work.
•Check that the horn works.
•Check that the exterior lights work.
•Turn the steering wheel to check thatthe steering power assist works.
Operation in Standing Water
Ingestion of water into the diesel enginecan result in immediate and severedamage to the engine. If driving throughwater, slow down to avoid splashing waterinto the intake. If the engine stalls, and yoususpect ingestion of water into the engine,do not try to restart the engine. Consultyour dealer for service immediately.
Your fuel tank vents to the atmosphere byvalves on top of the tank and through thefuel cap. If water reaches the top of thetank, the valves may pull water into thefuel tank. Water in the fuel can causeperformance issues and damage the fuelinjection system.
189
2024 F-650/750 (TBC) , enUSA, Edition date: 202210, First-PrintingDriving HintsE176913
Page 199 of 386
This program is separate from the NewVehicle Limited Warranty, but the coverageis concurrent with the powertrain coverageperiod of your vehicle. Canadian roadsidecoverage and benefits may differ from theU.S. coverage. For complete details, seeyour Warranty Guide atwww.ford.com/support/warranty/.
Download the Sykes4Ford RoadsideAssistance App for access to your roadsideassistance services.
If you require more information, please callus in Canada at 1-800-665-2006, or visitour website at www.ford.ca.
Ford Motor Company reserves the right tomodify or discontinue Roadside Assistanceat any time. Certain restrictions apply toRoadside Assistance benefits.
For further details, call1-800-241-3673 (United States)1-800-665-2006 (Canada)
AUTOMATIC CRASH SHUTOFF
WHAT IS AUTOMATIC CRASHSHUTOFF
The automatic crash shutoff is designedto stop the fuel going to the engine in theevent of a moderate or severe crash.
Note:Not every impact causes a shutoff.
AUTOMATIC CRASH SHUTOFFPRECAUTIONS
WARNING: If your vehicle has beeninvolved in a crash, have the fuel systemchecked. Failure to follow this instructioncould result in fire, personal injury ordeath.
RE-ENABLING YOUR VEHICLE
1.Switch the ignition off.
2.Attempt to start your vehicle.
3.Switch the ignition off.
4.Attempt to start your vehicle.
Note:If your vehicle does not start after thethird attempt, have your vehicle checked assoon as possible.
195
2024 F-650/750 (TBC) , enUSA, Edition date: 202210, First-PrintingCrash and Breakdown Information
Page 218 of 386
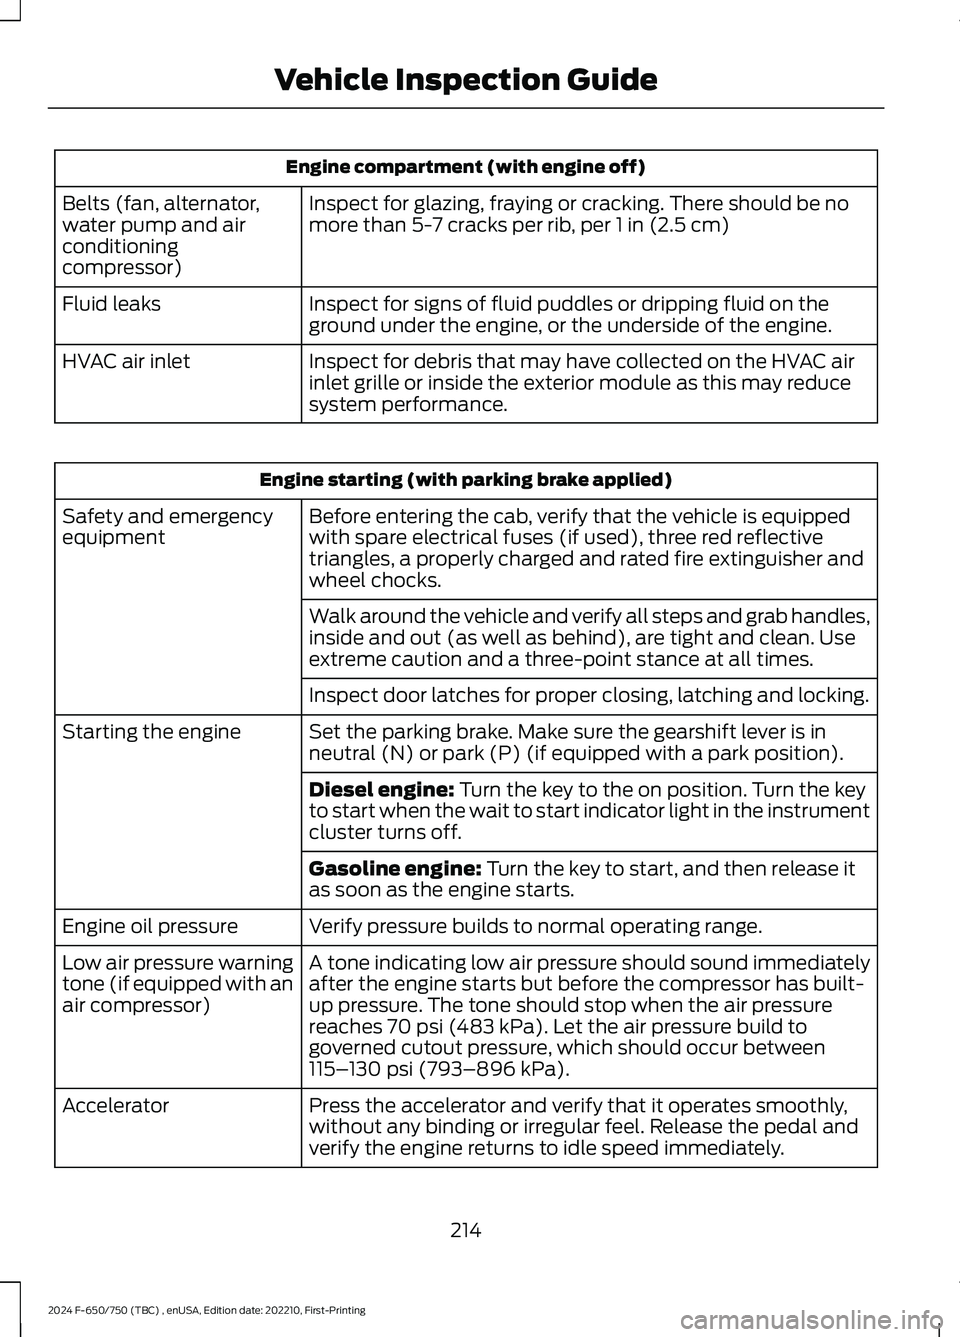
Engine compartment (with engine off)
Inspect for glazing, fraying or cracking. There should be nomore than 5-7 cracks per rib, per 1 in (2.5 cm)Belts (fan, alternator,water pump and airconditioningcompressor)
Inspect for signs of fluid puddles or dripping fluid on theground under the engine, or the underside of the engine.Fluid leaks
Inspect for debris that may have collected on the HVAC airinlet grille or inside the exterior module as this may reducesystem performance.
HVAC air inlet
Engine starting (with parking brake applied)
Before entering the cab, verify that the vehicle is equippedwith spare electrical fuses (if used), three red reflectivetriangles, a properly charged and rated fire extinguisher andwheel chocks.
Safety and emergencyequipment
Walk around the vehicle and verify all steps and grab handles,inside and out (as well as behind), are tight and clean. Useextreme caution and a three-point stance at all times.
Inspect door latches for proper closing, latching and locking.
Set the parking brake. Make sure the gearshift lever is inneutral (N) or park (P) (if equipped with a park position).Starting the engine
Diesel engine: Turn the key to the on position. Turn the keyto start when the wait to start indicator light in the instrumentcluster turns off.
Gasoline engine: Turn the key to start, and then release itas soon as the engine starts.
Verify pressure builds to normal operating range.Engine oil pressure
A tone indicating low air pressure should sound immediatelyafter the engine starts but before the compressor has built-up pressure. The tone should stop when the air pressurereaches 70 psi (483 kPa). Let the air pressure build togoverned cutout pressure, which should occur between115–130 psi (793–896 kPa).
Low air pressure warningtone (if equipped with anair compressor)
Press the accelerator and verify that it operates smoothly,without any binding or irregular feel. Release the pedal andverify the engine returns to idle speed immediately.
Accelerator
214
2024 F-650/750 (TBC) , enUSA, Edition date: 202210, First-PrintingVehicle Inspection Guide
Page 251 of 386

Note:Battery posts, terminals and relatedaccessories contain lead and leadcompounds. Wash hands after handling.
Note:Electrical or electronic accessoriesor components added to the vehicle by thedealer or the owner may adversely affectbattery performance and durability.
Your vehicle is equipped with a Motorcraftmaintenance-free battery which normallydoes not require additional water duringits life of service.
For longer, trouble-free operation, keep thetop of the battery clean and dry. Also,make certain the battery cables are alwaystightly fastened to the battery terminals.
If you see any corrosion on the battery orterminals, remove the cables from theterminals and clean with a wire brush. Youcan neutralize the acid with a solution ofbaking soda and water.
It is recommended that the negativebattery cable terminal be disconnectedfrom the battery if you plan to store yourvehicle for an extended period of time.
Because your vehicle’s engine iselectronically controlled by a computer,some control conditions are maintainedby power from the battery. When thebattery is disconnected or a new batteryis installed, the engine must relearn its idleand fuel trim strategy for optimumdriveability and performance. To begin thisprocess
1.With the vehicle at a complete stop,set the parking brake.
2.Put the gearshift in park (P) or neutral(N) and turn off all accessories.
3.Start the engine. Run the engine untilit reaches normal operatingtemperature.
4.Allow the engine to idle for at least oneminute.
5.Turn the air conditioning (if equipped)on and allow the engine to idle for atleast one minute.
6.Release the parking brake. With yourfoot on the brake pedal and with theair conditioning on, put the vehicle indrive (D) and allow the engine to idlefor at least one minute.
•If you do not allow the engine torelearn its idle trim, the idle qualityof your vehicle may be adverselyaffected until the idle trim iseventually relearned.
7.Drive the vehicle to complete therelearning process
•The vehicle may need to be driven10 mi (16 km) or more to relearn theidle and fuel trim strategy alongwith the ethanol content for flexiblefuel vehicles.
If the battery has been disconnected or anew battery has been installed, the clockand radio settings must be reset once thebattery is reconnected.
Always dispose of automotivebatteries in a responsible manner.Follow your local authorized standardsfor disposal. Call your local authorizedrecycling center to find out more aboutrecycling automotive batteries.
Battery Management System (IfEquipped)
The battery management system (BMS)monitors battery conditions and takesactions to extend battery life. If excessivebattery drain is detected, the system maytemporarily disable certain electricalfeatures to protect the battery. Thoseelectrical accessories affected include therear defrost, heated/cooled seats, climatecontrol fan, heated steering wheel, audioand navigation system. A message may beshown in the information displays to alert
247
2024 F-650/750 (TBC) , enUSA, Edition date: 202210, First-PrintingMaintenance