2024 FORD F650/750 remove seats
[x] Cancel search: remove seatsPage 36 of 386
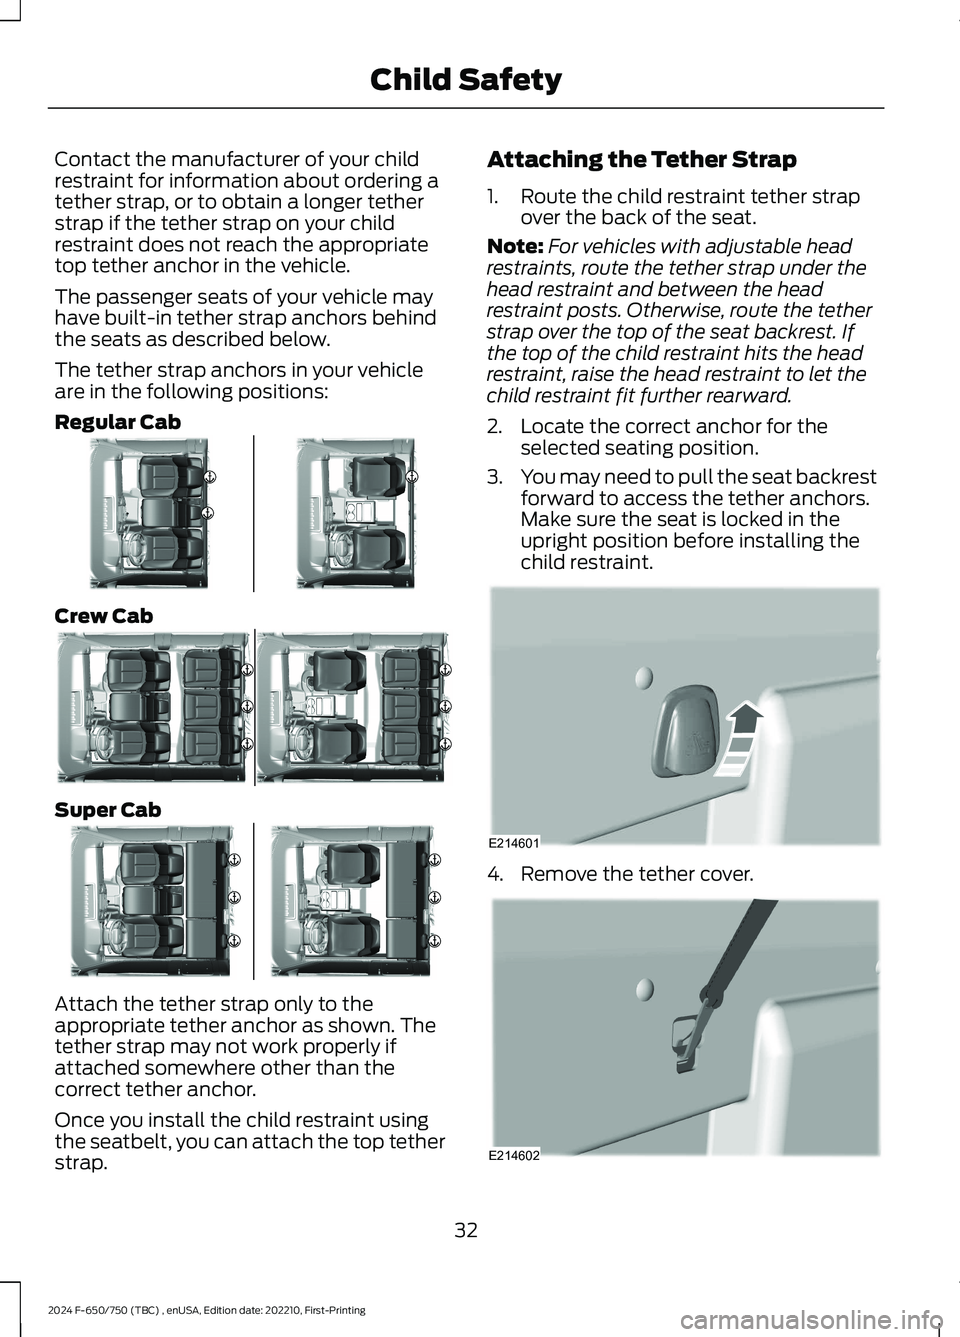
Contact the manufacturer of your childrestraint for information about ordering atether strap, or to obtain a longer tetherstrap if the tether strap on your childrestraint does not reach the appropriatetop tether anchor in the vehicle.
The passenger seats of your vehicle mayhave built-in tether strap anchors behindthe seats as described below.
The tether strap anchors in your vehicleare in the following positions:
Regular Cab
Crew Cab
Super Cab
Attach the tether strap only to theappropriate tether anchor as shown. Thetether strap may not work properly ifattached somewhere other than thecorrect tether anchor.
Once you install the child restraint usingthe seatbelt, you can attach the top tetherstrap.
Attaching the Tether Strap
1.Route the child restraint tether strapover the back of the seat.
Note:For vehicles with adjustable headrestraints, route the tether strap under thehead restraint and between the headrestraint posts. Otherwise, route the tetherstrap over the top of the seat backrest. Ifthe top of the child restraint hits the headrestraint, raise the head restraint to let thechild restraint fit further rearward.
2.Locate the correct anchor for theselected seating position.
3.You may need to pull the seat backrestforward to access the tether anchors.Make sure the seat is locked in theupright position before installing thechild restraint.
4.Remove the tether cover.
32
2024 F-650/750 (TBC) , enUSA, Edition date: 202210, First-PrintingChild SafetyE345911 E345904 E345910 E214601 E214602
Page 38 of 386
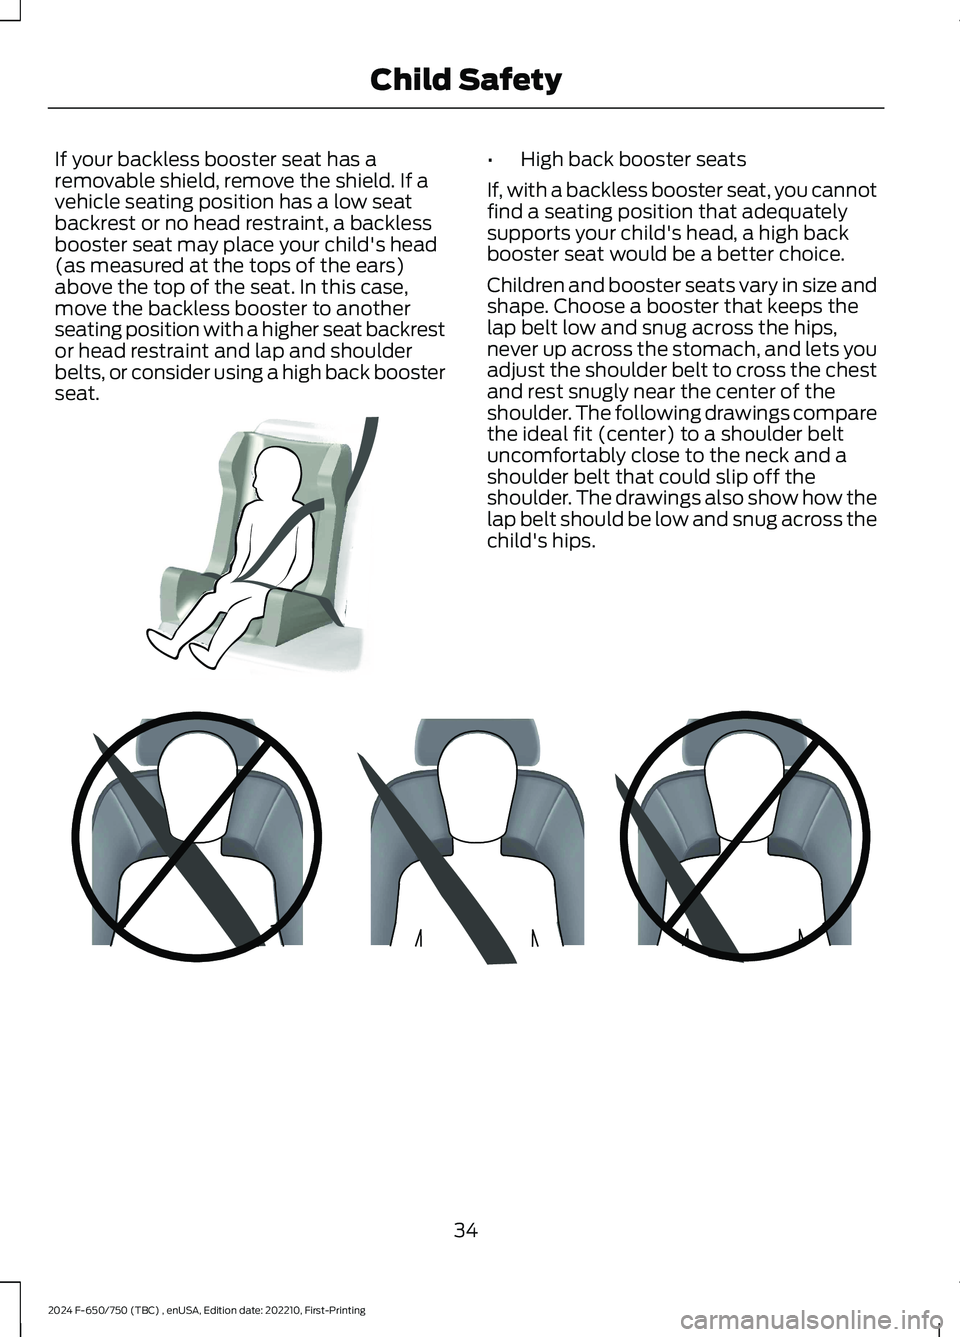
If your backless booster seat has aremovable shield, remove the shield. If avehicle seating position has a low seatbackrest or no head restraint, a backlessbooster seat may place your child's head(as measured at the tops of the ears)above the top of the seat. In this case,move the backless booster to anotherseating position with a higher seat backrestor head restraint and lap and shoulderbelts, or consider using a high back boosterseat.
•High back booster seats
If, with a backless booster seat, you cannotfind a seating position that adequatelysupports your child's head, a high backbooster seat would be a better choice.
Children and booster seats vary in size andshape. Choose a booster that keeps thelap belt low and snug across the hips,never up across the stomach, and lets youadjust the shoulder belt to cross the chestand rest snugly near the center of theshoulder. The following drawings comparethe ideal fit (center) to a shoulder beltuncomfortably close to the neck and ashoulder belt that could slip off theshoulder. The drawings also show how thelap belt should be low and snug across thechild's hips.
34
2024 F-650/750 (TBC) , enUSA, Edition date: 202210, First-PrintingChild SafetyE70710 E142596
Page 43 of 386
•Height adjuster at the front outboardseating positions.
•Safety belt pretensioner at the frontoutboard seating positions.
•Safety belt warning light and chime.
FASTENING THE SEATBELTS
The front outboard and rear safetyrestraints in the vehicle are combinationlap and shoulder belts.
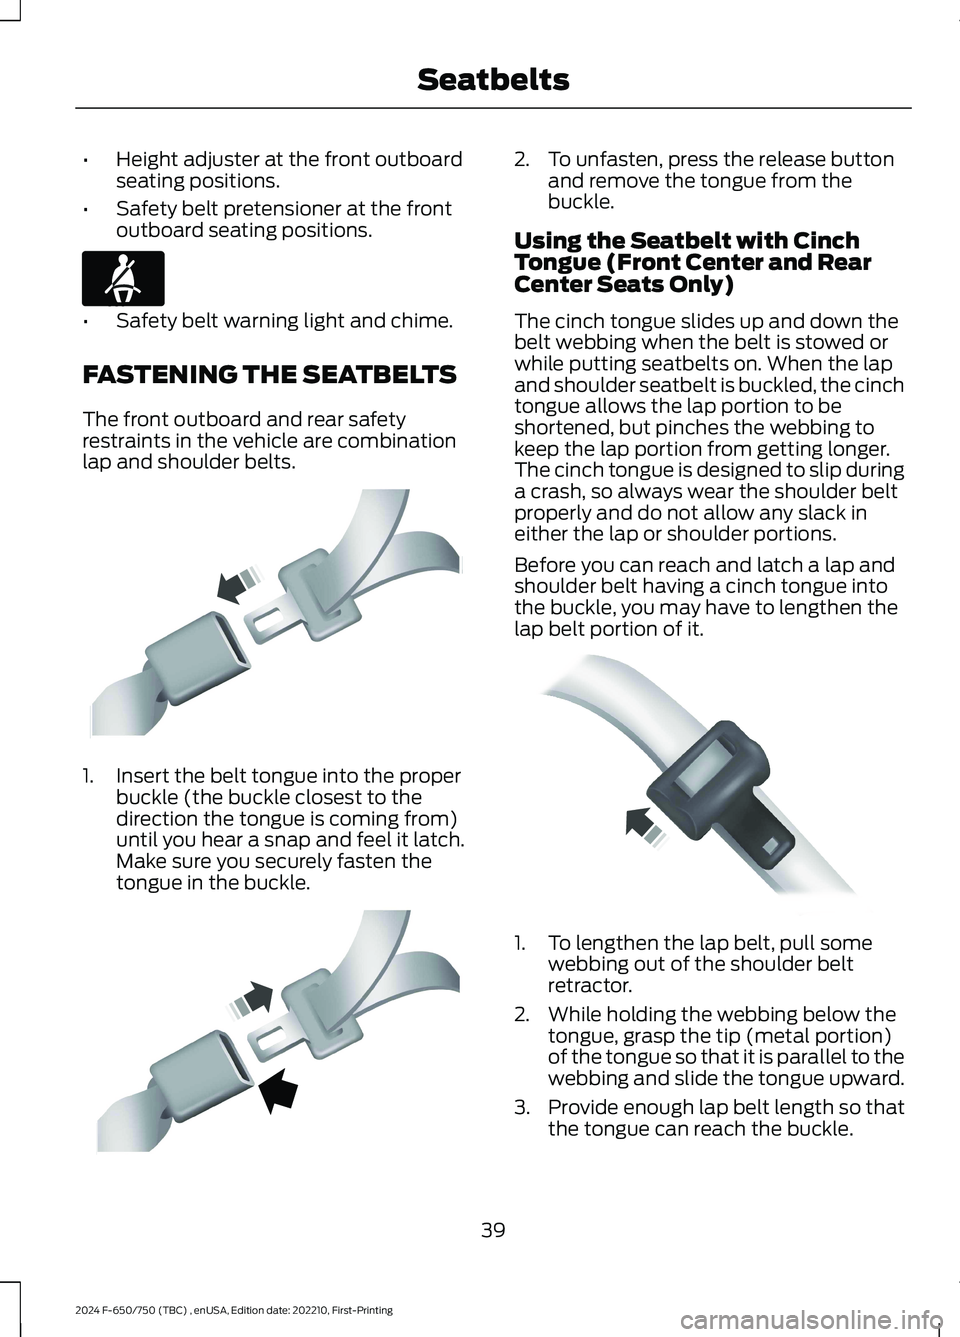
1.Insert the belt tongue into the properbuckle (the buckle closest to thedirection the tongue is coming from)until you hear a snap and feel it latch.Make sure you securely fasten thetongue in the buckle.
2.To unfasten, press the release buttonand remove the tongue from thebuckle.
Using the Seatbelt with CinchTongue (Front Center and RearCenter Seats Only)
The cinch tongue slides up and down thebelt webbing when the belt is stowed orwhile putting seatbelts on. When the lapand shoulder seatbelt is buckled, the cinchtongue allows the lap portion to beshortened, but pinches the webbing tokeep the lap portion from getting longer.The cinch tongue is designed to slip duringa crash, so always wear the shoulder beltproperly and do not allow any slack ineither the lap or shoulder portions.
Before you can reach and latch a lap andshoulder belt having a cinch tongue intothe buckle, you may have to lengthen thelap belt portion of it.
1.To lengthen the lap belt, pull somewebbing out of the shoulder beltretractor.
2.While holding the webbing below thetongue, grasp the tip (metal portion)of the tongue so that it is parallel to thewebbing and slide the tongue upward.
3.Provide enough lap belt length so thatthe tongue can reach the buckle.
39
2024 F-650/750 (TBC) , enUSA, Edition date: 202210, First-PrintingSeatbeltsE71880 E142587 E142588 E162708
Page 91 of 386
Air directed to the instrument panel andfootwell air vents turns off. You can alsouse this setting to defog and clear thewindshield of a thin covering of ice.
Switching Maximum AirConditioning On and Off
Press and release the button formaximum cooling.
The left-hand and right-hand settings setto LO, recirculated air flows through theinstrument panel air vents, air conditioningturns on and the blower motor adjusts tothe highest speed.
Switching Recirculated Air On andOff
Press and release the button toswitch between outside air andrecirculated air.
The air currently in the passengercompartment recirculates. This mayreduce the time needed to cool the interior(when used with A/C) and reduceunwanted odors from entering your vehicle.
Note:Recirculated air may turn off (orprevent you from switching on) in all air flowmodes except MAX A/C to reduce the riskof fogging. Recirculation may also turn onand off in various air distribution controlcombinations during hot weather in orderto improve cooling efficiency.
HINTS ON CONTROLLING THE
INTERIOR CLIMATE
General Hints
Note:Prolonged use of recirculated air maycause the windows to fog up.
Note:You may feel a small amount of airfrom the footwell air vents regardless of theair distribution setting.
Note:To reduce humidity build-up insideyour vehicle, do not drive with the systemswitched off or with recirculated air alwaysswitched on.
Note:Do not place objects under the frontseats as this may interfere with the airflowto the rear seats.
Note:Remove any snow, ice or leaves fromthe air intake area at the base of thewindshield.
Note:To improve the time to reach acomfortable temperature in hot weather,drive with the windows open until you feelcold air through the air vents.
Quickly Heating the Interior
1.Adjust the blower motor speed to thehighest speed setting.
2.Adjust the temperature control to thehighest setting.
3.Direct air to the footwell air vents.
Recommended Settings forHeating
1.Adjust the blower motor speed to thecenter setting.
2.Adjust the temperature control to themidway point of the hot settings.
3.Direct air to the footwell air vents.
Quickly Cooling the Interior
1.Switch MAX A/C on.
2.Drive with the windows open for a shortperiod of time.
Recommended Settings forCooling
1.Adjust the blower motor speed to thecenter setting.
2.Adjust the temperature control to themidway point of the cold settings.
87
2024 F-650/750 (TBC) , enUSA, Edition date: 202210, First-PrintingClimate Control (If Equipped)
Page 94 of 386
Note:Adjust the seat backrest to an uprightdriving position before adjusting the headrestraint. Adjust the head restraint so thatthe top of it is level with the top of your headand as far forward as possible. Make surethat you remain comfortable. If you areextremely tall, adjust the head restraint toits highest position.
Front Seat Adjustable Head Restraint(If Equipped)
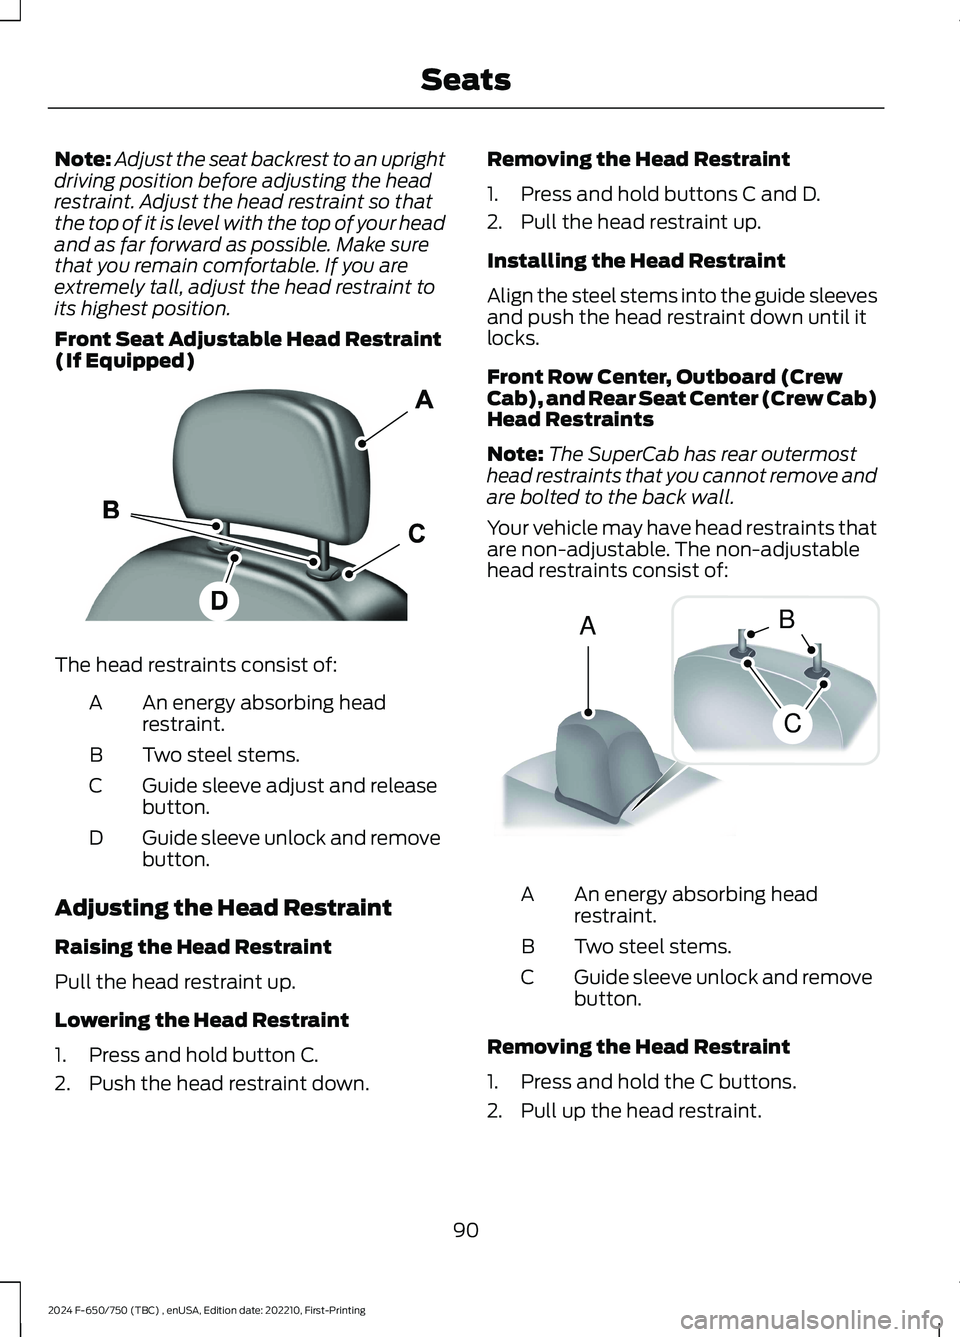
The head restraints consist of:
An energy absorbing headrestraint.A
Two steel stems.B
Guide sleeve adjust and releasebutton.C
Guide sleeve unlock and removebutton.D
Adjusting the Head Restraint
Raising the Head Restraint
Pull the head restraint up.
Lowering the Head Restraint
1.Press and hold button C.
2.Push the head restraint down.
Removing the Head Restraint
1.Press and hold buttons C and D.
2.Pull the head restraint up.
Installing the Head Restraint
Align the steel stems into the guide sleevesand push the head restraint down until itlocks.
Front Row Center, Outboard (CrewCab), and Rear Seat Center (Crew Cab)Head Restraints
Note:The SuperCab has rear outermosthead restraints that you cannot remove andare bolted to the back wall.
Your vehicle may have head restraints thatare non-adjustable. The non-adjustablehead restraints consist of:
An energy absorbing headrestraint.A
Two steel stems.B
Guide sleeve unlock and removebutton.C
Removing the Head Restraint
1.Press and hold the C buttons.
2.Pull up the head restraint.
90
2024 F-650/750 (TBC) , enUSA, Edition date: 202210, First-PrintingSeatsE138642 ACB E162872
Page 126 of 386
1.Remove the diesel exhaust fluidcontainer cap. Place the spout onto thecontainer and tighten until you feel astrong resistance.
2.Remove the diesel exhaust fluid tankfiller cap.
3.Insert the spout into the filler neck untilthe seal on the spout seats onto thefiller neck. Pour the fluid into the tank.When the tank is full the fluid stops. Incase of direct fill tank, the spout doesnot seal against the fill tank interfaceand does not stop the flowingautomatically.
4.Return the container to the verticalposition slightly below the dieselexhaust fluid filler neck. Allow any fluidremaining in the spout to drain backinto the container.
5.Remove the spout from the dieselexhaust fluid filler neck. Replace thediesel exhaust fluid tank cap.
6.Remove the spout from the dieselexhaust fluid container and replace thecap.
Note:If there is diesel exhaust fluid left inthe container retain it for later use. Thespout is reusable. Wash the spout withclean water prior to storage. Do not use thediesel exhaust fluid spout with any otherfluid.
Filling the Diesel Exhaust Fluid Tank inCold Climates
Diesel exhaust fluid freezes if the ambienttemperature is below 12°F (-11°C). Yourvehicle has a preheating system whichallows diesel exhaust fluid to operatebelow 12°F (-11°C). If you do not use yourvehicle for an extended period when theambient temperature is below 12°F (-11°C),the fluid in the tank freezes. If the tank isoverfilled and the fluid freezes it maydamage the tank. This is not covered bythe vehicle warranty.
Note: If the diesel exhaust fluid tank isfrozen, it may not recognize when the tankis refilled. The diesel exhaust fluid levelupdates once the tank thaws out.
Diesel Exhaust Fluid WarningMessages and Vehicle Operations
WARNING: Diesel exhaust fluidmust be refilled when low or replacedwhen contaminated or your vehiclespeed becomes limited to 50 mph(80 km/h). In these conditions, drive withcaution and refill diesel exhaust fluidimmediately. If the diesel exhaust fluidbecomes empty or contaminated andfluid is not replaced, your vehiclebecomes limited to engine idle only oncestopped. In these conditions, be cautiouswhere you stop your vehicle because youmay not be able to drive long distancesor maintain highway speeds until yourefill or replace the diesel exhaust fluid.
Note:Drain and replace diluted dieselexhaust fluid.
WARNING: Tampering with ordisabling the selective catalyticreduction system results in severevehicle performance limitation includingeventual speed limiting to 5 mph(8 km/h).
A systems check displays messagesindicating the amount of diesel exhaustfluid available or displays a warningmessage indicating the approximatedistance remaining as the fluid in the dieselexhaust fluid tank nears empty. SeeInformation Messages (page 75).
122
2024 F-650/750 (TBC) , enUSA, Edition date: 202210, First-PrintingEngine Emission Control
Page 251 of 386

Note:Battery posts, terminals and relatedaccessories contain lead and leadcompounds. Wash hands after handling.
Note:Electrical or electronic accessoriesor components added to the vehicle by thedealer or the owner may adversely affectbattery performance and durability.
Your vehicle is equipped with a Motorcraftmaintenance-free battery which normallydoes not require additional water duringits life of service.
For longer, trouble-free operation, keep thetop of the battery clean and dry. Also,make certain the battery cables are alwaystightly fastened to the battery terminals.
If you see any corrosion on the battery orterminals, remove the cables from theterminals and clean with a wire brush. Youcan neutralize the acid with a solution ofbaking soda and water.
It is recommended that the negativebattery cable terminal be disconnectedfrom the battery if you plan to store yourvehicle for an extended period of time.
Because your vehicle’s engine iselectronically controlled by a computer,some control conditions are maintainedby power from the battery. When thebattery is disconnected or a new batteryis installed, the engine must relearn its idleand fuel trim strategy for optimumdriveability and performance. To begin thisprocess
1.With the vehicle at a complete stop,set the parking brake.
2.Put the gearshift in park (P) or neutral(N) and turn off all accessories.
3.Start the engine. Run the engine untilit reaches normal operatingtemperature.
4.Allow the engine to idle for at least oneminute.
5.Turn the air conditioning (if equipped)on and allow the engine to idle for atleast one minute.
6.Release the parking brake. With yourfoot on the brake pedal and with theair conditioning on, put the vehicle indrive (D) and allow the engine to idlefor at least one minute.
•If you do not allow the engine torelearn its idle trim, the idle qualityof your vehicle may be adverselyaffected until the idle trim iseventually relearned.
7.Drive the vehicle to complete therelearning process
•The vehicle may need to be driven10 mi (16 km) or more to relearn theidle and fuel trim strategy alongwith the ethanol content for flexiblefuel vehicles.
If the battery has been disconnected or anew battery has been installed, the clockand radio settings must be reset once thebattery is reconnected.
Always dispose of automotivebatteries in a responsible manner.Follow your local authorized standardsfor disposal. Call your local authorizedrecycling center to find out more aboutrecycling automotive batteries.
Battery Management System (IfEquipped)
The battery management system (BMS)monitors battery conditions and takesactions to extend battery life. If excessivebattery drain is detected, the system maytemporarily disable certain electricalfeatures to protect the battery. Thoseelectrical accessories affected include therear defrost, heated/cooled seats, climatecontrol fan, heated steering wheel, audioand navigation system. A message may beshown in the information displays to alert
247
2024 F-650/750 (TBC) , enUSA, Edition date: 202210, First-PrintingMaintenance
Page 269 of 386
•Never wash or rinse the engine while itis hot or running; water in the runningengine may cause internal damage.
•Never wash or rinse any ignition coil,spark plug wire or spark plug well, orthe area in and around these locations.
•Cover the battery, power distributionbox, and air filter assembly to preventwater damage when cleaning theengine.
CLEANING THE WINDOWS AND
WIPER BLADES
Car wash chemicals and environmentalfallout can result in windshield and wiperblade contamination. Dirty windshield andwipers will result in poor windshield wiperoperation. Keep the windshield and wiperblades clean to maintain windshield wiperperformance.
To clean the windshield and wiper blades:
•Clean the windshield with anon-abrasive glass cleaner. Whencleaning the interior of the windshield,avoid getting any glass cleaner on theinstrument panel or door panels. Wipeany glass cleaner off these surfacesimmediately.
•For windshields contaminated withtree sap, chemicals, wax or bugs, cleanthe entire windshield using steel wool(no greater than 0000 grade) in acircular motion and rinse with water.
•Clean the wiper blades with isopropylrubbing alcohol or windshield washerconcentrate.
Note: Do not use razor blades or othersharp objects to clean or remove decalsfrom the inside of the heated rear window.The vehicle warranty does not coverdamage caused to the heated rear windowgrid lines.
CLEANING THE INTERIOR
WARNING: Do not use cleaningsolvents, bleach or dye on the vehicle'sseatbelts, as these actions may weakenthe belt webbing.
WARNING: On vehicles equippedwith seat-mounted airbags, do not usechemical solvents or strong detergents.Such products could contaminate theside airbag system and affectperformance of the side airbag in a crash.
For fabric, carpets, cloth seats and seatsequipped with side airbags:
•Remove dust and loose dirt with avacuum cleaner.
•Remove light stains and soil withMotorcraft Professional StrengthCarpet & Upholstery Cleaner.
•If grease or tar is present on thematerial, spot-clean the area first withMotorcraft Spot and Stain Remover. InCanada, use Motorcraft Multi-PurposeCleaner.
•If a ring forms on the fabric after spotcleaning, clean the entire areaimmediately (but do not oversaturate)or the ring will set.
•Do not use household cleaningproducts or glass cleaners, which canstain and discolor the fabric and affectthe flame retardant abilities of the seatmaterials.
Mirrors
Do not clean the housing or glass of anymirror with harsh abrasives, fuel or otherpetroleum or ammonia-based cleaningproducts.
265
2024 F-650/750 (TBC) , enUSA, Edition date: 202210, First-PrintingVehicle Care