2024 FORD F650/750 length
[x] Cancel search: lengthPage 43 of 386
•Height adjuster at the front outboardseating positions.
•Safety belt pretensioner at the frontoutboard seating positions.
•Safety belt warning light and chime.
FASTENING THE SEATBELTS
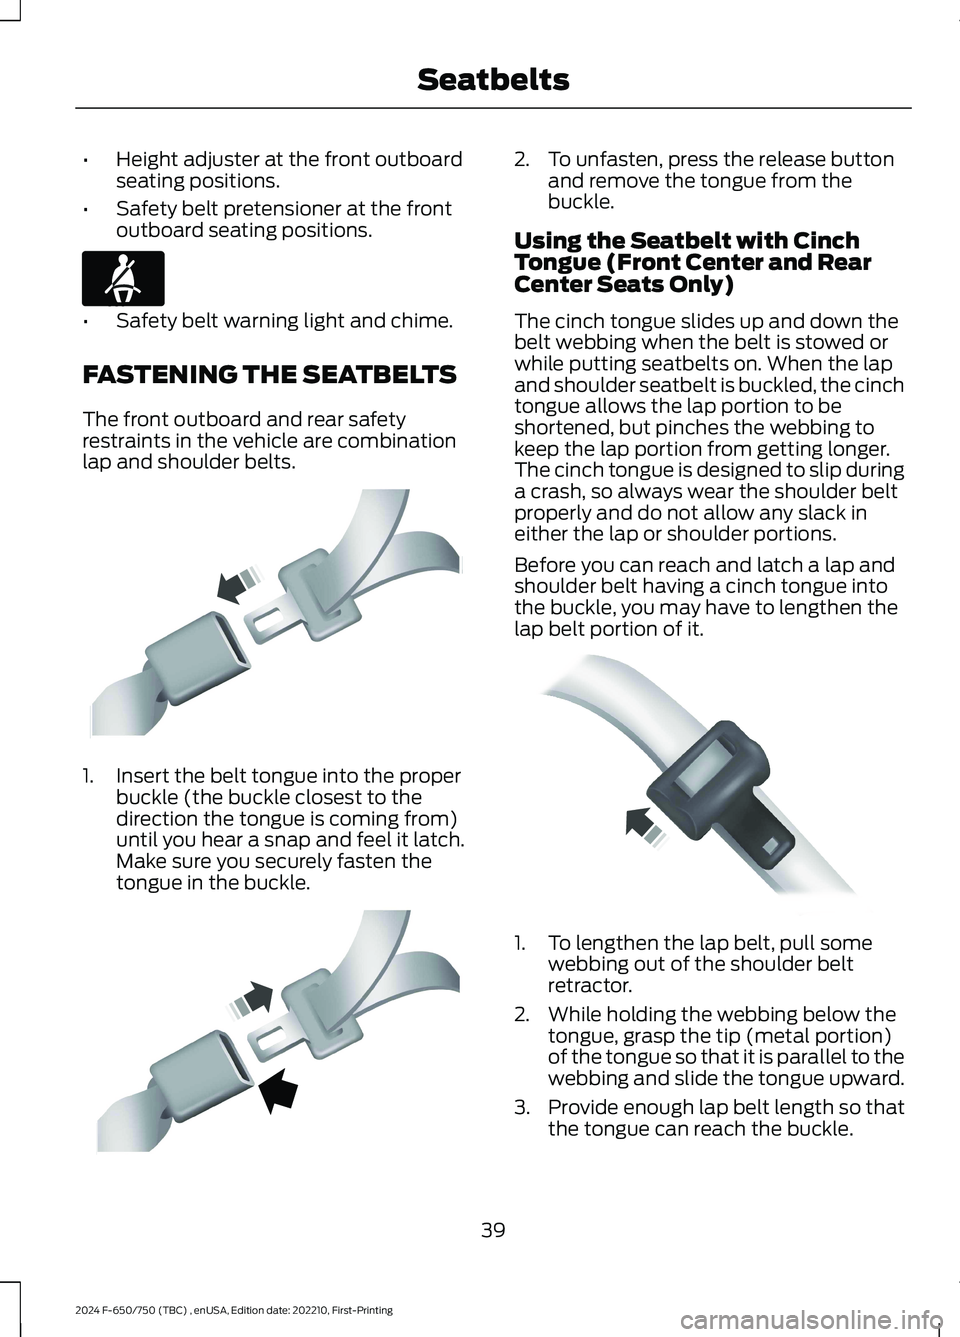
The front outboard and rear safetyrestraints in the vehicle are combinationlap and shoulder belts.
1.Insert the belt tongue into the properbuckle (the buckle closest to thedirection the tongue is coming from)until you hear a snap and feel it latch.Make sure you securely fasten thetongue in the buckle.
2.To unfasten, press the release buttonand remove the tongue from thebuckle.
Using the Seatbelt with CinchTongue (Front Center and RearCenter Seats Only)
The cinch tongue slides up and down thebelt webbing when the belt is stowed orwhile putting seatbelts on. When the lapand shoulder seatbelt is buckled, the cinchtongue allows the lap portion to beshortened, but pinches the webbing tokeep the lap portion from getting longer.The cinch tongue is designed to slip duringa crash, so always wear the shoulder beltproperly and do not allow any slack ineither the lap or shoulder portions.
Before you can reach and latch a lap andshoulder belt having a cinch tongue intothe buckle, you may have to lengthen thelap belt portion of it.
1.To lengthen the lap belt, pull somewebbing out of the shoulder beltretractor.
2.While holding the webbing below thetongue, grasp the tip (metal portion)of the tongue so that it is parallel to thewebbing and slide the tongue upward.
3.Provide enough lap belt length so thatthe tongue can reach the buckle.
39
2024 F-650/750 (TBC) , enUSA, Edition date: 202210, First-PrintingSeatbeltsE71880 E142587 E142588 E162708
Page 44 of 386
Fastening the Cinch Tongue
WARNING: Always drive and ridewith your seatback upright and the lapbelt snug and low across the hips.
1.Pull the lap and shoulder belt from theretractor so that the shoulder beltportion of the seatbelt crosses yourshoulder and chest.
2.Be sure the belt is not twisted. If thebelt is twisted, remove the twist.
3.Insert the belt tongue into the properbuckle for your seating position untilyou hear a snap and feel it latch.
4.Make sure the tongue is securelyfastened to the buckle by pulling onthe tongue.
While you are fastened in the seatbelt, thelap and shoulder belt with a cinch tongueadjusts to your movement. However, if youbrake hard, turn hard, or if your vehiclereceives an impact of 5 mph (8 km/h) ormore, the seatbelt will become locked andhelp reduce your forward movement.
Lap Belts
WARNING: Always drive and ridewith your seatback upright and the lapbelt snug and low across the hips.
The front center lap belt does not adjustautomatically.
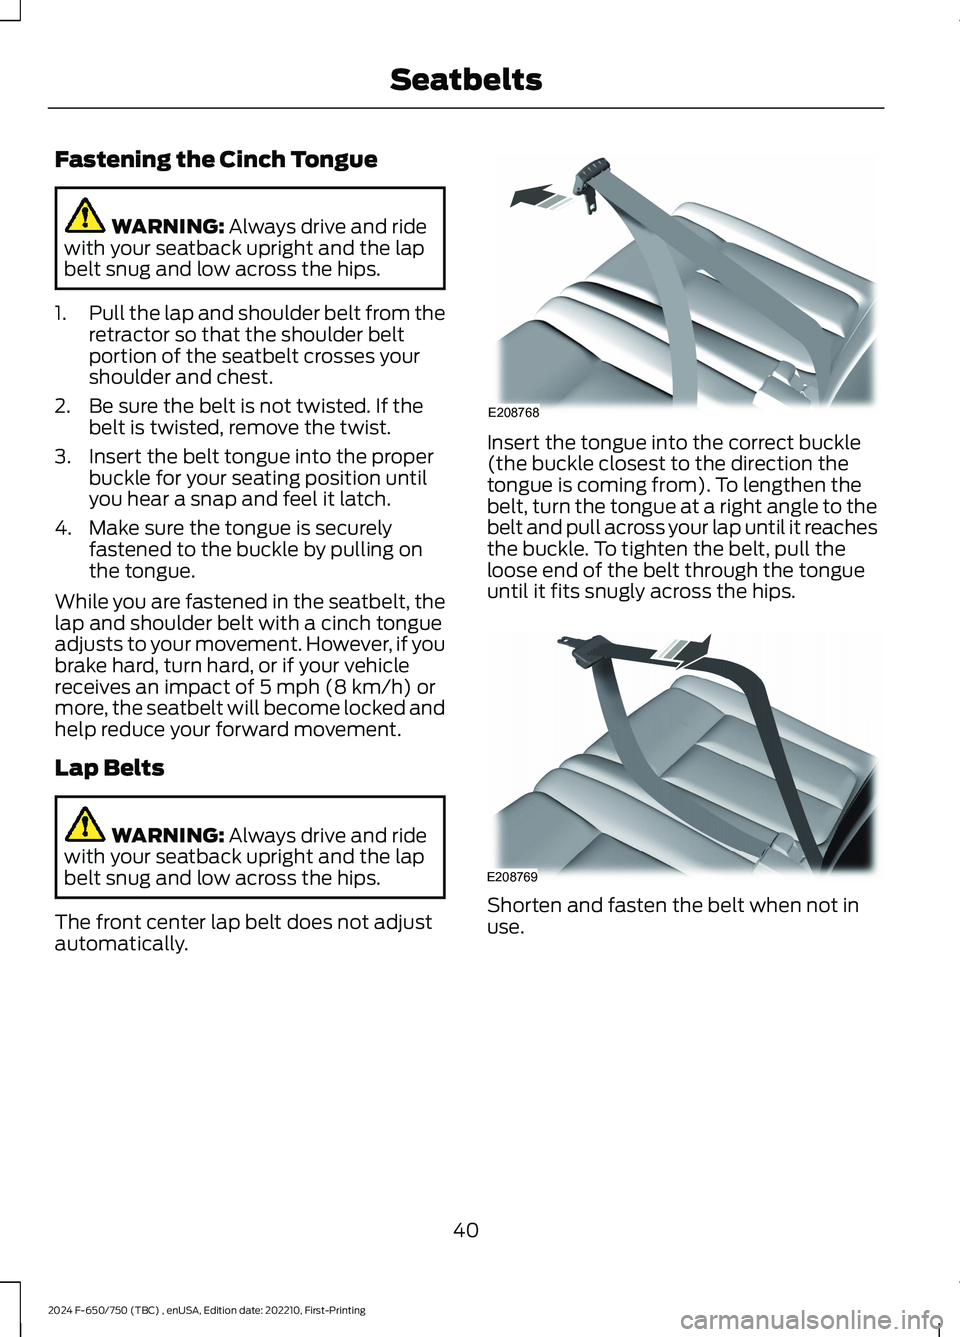
Insert the tongue into the correct buckle(the buckle closest to the direction thetongue is coming from). To lengthen thebelt, turn the tongue at a right angle to thebelt and pull across your lap until it reachesthe buckle. To tighten the belt, pull theloose end of the belt through the tongueuntil it fits snugly across the hips.
Shorten and fasten the belt when not inuse.
40
2024 F-650/750 (TBC) , enUSA, Edition date: 202210, First-PrintingSeatbeltsE208768 E208769
Page 45 of 386
Using Seatbelts During Pregnancy
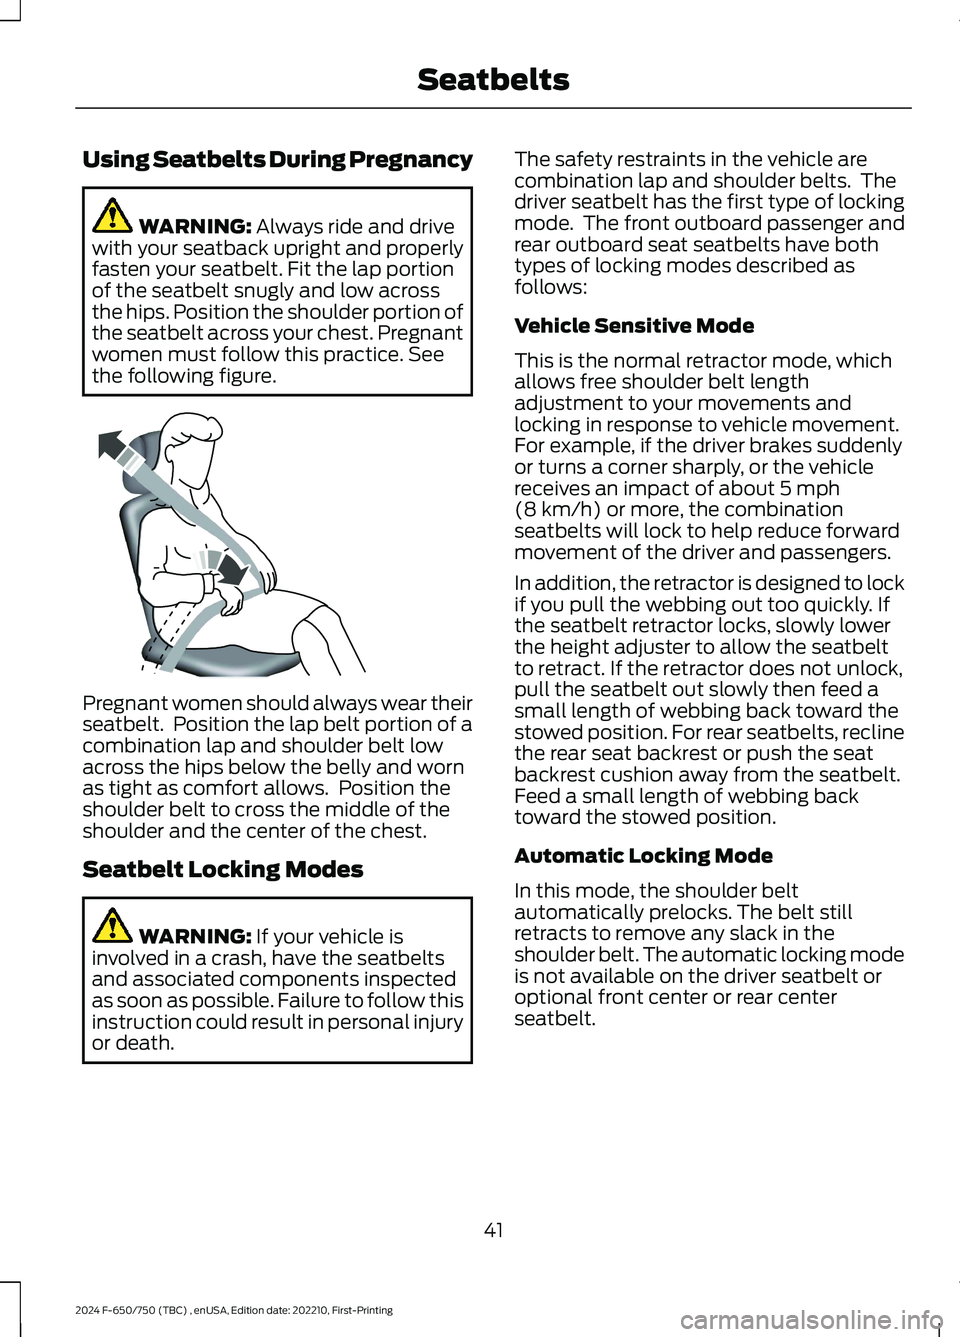
WARNING: Always ride and drivewith your seatback upright and properlyfasten your seatbelt. Fit the lap portionof the seatbelt snugly and low acrossthe hips. Position the shoulder portion ofthe seatbelt across your chest. Pregnantwomen must follow this practice. Seethe following figure.
Pregnant women should always wear theirseatbelt. Position the lap belt portion of acombination lap and shoulder belt lowacross the hips below the belly and wornas tight as comfort allows. Position theshoulder belt to cross the middle of theshoulder and the center of the chest.
Seatbelt Locking Modes
WARNING: If your vehicle isinvolved in a crash, have the seatbeltsand associated components inspectedas soon as possible. Failure to follow thisinstruction could result in personal injuryor death.
The safety restraints in the vehicle arecombination lap and shoulder belts. Thedriver seatbelt has the first type of lockingmode. The front outboard passenger andrear outboard seat seatbelts have bothtypes of locking modes described asfollows:
Vehicle Sensitive Mode
This is the normal retractor mode, whichallows free shoulder belt lengthadjustment to your movements andlocking in response to vehicle movement.For example, if the driver brakes suddenlyor turns a corner sharply, or the vehiclereceives an impact of about 5 mph(8 km/h) or more, the combinationseatbelts will lock to help reduce forwardmovement of the driver and passengers.
In addition, the retractor is designed to lockif you pull the webbing out too quickly. Ifthe seatbelt retractor locks, slowly lowerthe height adjuster to allow the seatbeltto retract. If the retractor does not unlock,pull the seatbelt out slowly then feed asmall length of webbing back toward thestowed position. For rear seatbelts, reclinethe rear seat backrest or push the seatbackrest cushion away from the seatbelt.Feed a small length of webbing backtoward the stowed position.
Automatic Locking Mode
In this mode, the shoulder beltautomatically prelocks. The belt stillretracts to remove any slack in theshoulder belt. The automatic locking modeis not available on the driver seatbelt oroptional front center or rear centerseatbelt.
41
2024 F-650/750 (TBC) , enUSA, Edition date: 202210, First-PrintingSeatbeltsE142590
Page 149 of 386

Only qualified service technicians shouldperform air brake inspection andadjustment or repairs.
Cam Brakes - Automatic SlackAdjusters - Drum Brakes
WARNING: Do not manually adjustthe automatic slack adjusters to correctexcessive push rod stroke as it may resultin reduced brake effectiveness and avehicle crash. Excessive push rod strokeindicates that a problem exists with theautomatic adjuster, with the installationof the adjuster, or with foundation brakecomponents that manual adjustmentdoes not remedy. Seek service from aqualified facility for excessive push rodstroke.
Standard air brakes (cam) are equippedwith automatic brake adjusters. Automaticadjustment occurs during brakeapplications. Inspect brakes for properadjustment at the specified intervals. SeeScheduled Maintenance (page 325).
Emergency Air Brake
WARNING: Do not continue tooperate the vehicle with a failure of oneof the brake systems. Take the vehicleto your dealer for service immediately.
Brake Wear Indicator - Disc Brakes
Inspect the brake wear indicator every timebefore starting the vehicle. The wearindicator length through the hole continuesto reduce depending on the brake padwear. Replace the brake pads immediatelyif the lining material thickness is 0.0787 in(2 mm) or less on either of the brake pads.
EXHAUST BRAKE (IF EQUIPPED)
WARNING: Do not use tow/haulwhen the road surface is slippery. Failureto follow this instruction could result inthe loss of control of your vehicle.
WARNING: Do not use dieselengine exhaust braking when the roadsurface is slippery. Failure to follow thisinstruction could result in the loss ofcontrol of your vehicle.
145
2024 F-650/750 (TBC) , enUSA, Edition date: 202210, First-PrintingBrakesE210337 E392040
Page 197 of 386
We recommend the use of a wheel lift anddollies or flatbed equipment to tow yourvehicle. Do not tow with a slingbelt. FordMotor Company has not approved aslingbelt towing procedure. Vehicledamage may occur if towed incorrectly, orby any other means.
Ford Motor Company produces a towingmanual for all authorized tow truckoperators. Have your tow truck operatorrefer to this manual for proper hook-upand towing procedures for your vehicle.
It is acceptable to have your two-wheeldrive vehicle towed with the front wheelson the ground (without dollies) and therear wheels off the ground.
TOWING POINTS (IF EQUIPPED)
WARNING: Using recovery hooksis dangerous and should only be done bya person familiar with proper vehiclerecovery safety practices. Improper useof recovery hooks may cause hook failureor separation from the vehicle and couldresult in serious injury or death.
WARNING: Always slowly removethe slack from the recovery strap priorto pulling. Failure to do so can introducesignificantly higher loads which cancause the recovery hooks to break off, orthe recovery strap to fail which can causeserious injury or death.
WARNING: Never link two strapstogether with a clevis pin. These heavymetal objects could become projectilesif the strap breaks and can cause seriousinjury or death.
Your vehicle comes equipped withframe-mounted front recovery hooks.These hooks should never have a loadapplied to them greater than the grossvehicle weight rating of your vehicle.
Before using recovery hooks:
•Make sure all attaching points aresecure and capable of withstandingthe applied load.
•Never use chains, cables or tow strapswith metal hook ends.
•Only use recovery straps that have aminimum breaking strength two tothree times the gross vehicle weight ofthe stuck vehicle.
•Make sure the recovery strap is in goodcondition and free of visible cuts, tearsor damage.
•Use a damper device such as a tarp,heavy blanket or piece of carpetdraped over the recovery strap to helpabsorb the energy in the event thestrap breaks.
•Make sure the stuck vehicle is notloaded heavier than its gross vehicleweight rating specified on thecertification label.
•Always align the tow vehicle and stuckvehicle in a straight line (within 10degrees).
•Keep bystanders to the sides of thevehicle, at a distance of at least twicethe length of the recovery strap. Thishelps avoid injury from the hazard of arecovery hook or strap breaking, or avehicle lurching into their path.
193
2024 F-650/750 (TBC) , enUSA, Edition date: 202210, First-PrintingRoadside Emergencies
Page 261 of 386
as a stroke indicator to aid inadjustment checks. If the push rod isclean and the brakes are out ofadjustment, you can see the orangemarker protruding from the chamberwhen the brakes are applied.
•Checking the brake lining (every serviceinterval). When brake linings or blockswear within 0.063 in (1.6 mm) theymust be replaced.
•Periodic checking (every serviceinterval) of the air compressor filter.Check the filter minder and when theindicator is near or on the red linemarked Service, replace the filter andreset the service filter minder.
Do not back off or disconnect the frontbrakes so that they are less effective,letting the rear brakes do all the stoppingof your vehicle. Do not overlook the brakeson the trailer either. Brake condition on thetrailer is just as important as the tractor.Proper brake balance on trucks andtractor-trailers is essential for effectivebraking.
Once a year, inspect the entire brakesystem:
•Rubber components for deterioration.A qualified technician should inspectthese components and replace themas necessary. Replacement intervalsvary according to the severity andlength of vehicle service.
•Condition of brake drums, brakechambers and slack adjusters.
•System for air leaks.
•Hose or pipes for rust, damage anddeterioration.
•Operation of service and parkingbrakes.
Periodically inspect parts such as air brakechamber diaphragm, air compressor andair cleaner. Replace any parts if you canconsider them unserviceable.
Air Dryer
Climactic conditions affect performanceof desiccant or after-cooler type air dryers.You must establish a maintenanceschedule for each specific operation.
The use of an air dryer on a vehicle doesnot eliminate the need to drain the airreservoirs periodically.
Inspect for moisture in the air system byopening reservoirs, draincocks or valvesand checking for presence of water. Thepresence of small amounts of water dueto condensation is normal and is not anindication that the dryer is not functioningproperly.
Replace or rebuild the desiccant cartridgewhen you determine that the desiccant iscontaminated and does not have adequatewater absorption capacity. The desiccantchange interval may vary. A generalrecommendation is to replace thedesiccant every 12 months (yearly). Ifexperience has shown that extended orshortened life has resulted for a particularinstallation, then the yearly interval can beincreased or decreased accordingly.
Draining the Air Brake Reservoir
WARNING: Failure to drain airbrake reservoirs can result in a reductionor loss of braking ability due to fluidaccumulation in the reservoir and/orpossible freeze-up during cold weather.
Completely drain all the air brake reservoirsdaily by opening the draincock at the endsof the tanks. (Where accessible.Pull-chains are used when the drains areundercab or otherwise inaccessible.) Closethe draincock after draining. Manually drain
257
2024 F-650/750 (TBC) , enUSA, Edition date: 202210, First-PrintingMaintenance