2024 FORD F650/750 clock
[x] Cancel search: clockPage 32 of 386
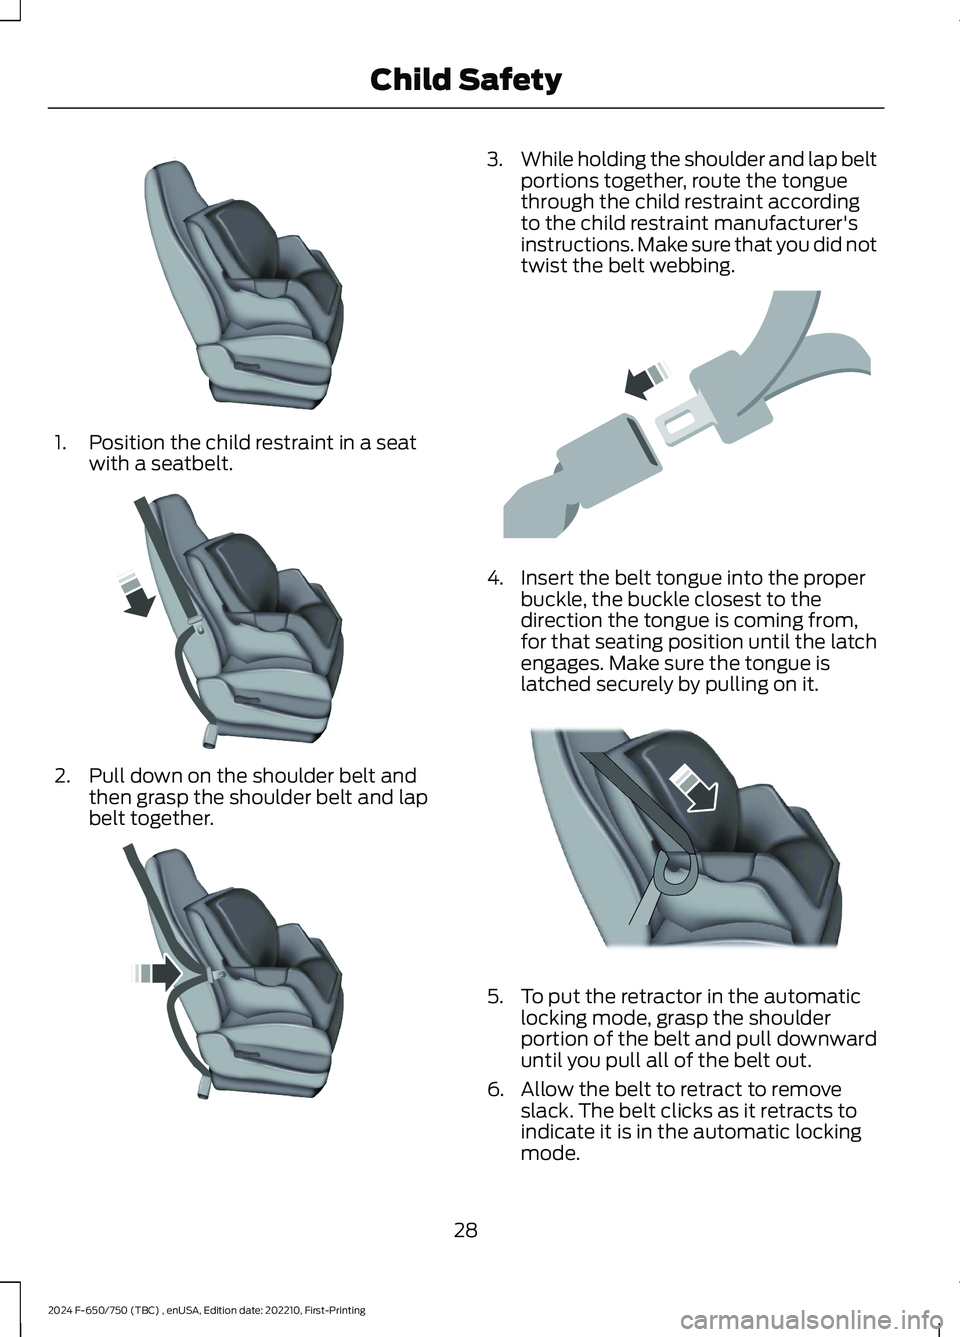
1.Position the child restraint in a seatwith a seatbelt.
2.Pull down on the shoulder belt andthen grasp the shoulder belt and lapbelt together.
3.While holding the shoulder and lap beltportions together, route the tonguethrough the child restraint accordingto the child restraint manufacturer'sinstructions. Make sure that you did nottwist the belt webbing.
4.Insert the belt tongue into the properbuckle, the buckle closest to thedirection the tongue is coming from,for that seating position until the latchengages. Make sure the tongue islatched securely by pulling on it.
5.To put the retractor in the automaticlocking mode, grasp the shoulderportion of the belt and pull downwarduntil you pull all of the belt out.
6.Allow the belt to retract to removeslack. The belt clicks as it retracts toindicate it is in the automatic lockingmode.
28
2024 F-650/750 (TBC) , enUSA, Edition date: 202210, First-PrintingChild SafetyE142528 E142529 E142530 E142531 E142875
Page 42 of 386
PRINCIPLE OF OPERATION
WARNING: Always drive and ridewith the seat backrest upright and thelap belt snug and low across the hips.
WARNING: To reduce the risk ofinjury, make sure children sit where theycan be properly restrained.
WARNING: Never let a passengerhold a child on his or her lap while yourvehicle is moving. The passenger cannotprotect the child from injury in a crashwhich may result in serious injury ordeath.
WARNING: All occupants of thevehicle, including the driver, shouldalways properly wear their safety belts,even when an airbag supplementalrestraint system is provided. Failure toproperly wear your safety belt couldseriously increase the risk of injury ordeath.
WARNING: It is extremelydangerous to ride in a cargo area, insideor outside of a vehicle. In a crash, peopleriding in these areas are more likely to beseriously injured or killed. Do not allowpeople to ride in any area of your vehiclethat is not equipped with seats andsafety belts. Be sure everyone in yourvehicle is in a seat and using a safety beltproperly.
WARNING: In a rollover crash, anunbelted person is significantly morelikely to die than a person wearing asafety belt.
WARNING: Each seating positionin your vehicle has a specific safety beltassembly which is made up of onebuckle and one tongue that are designedto be used as a pair. 1) Use the shoulderbelt on the outside shoulder only. Neverwear the shoulder belt under the arm. 2)Never swing the safety belt around yourneck over the inside shoulder. 3) Neveruse a single belt for more than oneperson.
WARNING: When possible, allchildren 12 years old and under shouldbe properly restrained in a rear seatingposition. Failure to follow this couldseriously increase the risk of injury ordeath.
WARNING: Safety belts and seatscan become hot in a vehicle that hasbeen closed up in sunny weather; theycould burn a small child. Check seatcovers and buckles before you place achild anywhere near them.
WARNING: Front and rear seatoccupants, including pregnant women,should wear safety belts for optimumprotection in an accident.
All seating positions in this vehicle havelap and shoulder safety belts. Alloccupants of the vehicle should alwaysproperly wear their safety belts, even whenan airbag supplemental restraint systemis provided.
The safety belt system consists of:
•Lap and shoulder safety belts.
•Shoulder safety belt with automaticlocking mode, (except driver safetybelt).
38
2024 F-650/750 (TBC) , enUSA, Edition date: 202210, First-PrintingSeatbelts
Page 46 of 386
When to Use the Automatic LockingMode
Use this mode any time a child safety seat,except a booster, is installed in passengerfront or rear seating positions. Properlyrestrain children 12 years old and under ina rear seating position whenever possible.See Child Safety (page 25).
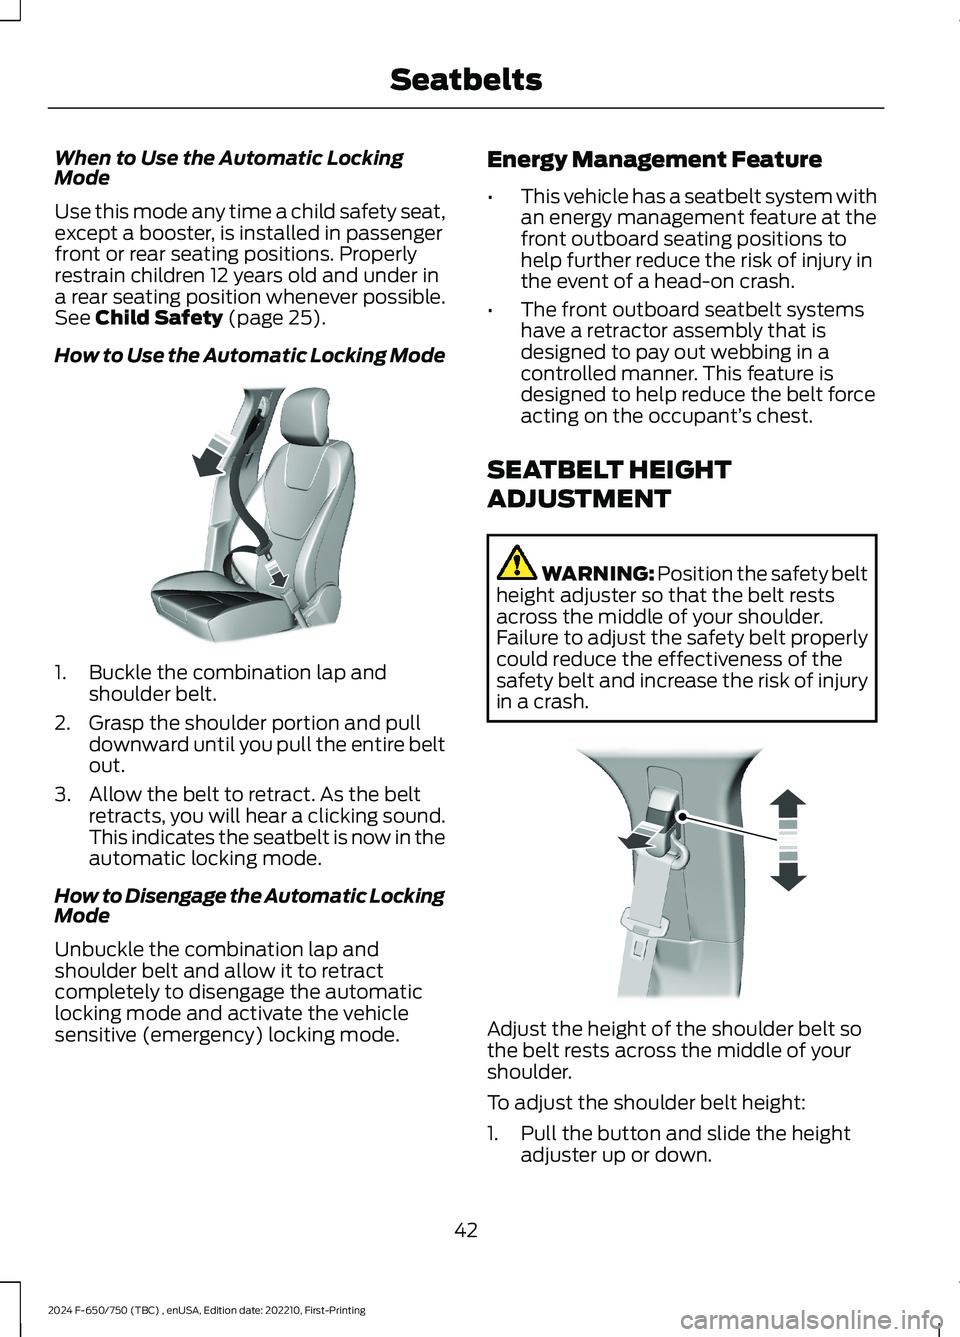
How to Use the Automatic Locking Mode
1.Buckle the combination lap andshoulder belt.
2.Grasp the shoulder portion and pulldownward until you pull the entire beltout.
3.Allow the belt to retract. As the beltretracts, you will hear a clicking sound.This indicates the seatbelt is now in theautomatic locking mode.
How to Disengage the Automatic LockingMode
Unbuckle the combination lap andshoulder belt and allow it to retractcompletely to disengage the automaticlocking mode and activate the vehiclesensitive (emergency) locking mode.
Energy Management Feature
•This vehicle has a seatbelt system withan energy management feature at thefront outboard seating positions tohelp further reduce the risk of injury inthe event of a head-on crash.
•The front outboard seatbelt systemshave a retractor assembly that isdesigned to pay out webbing in acontrolled manner. This feature isdesigned to help reduce the belt forceacting on the occupant’s chest.
SEATBELT HEIGHT
ADJUSTMENT
WARNING: Position the safety beltheight adjuster so that the belt restsacross the middle of your shoulder.Failure to adjust the safety belt properlycould reduce the effectiveness of thesafety belt and increase the risk of injuryin a crash.
Adjust the height of the shoulder belt sothe belt rests across the middle of yourshoulder.
To adjust the shoulder belt height:
1.Pull the button and slide the heightadjuster up or down.
42
2024 F-650/750 (TBC) , enUSA, Edition date: 202210, First-PrintingSeatbeltsE142591 E145664
Page 117 of 386
WARNING: Wait at least fiveseconds before removing the fuel pumpnozzle to allow any residual fuel to draininto the fuel tank.
WARNING: Stop refueling after thefuel pump nozzle automatically shutsoff for the second time. Failure to followthis will fill the expansion space in thefuel tank and could lead to fueloverflowing.
WARNING: Do not remove the fuelpump nozzle from its fully insertedposition when refueling.
An engine that suddenly becomes noisy oroperates poorly after a fuel fill could beusing substandard fuel. We recommendthat you purchase diesel fuel from areputable fuel station.
Use only clean, approved containers thatprevent the entry of dirt or water wheneveryou store diesel fuel.
Do not store diesel fuel in a galvanizedcontainer. The fuel dissolves the zinc in thegalvanized container. The zinc will thenremain in the fuel. If you run thecontaminated fuel through the engine, thezinc damages the fuel injectors. Enginedamage caused may not be covered bythe vehicle warranty.
Use the following guidelines to avoidelectrostatic charge build-up when fillingan ungrounded fuel container:
•Place the approved fuel container onthe ground.
•Do not fill a fuel container while it is inthe vehicle (including the cargo area).
•Keep the fuel pump nozzle in contactwith the fuel container when filling.
•Do not use a device that would holdthe fuel pump handle in the fill position.
Fuel Filler Cap
WARNING: The fuel system maybe under pressure. If you hear a hissingsound near the fuel filler inlet, do notrefuel until the sound stops. Otherwise,fuel may spray out, which could causeserious personal injury.
Note:If you do not use the correct fuel fillercap, excessive pressure or vacuum in thefuel tank may damage the fuel system orcause the fuel cap to disengage in a crash.
The fuel tank has a threaded fuel filler cap.
Note:If you must replace the fuel filler cap,replace it with a fuel filler cap that isdesigned for your vehicle. The vehiclewarranty may be void for any damage to thefuel tank or fuel system if the correctgenuine Ford, Motorcraft or other certifiedfuel filler cap is not used.
When refueling the vehicle fuel tank do thefollowing:
1.Bring your vehicle to a complete stopand shift into neutral (N) or park (P).
2.Apply the parking brake and switch theignition off.
3.Turn the fuel filler capcounterclockwise and remove it.
4.Refuel your vehicle as required.
5.Replace the fuel filler cap, turn itclockwise until you feel a strongresistance.
Fuel Fill Rate
Your vehicle has a fuel fill inlet that is ableto accept fuel up to 20 gal (75 L) perminute from a fuel-dispensing nozzle.Pumping fuel at greater flow rates mayresult in premature nozzle shut off or spitback.
113
2024 F-650/750 (TBC) , enUSA, Edition date: 202210, First-PrintingFuel and Refueling
Page 119 of 386

1.When your vehicle has stopped, shiftinto neutral (N) or park (P).
2.Apply the parking brake and switch theignition off.
3.Turn the fuel filler capcounterclockwise and remove it.
4.Refuel your vehicle as required.
5.Replace the fuel filler cap, turn itclockwise until you feel a strongresistance.
If the fuel cap warning lamp or a warningmessage appears in the instrument cluster,you may not have installed the fuel fillercap correctly.
If the fuel cap warning lamp remains on,at the next opportunity, safely pull off ofthe road, remove the fuel filler cap, alignthe cap properly and reinstall it. The checkfuel cap warning lamp or warning messagemay not reset immediately. It may takeseveral driving cycles for the indicators toturn off. A driving cycle consists of anengine start-up (after four or more hourswith the engine off) followed by normalcity and highway driving.
FUEL CONSUMPTION
The advertised capacity is the maximumamount of fuel that you can add to the fueltank after running out of fuel. Included inthe advertised capacity is an emptyreserve. The empty reserve is anunspecified amount of fuel that remainsin the fuel tank when the fuel gaugeindicates empty.
Note:The amount of fuel in the emptyreserve varies and should not be relied uponto increase driving range.
Filling the Fuel Tank
For consistent results when refueling:
•Turn the ignition off before fueling; aninaccurate reading results if the engineis left running.
•Use the same fill rate(low-medium-high) each time the tankis filled.
•Allow no more than one automaticshut-off when refueling.
Results are most accurate when the fillingmethod is consistent.
Calculating Fuel Economy
Do not measure fuel economy during thefirst 1,000 mi (1,600 km) of driving (this isyour engine’s break-in period). A moreaccurate measurement is obtained after2,000 mi (3,200 km) to 3,000 mi(4,800 km). Also, fuel expense, frequencyof fill ups or fuel gauge readings are notaccurate ways to measure fuel economy.
1.Fill the fuel tank completely and recordthe initial odometer reading.
2.Each time you fill the fuel tank, recordthe amount of fuel added.
3.After at least three fill ups, fill the fueltank and record the current odometerreading.
4.Subtract your initial odometer readingfrom the current odometer reading.
To calculate L/100 km (liters per 100kilometers) fuel consumption, multiply theliters used by 100, then divide by kilometerstraveled. To calculate MPG (miles pergallon) fuel consumption, divide milestraveled by gallons used.
115
2024 F-650/750 (TBC) , enUSA, Edition date: 202210, First-PrintingFuel and Refueling
Page 232 of 386

Do not use supplemental engine oiladditives because they are unnecessaryand could lead to engine damage that thevehicle warranty may not cover.
1.Clean the area surrounding the engineoil filler cap before you remove it.
2.Remove the engine oil filler cap.
3.Add engine oil that meets ourspecifications. See Capacities andSpecifications (page 291).
4.Reinstall the engine oil filler cap. Turnit clockwise until you feel a strongresistance.
Note: Do not add oil further than themaximum mark. Oil levels above themaximum mark may cause engine damage.
Note:Immediately soak up any oil spillagewith an absorbent cloth.
Engine Oil Pressure Warning Lamp
WARNING: If it illuminates whenyou are driving do not continue yourjourney, even if the oil level is correct.Have your vehicle checked.
It illuminates when you switchthe ignition on.
If it illuminates when the engineis running this indicates a malfunction.Stop your vehicle as soon as it is safe todo so and switch the engine off. Check theengine oil level. If the oil level is sufficient,this indicates a system malfunction. Haveyour vehicle checked as soon as possible.
CHANGING THE ENGINE OIL
AND OIL FILTER
WARNING: Do not add engine oilwhen the engine is hot. Failure to followthis instruction could result in personalinjury.
Your vehicle has an Intelligent Oil LifeMonitor™ that calculates the proper oilchange service interval. When theinformation display indicates: OIL CHANGEREQUIRED, change the engine oil and oilfilter. See Information Displays (page71).
The engine oil filter protects your engineby filtering harmful, abrasive or sludgeparticles and particles significantly smallerthan most available will-fit filters. SeeMotorcraft Parts (page 293).
1.Unscrew the oil filter and oil pan drainplug and wait for the oil to drain.
2.Replace the filter.
3.Reinstall the oil pan drain plug.
4.Refill the engine with new oil. SeeEngine Oil Capacity andSpecification (page 299).
5.Reset the Intelligent Oil Life Monitor™.See Information Displays (page 71).
Engine Lubrication for SevereService Operation
The following conditions define severeoperation:
•Frequent or extended idling such asover 10 minutes per hour of normaldriving.
•Low-speed operation or stationary use.
•If the vehicle is operated in sustained,ambient temperatures below -9°F(-23°C) or above 100°F (38°C).
228
2024 F-650/750 (TBC) , enUSA, Edition date: 202210, First-PrintingMaintenanceE67022
Page 239 of 386
3.Rotate the drain counterclockwise untilthe O-ring is visible. Allow the dieselfuel conditioner module to drain forapproximately 25 seconds or untilclean fuel is observed. Rotate the drainclockwise to tighten it. If no liquiddrains, there may be a clog in the drain.Have the conditioner module servicedby an authorized dealer.
4.Make sure that you fully tighten thedrain valve and then remove thecontainer from under your vehicle.
5.Restart the engine. If the Water in FuelDrain Filter message and lightcontinues to illuminate, have the fuelsystem checked and repaired.
ENGINE COOLANT CHECK -
6.7L DIESEL
WARNING: Do not remove thecoolant reservoir cap when the engine ison or the cooling system is hot. Wait 10minutes for the cooling system to cooldown. Cover the coolant reservoir capwith a thick cloth to prevent thepossibility of scalding and slowly removethe cap. Failure to follow this instructioncould result in personal injury.
WARNING: To reduce the risk ofpersonal injury, make sure the engine iscool before unscrewing the coolantpressure relief cap. The cooling systemis under pressure. Steam and hot liquidcan come out forcefully when you loosenthe cap slightly.
When the engine is cold, check theconcentration and level of the coolant atthe intervals listed in the scheduledmaintenance information. See ScheduledMaintenance (page 325).
Note:Make sure that the coolant level isbetween the MIN and the MAX marks onthe coolant reservoir.
Note: Coolant expands when it is hot. Thelevel may extend beyond the MAX mark.
Maintain coolant concentration within48% to 50%, which equates to a freezepoint between -30°F (-34°C) and -34°F(-37°C). Coolant concentration should bechecked using a refractometer. We do notrecommend the use of hydrometers orcoolant test strips for measuring coolantconcentration.
Adding Coolant
WARNING: Do not put coolant inthe windshield washer reservoir. Ifsprayed on the windshield, coolant couldmake it difficult to see through thewindshield.
WARNING: Do not add coolantfurther than the MAX mark.
WARNING: Do not add coolantwhen the vehicle is on or the coolingsystem is hot. Failure to follow thisinstruction could result in personal injury.
WARNING: Do not remove thecoolant reservoir cap when the engine ison or the cooling system is hot. Wait 10minutes for the cooling system to cooldown. Cover the coolant reservoir capwith a thick cloth to prevent thepossibility of scalding and slowly removethe cap. Failure to follow this instructioncould result in personal injury.
Note: Automotive fluids are notinterchangeable. Do not use coolant orwindshield washer fluid outside of itsspecified function and vehicle location.
235
2024 F-650/750 (TBC) , enUSA, Edition date: 202210, First-PrintingMaintenance
Page 240 of 386
Note: Do not use stop leak pellets, coolingsystem sealants, or non-specified additivesas they can cause damage to the enginecooling or heating systems. Resultingcomponent damage may not be covered bythe vehicle warranty.
It is very important to use predilutedcoolant approved to the correctspecification to avoid plugging the smallpassageways in the engine cooling system.See Cooling System Capacity andSpecification (page 301). Do not mixdifferent colors or types of coolant in yourvehicle. Mixing of engine coolants or usingan incorrect coolant may harm the engineor cooling system components and maynot be covered by the vehicle warranty.
Note: Coolants marketed for all makes andmodels may not be approved to Fordspecifications and may cause damage tothe cooling system. Resulting componentdamage may not be covered by the vehicleWarranty.
If the coolant level is at or below theminimum mark, add prediluted coolantimmediately.
For vehicles with overflow coolant systemswith a non-pressurized cap on the coolantrecovery system, add coolant to thecoolant recovery reservoir when the engineis cool. Add prediluted coolant to themaximum level. For all vehicles which havea coolant degas system with a pressurizedcap, or if it is necessary to remove thecoolant pressure relief cap on the radiator,follow these steps to add engine coolant:
1.Turn the engine off and let it cool.
2.Unscrew the cap slowly. Any pressureescapes as you unscrew the cap.
3.Fill the coolant reservoir slowly withprediluted engine coolant to within theminimum and maximum range on theengine coolant reservoir. If youremoved the radiator cap in anoverflow system, fill the radiator until
the coolant is visible and the radiatoris almost full. If coolant is added tobring the level within the minimum andmaximum range when the engine is notcold, the system may remain underfilled.
4.Replace the coolant reservoir cap, turnit clockwise until you feel a strongresistance.
5.Check the coolant level in the coolantreservoir the next few times you driveyour vehicle. If necessary, add enoughprediluted engine coolant to bring thecoolant level to the proper level.
Note:If prediluted coolant is not available,use the approved antifreeze concentratediluting it to 50/50 with distilled water. SeeCooling System Capacity andSpecification (page 301). Using water thathas not been deionized may contribute todeposit formation, corrosion or plugging ofthe small cooling system passageways.
If you have to add more than 1.1 qt (1 L) ofengine coolant per month, have yourvehicle checked as soon as possible.Operating an engine with a low level ofcoolant can result in engine overheatingand possible engine damage.
Note:During normal vehicle operation, thecoolant may change color from orange topink or light red. As long as the coolant isclear and uncontaminated, this color changedoes not indicate the coolant has degradednor does it require the coolant to be drained,the system to be flushed, or the coolant tobe replaced.
In case of emergency, you can add a largeamount of water without predilutedcoolant to reach a vehicle service location.On arrival do the following:
1.Drain the cooling system.
2.Chemically clean the cooling system.We recommend Motorcraft PremiumCooling System Flush.
236
2024 F-650/750 (TBC) , enUSA, Edition date: 202210, First-PrintingMaintenance