2024 FORD F650/750 tires
[x] Cancel search: tiresPage 183 of 386
AIR SUSPENSION
Note:Do not operate your vehicle withoutair in the suspension springs. Operating yourvehicle without air in the suspension springsdamages the suspension, degrades rideperformance and may cause propertydamage.
The air suspension system automaticallyadjusts to different loads to maintain aconstant frame height, allows for ease ofvehicle loading, provides improved vehicleride, and increased driver comfort.
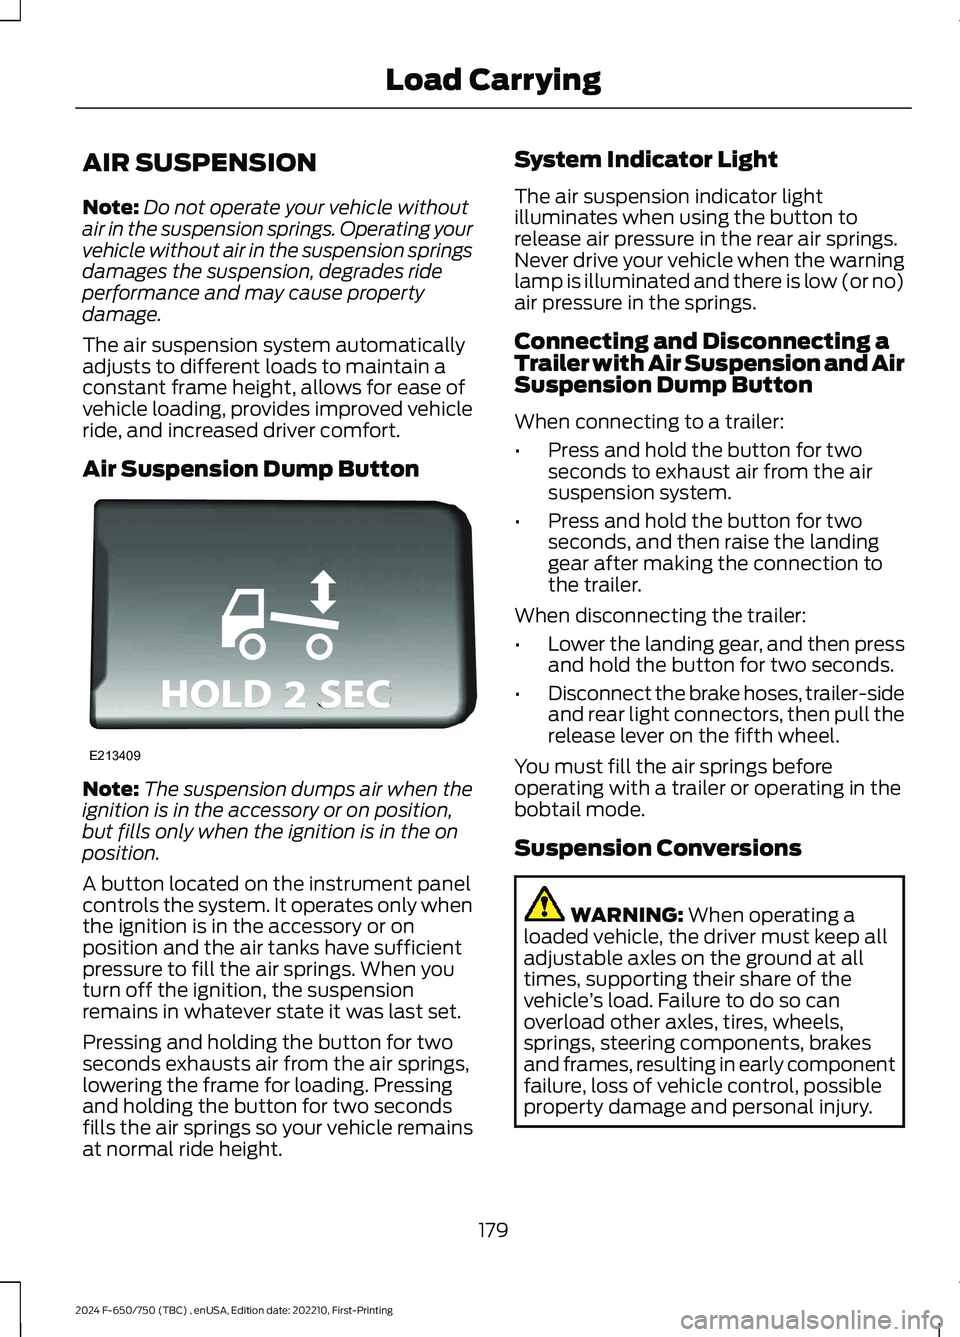
Air Suspension Dump Button
Note:The suspension dumps air when theignition is in the accessory or on position,but fills only when the ignition is in the onposition.
A button located on the instrument panelcontrols the system. It operates only whenthe ignition is in the accessory or onposition and the air tanks have sufficientpressure to fill the air springs. When youturn off the ignition, the suspensionremains in whatever state it was last set.
Pressing and holding the button for twoseconds exhausts air from the air springs,lowering the frame for loading. Pressingand holding the button for two secondsfills the air springs so your vehicle remainsat normal ride height.
System Indicator Light
The air suspension indicator lightilluminates when using the button torelease air pressure in the rear air springs.Never drive your vehicle when the warninglamp is illuminated and there is low (or no)air pressure in the springs.
Connecting and Disconnecting aTrailer with Air Suspension and AirSuspension Dump Button
When connecting to a trailer:
•Press and hold the button for twoseconds to exhaust air from the airsuspension system.
•Press and hold the button for twoseconds, and then raise the landinggear after making the connection tothe trailer.
When disconnecting the trailer:
•Lower the landing gear, and then pressand hold the button for two seconds.
•Disconnect the brake hoses, trailer-sideand rear light connectors, then pull therelease lever on the fifth wheel.
You must fill the air springs beforeoperating with a trailer or operating in thebobtail mode.
Suspension Conversions
WARNING: When operating aloaded vehicle, the driver must keep alladjustable axles on the ground at alltimes, supporting their share of thevehicle’s load. Failure to do so canoverload other axles, tires, wheels,springs, steering components, brakesand frames, resulting in early componentfailure, loss of vehicle control, possibleproperty damage and personal injury.
179
2024 F-650/750 (TBC) , enUSA, Edition date: 202210, First-PrintingLoad CarryingE213409
Page 185 of 386

TOWING A TRAILER
WARNING: Do not exceedthe GVWR or the GAWRspecified on the certificationlabel.
WARNING: Towing trailersbeyond the maximumrecommended gross trailerweight exceeds the limit of thevehicle and could result in enginedamage, transmission damage,structural damage, loss ofvehicle control, vehicle rolloverand personal injury.
Your vehicle may have electricalitems, such as fuses or relays,related to towing. See Fuses(page 202).
Your vehicle's load capacitydesignation is by weight, not byvolume, so you cannot necessarilyuse all available space whenloading a vehicle.
Towing a trailer places an extraload on your vehicle's engine,transmission, axle, brakes, tiresand suspension. Inspect thesecomponents periodically during,and after, any towing operation.
Load Placement
To help minimize how trailermovement affects your vehiclewhen driving:
•Load the heaviest items closestto the trailer floor.
•Load the heaviest itemscentered between the left andright side trailer tires.
•Load the heaviest items abovethe trailer axles or just slightlyforward toward the trailertongue. Do not allow the finaltrailer tongue weight to goabove or below 10-15% of theloaded trailer weight.
When driving with a trailer orpayload, a slight takeoff vibrationor shudder may be present due tothe increased payload weight.Additional information regardingproper trailer loading and settingyour vehicle up for towing islocated in another chapter of thismanual. See Load Limit (page178).
You can also find information inthe RV & Trailer Towing Guideavailable at your authorizeddealer, or online.
RV & Trailer Towing Guide Online
http://www.fleet.ford.com/towing-guides/Website
181
2024 F-650/750 (TBC) , enUSA, Edition date: 202210, First-PrintingTowing
Page 190 of 386

GENERAL DRIVING POINTS
General Information
•Accelerate smoothly and evenly. Rapidacceleration increases fuelconsumption without increasing engineperformance.
•When approaching a hill, press theaccelerator smoothly to start theincline at full power, and then shiftdown as needed to maintain vehiclespeed.
•When going down a hill, or long steepgrades, prevent overspeeding of theengine. Normally, choose the samegear to descend the hill that you use toascend the hill. The engine governorhas no control over engine speed whenit is being pushed by a loaded vehicle.
•Do not operate in a gear that permitsan engine speed more than themaximum governed speed or high-idleRPM (no load).
•Always shift to a lower gear at highaltitudes to prevent engine smoking.
Backing Up
WARNING: All vehicles have blindspots. To reduce the risk of severe injuryor property damage, never move yourvehicle to the side or rear or change laneswithout being sure your way is clear onboth sides and to your rear.
WARNING: To reduce the risk ofthe possibility of personal injury whilebacking up the vehicle, always be sureyour vehicle’s path is clear.
Before backing up your vehicle, be sure youcan do so safely. If anything behind the cablimits your view, do not rely on mirrorsalone to make sure that your intended pathis clear. If other people are in the vicinity,have someone standing well behind yourvehicle and outside of your intended path(visible through an exterior mirror) guideyou as you back up.
Although OSHA or some governmentalregulations may require the use of anelectrical or mechanical back up alarm towarn bystanders, such an alarm does notguarantee that the intended path is clear.When in doubt, get out of your vehicle andvisually check the intended path is clear.Back up slowly as to allow others time tomove, if necessary.
If you install an electrical back up alarm,connect it to the backup lamp circuit.
Parking
WARNING: When parking yourvehicle, do not leave the transmission ingear; if the key is in the on position andthe vehicle rolls, the engine could start.Failure to follow these instructions couldresult in an unattended vehicle moving,possibly causing personal injury orproperty damage.
Always use the parking brake. Whenparking on a grade, block the wheels andturn the front wheels to one side so that ifyour vehicle rolls, the front tires act againstthe curb to stop your vehicle. The frontwheels are more effective at stopping arolling vehicle than the rear wheels.
186
2024 F-650/750 (TBC) , enUSA, Edition date: 202210, First-PrintingDriving Hints
Page 191 of 386
ECONOMICAL DRIVING
Your fuel economy is affected by severalthings, such as how you drive, theconditions you drive under, and how youmaintain your vehicle.
You may improve your fuel economy bykeeping these things in mind:
•Accelerate and slow down in a smooth,moderate fashion.
•Drive at steady speeds withoutstopping.
•Anticipate stops; slowing down mayeliminate the need to stop.
•Close the windows for high-speeddriving.
•Drive at reasonable speeds. Travelingat 55 mph (90 km/h) uses 15% lessfuel than traveling at 65 mph(105 km/h).
•Keep the tires properly inflated and useonly the recommended size.
•Use the recommended engine oil.
•Perform all regularly scheduledmaintenance.
Avoid these actions; they reduce your fueleconomy:
•Sudden accelerations or hardaccelerations.
•Warm up your vehicle on coldmornings.
•Use the air conditioner.
•Use the speed control in hilly terrain.
•Rest your foot on the brake pedal whiledriving.
•Carry unnecessary weight.Approximately 1 mpg [0.4 km/L] is lostfor every 400 lb (180 kg) of weightcarried.
•Driving with the wheels out ofalignment.
Conditions
•Adding certain accessories to yourvehicle may reduce fuel economy. Forexample bug deflectors, rollbars, lightbars, running boards, ski racks orluggage racks.
•Using fuel blended with alcohol maylower fuel economy.
•Fuel economy may decrease with lowertemperatures during the first 5–10 mi(12–16 km) of driving.
•Driving on flat terrain offers improvedfuel economy as compared to drivingon hilly terrain.
•Transmissions give their best fueleconomy when operated in the topcruise gear and with steady pressureon the gas pedal.
COLD WEATHER
PRECAUTIONS - 6.7L DIESEL
Winter Grille Cover (If Equipped)
The winter grille cover enhances heaterperformance and will reduce the amountof time it takes to warm the inside of yourvehicle in extremely cold conditions below-0.4°F (-18°C).
The winter grille cover installs over theoutside of the front grille and restricts theair flowing to the engine compartment bycovering the radiator grille openings.
187
2024 F-650/750 (TBC) , enUSA, Edition date: 202210, First-PrintingDriving Hints
Page 192 of 386
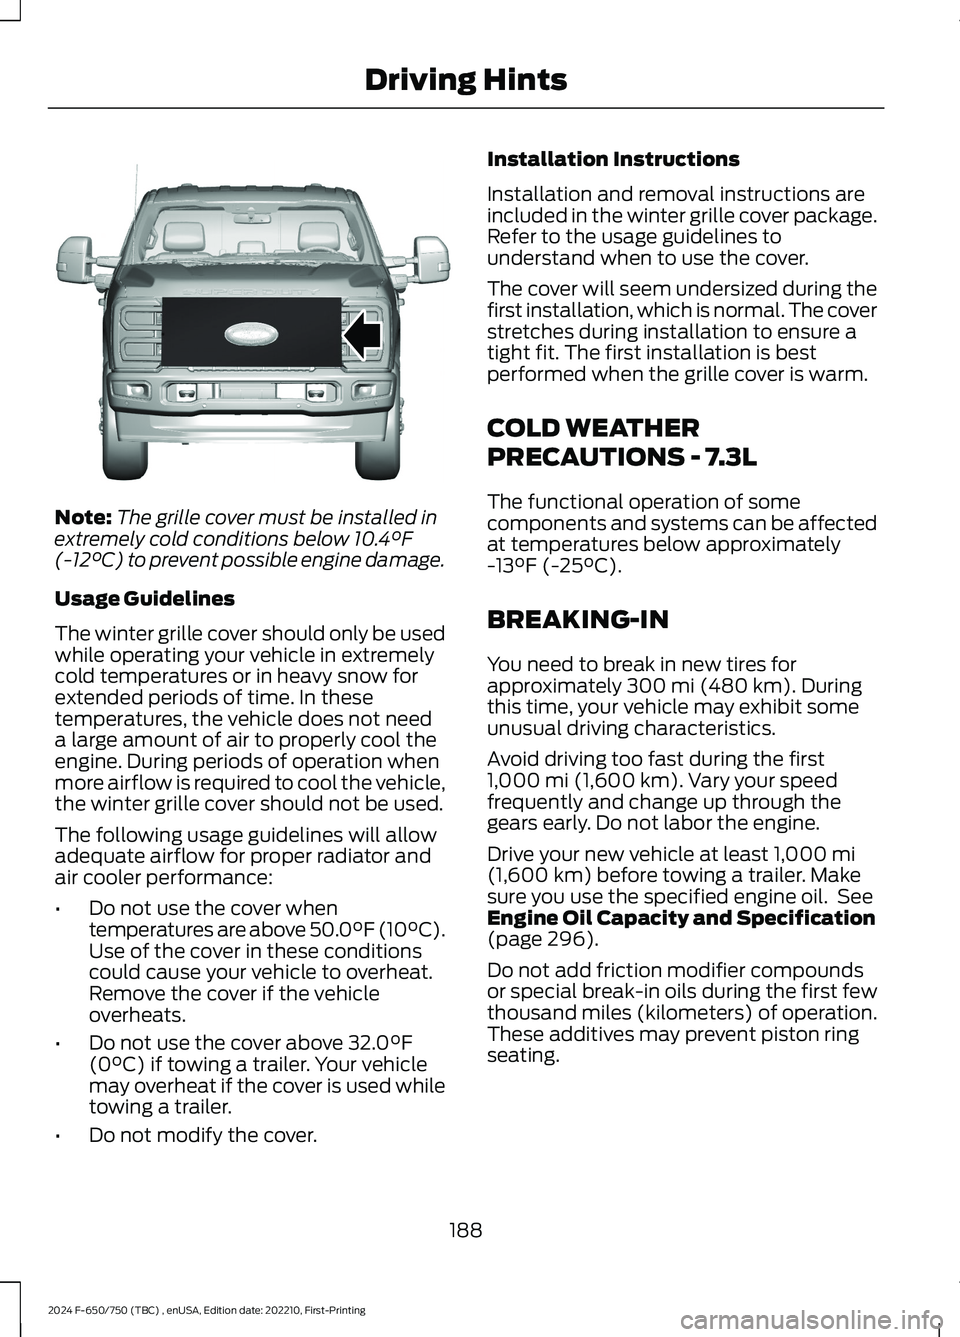
Note:The grille cover must be installed inextremely cold conditions below 10.4°F(-12°C) to prevent possible engine damage.
Usage Guidelines
The winter grille cover should only be usedwhile operating your vehicle in extremelycold temperatures or in heavy snow forextended periods of time. In thesetemperatures, the vehicle does not needa large amount of air to properly cool theengine. During periods of operation whenmore airflow is required to cool the vehicle,the winter grille cover should not be used.
The following usage guidelines will allowadequate airflow for proper radiator andair cooler performance:
•Do not use the cover whentemperatures are above 50.0°F (10°C).Use of the cover in these conditionscould cause your vehicle to overheat.Remove the cover if the vehicleoverheats.
•Do not use the cover above 32.0°F(0°C) if towing a trailer. Your vehiclemay overheat if the cover is used whiletowing a trailer.
•Do not modify the cover.
Installation Instructions
Installation and removal instructions areincluded in the winter grille cover package.Refer to the usage guidelines tounderstand when to use the cover.
The cover will seem undersized during thefirst installation, which is normal. The coverstretches during installation to ensure atight fit. The first installation is bestperformed when the grille cover is warm.
COLD WEATHER
PRECAUTIONS - 7.3L
The functional operation of somecomponents and systems can be affectedat temperatures below approximately-13°F (-25°C).
BREAKING-IN
You need to break in new tires forapproximately 300 mi (480 km). Duringthis time, your vehicle may exhibit someunusual driving characteristics.
Avoid driving too fast during the first1,000 mi (1,600 km). Vary your speedfrequently and change up through thegears early. Do not labor the engine.
Drive your new vehicle at least 1,000 mi(1,600 km) before towing a trailer. Makesure you use the specified engine oil. SeeEngine Oil Capacity and Specification(page 296).
Do not add friction modifier compoundsor special break-in oils during the first fewthousand miles (kilometers) of operation.These additives may prevent piston ringseating.
188
2024 F-650/750 (TBC) , enUSA, Edition date: 202210, First-PrintingDriving HintsE391665
Page 217 of 386
VEHICLE INSPECTION
INFORMATION
To make sure your vehicle is ready tooperate, conduct a pre-trip inspection atthe beginning of each work period. Followthe steps listed in this section to verify aproper vehicle inspection procedure.
WARNING: Exercise great cautionwhen working on a vehicle equipped withan automatic fan clutch. The fan startsin motion only after the engine coolantreaches a predetermined temperatureor the refrigerant pressure (if equippedwith air conditioning) reaches apredetermined setting. The fan starts atthis point with no advance warning.Never reach near, or permit objects toprotrude into, the fan blade radius whilethe engine is running as this could resultin vehicle damage, personal injury ordeath.
WARNING: Do not operate thevehicle if any suspension conditionslisted in the following charts are evident.Loss of steering or suspension couldresult in property damage, personal injuryor death.
WARNING: If a wheel must bechanged, obtain expert tire service help.Mounting and un-mounting of tiresshould only be performed by a qualifiedtechnician using necessary safetyprocedures and equipment, otherwisethe result could be property damage,personal injury or death.
Note:Always make sure you apply theparking brake before starting the engine.
Engine compartment (with engine off)
Use the dipstick to verify the oil level is in the proper operatingrange. See Engine Oil Dipstick (page 227).Engine oil
Look through the plastic reservoir and verify the coolant levelis within the proper operating range. Do not remove thepressure cap until the coolant has cooled. See EngineCoolant Check (page 238).
Engine coolant
Verify that the fluid level is in the proper operating range. SeePower Steering Fluid Check (page 246).Power steering fluid
Remove the master cylinder caps and inspect the fluid level.See Brake Fluid Check (page 245).Brake fluid
213
2024 F-650/750 (TBC) , enUSA, Edition date: 202210, First-PrintingVehicle Inspection Guide
Page 224 of 386
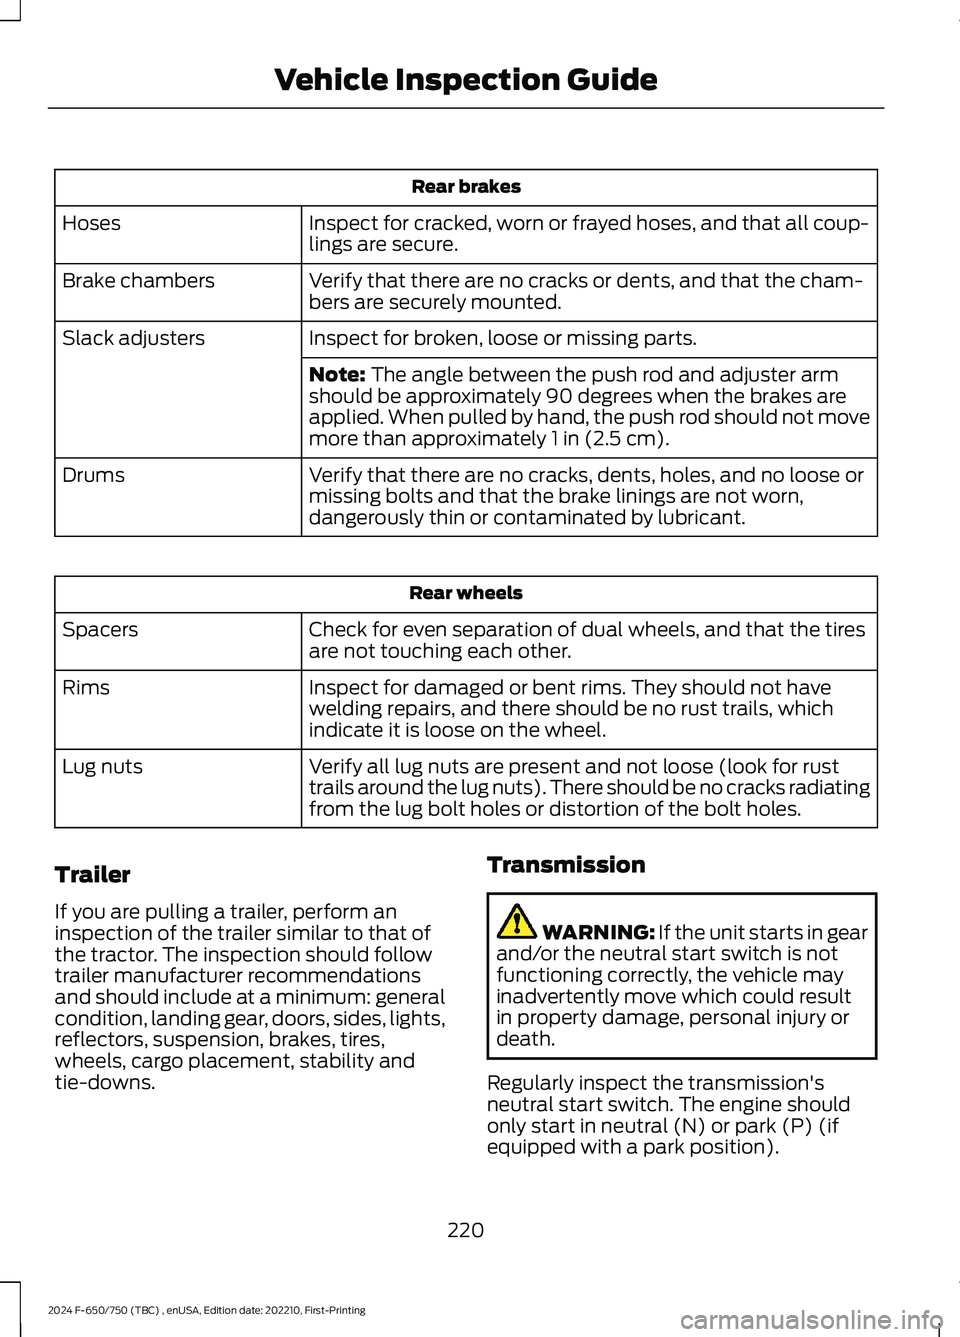
Rear brakes
Inspect for cracked, worn or frayed hoses, and that all coup-lings are secure.Hoses
Verify that there are no cracks or dents, and that the cham-bers are securely mounted.Brake chambers
Inspect for broken, loose or missing parts.Slack adjusters
Note: The angle between the push rod and adjuster armshould be approximately 90 degrees when the brakes areapplied. When pulled by hand, the push rod should not movemore than approximately 1 in (2.5 cm).
Verify that there are no cracks, dents, holes, and no loose ormissing bolts and that the brake linings are not worn,dangerously thin or contaminated by lubricant.
Drums
Rear wheels
Check for even separation of dual wheels, and that the tiresare not touching each other.Spacers
Inspect for damaged or bent rims. They should not havewelding repairs, and there should be no rust trails, whichindicate it is loose on the wheel.
Rims
Verify all lug nuts are present and not loose (look for rusttrails around the lug nuts). There should be no cracks radiatingfrom the lug bolt holes or distortion of the bolt holes.
Lug nuts
Trailer
If you are pulling a trailer, perform aninspection of the trailer similar to that ofthe tractor. The inspection should followtrailer manufacturer recommendationsand should include at a minimum: generalcondition, landing gear, doors, sides, lights,reflectors, suspension, brakes, tires,wheels, cargo placement, stability andtie-downs.
Transmission
WARNING: If the unit starts in gearand/or the neutral start switch is notfunctioning correctly, the vehicle mayinadvertently move which could resultin property damage, personal injury ordeath.
Regularly inspect the transmission'sneutral start switch. The engine shouldonly start in neutral (N) or park (P) (ifequipped with a park position).
220
2024 F-650/750 (TBC) , enUSA, Edition date: 202210, First-PrintingVehicle Inspection Guide
Page 263 of 386
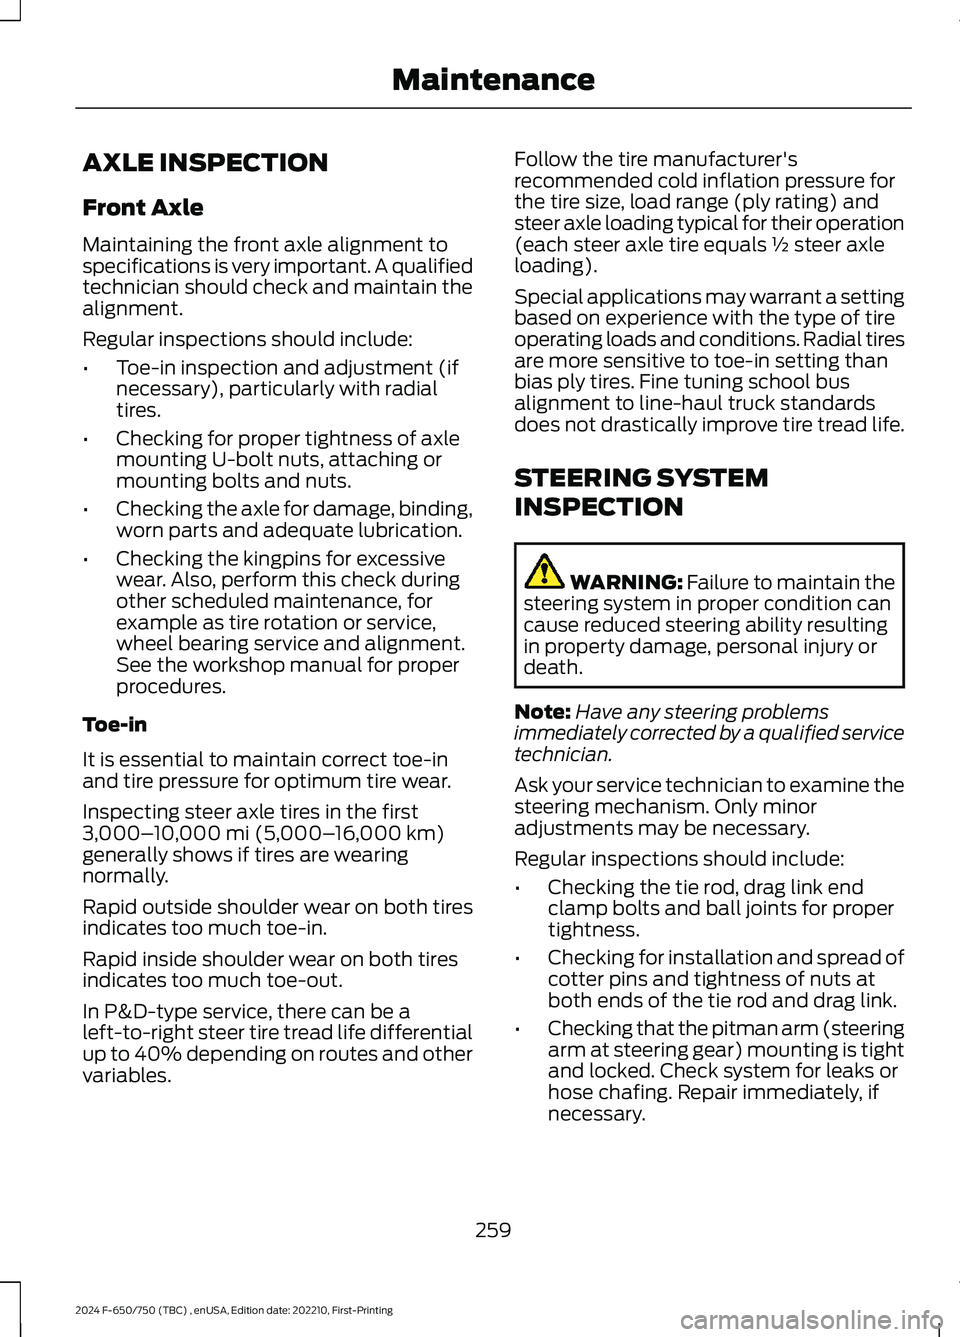
AXLE INSPECTION
Front Axle
Maintaining the front axle alignment tospecifications is very important. A qualifiedtechnician should check and maintain thealignment.
Regular inspections should include:
•Toe-in inspection and adjustment (ifnecessary), particularly with radialtires.
•Checking for proper tightness of axlemounting U-bolt nuts, attaching ormounting bolts and nuts.
•Checking the axle for damage, binding,worn parts and adequate lubrication.
•Checking the kingpins for excessivewear. Also, perform this check duringother scheduled maintenance, forexample as tire rotation or service,wheel bearing service and alignment.See the workshop manual for properprocedures.
Toe-in
It is essential to maintain correct toe-inand tire pressure for optimum tire wear.
Inspecting steer axle tires in the first3,000–10,000 mi (5,000–16,000 km)generally shows if tires are wearingnormally.
Rapid outside shoulder wear on both tiresindicates too much toe-in.
Rapid inside shoulder wear on both tiresindicates too much toe-out.
In P&D-type service, there can be aleft-to-right steer tire tread life differentialup to 40% depending on routes and othervariables.
Follow the tire manufacturer'srecommended cold inflation pressure forthe tire size, load range (ply rating) andsteer axle loading typical for their operation(each steer axle tire equals ½ steer axleloading).
Special applications may warrant a settingbased on experience with the type of tireoperating loads and conditions. Radial tiresare more sensitive to toe-in setting thanbias ply tires. Fine tuning school busalignment to line-haul truck standardsdoes not drastically improve tire tread life.
STEERING SYSTEM
INSPECTION
WARNING: Failure to maintain thesteering system in proper condition cancause reduced steering ability resultingin property damage, personal injury ordeath.
Note:Have any steering problemsimmediately corrected by a qualified servicetechnician.
Ask your service technician to examine thesteering mechanism. Only minoradjustments may be necessary.
Regular inspections should include:
•Checking the tie rod, drag link endclamp bolts and ball joints for propertightness.
•Checking for installation and spread ofcotter pins and tightness of nuts atboth ends of the tie rod and drag link.
•Checking that the pitman arm (steeringarm at steering gear) mounting is tightand locked. Check system for leaks orhose chafing. Repair immediately, ifnecessary.
259
2024 F-650/750 (TBC) , enUSA, Edition date: 202210, First-PrintingMaintenance