2023 TOYOTA VENZA HYBRID height
[x] Cancel search: heightPage 31 of 560
311-1. For safe use
1
For safety and security
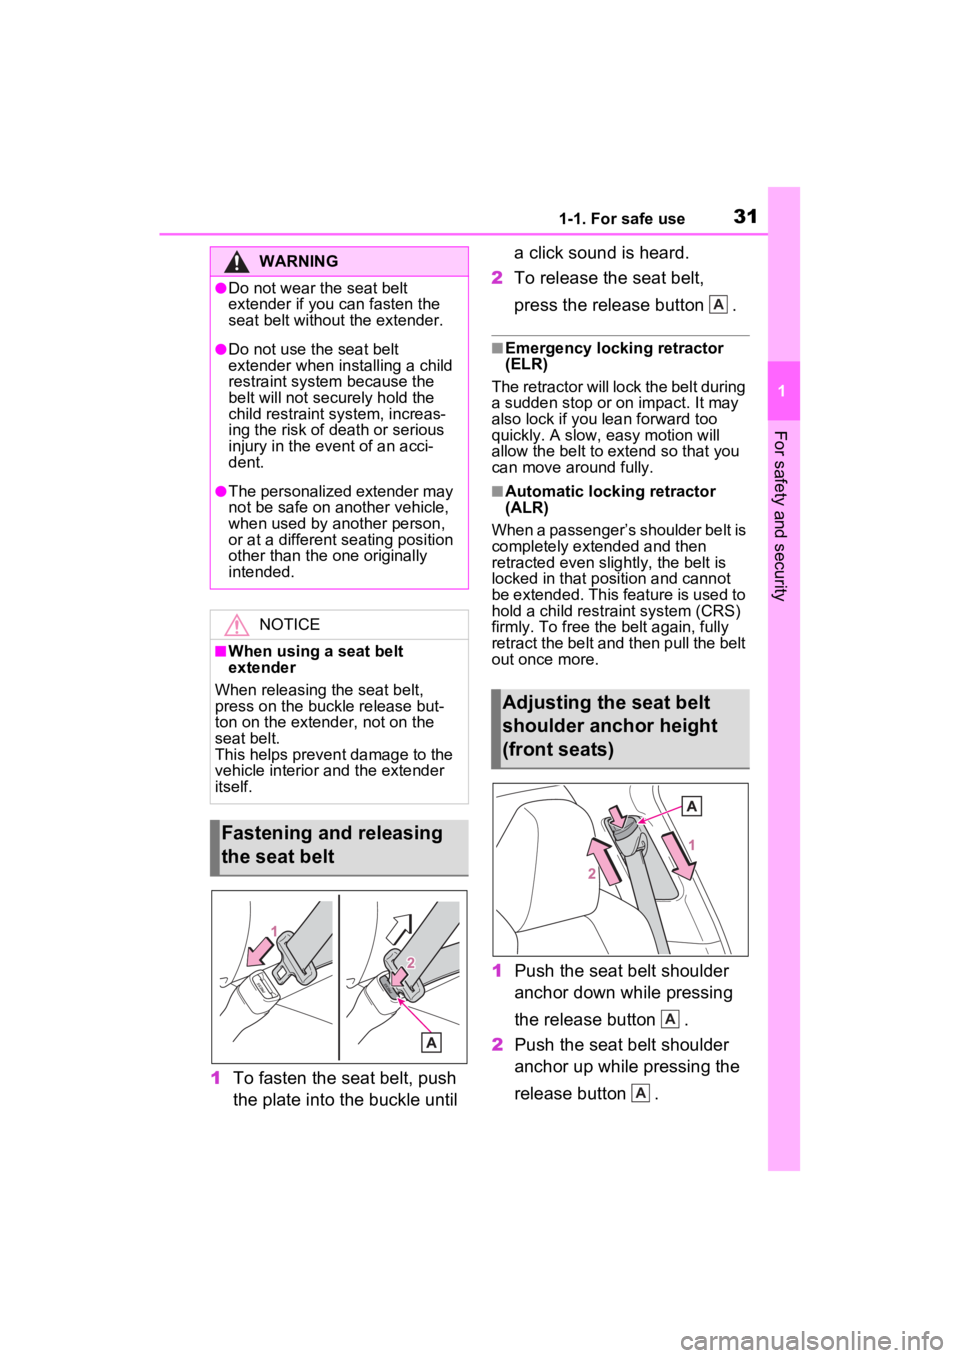
1To fasten the seat belt, push
the plate into the buckle until a click sound is heard.
2 To release the seat belt,
press the release button .
■Emergency locking retractor
(ELR)
The retractor will lock the belt during
a sudden stop or on impact. It may
also lock if you lean forward too
quickly. A slow, easy motion will
allow the belt to extend so that you
can move around fully.
■Automatic locking retractor
(ALR)
When a passenger’s shoulder belt is
completely extended and then
retracted even slightly, the belt is
locked in that position and cannot
be extended. This feature is used to
hold a child restraint system (CRS)
firmly. To free the belt again, fully
retract the belt and then pull the belt
out once more.
1 Push the seat belt shoulder
anchor down while pressing
the release button .
2 Push the seat belt shoulder
anchor up while pressing the
release button .
WARNING
●Do not wear the seat belt
extender if you can fasten the
seat belt without the extender.
●Do not use the seat belt
extender when installing a child
restraint system because the
belt will not securely hold the
child restraint system, increas-
ing the risk of death or serious
injury in the event of an acci-
dent.
●The personalized extender may
not be safe on another vehicle,
when used by another person,
or at a different seating position
other than the one originally
intended.
NOTICE
■When using a seat belt
extender
When releasing the seat belt,
press on the buckle release but-
ton on the extender, not on the
seat belt.
This helps prevent damage to the
vehicle interior and the extender
itself.
Fastening and releasing
the seat belt
Adjusting the seat belt
shoulder anchor height
(front seats)
A
A
A
Page 32 of 560
321-1. For safe use
Move the height adjuster up and
down as needed until you hear a
click.
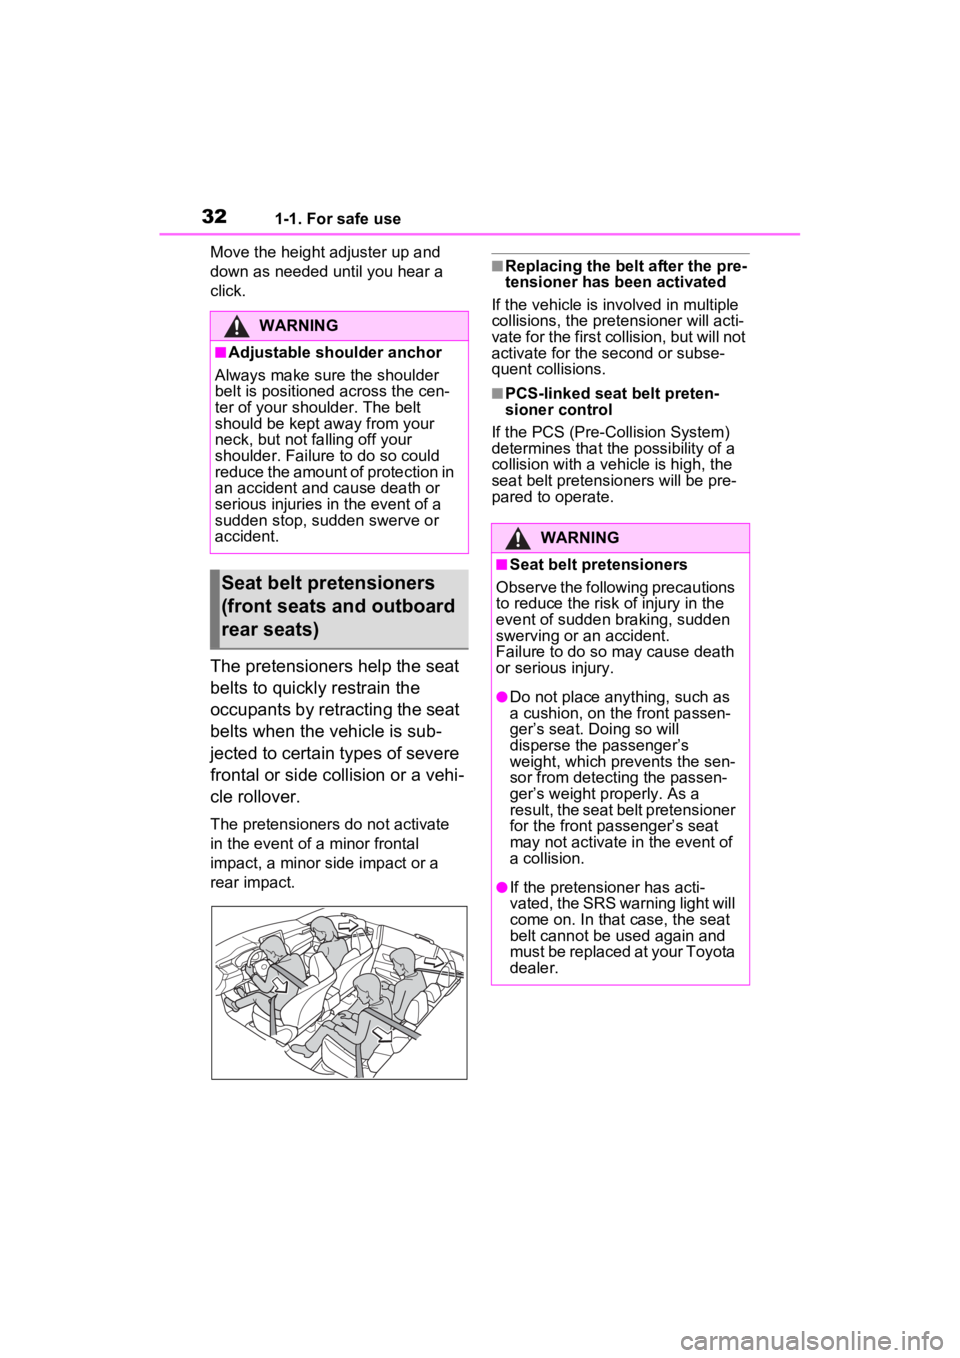
The pretensioners help the seat
belts to quickly restrain the
occupants by retracting the seat
belts when the vehicle is sub-
jected to certain types of severe
frontal or side collision or a vehi-
cle rollover.
The pretensioners do not activate
in the event of a minor frontal
impact, a minor side impact or a
rear impact.
■Replacing the belt after the pre-
tensioner has been activated
If the vehicle is involved in multiple
collisions, the pretensioner will acti-
vate for the first collision, but will not
activate for the second or subse-
quent collisions.
■PCS-linked seat belt preten-
sioner control
If the PCS (Pre-Collision System)
determines that the possibility of a
collision with a vehi cle is high, the
seat belt pretensioners will be pre-
pared to operate.
WARNING
■Adjustable shoulder anchor
Always make sure the shoulder
belt is positioned across the cen-
ter of your shoulder. The belt
should be kept away from your
neck, but not falling off your
shoulder. Failure to do so could
reduce the amount of protection in
an accident and cause death or
serious injuries in the event of a
sudden stop, sudden swerve or
accident.
Seat belt pretensioners
(front seats and outboard
rear seats)
WARNING
■Seat belt pretensioners
Observe the following precautions
to reduce the risk of injury in the
event of sudden braking, sudden
swerving or an accident.
Failure to do so may cause death
or serious injury.
●Do not place anything, such as
a cushion, on the front passen-
ger’s seat. Doing so will
disperse the passenger’s
weight, which prevents the sen-
sor from detecting the passen-
ger’s weight properly. As a
result, the seat belt pretensioner
for the front passenger’s seat
may not activate in the event of
a collision.
●If the pretensioner has acti-
vated, the SRS warning light will
come on. In that case, the seat
belt cannot be used again and
must be replaced at your Toyota
dealer.
Page 159 of 560
1593-3. Adjusting the seats
3
Before driving
3-3.Adjusting the seats
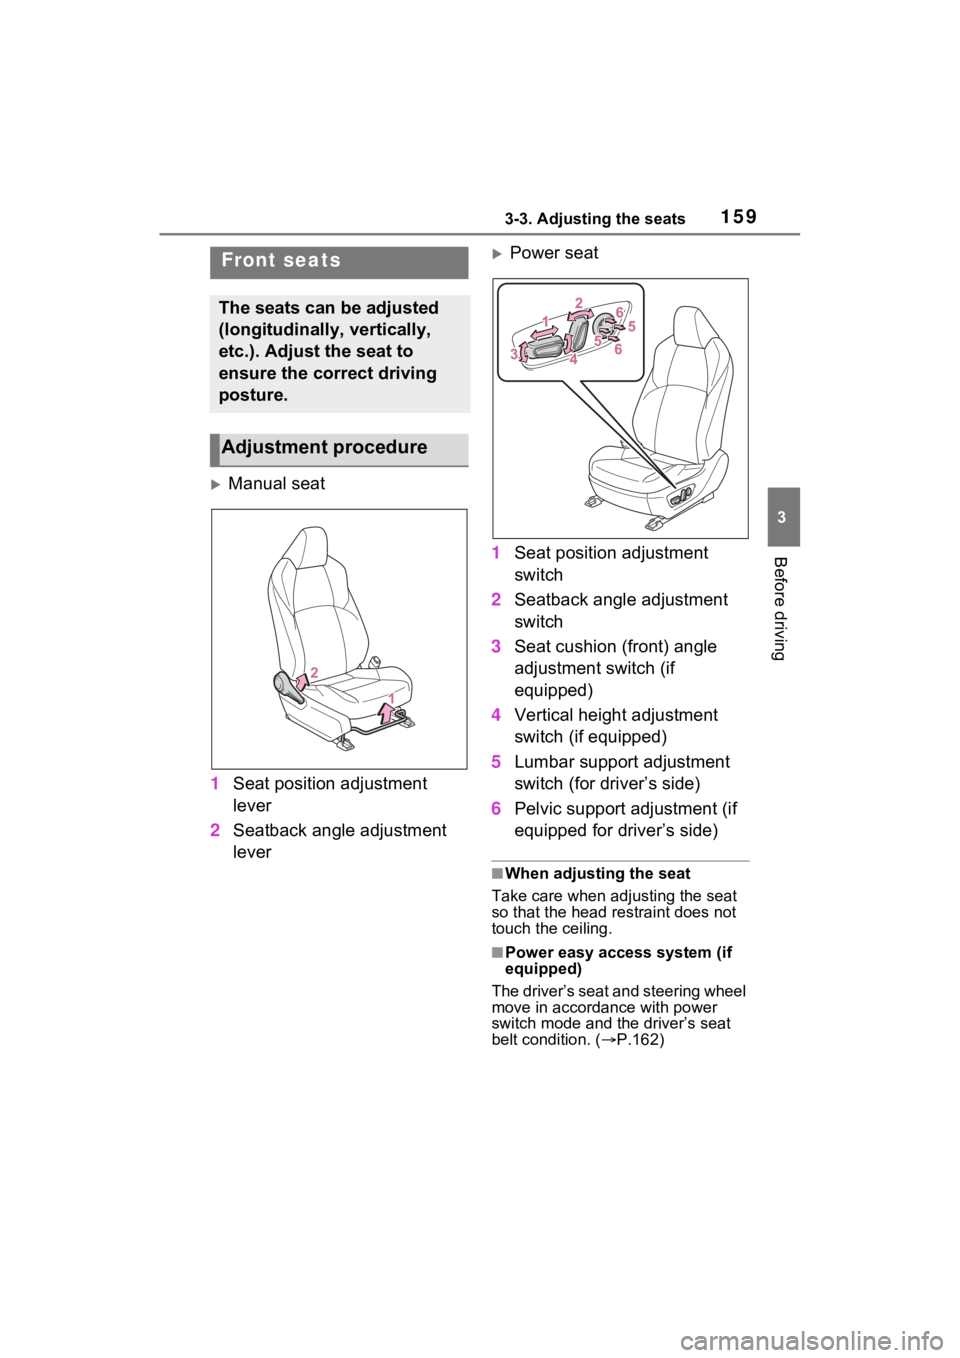
Manual seat
1 Seat position adjustment
lever
2 Seatback angle adjustment
lever
Power seat
1 Seat position adjustment
switch
2 Seatback angle adjustment
switch
3 Seat cushion (front) angle
adjustment switch (if
equipped)
4 Vertical height adjustment
switch (if equipped)
5 Lumbar support adjustment
switch (for driver’s side)
6 Pelvic support adjustment (if
equipped for driver’s side)
■When adjusting the seat
Take care when adjusting the seat
so that the head restraint does not
touch the ceiling.
■Power easy access system (if
equipped)
The driver’s seat and steering wheel
move in accordance with power
switch mode and th e driver’s seat
belt condition. ( P.162)
Front seats
The seats can be adjusted
(longitudinally, vertically,
etc.). Adjust the seat to
ensure the correct driving
posture.
Adjustment procedure
Page 164 of 560
1643-3. Adjusting the seats
●Operate the tilt and telescopic
steering control switch (only can-
cels steering wheel position
recall).
■Using the Intelligent Assistant
(if equipped)
The following operations can be
performed using the Intelligent
Assistant:
●Recording a dr iving position
●Recalling a driving position (it can
be performed only when the shift
lever is in P)
For details regardi ng the Intelligent
Assistant, refer to the “MULTIME-
DIA OWNER’S MANUAL”.
■Seat positions that can be
memorized ( P.159)
The positions adjusted by the fol-
lowing procedure can be recorded:
●Seat position adjustment
●Seatback angle adjustment
●Seat cushion (front) angle adjust-
ment
●Vertical height adjustment
■Operating the driving position
memory after turning the power
switch to OFF
Recorded seat positions can be
activated up to 1 80 seconds after
the driver’s door is opened and
another 60 seconds after it is closed
again.
■In order to correctly use the
driving position memory func-
tion
If a seat position is already in the
furthest possible position and the
seat is operated in the same direc-
tion, the recorded position may be
slightly different w hen it is recalled.
■When recalling the driving posi-
tion
Take care when recalling the driving
position so that the head restraint
does not touch the ceiling.
■When the recorded seat posi-
tion cannot be recalled
The seat position may not be
recalled in some situations when the
seat position is recorded in a certain
range. For details, contact your
Toyota dealer.
■Registering procedure
Record your driving position to
button “1” or “2” before perform-
ing the following:
Carry only the key you want to
register, and then close the
driver’s door.
If 2 or more keys are in the vehi-
cle, the driving position cannot
be recorded properly.
1 Check that the shift lever is in
P.
2 Turn the power switch to ON.
3 Recall the driving position
that you want to record.
4 While pressing the recalled
button, press and hold the
door lock switch (either lock
or unlock) until the buzzer
sounds.
WARNING
■Seat adjustment caution
Take care during seat adjustment
so that the seat does not strike
the rear passenger or squeeze
your body against the steering
wheel.
Registering/recall/cancel-
ing a driving position to
an electronic key (mem-
ory recall function)
Page 166 of 560
1663-3. Adjusting the seats
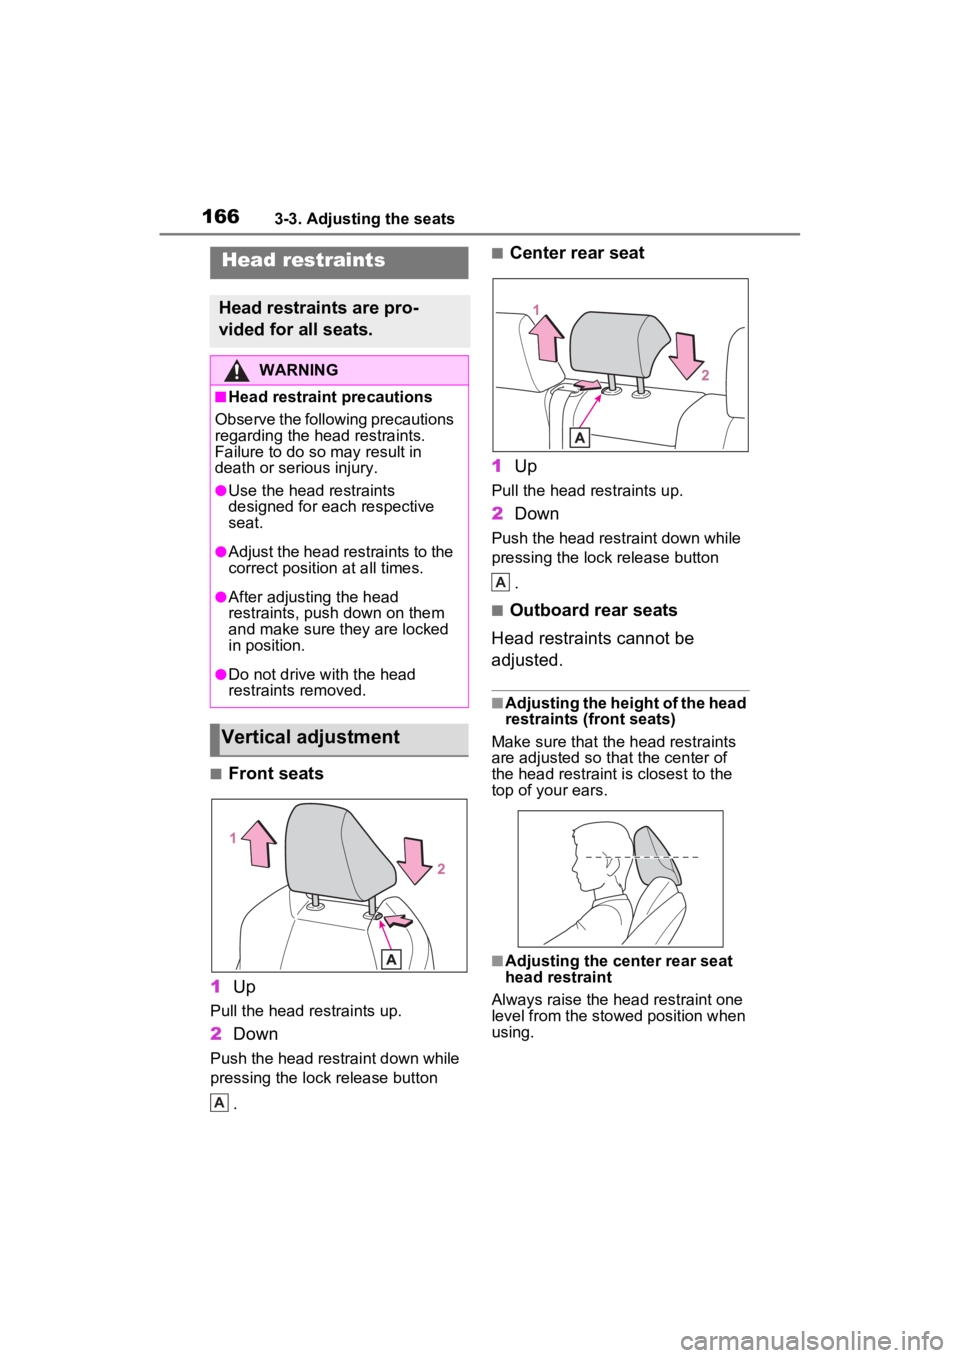
■Front seats
1 Up
Pull the head restraints up.
2Down
Push the head restraint down while
pressing the lock release button
.
■Center rear seat
1 Up
Pull the head restraints up.
2Down
Push the head restraint down while
pressing the lock release button
.
■Outboard rear seats
Head restraints cannot be
adjusted.
■Adjusting the height of the head
restraints (front seats)
Make sure that the head restraints
are adjusted so that the center of
the head restraint i s closest to the
top of your ears.
■Adjusting the center rear seat
head restraint
Always raise the head restraint one
level from the stowed position when
using.
Head restraints
Head restraints are pro-
vided for all seats.
WARNING
■Head restraint precautions
Observe the following precautions
regarding the head restraints.
Failure to do so m ay result in
death or serious injury.
●Use the head restraints
designed for each respective
seat.
●Adjust the head restraints to the
correct position at all times.
●After adjusting the head
restraints, push down on them
and make sure they are locked
in position.
●Do not drive with the head
restraints removed.
Vertical adjustment
A
A
Page 167 of 560
1673-3. Adjusting the seats
3
Before driving
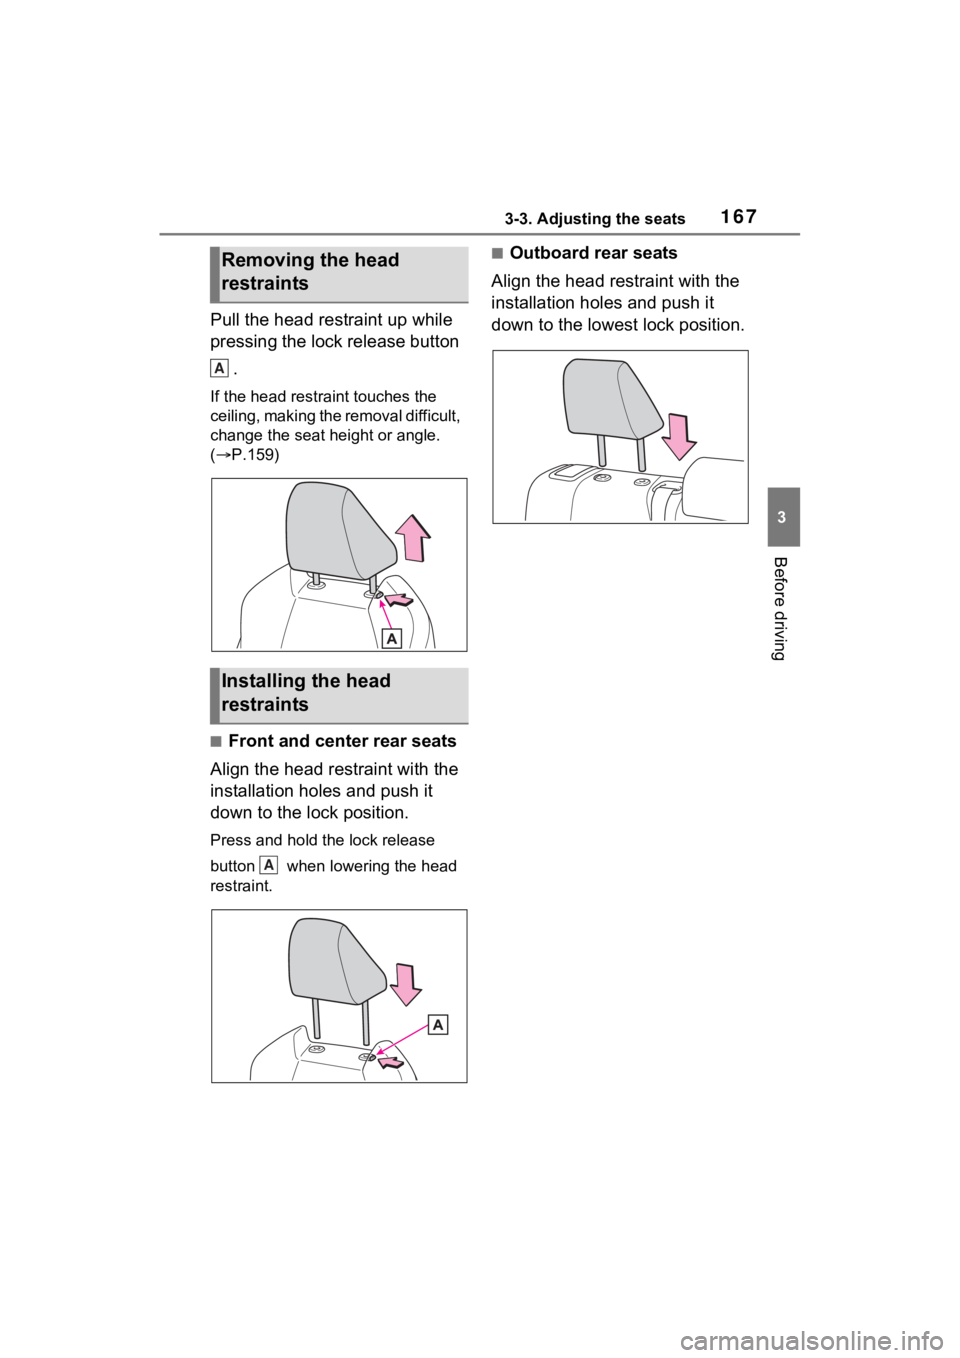
Pull the head restraint up while
pressing the lock release button .
If the head restraint touches the
ceiling, making the removal difficult,
change the seat height or angle.
( P.159)
■Front and center rear seats
Align the head restraint with the
installation holes and push it
down to the lock position.
Press and hold the lock release
button when lowering the head
restraint.
■Outboard rear seats
Align the head restraint with the
installation holes and push it
down to the lowest lock position.Removing the head
restraints
Installing the head
restraints
A
A
Page 169 of 560
1693-4. Adjusting the steering wheel and mirrors
3
Before driving
*: If equipped
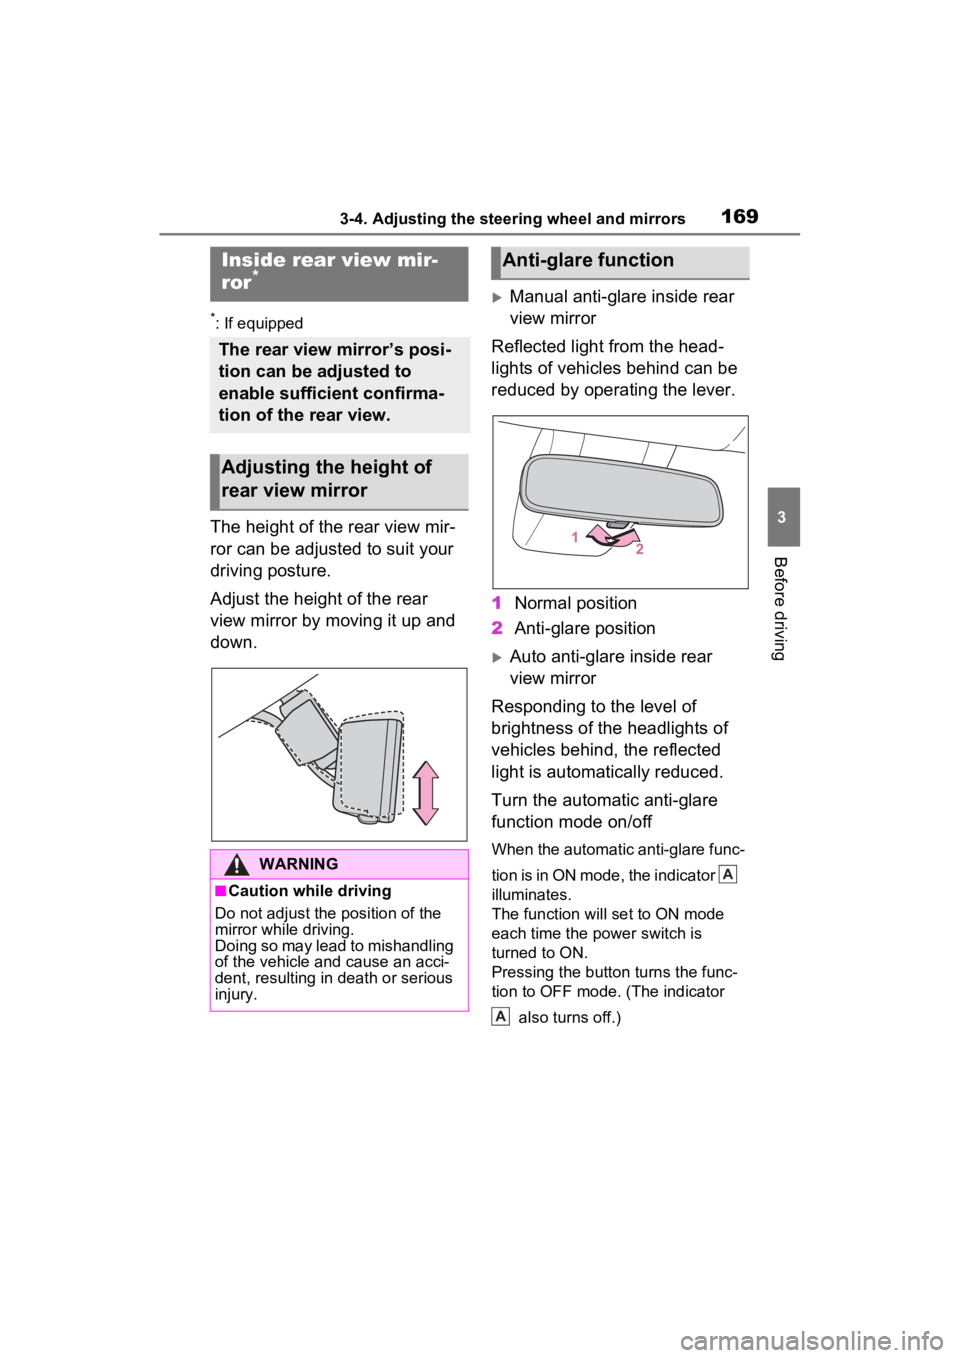
The height of the rear view mir-
ror can be adjusted to suit your
driving posture.
Adjust the height of the rear
view mirror by moving it up and
down.
Manual anti-glare inside rear
view mirror
Reflected light from the head-
lights of vehicles behind can be
reduced by operating the lever.
1 Normal position
2 Anti-glare position
Auto anti-glare inside rear
view mirror
Responding to the level of
brightness of the headlights of
vehicles behind, the reflected
light is automatically reduced.
Turn the automatic anti-glare
function mode on/off
When the automatic anti-glare func-
tion is in ON mode, the indicator
illuminates.
The function will set to ON mode
each time the power switch is
turned to ON.
Pressing the button turns the func-
tion to OFF mode. (The indicator
also turns off.)
Inside rear view mir-
ror*
The rear view mirror’s posi-
tion can be adjusted to
enable sufficient confirma-
tion of the rear view.
Adjusting the height of
rear view mirror
WARNING
■Caution while driving
Do not adjust the position of the
mirror while driving.
Doing so may lead to mishandling
of the vehicle and cause an acci-
dent, resulting in death or serious
injury.
Anti-glare function
A
A
Page 172 of 560
1723-4. Adjusting the steering wheel and mirrors
driving, make sure the back door
is closed.
●Vehicles with panoramic fixed
moon roof with one-touch frosted
glass control: If the display is diffi-
cult to see due to reflected light,
close the electronic sunshade.
●Any of the following conditions
may occur when d riving in the
dark, such as at night. None of
them indicates that a malfunction
has occurred.
• Colors of objects in the displayed
image may differ from their actual
color.
• Depending on the height of the
lights of the vehicle behind, the
area around the vehicle may
appear white and blurry.
• Automatic image adjustment for brighter surrounding image may
cause flickering.
If it is difficult to see the displayed
image or flickering bothers you,
change to optical mirror mode.
●The Digital Rear-view Mirror may
become hot while it is in digital
mirror mode.
This is not a malfunction.
●Depending on your physical con-
dition or age, it may take longer
than usual to focus on the dis-
played image. In this case,
change to optical mirror mode.
●Do not let passengers stare at the
displayed image when the vehicle
is being driven, as doing so may
cause motion sickness.
■When the system malfunctions
If the symbol show n in the illustra-
tion is displayed when using the
Digital Rear-view Mirror in digital
mirror mode, the system may be
malfunctioning. Th e symbol will dis-
appear in a few seconds. Operate
the lever, change to optical mirror
mode and have the vehicle
inspected by your Toyota dealer.
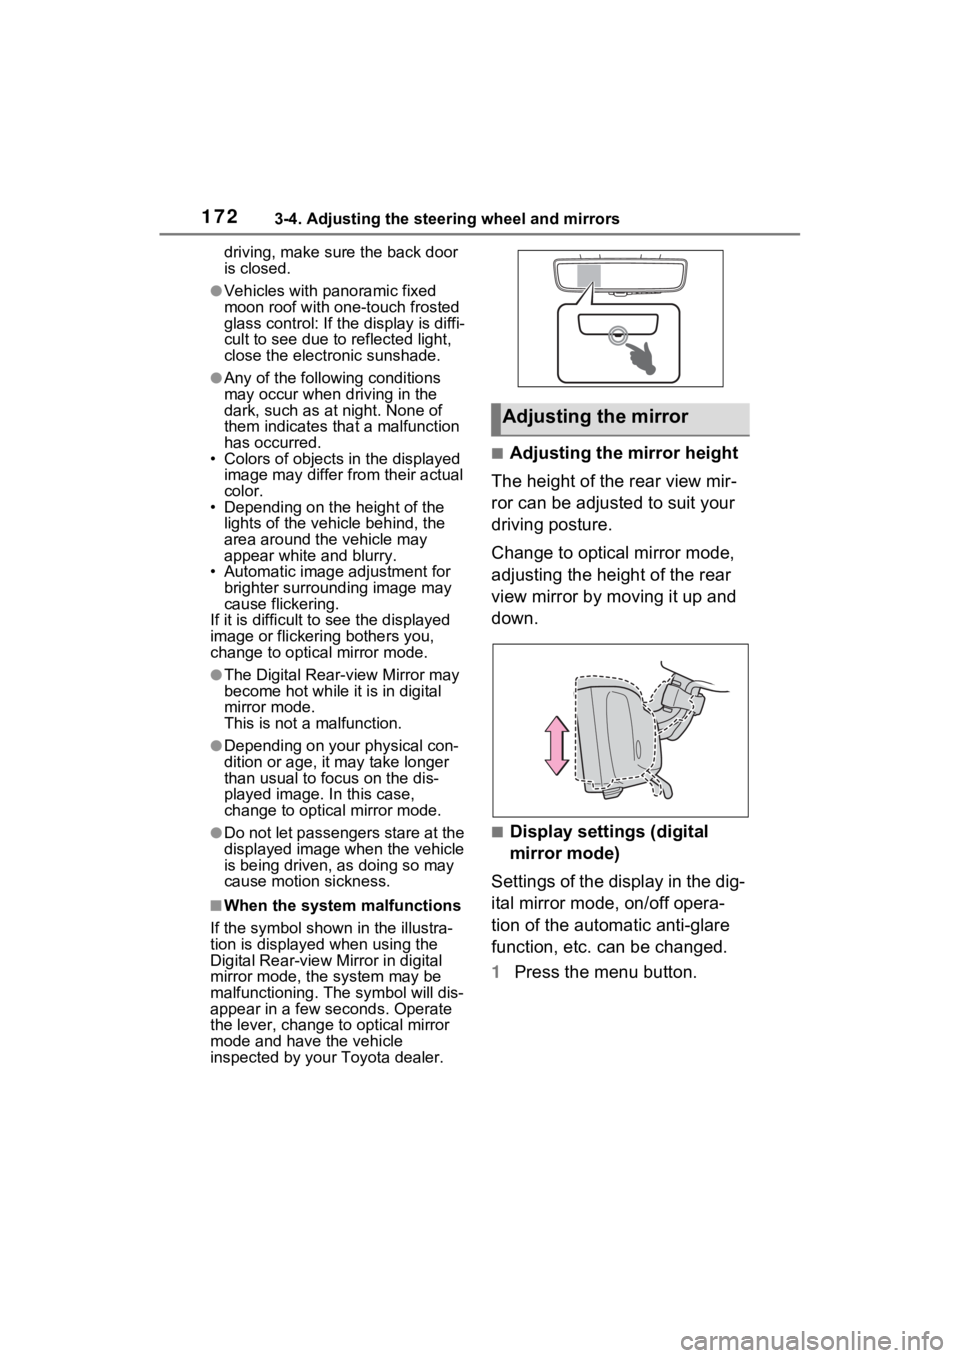
■Adjusting the mirror height
The height of the rear view mir-
ror can be adjusted to suit your
driving posture.
Change to optical mirror mode,
adjusting the height of the rear
view mirror by moving it up and
down.
■Display settings (digital
mirror mode)
Settings of the display in the dig-
ital mirror mode, on/off opera-
tion of the automatic anti-glare
function, etc. can be changed.
1 Press the menu button.
Adjusting the mirror