2023 TOYOTA RAV4 PRIME remote control
[x] Cancel search: remote controlPage 9 of 662
9
better understanding of the cir-
cumstances in which crashes
and injuries occur.
NOTE: EDR data are recorded
by your vehicle only if a non-triv-
ial crash situation occurs; no
data are recorded by the EDR
under normal driving conditions
and no personal data (e.g.,
name, gender, age, and crash
location) are recorded. How-
ever, other parties, such as law
enforcement, could combine the
EDR data with the type of per-
sonally identifying data rou-
tinely acquired during a crash
investigation.
To read data recorded by an
EDR, special equipment is
required, and access to the
vehicle or the EDR is needed. In
addition to the vehicle manufac-
turer, other parties, such as law
enforcement, that have the spe-
cial equipment, can read the
information if they have access
to the vehicle or the EDR.
Disclosure of the EDR data
Toyota will not disclose the data
recorded in an EDR to a third party
except when:
• An agreement from the vehicle’s
owner (or the less ee for a leased
vehicle) is obtained
• In response to an official request by the police, a court of law or a
government agency
• For use by Toyota in a lawsuit
However, if necessary, Toyota may:
• Use the data for research on
vehicle safety performance
• Disclose the data to a third party for research pur poses without
disclosing information about the
specific vehicle or vehicle owner
The SRS airbag and seat belt
pretensioner devices in your
Toyota contain ex plosive chemi-
cals. If the vehicle is scrapped
with the airbags and seat belt
pretensioners left as they are,
this may cause an accident such
as fire. Be sure to have the sys-
tems of the SRS airbag and seat
belt pretensioner removed and
disposed of by a qualified ser-
vice shop or by your Toyota
dealer before you scrap your
vehicle.
Special handling may apply,
See www.dtsc.ca.gov/
hazardouswaste/perchlorate.
Your vehicle has components
that may contain perchlorate.
These components may include
the airbags, seat belt preten-
sioners, wireless remote control
batteries, and the batteries in
the tire pressure warning valve
and transmitters.
Scrapping of your Toyota
Perchlorate Material
Page 20 of 662
20Pictorial index
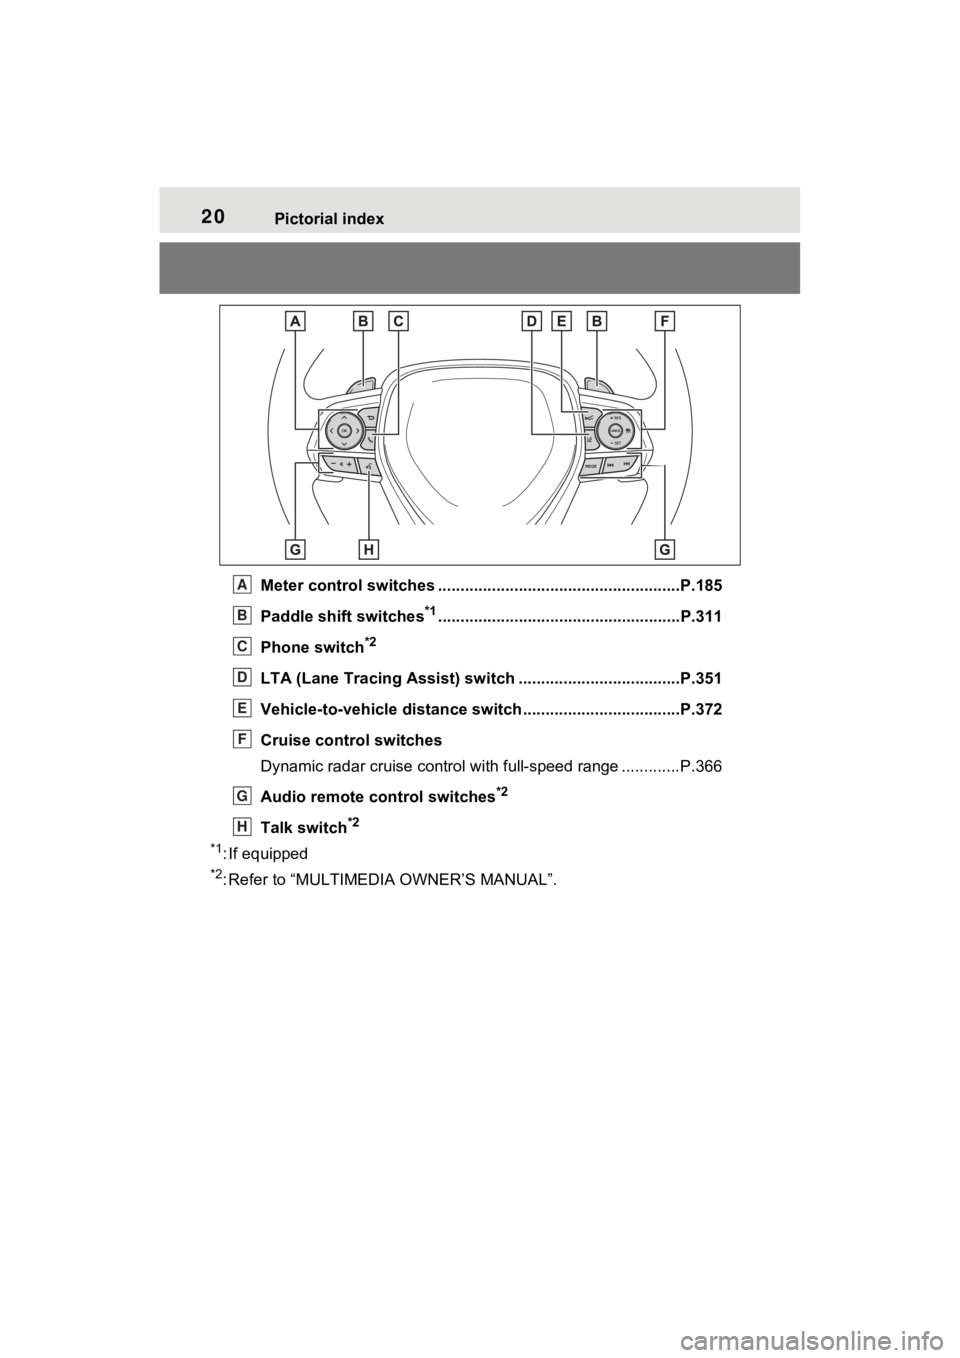
Meter control switches ......................................................P.185
Paddle shift switches
*1......................................................P.311
Phone switch
*2
LTA (Lane Tracing Assist) sw itch ....................................P.351
Vehicle-to-vehicle distance switch ...................................P.372
Cruise control switches
Dynamic radar cruise control with full-speed range ............. P.366
Audio remote control switches
*2
Talk switch*2
*1
: If equipped
*2: Refer to “MULTIMEDIA OWNER’S MANUAL”.
A
B
C
D
E
F
G
H
Page 71 of 662

711-4. Theft deterrent system
1
For safety and security
*: If equipped
■Items to check before lock-
ing the vehicle
To prevent unexpected trigger-
ing of the alarm and vehicle
theft, make sure of the following:
Nobody is in the vehicle.
The side windows and moon
roof (if equipped) or pan-
oramic moon roof (if
equipped) are closed before
the alarm is set.
No valuables or other per-
sonal items are left in the
vehicle.
■Setting
Close the doors and hood, and
lock all the doors. The system will be set automatically after 30
seconds.
The security indicator changes from
being on to flashing when the sys-
tem is set.
If all doors are closed with hood
open, alarm system can be set.
(
P.71)
■Canceling or stopping
Do one of the following to deac-
tivate or stop the alarm:
Unlock the doors using the
entry function or wireless
remote control.
Turn the power switch to ACC
or ON, or start the hybrid sys-
tem. (The alarm will be deacti-
vated or stopped after a few
seconds.)
■System maintenance
The vehicle has a maintenance-free
type alarm system.
■Triggering of the alarm
The alarm may be triggered in the
following situations:
(Stopping the alarm deactivates the
alarm system.)
●The doors are unlocked using the
mechanical key.
Alarm*
The alarm uses light and
sound to give an alert when
an intrusion is detected.
The alarm is triggered in the
following situations when
the alarm is set:
A locked door is unlocked or
opened in any way other
than using the entry func-
tion or wireless remote con-
trol. (The doors will lock
again automatically.)
The hood is opened.
Setting/canceling/stop-
ping the alarm system
Page 105 of 662
1052-2. Charging
2
Plug-in hybrid system
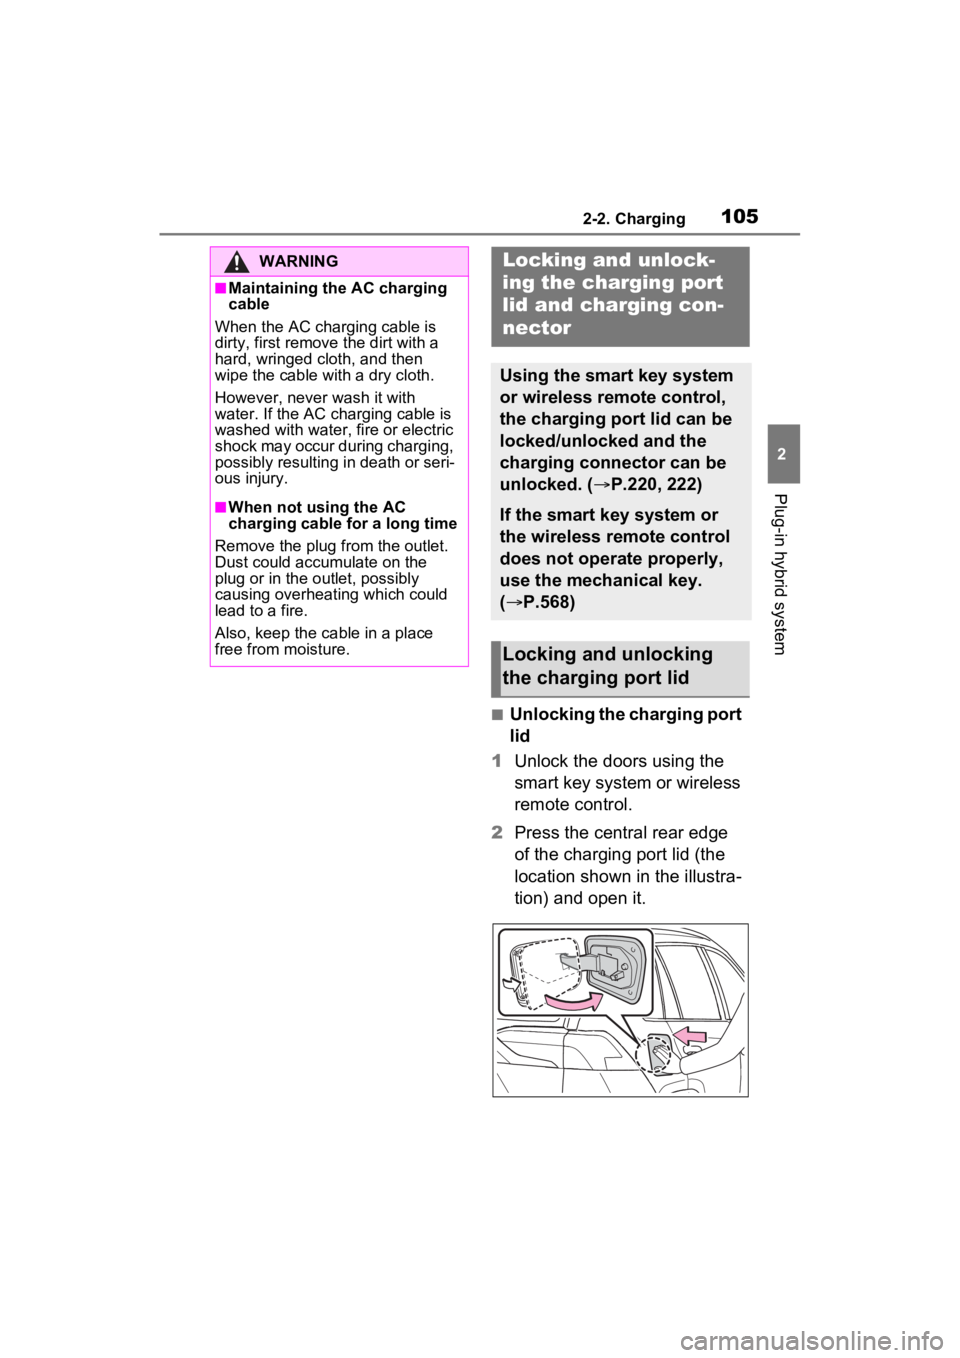
■Unlocking the charging port
lid
1 Unlock the doors using the
smart key system or wireless
remote control.
2 Press the central rear edge
of the charging port lid (the
location shown in the illustra-
tion) and open it.
WARNING
■Maintaining the AC charging
cable
When the AC charging cable is
dirty, first remove the dirt with a
hard, wringed cloth, and then
wipe the cable with a dry cloth.
However, never wash it with
water. If the AC charging cable is
washed with water, fire or electric
shock may occur during charging,
possibly resulting in death or seri-
ous injury.
■When not using the AC
charging cable for a long time
Remove the plug from the outlet.
Dust could accumulate on the
plug or in the outlet, possibly
causing overheating which could
lead to a fire.
Also, keep the ca ble in a place
free from moisture.
Locking an d unlock-
ing the charging port
lid and cha rging con-
nector
Using the smart key system
or wireless remote control,
the charging port lid can be
locked/unlocked and the
charging connector can be
unlocked. ( P.220, 222)
If the smart key system or
the wireless remote control
does not operate properly,
use the mechanical key.
(P.568)
Locking and unlocking
the charging port lid
Page 106 of 662
1062-2. Charging
■Locking the charging port
lid
The charging port lid will be
locked when the lid is closed
and the doors are locked using
the smart key system or wire-
less remote control.
■Security feature
If the doors are l ocked by the secu-
rity function when the charing port
lid is closed, the cha rging port lid will
also be locked. ( P.223)
■Locking the char ging port lid
If the charging port lid is closed after
the doors are lock ed, the lid will not
be locked. In this case, close the lid
and then lock the doors again.
■If the charging port lid does not
open
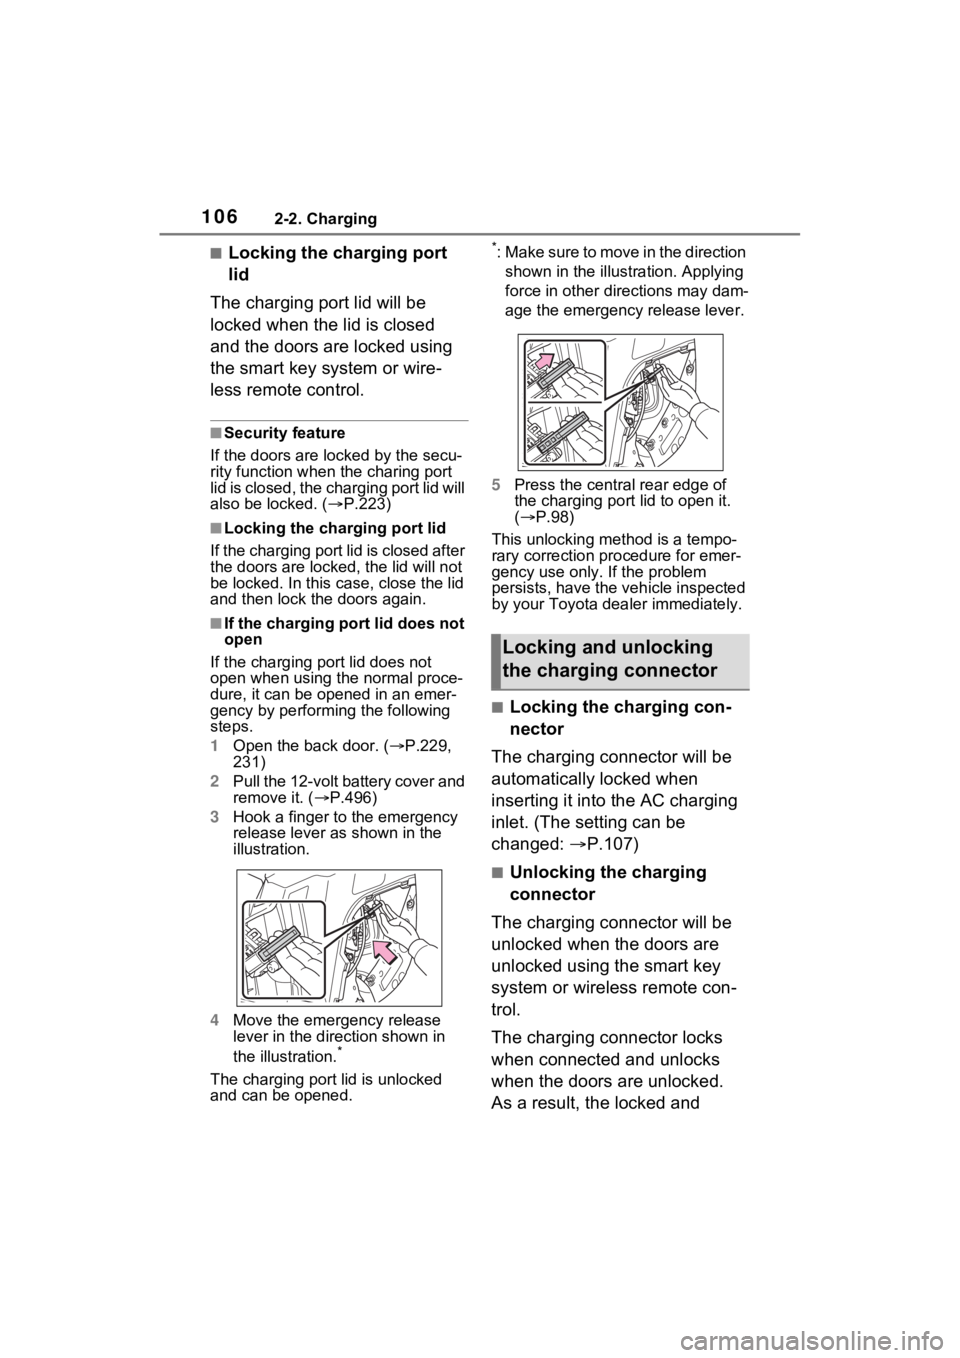
If the charging port lid does not
open when using the normal proce-
dure, it can be ope ned in an emer-
gency by performing the following
steps.
1 Open the back door. ( P.229,
231)
2 Pull the 12-volt battery cover and
remove it. ( P.496)
3 Hook a finger to the emergency
release lever as shown in the
illustration.
4 Move the emergency release
lever in the direction shown in
the illustration.
*
The charging port lid is unlocked
and can be opened.
*: Make sure to move in the direction
shown in the illust ration. Applying
force in other directions may dam-
age the emergency release lever.
5 Press the central rear edge of
the charging port lid to open it.
( P.98)
This unlocking method is a tempo-
rary correction procedure for emer-
gency use only. If the problem
persists, have the vehicle inspected
by your Toyota dea ler immediately.
■Locking the charging con-
nector
The charging connector will be
automatically locked when
inserting it into the AC charging
inlet. (The setting can be
changed: P.107)
■Unlocking the charging
connector
The charging connector will be
unlocked when the doors are
unlocked using the smart key
system or wireless remote con-
trol.
The charging connector locks
when connected and unlocks
when the doors are unlocked.
As a result, the locked and
Locking and unlocking
the charging connector
Page 107 of 662
1072-2. Charging
2
Plug-in hybrid system
unlocked condition of the
charging connector may not
match the locked or unlocked
condition of the doors.
If the charging connector is
locked while the doors are
unlocked, it can be unlocked
using the following operations.
When using the smart key
system, unlock the doors
again after performing a lock-
ing operation once. ( P.222)
When using the wireless
remote control, perform an
unlock operation by pressing
the unlock button. ( P.222)
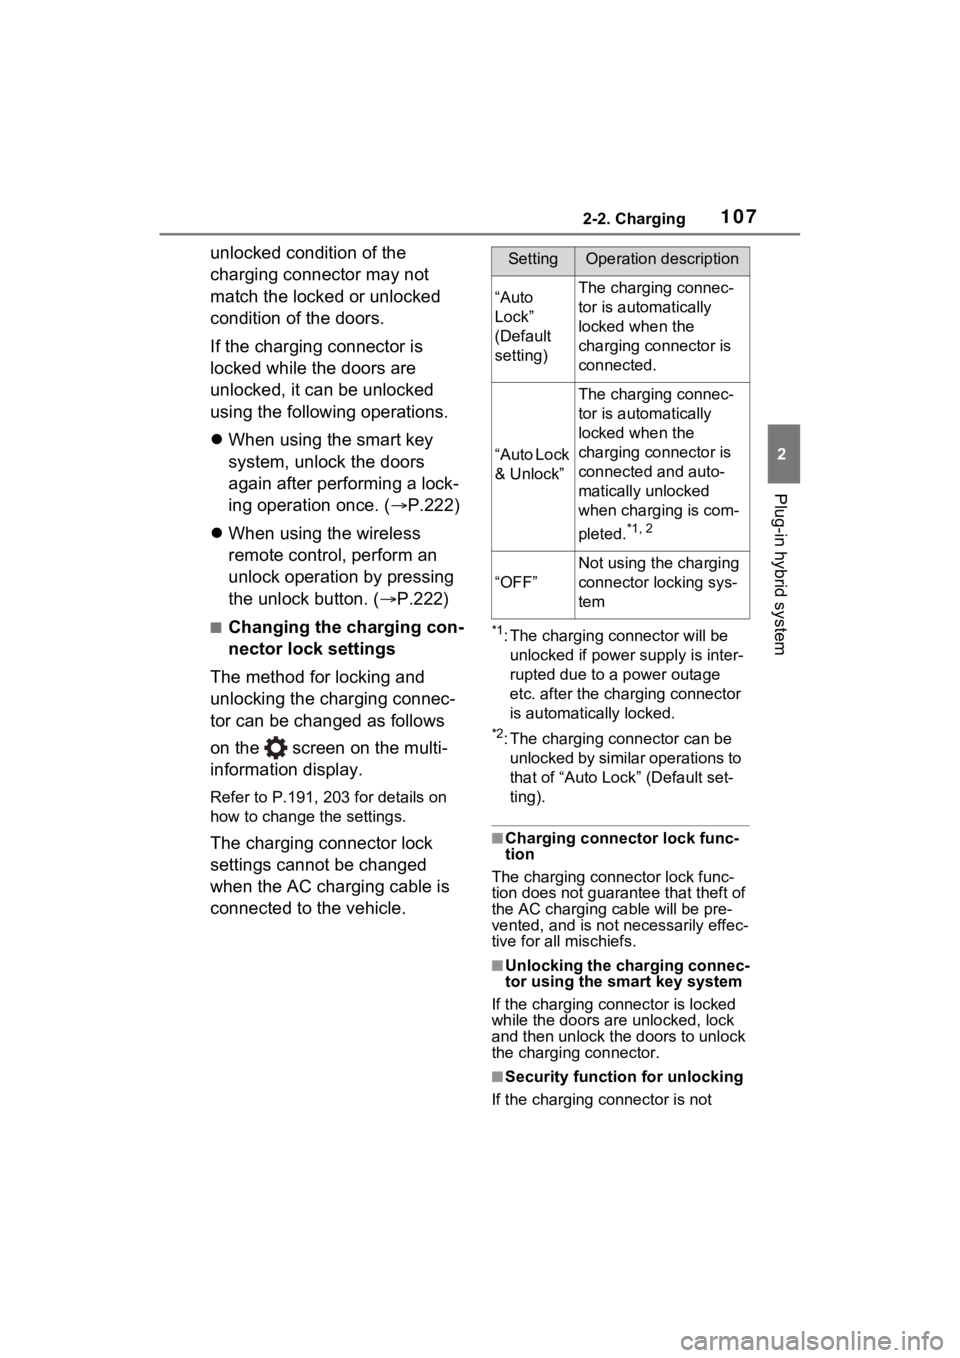
■Changing the charging con-
nector lock settings
The method for locking and
unlocking the charging connec-
tor can be changed as follows
on the screen on the multi-
information display.
Refer to P.191, 203 for details on
how to change the settings.
The charging connector lock
settings cannot be changed
when the AC charging cable is
connected to the vehicle.
*1: The charging connector will be unlocked if power supply is inter-
rupted due to a power outage
etc. after the charging connector
is automatically locked.
*2: The charging connector can be unlocked by similar operations to
that of “Auto Loc k” (Default set-
ting).
■Charging connector lock func-
tion
The charging connector lock func-
tion does not guarantee that theft of
the AC charging cable will be pre-
vented, and is not necessarily effec-
tive for all mischiefs.
■Unlocking the charging connec-
tor using the smart key system
If the charging connector is locked
while the doors are unlocked, lock
and then unlock the doors to unlock
the charging connector.
■Security function for unlocking
If the charging connector is not
SettingOperation description
“Auto
Lock”
(Default
setting)The charging connec-
tor is automatically
locked when the
charging connector is
connected.
“Auto Lock
& Unlock”
The charging connec-
tor is automatically
locked when the
charging connector is
connected and auto-
matically unlocked
when charging is com-
pleted.
*1, 2
“OFF”
Not using the charging
connector locking sys-
tem
Page 114 of 662

1142-2. Charging
peratures.
This control stops 31 days
after the AC charging cable is
connected, even if it is still
connected to the vehicle.
When this control operates,
charging schedule settings
are ignored and charging
starts.
■“Battery Cooler”
When the hybrid battery (trac-
tion battery) is hot and the AC
charging cable is connected to
the vehicle, this function cools
the hybrid battery (traction bat-
tery) before charging is carried
out.
“Battery Cooler” will operate
when the “Battery Cooler” of
the “Charging Settings” on the
multi-information display is
on. ( P.193)
When the charging voltage is
120 V, the function does not
operate.
■Traction battery heating and
cooling system (“Battery
Heater” and “Battery Cooler”)
●The system operates when the
hybrid battery (traction battery) is
below or above a c ertain tempera-
ture.
●The system may operate when
charging is not being performed.
●When the charging schedule is
used ( P.128), this function will
operate according to the charging
schedule.
■“Battery Heater”
●When “Battery Heater” is operat-
ing, the charging indicator illumi-
nates.
●When the AC charging cable is
removed from the vehicle or
remains connected to the vehicle
for approximately 3 days, the sys-
tem automatically stops.
●When “Battery Heater” is operat-
ing during charging, the charging
time may be longer than normal.
●If the outside temperature
becomes high w hile “Battery
Heater” is operating, charging
may complete ear lier than the
“Departure” or “ Departure time”
time set. ( P.128)
●When the following operations are
performed while “Battery Heater”
is operating, the hybrid battery
(traction battery) heating opera-
tion stops.
• The shift lever is changed to any position other than P
• The Remote Air Conditioning Sys- tem is operated ( P.431)
●“Battery Heater” may operate
even when the hybrid battery
(traction battery) is fully charged
depending on the temperature of
the hybrid battery (traction bat-
tery).
• The remaining charge of the hybrid battery (traction battery)
decreases when “Battery Heater”
operates. The charging operation
may start again to charge the
hybrid battery (traction battery).
• “Charging Stopped Due to Pulled Charging Connector” may be
shown when the charging connec-
tor is removed while recharging.
( P.158)
■“Battery Cooler”
●The charging indi cator is illumi-
nated while “Batter y Cooler” is on
standby or operating.
●“Battery Cooler” is implemented
for a maximum of approximately
Page 127 of 662
1272-2. Charging
2
Plug-in hybrid system
has accumulated.
■When the outside temperature
is low or high
The level shown on the SOC (State
of Charge) gauge ( P.173, 178)
may drop slightly when the power
switch is turned to ON, even if
charging has bee n completed and
the hybrid battery (traction battery)
is fully charged. However, this does
not indicate a malfunction.
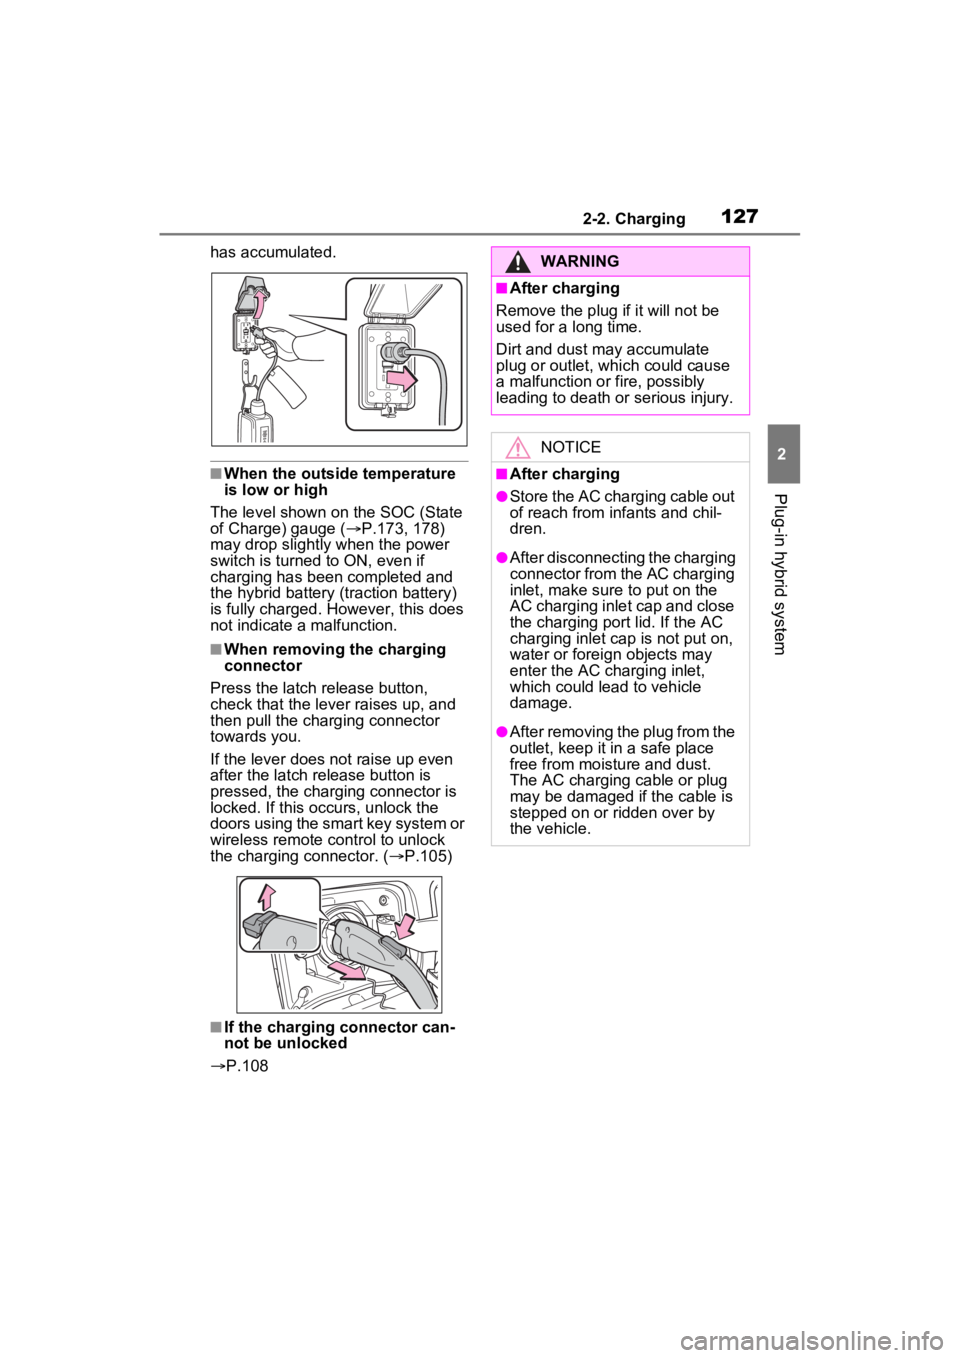
■When removing the charging
connector
Press the latch release button,
check that the lever raises up, and
then pull the charging connector
towards you.
If the lever does not raise up even
after the latch release button is
pressed, the charging connector is
locked. If this occurs, unlock the
doors using the smart key system or
wireless remote control to unlock
the charging connector. ( P.105)
■If the charging connector can-
not be unlocked
P.108
WARNING
■After charging
Remove the plug if it will not be
used for a long time.
Dirt and dust may accumulate
plug or outlet, which could cause
a malfunction or fire, possibly
leading to death or serious injury.
NOTICE
■After charging
●Store the AC charging cable out
of reach from infants and chil-
dren.
●After disconnecting the charging
connector from the AC charging
inlet, make sure to put on the
AC charging inlet cap and close
the charging port lid. If the AC
charging inlet cap is not put on,
water or foreign objects may
enter the AC cha rging inlet,
which could lead to vehicle
damage.
●After removing the plug from the
outlet, keep it in a safe place
free from moisture and dust.
The AC charging cable or plug
may be damaged if the cable is
stepped on or ridden over by
the vehicle.