2023 TOYOTA RAV4 PRIME change wheel
[x] Cancel search: change wheelPage 38 of 662

381-1. For safe use
vehicle was involved in an acci-
dent that was not severe enough
to cause the SRS side and curtain
shield airbags to inflate.
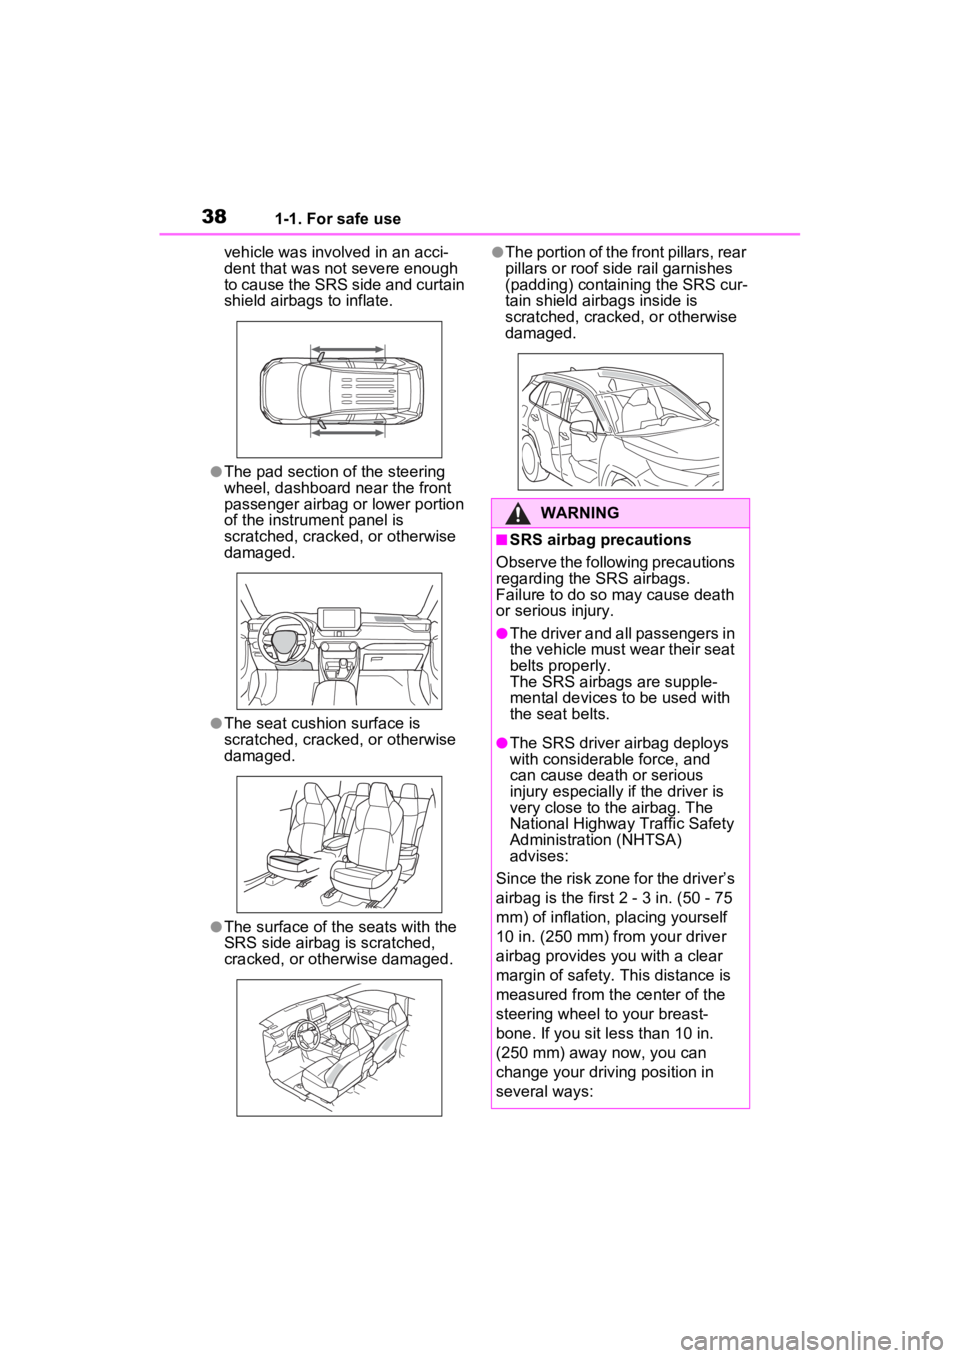
●The pad section of the steering
wheel, dashboard near the front
passenger airbag o r lower portion
of the instrument panel is
scratched, cracked, or otherwise
damaged.
●The seat cushion surface is
scratched, cracked, or otherwise
damaged.
●The surface of the seats with the
SRS side airbag is scratched,
cracked, or otherwise damaged.
●The portion of the front pillars, rear
pillars or roof side rail garnishes
(padding) containing the SRS cur-
tain shield airbags inside is
scratched, cracked, or otherwise
damaged.
WARNING
■SRS airbag precautions
Observe the following precautions
regarding the SRS airbags.
Failure to do so may cause death
or serious injury.
●The driver and all passengers in
the vehicle must wear their seat
belts properly.
The SRS airbags are supple-
mental devices to be used with
the seat belts.
●The SRS driver airbag deploys
with considerable force, and
can cause death or serious
injury especially if the driver is
very close to the airbag. The
National Highway Traffic Safety
Administration (NHTSA)
advises:
Since the risk zone for the driver’s
airbag is the first 2 - 3 in. (50 - 75
mm) of inflation, placing yourself
10 in. (250 mm) from your driver
airbag provides you with a clear
margin of safety. This distance is
measured from the center of the
steering wheel to your breast-
bone. If you sit less than 10 in.
(250 mm) away now, you can
change your driving position in
several ways:
Page 92 of 662

922-1. Plug-in hybrid system
HV mode while on the free-
way and change to EV mode
or AUTO EV/HV mode after
leaving the freeway. (P.76)
Turn the “A/C” switch off
when it is not needed. Doing
so can help reduce excessive
electricity and fuel consump-
tion.
In summer: When the ambient tem-
perature is high, use the recircu-
lated air mode. Doing so will help to
reduce the burden on the air condi-
tioning system and reduce electric-
ity and fuel consumption as well.
In winter: Avoid excessive and
unnecessary use o f the heater.
Usage of the heated steering wheel
(if equipped) and seat heaters are
effective. ( P.433)
Using the Remote Air Condi-
tioning System ( P.431)
while the AC charging cable is
connected to the vehicle can
reduce electricity consump-
tion immediately after starting
off by operating air condition-
ing mainly using electricity
from an external power
source.
When setting the charging
schedule, setting the charging
mode to “Departure” or
“Departure time” and “Climate
Prep” or “Climate preparation”
to on can reduce electricity
consumption immediately after starting off by operating
air conditioning before
charging is completed.
(
P.128)
Make sure to check the tire infla-
tion pressure frequently. If there
is improper tire inflation pres-
sure in the tires, the EV driving
range will become shorter, and
fuel consumption when in HV
mode will increase.
Also, as snow tires can cause
large amounts of friction, their
use on dry roads can lead to
increased fuel and electricity
consumption.
Carrying heavy luggage will lead
to poor fuel economy. Avoid car-
rying unnecessary luggage.
Installing a large roof rack will
also cause poor fuel economy.
Since the gasoline engine starts
up and cuts out automatically,
warming up is not necessary.
Air conditioningChecking tire inflation
pressure
Luggage
Warming up before driv-
ing
Page 192 of 662

1923-1. Instrument cluster
display was reset*
• “Distance”: Displays the distance
driven since the display was
reset
*
• “Total Time”: Displays the elapsed time since the display
was reset
*
*
: To reset, display the desired item and press and hold .
■Energy monitor
P.212
■Tire pressure
P.500
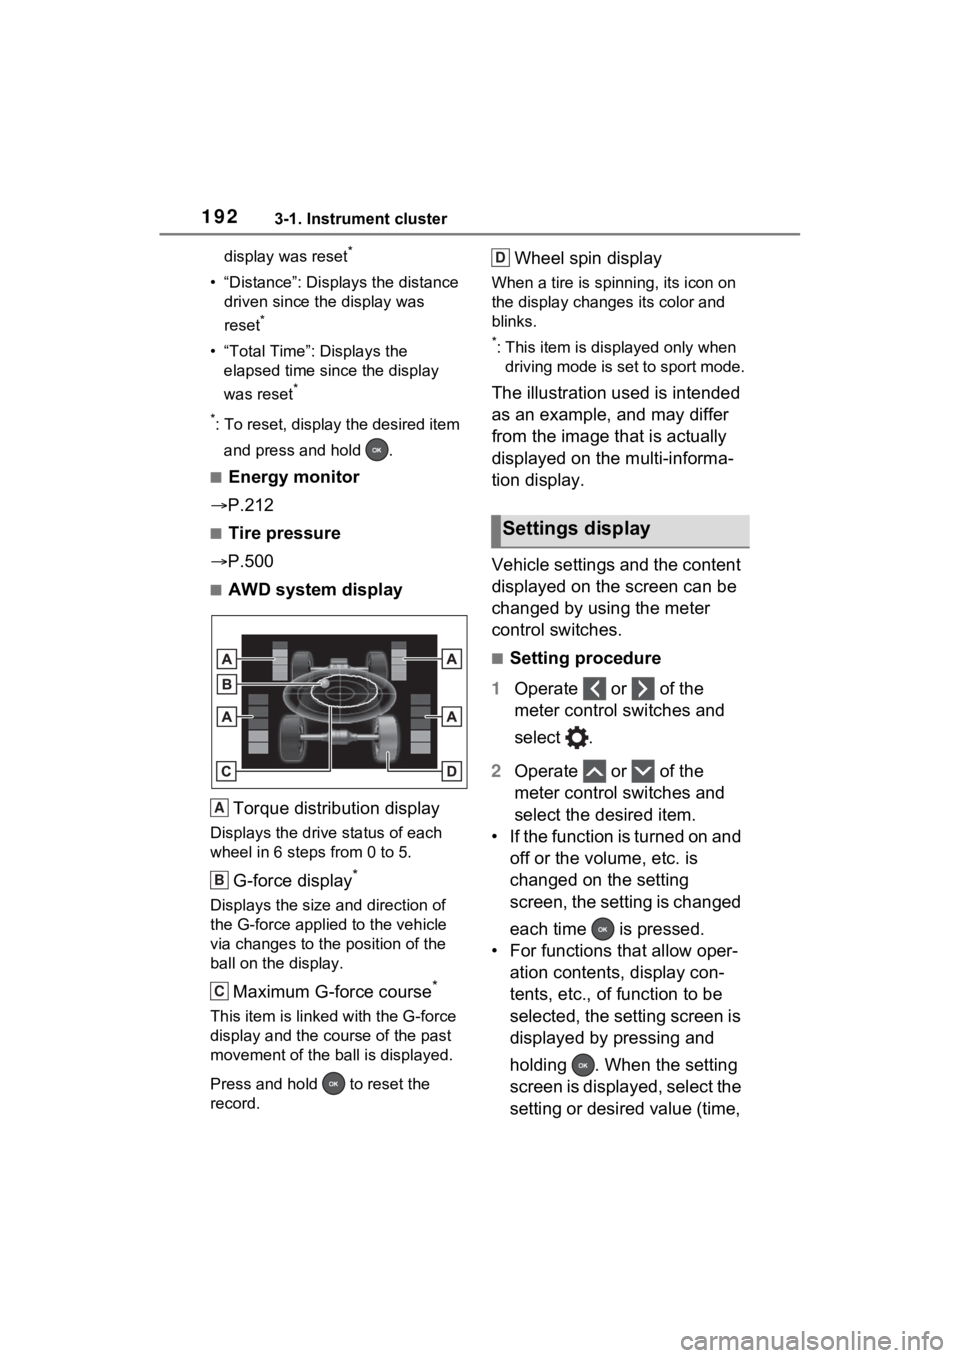
■AWD system display
Torque distribution display
Displays the drive status of each
wheel in 6 steps from 0 to 5.
G-force display*
Displays the size and direction of
the G-force applie d to the vehicle
via changes to the position of the
ball on the display.
Maximum G-force course*
This item is linke d with the G-force
display and the course of the past
movement of the ball is displayed.
Press and hold to reset the
record.
Wheel spin display
When a tire is spi nning, its icon on
the display changes its color and
blinks.
*: This item is displayed only when driving mode is set to sport mode.
The illustration used is intended
as an example, and may differ
from the image that is actually
displayed on the multi-informa-
tion display.
Vehicle settings and the content
displayed on the screen can be
changed by using the meter
control switches.
■Setting procedure
1 Operate or of the
meter control switches and
select .
2 Operate or of the
meter control switches and
select the desired item.
• If the function is turned on and off or the volume, etc. is
changed on the setting
screen, the setting is changed
each time is pressed.
• For functions that allow oper- ation contents, display con-
tents, etc., of function to be
selected, the setting screen is
displayed by pressing and
holding . When the setting
screen is displayed, select the
setting or desired value (time,
A
B
C
Settings display
D
Page 195 of 662

1953-1. Instrument cluster
3
Vehicle status information and indicators
power back door system operates.
*: Vehicles with Hands Free Power Back Door
“TPWS” (Tire Pressure Warn-
ing System) (if equipped)
( P.500)
• “Setting Pressure”
Select to initialize the tire pressure
warning system.
• “Identify Wheel”
Select to register the ID codes of
the tire pressure s ensors to the tire
pressure warning system.
• “Setting Unit”
Select to change t he units of mea-
sure displayed.
“Scheduled Maintenance”
( P.479)
Select to reset the scheduled main-
tenance information (message indi-
cating maintenance is required and
distance until the next mainte-
nance) after all maintenance is per-
formed.
“Rear Seat Reminder”
( P.224)
Select to enable/disable the rear
seat reminder.
■ Settings
“Language”
Select to change the language on
the multi-inform ation display.
“Units”
Select to change t he units of mea-
sure displayed.
“Meter Type”
Select to change the speedometer display.
(EV indicator) ( P.80)
Select to enable/disable the EV
indicator.
(Driving information dis-
play settings)
Select to set up t he following items.
• “Hybrid System”
Select to enable/disable the ECO
Accelerator Guidance (P.187).
• “Fuel Economy”
Select to change the display on
Fuel Economy ( P.186).
• “Power Consumption”
Select to change the display on
Power Consumption ( P.186).
(Audio settings) (if
equipped)
Select to enable/disable
screen.
(Vehicle information dis-
play settings)
• “Display Contents”
Select to set up t he following items.
“Energy monitor”:
Select to enable/disable the Energy
monitor ( P.212)
“AWD”:
Select to enable /disable the AWD
system display ( P.191).
• “Drive Info Type”
Select to change the drive informa-
tion type display between trip and
total. ( P.190).
• “Drive Info Items”
Page 204 of 662

2043-1. Instrument cluster
*: To reset, display the desired item and press and hold .
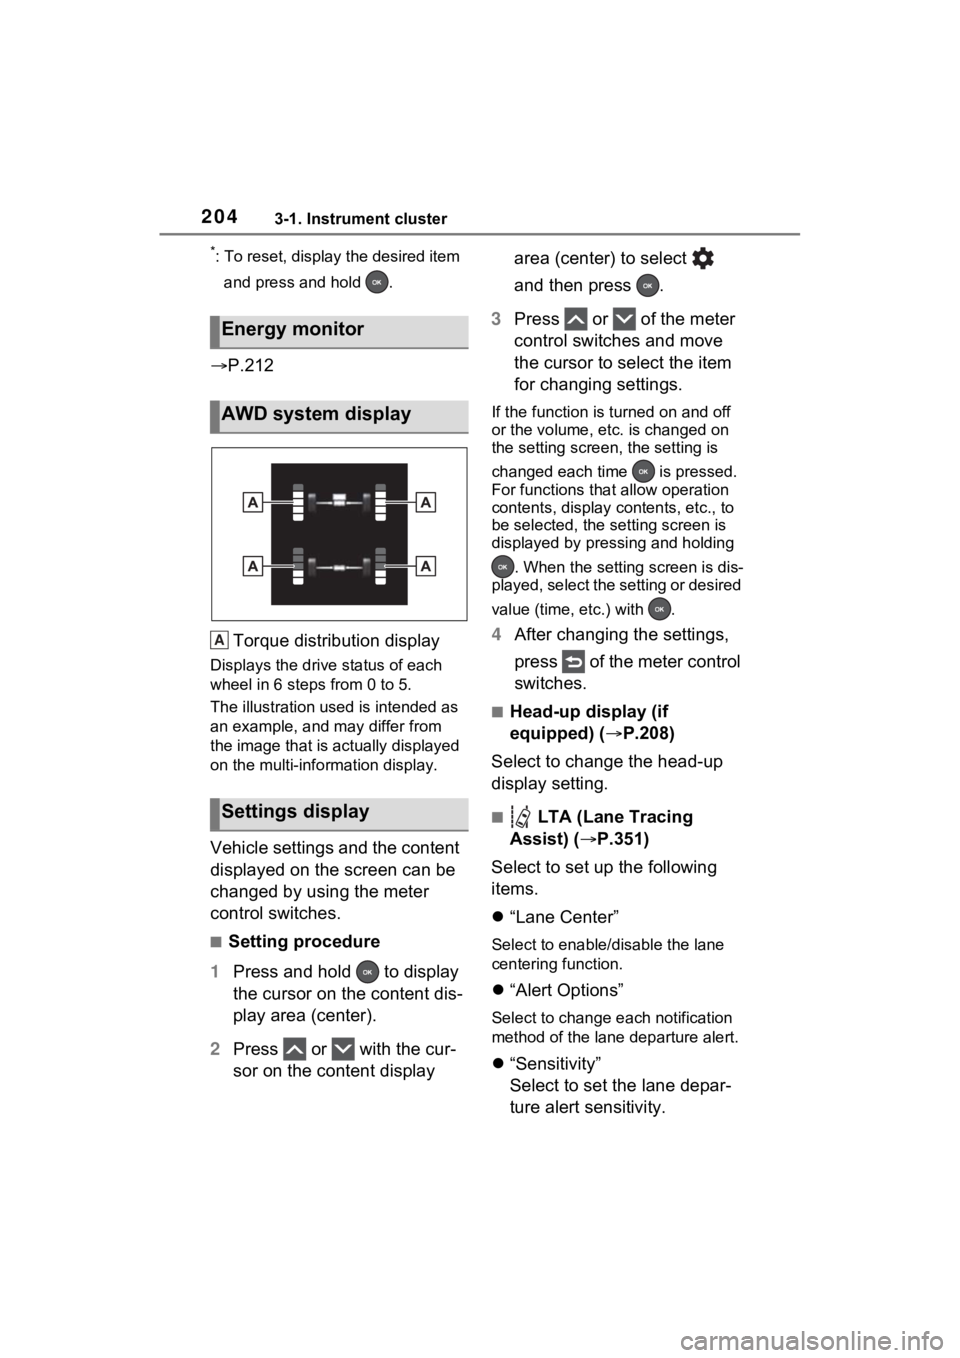
P.212
Torque distribution display
Displays the drive status of each
wheel in 6 steps from 0 to 5.
The illustration used is intended as
an example, and may differ from
the image that is actually displayed
on the multi-info rmation display.
Vehicle settings and the content
displayed on the screen can be
changed by using the meter
control switches.
■Setting procedure
1 Press and hold to display
the cursor on the content dis-
play area (center).
2 Press or with the cur-
sor on the content display area (center) to select
and then press .
3 Press or of the meter
control switches and move
the cursor to select the item
for changing settings.
If the function is turned on and off
or the volume, etc. is changed on
the setting screen, the setting is
changed each time is pressed.
For functions that allow operation
contents, display contents, etc., to
be selected, the setting screen is
displayed by pressing and holding
. When the setting screen is dis-
played, select the setting or desired
value (time, etc.) with .
4 After changing the settings,
press of the meter control
switches.
■Head-up display (if
equipped) ( P.208)
Select to change the head-up
display setting.
■ LTA (Lane Tracing
Assist) ( P.351)
Select to set up the following
items.
“Lane Center”
Select to enable /disable the lane
centering function.
“Alert Options”
Select to change each notification
method of the lane departure alert.
“Sensitivity”
Select to set the lane depar-
ture alert sensitivity.
Energy monitor
AWD system display
Settings display
A
Page 206 of 662

2063-1. Instrument cluster
when the system recognizes
excess speed and Do Not Enter
sign.
“Notification Level”
Select to change e ach notification
level used to notify the driver when
the system recognizes a speed limit
sign.
■ Vehicle Settings
“Charging Settings”
Select to set up the following items.
• “Charging Schedule”
Select to register or change the
charging schedule. ( P.128)
• “Charging Current”
Select to change the charging cur-
rent. ( P.111)
• “Battery Cooler”
Select to enable/disable the bat-
tery cooler. ( P.114)
• “Battery Heater”
Select to enable/disable the bat-
tery heater. ( P.113)
DRCC
Select to change the curve speed
reduction function setting.
PBD (Power Back Door)
( P.229)
Select to set up the following items.
• System settings
Select to enable/disable the power
back door system.
• “Hands Free”
Select to enable/disable the Hands
Free Power Back Door.
• “Opening Adjustment” Select the open position when
power back door is fully open.
•“Volume”
Select to set the volume of the
buzzer which sounds when the
power back door system operates.
“TPWS” (Tire Pressure Warn-
ing System) (if equipped)
( P.500)
• “Setting Pressure”
Select to initialize the tire pres-
sure warning system.
• “Identifying Each Wheel & Posi- tion”
Select to change the tire pressure
warning system sensor ID code
set. To enable this function, a
second set of tire pressure warn-
ing system sensor ID codes must
be registered by a Toyota dealer.
For information regarding chang-
ing the registered ID code set,
contact your Toyota dealer.
• “Pressure unit setting” Select to change the units of
measure displayed.
Rear Seat Reminder
( P.224)
Select to enable/disable the
rear seat reminder function.
■ Settings
“Language”
Select to change the lan-
guage on the multi-informa-
tion display.
“Units”
Select to change the unit of
measure for fuel consump-
tion.
Page 212 of 662

2123-1. Instrument cluster
systems will be displayed when
necessary:
■Driving support systems
Displays a warning/sugges-
tion/advice message or the
operating state of a relevant
system.
PCS (Pre-Collision System)
( P.340)
Brake Override System
( P.283)
Drive-Start Control ( P.283)
Parking Support Brake func-
tion (static objects) (if
equipped) ( P.400)
Displayed content is the same as
that displayed on the meter. For
details, refer to the explanations of
each system.
■ / icons
Displays the following multi-
information display linked icons:
: Master warning icon
Displayed when a warning mes-
sage is displayed on the multi-infor-
mation display.
: Information icon
Displayed when a sugges-
tion/advice pop-up display is dis-
played on the multi-information
display.
■Warning message
Some warning messages are
displayed when necessary,
according to certain conditions.
Displayed content is the same as that displayed on
the multi-informa-
tion display. For details, refer to the
explanations of each system.
■Audio system operation
status (if equipped)
Displayed when an audio
remote control switch on the
steering wheel is operated.
■Hands-free system status
(if equipped)
Displayed when the hands-free
system is operated.
■Outside temperature dis-
play
Displayed when the power
switch is turned to ON or when
the low outside temperature
indicator is flashing.
■When a pop-up display is dis-
played
When a pop-up display is displayed,
a current display may no longer be
displayed. In this case, the display
will return afte r the pop-up display
disappears.
■Outside temperature display
●When the ambient temperature is
approximately 37°F (3°C) or
lower, will flash for approxi-
mately 10 second s and the out-
side temperat ure display will turn
off.
●In the following sit uations, the cor-
rect outside temperature may not
be displayed, or the display may
take longer than normal to
change:
• When stopped (including when using “My Room Mode”), or driv-
ing at low speeds (less than 12
mph [20 km/h])
Page 257 of 662

2574-4. Adjusting the steering wheel and mirrors
4
Before driving
■To prevent sensor error (vehi-
cles with auto anti-glare inside
rear view mirror)
To ensure that the sensors operate
properly, do not touch or cover
them.
*: If equipped
Digital Rear-view Mir-
ror*
The Digital Rear-view Mirror
is a system that uses the
camera on the rear of the
vehicle and displays its
image on the display of the
Digital Rear-view Mirror.
The Digital Rear-view Mirror
can be changed between
optical mirror mode and dig-
ital mirror mode by operat-
ing the lever.
The Digital Rear-view Mirror
allows the driver to see the
rear view despite obstruc-
tions, such as the head
restraints or luggage,
ensuring rear visibility.
Also, the rear seats are not
displayed and privacy of the
passengers is enhanced.
WARNING
Observe the following precau-
tions.
Failure to do so may result in
death or serious injury.
■Before using the Digital Rear-
view Mirror
●Make sure to adjust the mirror
before driving. ( P.260)
• Change to optical mirror mode and adjust the position of the
Digital Rear-view Mirror so that
the area behind your vehicle
can be viewed properly.