2023 TOYOTA RAV4 HYBRID emergency towing eyelet
[x] Cancel search: emergency towing eyeletPage 304 of 586

3024-5. Using the driving support systems
Pay particular attention to the fol-
lowing objects:
●Wires, fences, ropes, etc.
●Cotton, snow and other materials
that absorb sound waves
●Sharply-angled objects
●Low objects
●Tall objects with upper sections
projecting outwards in the direc-
tion of your vehicle
People may not be detected if they
are wearing certain types of cloth-
ing.
■Situations in which the system
may not operate properly
Certain vehicle conditions and the
surrounding environment may affect
the ability of a sensor to correctly
detect objects. Particular instances
where this may occur are listed
below.
●There is dirt, snow or ice on a sen-
sor. (Cleaning the sensors will
resolve this problem.)
●A sensor is frozen. (Thawing the
area will resolve this problem.)
In especially cold weather, if a
sensor is frozen the sensor dis-
play may be displayed abnor-
mally, or objects, such as a wall,
may not be detected.
●When a sensor or the area around
a sensor is extremely hot or cold.
●On an extremely bumpy road, on
an incline, on gravel, or on grass.
●When vehicle horns, vehicle
detectors, motorcycle engines, air
brakes of large vehicles, the clear-
ance sonar of other vehicles or other devices which produce ultra-
sonic waves are near the vehicle.
●A sensor is coated with a sheet of
spray or heavy rain.
●If objects draw too close to the
sensor.
●When a pedestrian is wearing
clothing that does not reflect ultra-
sonic waves (ex. skirts with gath-
ers or frills).
●When objects that are not perpen-
dicular to the ground, not perpen-
dicular to the vehicle traveling
direction, uneven, or waving are in
the detection range.
●Strong wind is blowing.
●When driving in inclement weather
such as fog, snow or a sandstorm.
●When an object that cannot be
detected is between the vehicle
and a detected object.
●If an object such as a vehicle,
motorcycle, bicycle or pedestrian
cuts in front of the
vehicle or runs
out from the side of the vehicle.
●If the orientation of a sensor has
been changed due to a collision or
other impact.
●When equipment that may
obstruct a sensor is installed, such
as a towing eyelet, bumper pro-
tector (an additional trim strip,
etc.), bicycle c arrier, or snow
plow.
●If the front of the v ehicle is raised
or lowered due to the carried load.
●If the vehicle cannot be driven in a
stable manner, such as when the
vehicle has been in an accident or
is malfunctioning.
●When tire chains, a compact
spare tire or an emergency tire
puncture repai r kit are used.
■Situations in which the system
may operate even if there is no
possibility of a collision
In some situations, such as the fol-
lowing, the system may operate
Page 315 of 586

3134-5. Using the driving support systems
4
Driving
WARNING
■Cautions regarding the use of
the system
Do not overly rely on the system,
as doing so may lead to an acci-
dent.
Always drive while checking the
safety of the surroundings of the
vehicle.
Depending on the vehicle and
road conditions, weather, etc., the
system may not operate.
The detection capa bilities of sen-
sors and radars are limited.
Always drive while checking the
safety of the surroundings of the
vehicle.
●The driver is solely responsible
for safe driving. Always drive
carefully, taking care to observe
your surroundings. The Parking
Support Brake system is
designed to provide support to
lessen the severity of collisions.
However, it may not operate in
some situations.
●The Parking Support Brake sys-
tem is not designed to stop the
vehicle completely. Addition-
ally, even if the system has
stopped the vehicle, it is neces-
sary to depress the brake pedal
immediately as brake control
will be canceled after approxi-
mately 2 seconds.
●It is extremely dangerous to
check the system operations by
intentionally driving the vehicle
into the direction of a wall, etc.
Never attempt such actions.
■When to disable the Parking
Support Brake
In the following situations, disable
the Parking Support Brake as the
system may operate even though
there is no poss ibility of a colli-
sion.
●When inspecting the vehicle
using a chassis roller, chassis
dynamo or free roller.
●When loading the vehicle onto a
boat, truck or other transport
vessel.
●If the suspension has been
modified or tires of a size other
than specified are installed.
●If the front of the vehicle is
raised or lowered due to the
carried load.
●When equipment that may
obstruct a sensor is installed,
such as a towing eyelet, bumper
protector (an additional trim
strip, etc.), bicycle carrier, or
snow plow.
●When using automatic car
washing devices.
●If the vehicle cannot be driven in
a stable manner, such as when
the vehicle has been in an acci-
dent or is malfunctioning.
●When the vehicle is driven in a
sporty manner or off-road.
●When the tires are not properly
inflated.
●When the tires are very worn.
●When tire chains, a compact
spare tire or an emergency tire
puncture repair kit are used.
●When your vehicle is towing a
trailer or during emergency tow-
ing.
Page 453 of 586
4517-2. Steps to take in an emergency
7
When trouble arises
7-2.Steps to take in an emergency
The following may indicate a
problem with your transmission.
Contact your Toyota dealer or
commercial towing service
before towing.
The hybrid system warning
message is shown on the
multi-information display and
the vehicle does not move.
The vehicle makes an abnor-
mal sound.
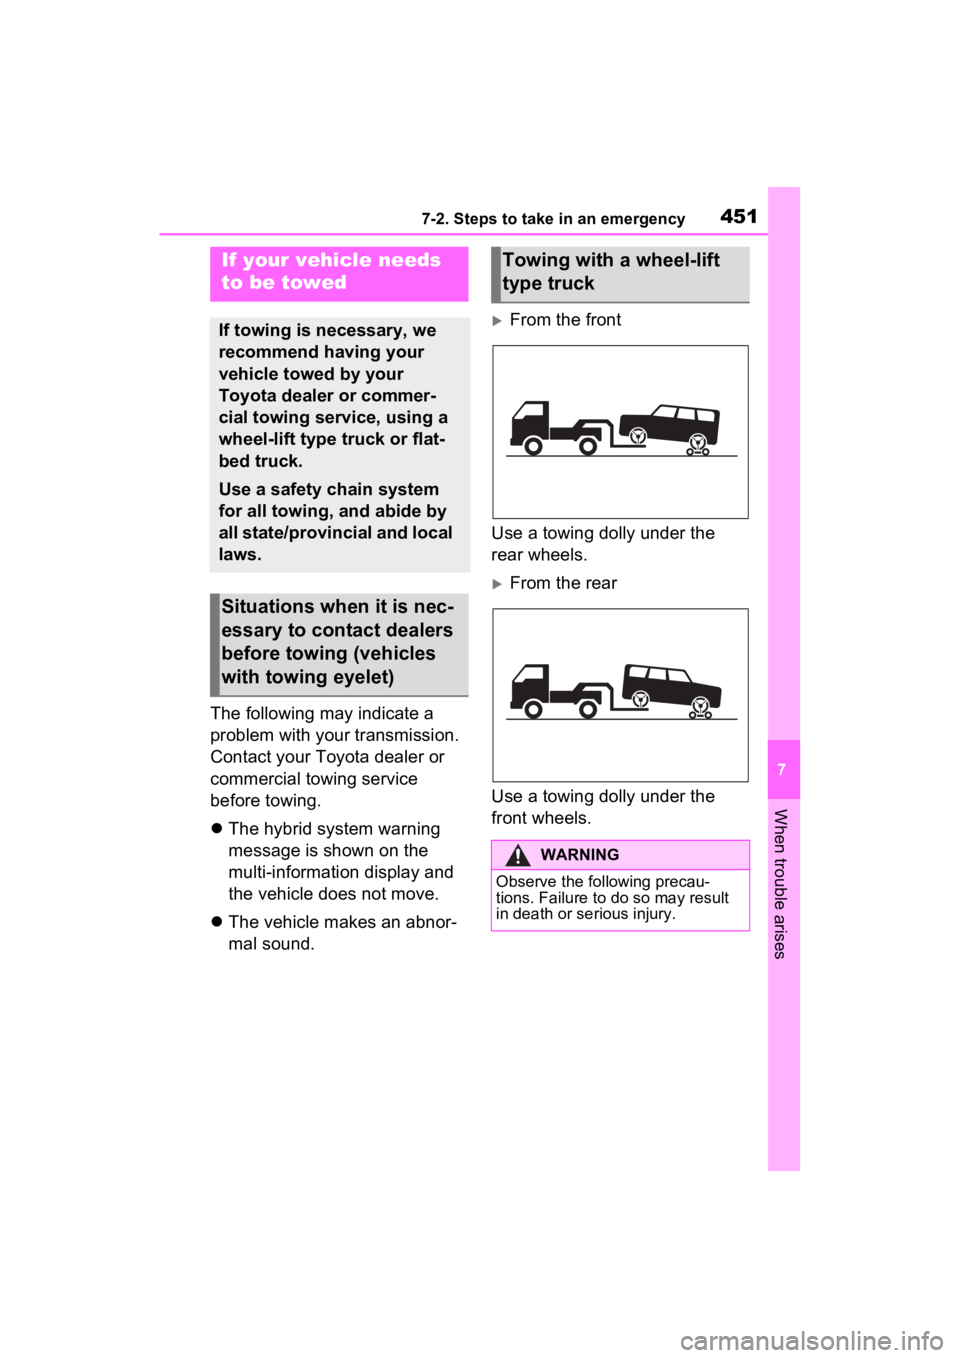
From the front
Use a towing dolly under the
rear wheels.
From the rear
Use a towing dolly under the
front wheels.
If your vehicle needs
to be towed
If towing is necessary, we
recommend having your
vehicle towed by your
Toyota dealer or commer-
cial towing service, using a
wheel-lift type truck or flat-
bed truck.
Use a safety chain system
for all towing, and abide by
all state/provincial and local
laws.
Situations when it is nec-
essary to contact dealers
before towing (vehicles
with towing eyelet)
Towing with a wheel-lift
type truck
WARNING
Observe the following precau-
tions. Failure to do so may result
in death or serious injury.
Page 454 of 586
4527-2. Steps to take in an emergency
When using a flat-bed truck to
transport the vehicle, use tire
strapping belts. Refer to the
owner’s manual of the flat-bed
truck for the tire strapping
method.
In order to suppress vehicle
movement during transporta-
tion, set the parking brake and
turn the power switch off.
If a tow truck is not available in
an emergency, your vehicle may
be temporarily towed using
cables or chains secured to the
emergency towing eyelets. This
should only be attempted on
hard surfaced roads for short
WARNING
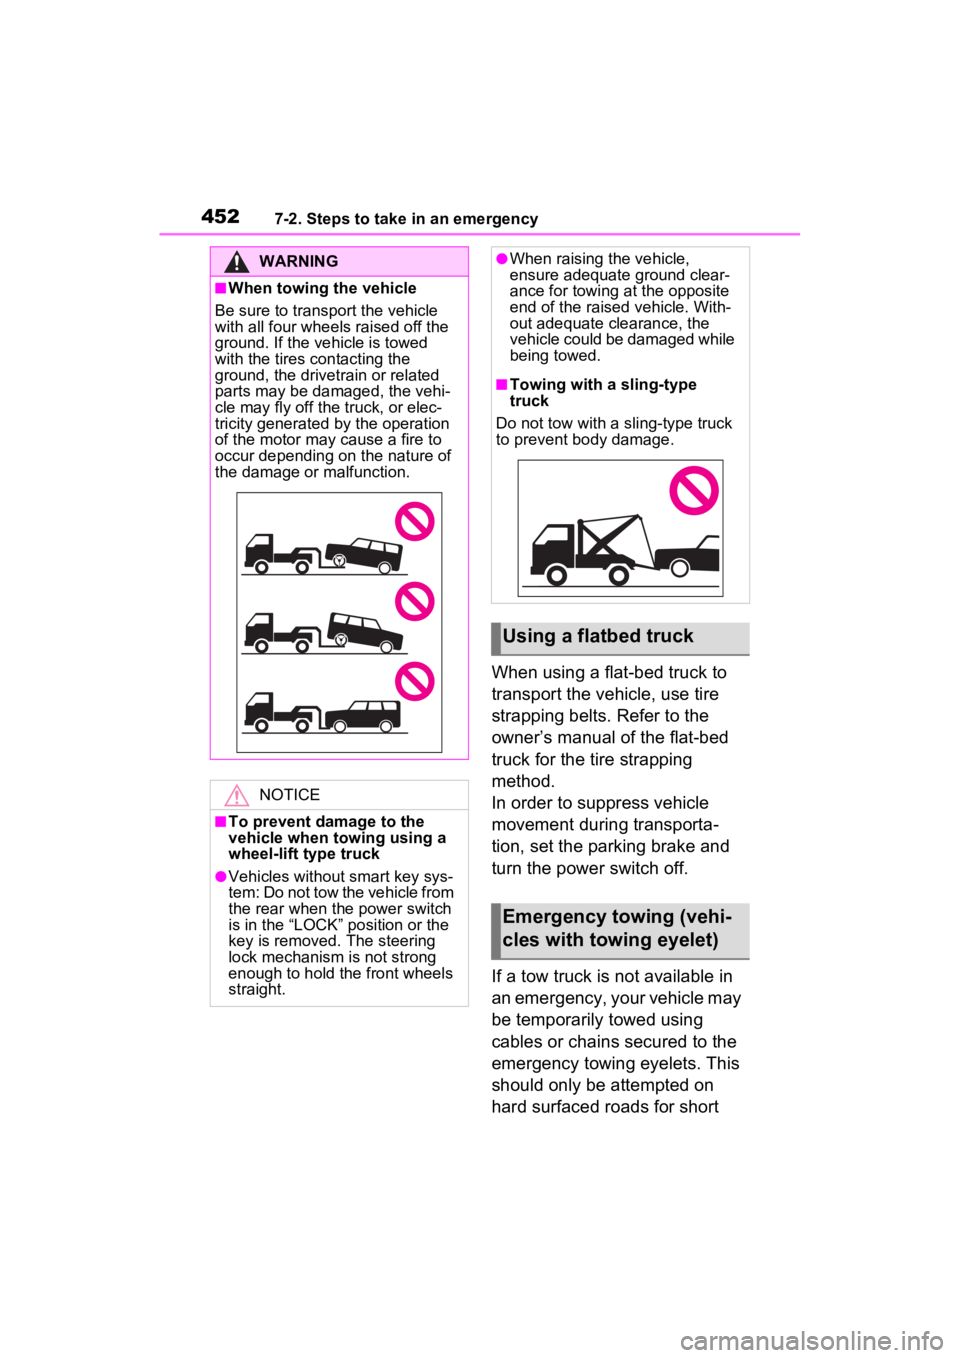
■When towing the vehicle
Be sure to transport the vehicle
with all four wheels raised off the
ground. If the vehicle is towed
with the tires contacting the
ground, the drivetrain or related
parts may be damaged, the vehi-
cle may fly off the truck, or elec-
tricity generated by the operation
of the motor may cause a fire to
occur depending on the nature of
the damage or malfunction.
NOTICE
■To prevent damage to the
vehicle when towing using a
wheel-lift type truck
●Vehicles without smart key sys-
tem: Do not tow the vehicle from
the rear when th e power switch
is in the “LOCK” position or the
key is removed. The steering
lock mechanism is not strong
enough to hold the front wheels
straight.
●When raising the vehicle,
ensure adequate ground clear-
ance for towing at the opposite
end of the raised vehicle. With-
out adequate clearance, the
vehicle could be damaged while
being towed.
■Towing with a sling-type
truck
Do not tow with a sling-type truck
to prevent body damage.
Using a flatbed truck
Emergency towing (vehi-
cles with towing eyelet)
Page 455 of 586
4537-2. Steps to take in an emergency
7
When trouble arises
distances at under 18 mph (30
km/h).
A driver must be in the vehicle to
steer and operate the brakes.
The vehicle’s wheels, drive
train, axles, steering and brakes
must be in good condition.
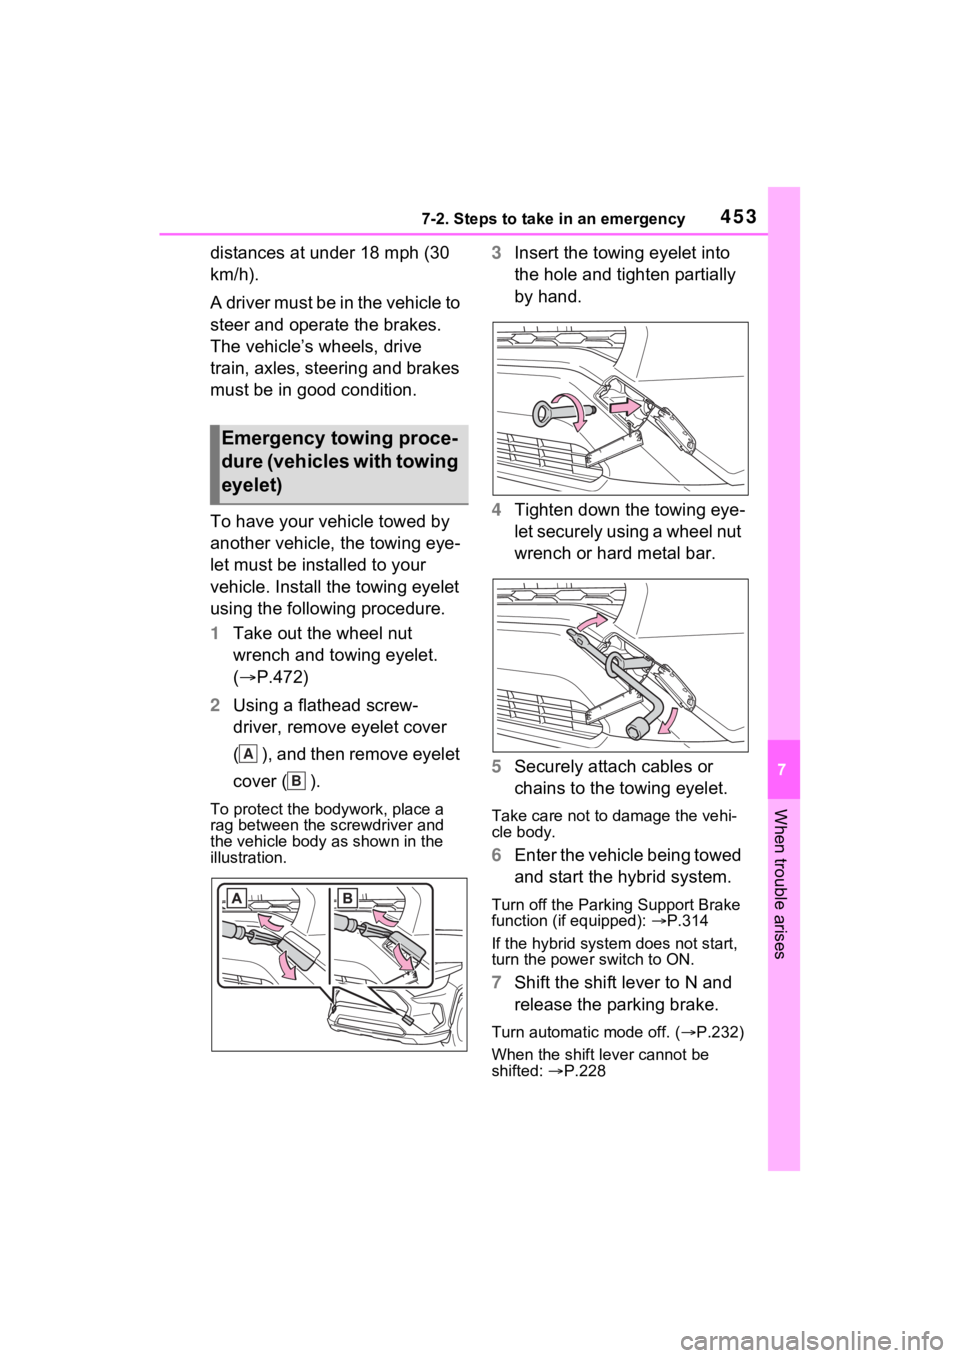
To have your vehicle towed by
another vehicle, the towing eye-
let must be installed to your
vehicle. Install the towing eyelet
using the following procedure.
1Take out the wheel nut
wrench and towing eyelet.
( P.472)
2 Using a flathead screw-
driver, remove eyelet cover
( ), and then remove eyelet
cover ( ).
To protect the bodywork, place a
rag between the screwdriver and
the vehicle body as shown in the
illustration.
3Insert the towing eyelet into
the hole and tighten partially
by hand.
4 Tighten down the towing eye-
let securely using a wheel nut
wrench or hard metal bar.
5 Securely attach cables or
chains to the towing eyelet.
Take care not to damage the vehi-
cle body.
6Enter the vehicle being towed
and start the hybrid system.
Turn off the Parking Support Brake
function (if equipped): P.314
If the hybrid system does not start,
turn the power switch to ON.
7 Shift the shift lever to N and
release the parking brake.
Turn automatic mode off. ( P.232)
When the shift lever cannot be
shifted: P.228
Emergency towing proce-
dure (vehicles with towing
eyelet)
A
B
Page 456 of 586

4547-2. Steps to take in an emergency
■While towing
If the hybrid system is off, the power
assist for the brakes and steering
will not function, making steering
and braking more difficult.
■Wheel nut wrench (if equipped)
Wheel nut wrench is installed in the
tool bag in luggage compartment.
( P.472)
WARNING
Observe the following precau-
tions. Failure to do so may result
in death or serious injury.
■While towing (vehicles with
towing eyelet)
●When towing using cables or
chains, avoid sudden starts, etc.
which place excessive stress on
the towing eyelets, cables or
chains. The towing eyelets,
cables or chains may become
damaged, broken debris may hit
people, and cause serious dam-
age.
●Vehicles without smart key sys-
tem: Do not turn the power
switch to the “LOCK” position.
There is a possibility that the
steering wheel is locked and
cannot be operated.
■Installing towi ng eyelets to
the vehicle (vehicles with
towing eyelets)
Make sure that towing eyelets are
installed securely. If not securely
installed, towing eyelets may
come loose during towing.
NOTICE
■To prevent damage to the
vehicle during emergency
towing (vehicles with towing
eyelet)
Do not secure cables or chains to
the suspension components.
Page 474 of 586
4727-2. Steps to take in an emergency
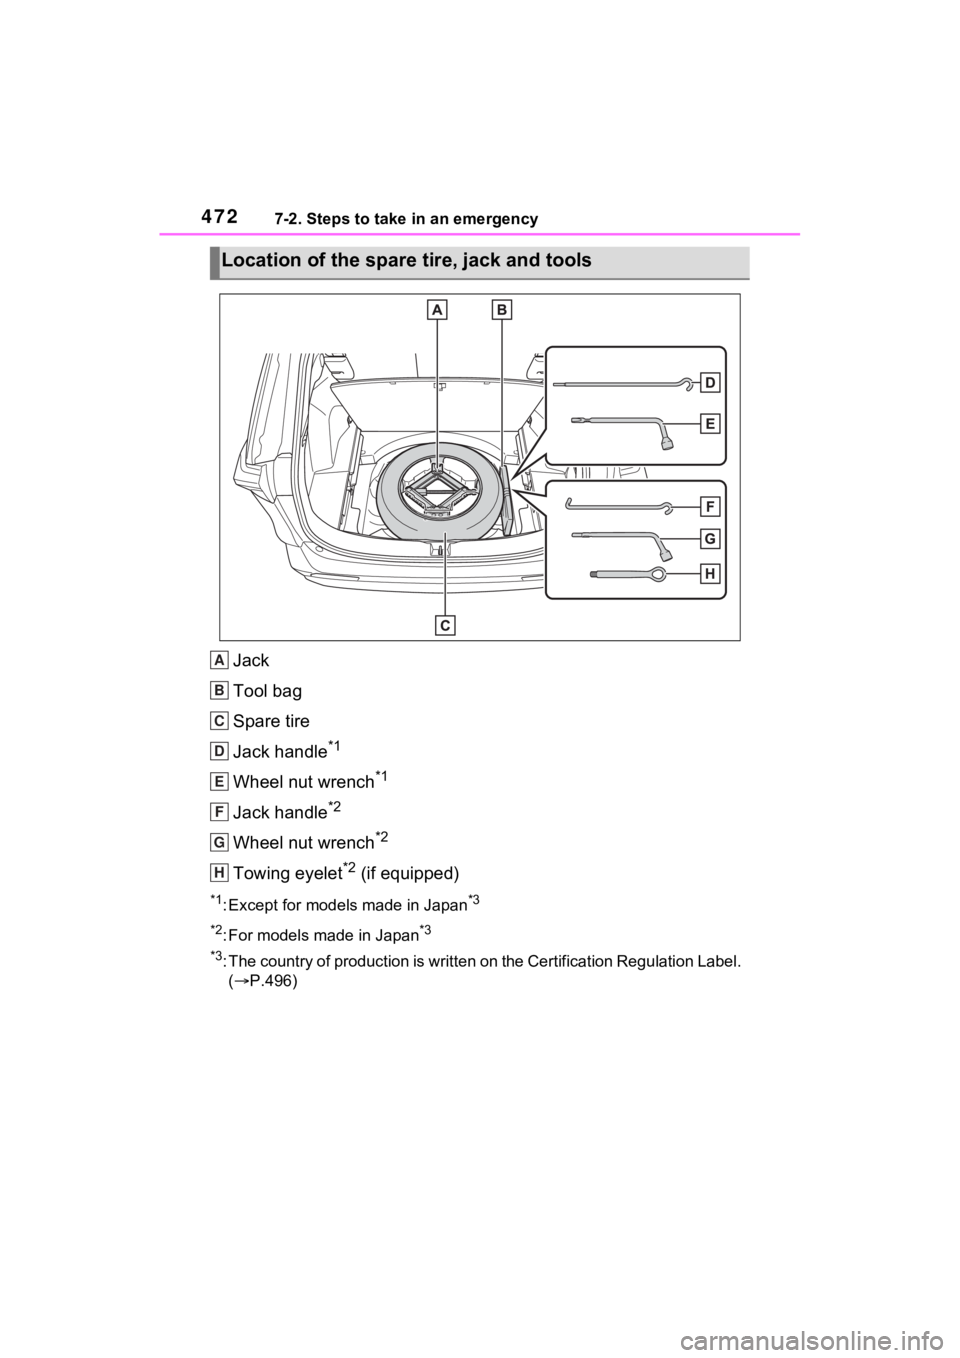
Jack
Tool bag
Spare tire
Jack handle
*1
Wheel nut wrench*1
Jack handle*2
Wheel nut wrench*2
Towing eyelet*2 (if equipped)
*1: Except for models made in Japan*3
*2
: For models made in Japan*3
*3
: The country of production is wri tten on the Certification Regulation Label.
( P.496)
Location of the spare t ire, jack and tools
A
B
C
D
E
F
G
H
Page 564 of 586

562Alphabetical Index
Light switch .......................... 237
LTA switch............................ 273
Meter control switches . 106, 116
Moon roof switches .............. 186
Outside rear view mirror switches ............................. 181
Panoramic moon roof switches ........................................... 189
Parking brake switch ............ 231
Power back door switch145, 146
Power door lock switch ........ 139
Power switch ................ 217, 219
Power window switch ........... 183
Rear window and outside rear view mirror defoggers switch........................................... 344
Rear window wipe r and washer
switch ................................. 247
Seat heater switches .... 350, 351
Seat ventilator switches ....... 351
Tire pressure warning reset switch ......................... 414, 415
Vehicle-to-vehicle distance switch ................................. 282
VSC OFF switch................... 327
Window lock switch .............. 185
Windshield defogger switch . 344
Windshield wiper de-icer switch ........................................... 347
Windshield wipers and washer switch ................................. 244
Wireless charger switch ....... 367
T
Tachometer ............................... 99
Tail lights Light switch .......................... 237
Replacing light bulbs ............ 439
Theft deterrent system Alarm ...................................... 81
Immobilizer system ................ 80
Tire inflati on pressure Maintenance data .................502
Tire inflation pressure display
function ...............................412
Warning light ........................462
Tire information ......................507 Glossary ...............................511
Size ......................................509
Tire identification number .....508
Tire section names ...............509
Tire pressure warning system Function................................412
Initializing..............................414
Installing tire p ressure warning
valves and transmitters ......413
Registering ID codes ............417
Warning light ........................462
Tires .........................................409 Chains ..................................336
Checking ..............................409
Glossary ...............................511
If you have a flat tire .............471
Inflation pressure ..................420
Information ......... ..................507
Replacing .............................471
Rotating tires ........................411
Size ......................................502
Snow tires.............................334
Spare tire ..............................471
Tire identification number .....508
Tire inflation pressure display function ...............................412
Tire pressure warning system ...........................................412
Uniform Tire Qua lity Grading 510
Warning light ........................462
Tools ........................................472
Top tether strap ........................61
Total load capacity .........202, 205
Towing Dinghy towing .......................216
Emergency towing ................452
Towing eyelet ...............453, 472