2023 TOYOTA PRIUS PLUG-IN HYBRID lock
[x] Cancel search: lockPage 156 of 818

1542-2. Charging
Prius Plug-in Hybrid_OM_OM47F38E_(EE)
NOTICE
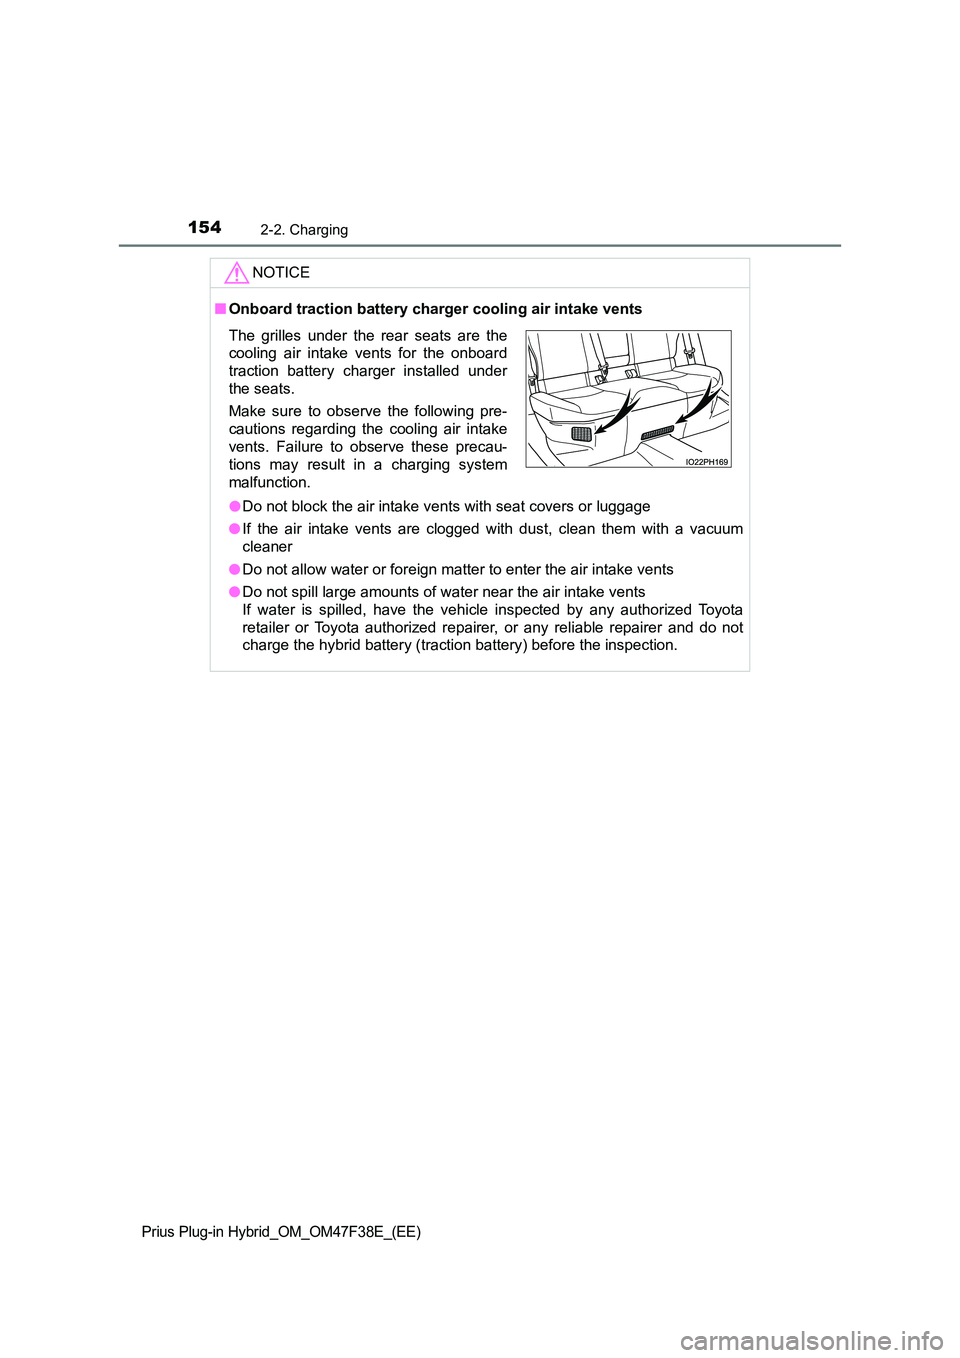
■Onboard traction battery charger cooling air intake vents
● Do not block the air intake vents with seat covers or luggage
● If the air intake vents are clogged with dust, clean them with a vacuum
cleaner
● Do not allow water or foreign matter to enter the air intake vents
● Do not spill large amounts of water near the air intake vents
If water is spilled, have the vehicle inspected by any authorized Toyota
retailer or Toyota authorized repairer, or any reliable repairer and do not
charge the hybrid battery (traction battery) before the inspection.
The grilles under the rear seats are the
cooling air intake vents for the onboard
traction battery charger installed under
the seats.
Make sure to observe the following pre-
cautions regarding the cooling air intake
vents. Failure to observe these precau-
tions may result in a charging system
malfunction.
Page 159 of 818

1572-2. Charging
2
Plug-in hybrid system
Prius Plug-in Hybrid_OM_OM47F38E_(EE)
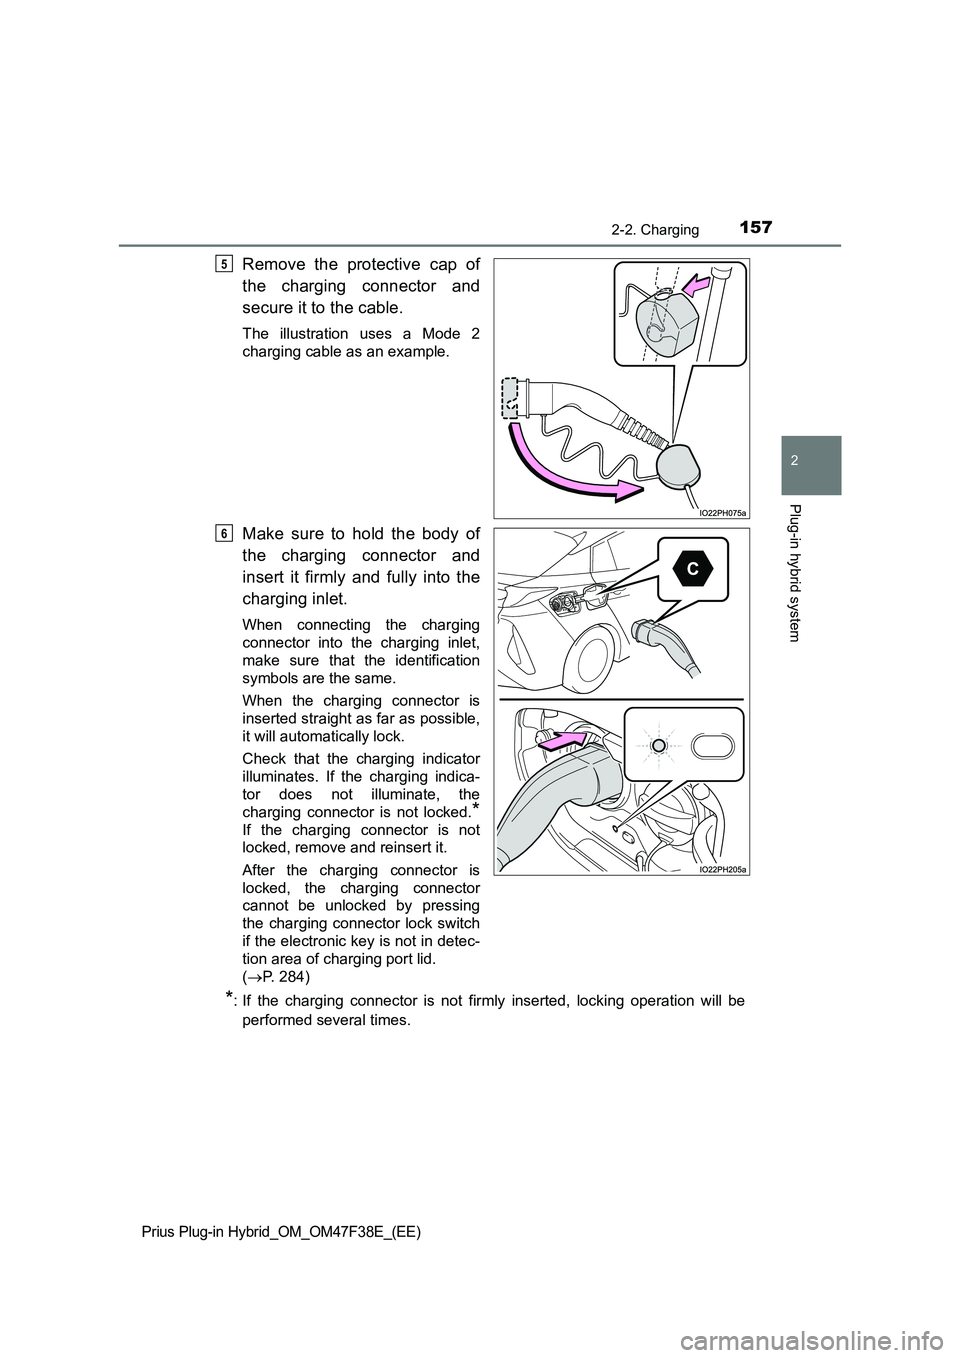
Remove the protective cap of
the charging connector and
secure it to the cable.
The illustration uses a Mode 2
charging cable as an example.
Make sure to hold the body of
the charging connector and
insert it firmly and fully into the
charging inlet.
When connecting the charging
connector into the charging inlet,
make sure that the identification
symbols are the same.
When the charging connector is
inserted straight as far as possible,
it will automatically lock.
Check that the charging indicator
illuminates. If the charging indica-
tor does not illuminate, the
charging connector is not locked.
*
If the charging connector is not
locked, remove and reinsert it.
After the charging connector is
locked, the charging connector
cannot be unlocked by pressing
the charging connector lock switch
if the electronic key is not in detec-
tion area of charging port lid.
(P. 284)
*: If the charging connector is not firmly inserted, locking operation will be
performed several times.
5
6
Page 160 of 818

1582-2. Charging
Prius Plug-in Hybrid_OM_OM47F38E_(EE)
If the charging indicator flashes
after inserting the charging con-
nector:
The charge schedule is regis-
tered (P. 166). Carry an elec-
tronic key and press the
charging connector lock switch
to unlock the charging connec-
tor.
After temporarily removing the charging connector, reinsert it within
approximately 5 seconds. (P. 158)
If the error warning indicator on the CCID (Charging Circuit Interrupting
Device) flashes during charging, check P. 120 and follow the correction
procedure.
The charging indicator will turn off when charging is completed.
■During charging
●The surface of the CCID (Charging Circuit Interrupting Device) may become
hot, but this does not indicate a malfunction. (When using Mode 2 charging
cable.)
●Depending on radio wave conditions, interference may be heard on the
radio.
●The current charging condition and the estimated time until charging will
complete can be checked on the multi-information display. (P. 149)
●During charging, the hybrid battery (traction battery) status indicator illumi-
nates and flashes, and changes according to the charging amount.
(P. 113)
■If the charging indicator flashes after connecting the charging cable
The charge schedule (P. 166) is registered and charging cannot be per-
formed. To cancel charging using the charging schedule and start charging,
perform any of the following procedures.
●Turn “Charge Now” on (P. 174)
●While the charging indicator is flashing, remove and reconnect the charging
connector within 5 seconds
■When the charging connector cannot be inserted into the charging inlet
P. 135
Page 161 of 818

1592-2. Charging
2
Plug-in hybrid system
Prius Plug-in Hybrid_OM_OM47F38E_(EE)
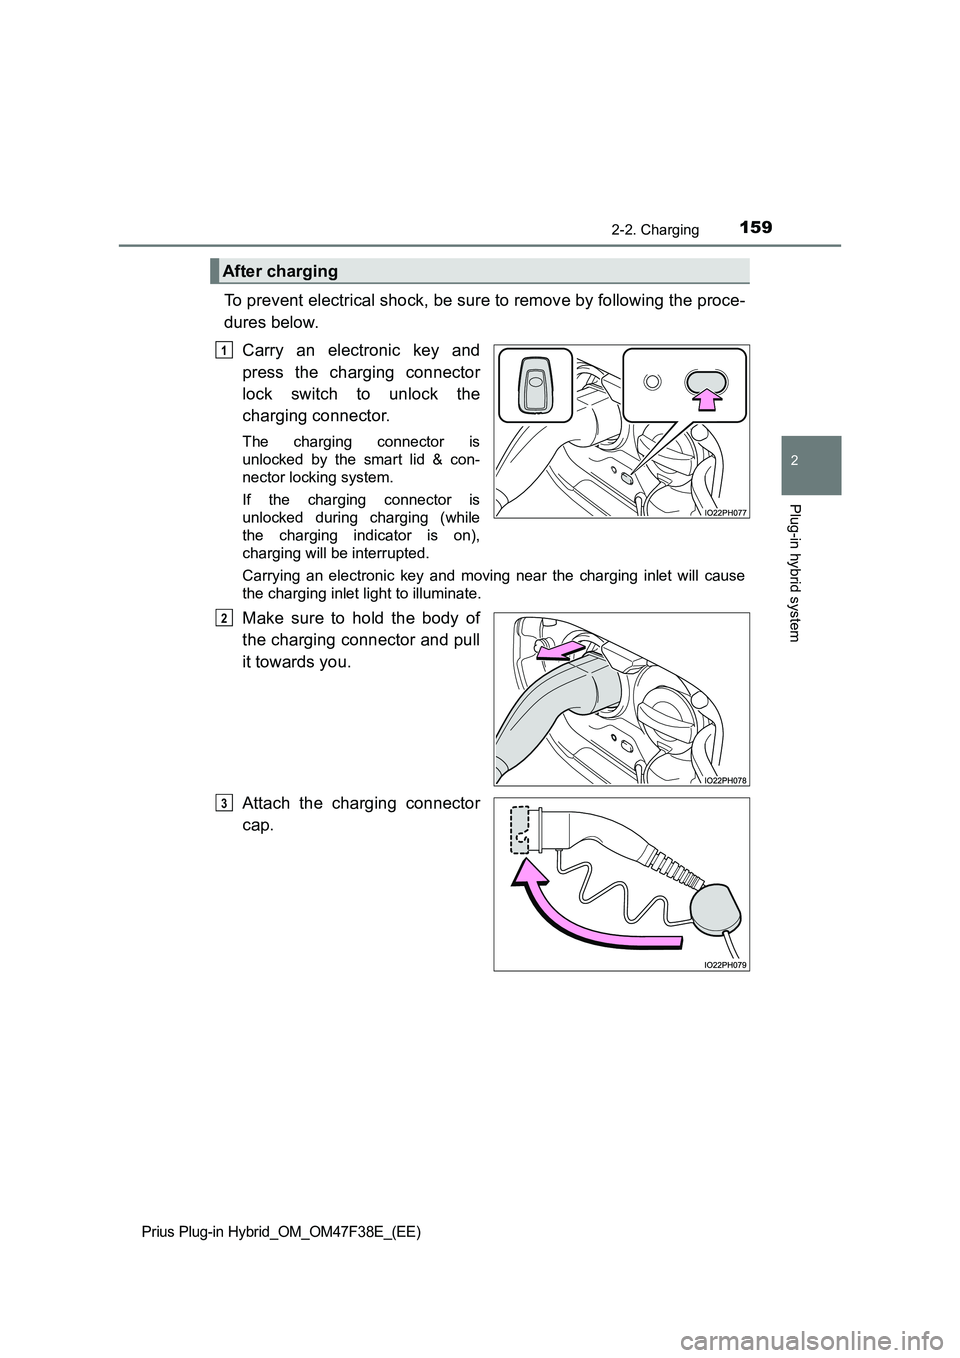
To prevent electrical shock, be sure to remove by following the proce-
dures below.
Carry an electronic key and
press the charging connector
lock switch to unlock the
charging connector.
The charging connector is
unlocked by the smart lid & con-
nector locking system.
If the charging connector is
unlocked during charging (while
the charging indicator is on),
charging will be interrupted.
Carrying an electronic key and moving near the charging inlet will cause
the charging inlet light to illuminate.
Make sure to hold the body of
the charging connector and pull
it towards you.
Attach the charging connector
cap.
After charging
1
2
3
Page 163 of 818

1612-2. Charging
2
Plug-in hybrid system
Prius Plug-in Hybrid_OM_OM47F38E_(EE)
■Charging time
P. 143
■ Safety function
Charging will not start when the charging connector is not locked. If the
charging indicator does not illuminate even when the charging connector is
inserted, remove and reinsert the connector, and then check that the charging
indicator illuminates.
■ When the outside temperature is low or high
The level shown on the remaining charge display ( P. 232) may drop slightly
when the power switch is turned to ON mode, even if charging has been com-
pleted and the hybrid battery (traction battery) is fully charged. However, this
does not indicate a malfunction.
■ Charging time may increase
P. 144
■ While charging
When the power switch is turned to ON mode and the energy monitor dis-
plays, the charging connector is displayed on the energy monitor and the flow
of electricity during charging is displayed ( P. 223). Also, when the charging
connector is locked, is displayed.
■ If the charging cable cannot be unlocked
P. 136
■ When removing the charging connector
■ Push lifter
Carry an electronic key and press the
charging connector lock switch and check
that the lock is released, and then pull the
charging connector towards you.
When the charging port lid is open, make
sure not to touch the push lifter. If it is
touched accidentally, the charging port lid
or connector lock may operate.
If they are accidentally operated, carry an
electronic key or unlock the doors, and
then press the charging connector lock
switch to unlock.Push lifter
Page 166 of 818

1642-2. Charging
Prius Plug-in Hybrid_OM_OM47F38E_(EE)
NOTICE
■When use the charging cable and related parts
To prevent damage to the charging cable and related parts, observe the fol-
lowing precautions.
● When interrupting or canceling charging, remove the charging connector
before removing the plug.
● When removing the charging cable, check that the charging connector is
unlocked.
● Do not forcefully pull the connector cap and charging inlet cap.
● Do not apply a vibration to the charging connector while charging.
Charging may be stopped.
● Do not insert anything but the charging connector.
● When inserting the plug into or removing the plug from the socket, make
sure to hold the body of the plug.
● Do not damage the charging inlet cap with a sharp object.
● Do not forcefully pull the charging cable that is caught or entangled.
If the cable is entangled, disentangle it before using.
● When charging from the external device, use the charging cable equipped
with the vehicle.
■ When charging
Do not insert the plug into the charging inlet.
The charging inlet may be damaged.
■ After charging
● Store the charging cable out of reach from infants and children.
● After disconnecting the charging connector from the charging inlet, make
sure to put on the charging inlet cap and close the charging port lid.
If the charging inlet cap is not put on, water or foreign objects may enter
the charging inlet, which could lead to vehicle damage.
● After removing the plug from the socket, keep it in a safe place free from
moisture and dust.
The charging cable or plug may be damaged if the cable is stepped on or
ridden over by the vehicle.
Page 168 of 818

1662-2. Charging
Prius Plug-in Hybrid_OM_OM47F38E_(EE)
Using the charging schedule function
When registering the charge schedule, the following settings can be
changed.
■Select the charging mode
One of the two following charging modes can be selected.
*1: Charging schedule function is performed in accordance with the clock in
the instrument cluster. Before registering the charge schedule, check the
clock settings to the proper time.
*2: There might be a slight error in the timing when charging starts due to the
state of the hybrid battery (traction battery).
■
Repeated setting
The periodic charging schedule can be set by selecting your
desired day of the week.
■Air conditioning-linked setting (“Climate Prep”) (if equipped)
When the charging mode is set to “Departure”, the vehicle air condi-
tioning system (P. 522) can be set to automatically operate
*
according to the set time.
By adjusting the cabin temperature in advance, passengers can enjoy a
pleasant interior immediately after entering the vehicle.
*: Operation starts approximately 10 minutes before the set departure time.
Charging can be carried out at the desired time by registering
the charge schedule. Also, it is possible to set the charging
schedule to one’s preferences, such as having charging com-
plete by a certain departure time or be carried out at the same
time on certain days.
Settings of the charging schedule function
Charging modeOperation description
“Start”Starts charging at the set time*1 and finishes
charging when fully charged.
*2
“Departure”
Starts charging to finish at the set time.
When this setting is selected, the air conditioning-
linked function can be used. (if equipped)
Page 169 of 818

1672-2. Charging
2
Plug-in hybrid system
Prius Plug-in Hybrid_OM_OM47F38E_(EE)
■Turning “Charge Now” on and off
If even one charge schedule is registered, charging does not start
until the set time, even if the charging cable is connected to the
vehicle. To start charging without changing the charge schedule
setting, turn “Charge Now” on to temporarily cancel the charge
schedule and enable charging after connecting the charging cable.
■Changing “Next Charging Event”*1
It is possible to temporarily set the time of the next scheduled
charge without changing the registered repeated setting.
*2
*1: The “Next Charging Event” refers to the closest charge schedule from the
current time among the registered charge schedules. Charging schedule is
performed based on the “Next Charging Event”.
*2: When “Next Charging Event” is changed, the current charge schedule will
be temporarily ignored and charging will not be carried out until the time
specified by “Next Charging Event”. (For example, when “Next Charging
Event” is set for 2 days later, even if items are registered on the charge
schedule, charging will not be carried out until the time specified by “Next
Charging Event”.)
■Charging schedule
●The charge schedule cannot be set while driving.
●A maximum of 15 charge schedules can be registered.
■To make sure that the charging schedule function operates correctly
Check the following items.
●Adjust the clock to the correct time (P. 200)
●The calendar is set to the correct date (P. 202)
●Check that the power switch is turned off
●After registering the charge schedule, connect the charging cable
The charging start time is determined based on the charge schedule at the
time that the charging cable was connected.
●After connecting the charging cable, check that the charging indicator
flashes (P. 1 1 5 )
●Do not use a socket that has a power cut off function (including a timer func-
tion)
Use a socket that constantly supplies electricity. For sockets where the
power is cut off due to a timer function, etc., charging may not be carried
out according to plan if the power is cut off during the set time.