Page 170 of 818

1682-2. Charging
Prius Plug-in Hybrid_OM_OM47F38E_(EE)
■When the charging cable remains connected to the vehicle
Even if multiple consecutive charge schedules are registered, the next
charge will not be carried out according to the charging schedule until the
charging cable is removed and reconnected after charging completes. Also,
when the hybrid battery (traction battery) is fully charged, charging according
to the charging schedule will not be carried out.
■“Climate Prep” (if equipped)
●When the air conditioning-linked setting is turned on, the air conditioning
operates until the set departure time. Therefore, the air conditioning will con-
sume electricity and charging may not complete by the set departure time.
●If the hybrid battery (traction battery) is fully charged, charging will not be
carried out, even if the charge schedule is set. However, if “Climate Prep” is
turned on, the air conditioning will operate only once when it nears the time
set in “Departure”. If this occurs, the air conditioning will consume electricity
and the remaining charge of the hybrid battery (traction battery) when
departing may be decreased.
●When the doors are unlocked, the air conditioning system does not operate.
■When charging schedules are ignored
When the following operations are performed while the charging schedule is
on standby, charging schedule is temporarily canceled and charging is
started.
●When the Remote Air Conditioning System (P. 535) is operated
●When turning “Charge Now” on (P. 174)
●When an operation that temporarily cancels charging using the charging
schedule is performed (P. 158)
■Effects of outside temperature
When the charging mode is set to “Departure”, charging schedule may be
ignored due to the outside temperature and charging may start.
■“Traction Battery Cooler” (if equipped) (P. 145)
When charging is carried out using the charging schedule, the hybrid battery
(traction battery) cooling function may operate according to the temperature
of the hybrid battery (traction battery).
●When the charging mode is set to “Start”, cooling starts at the set charging
start time.
●When the charging mode is set to “Departure”, cooling starts approximately
30 minutes before the charging start time. However, if there is no time to fin-
ish charging by the charging schedule, the hybrid battery (traction battery)
cooling time may be shortened and “Traction Battery Cooler” may not oper-
ate.
Page 172 of 818
1702-2. Charging
Prius Plug-in Hybrid_OM_OM47F38E_(EE)
Press or of the
meter control switches to
select the charging mode/
time settings row, and then
press .
The charging mode/time set-
tings screen will display.
The clock display (12-hour dis-
play/24-hour display) changes
according to the clock settings.
(P. 200)
Press or of the
meter control switches to
select the item to change
with the cursor, and then
press or to change
the setting.
Set the desired charging mode
and charging start (or departure)
time.
When the charging mode is “Start”, this sets the charging start time.
When it is “Departure”, this sets the charging end time.
After changing the settings to the desired settings, press to return to
the previous screen.
To activate the repeated set-
ting, press or of the
meter control switches to
select “Repeat”, and then
press .
A screen where the repeated
day can be selected will display.
4
5
6
Page 186 of 818

1842-2. Charging
Prius Plug-in Hybrid_OM_OM47F38E_(EE)
*: Refer to P. 115 for details regarding charging indicator illumination and
flashing.
Refer to the following table and carry out the appropriate correction
procedure.
Charging indicator flashes and charging cannot be carried out.
When charging indicator
flashes
*:
Charge schedule is regis-
tered
When you wish to charge according to the
charging schedule, wait until the set time.
To start charging, set “Charge Now” to “On”.
(P. 174)
When charging indicator rap-
idly flashes
*:
Malfunction occurred in an
external power source or the
vehicleStart the hybrid system and follow the
instructions displayed by the message on
the multi-information display. (P. 187)
When charging schedule function does not operate normally
Likely causeCorrection procedure
Cannot charge at desired time
Vehicle clock is not properly
adjustedCheck the clock settings and adjust it to the
proper time. (P. 200)
The vehicle calendar is not
set correctly.Check the calendar setting and set it to the
correct date. (P. 202)
Charging cable is not con-
nected to vehicleBefore using the charging schedule, con-
nect the charging cable.
Incorrect charging mode
selected
Check the charging mode setting. (P. 1 6 6 )
When the charging mode is “Start”, charging
starts at the set time, but when it is “Depar-
ture”, charging is completed by the set time.
(The charging start time is automatically
controlled by the system.)
Likely causeCorrection procedure
Page 190 of 818

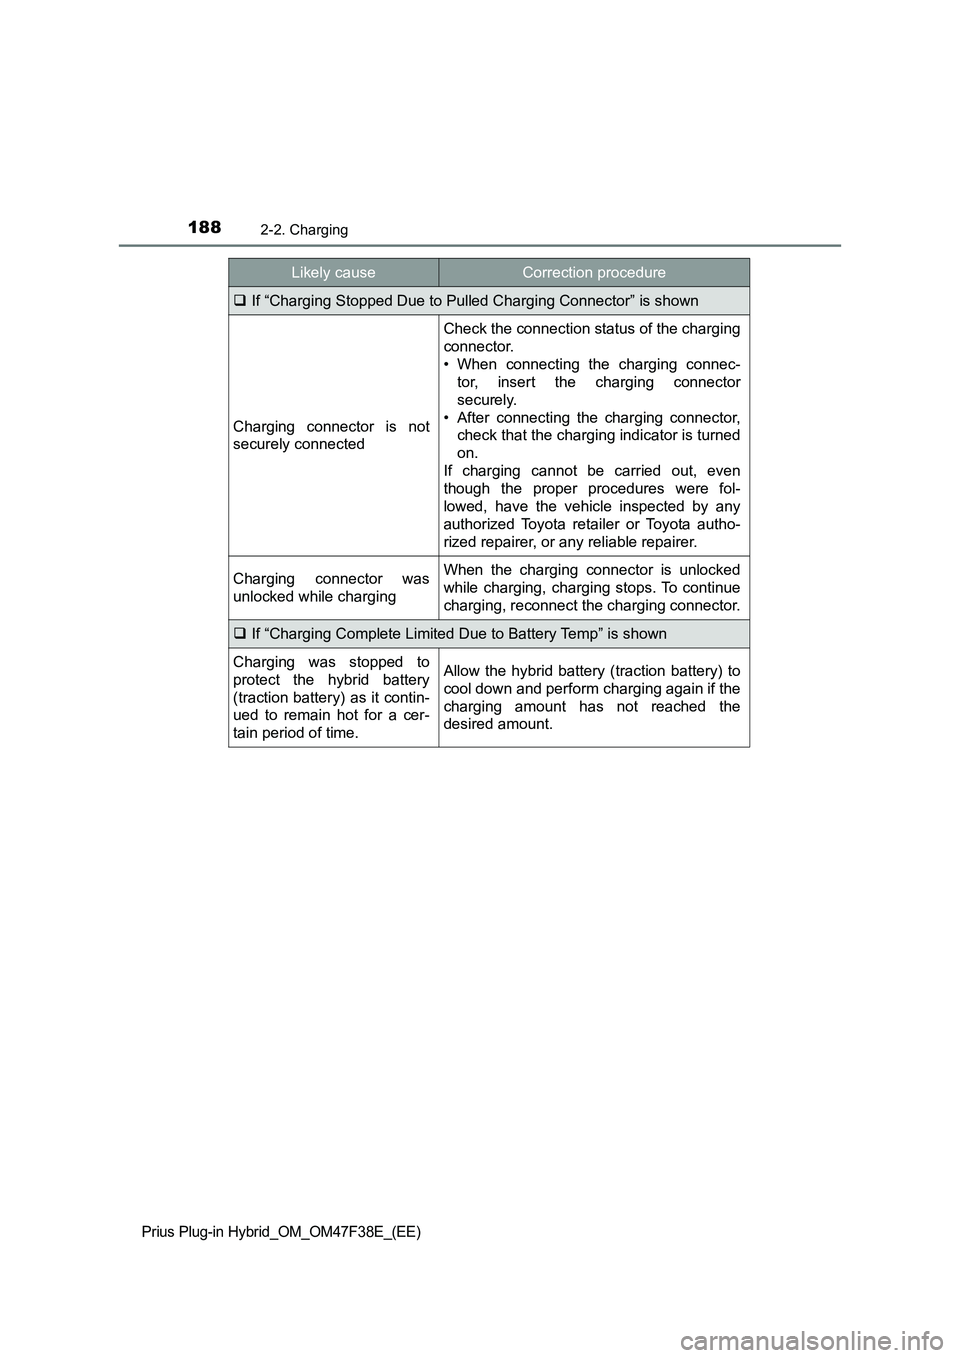
1882-2. Charging
Prius Plug-in Hybrid_OM_OM47F38E_(EE)
If “Charging Stopped Due to Pulled Charging Connector” is shown
Charging connector is not
securely connected
Check the connection status of the charging
connector.
• When connecting the charging connec-
tor, insert the charging connector
securely.
• After connecting the charging connector,
check that the charging indicator is turned
on.
If charging cannot be carried out, even
though the proper procedures were fol-
lowed, have the vehicle inspected by any
authorized Toyota retailer or Toyota autho-
rized repairer, or any reliable repairer.
Charging connector was
unlocked while chargingWhen the charging connector is unlocked
while charging, charging stops. To continue
charging, reconnect the charging connector.
If “Charging Complete Limited Due to Battery Temp” is shown
Charging was stopped to
protect the hybrid battery
(traction battery) as it contin-
ued to remain hot for a cer-
tain period of time.Allow the hybrid battery (traction battery) to
cool down and perform charging again if the
charging amount has not reached the
desired amount.
Likely causeCorrection procedure
Page 196 of 818

1943. Instrument cluster
Prius Plug-in Hybrid_OM_OM47F38E_(EE)
Combination meter
The units used on the display may differ depending on the target region.
Main display (P. 212)
The main display shows basic information related to driving, such as the
vehicle speed and remaining fuel amount.
Multi-information display (P. 220)
The multi-information display shows information which makes the vehicle
convenient-to-use, such as the hybrid system operation condition, electric-
ity consumption and fuel consumption history. Also, the operation contents
of the driving support systems and the combination meter display settings
can be changed by switching to the settings screen.
Warning lights and indicators (P. 204)
The warning lights and indicators comes on or flashes to indicate problems
with the vehicle or to show the operation status of the vehicle’s systems.
Clock (P. 200)
The large meter uses 2 liquid crystal displays to display informa-
tion such as the vehicle condition, driving status, electricity con-
sumption and fuel consumption.
Combination meter layout
1
2
3
4
Page 201 of 818
1993. Instrument cluster
3
Instrument cluster
Prius Plug-in Hybrid_OM_OM47F38E_(EE)
Score for each Eco score items (P. 230, 244)
Eco score result and advice
Driving time since the hybrid system started
Distance traveled since the hybrid system started
Average fuel consumption after the hybrid system started
Information for next charge schedule
*2
On/off setting for “Charge Now” (P. 174)
The setting can be switched each time is pressed.
*1: The screen will be turned off immediately if the doors are locked.
*2: It can be displayed when the charge schedules are registered.
(P. 166)
●A check screen for “Traction Battery Cooler” may be displayed
when the hybrid system is stopped. (if equipped) (P. 145)
1
2
3
4
5
6
7
Page 202 of 818
2003. Instrument cluster
Prius Plug-in Hybrid_OM_OM47F38E_(EE)
To adjust the time, perform operations on the screen (P. 240)
of the multi-information display.
■Adjusting the time
Press or of the meter control switches on the steering
wheel and select .
Press or of the meter control switches and select
.
Press to display the cursor.
Press or of the
meter control switches to
adjust the cursor position,
and then press or to
change the setting.
When the 12-hour display is
selected, “12H” is displayed,
and when the 24-hour display is
selected, “24H” is displayed.
When adjusting minutes, operation automatically starts from 00 sec-
onds.
After changing the settings, press to return to the previous screen.
Clock adjustment
1
2
3
4
Page 204 of 818

2023. Instrument cluster
Prius Plug-in Hybrid_OM_OM47F38E_(EE)
■The meters and display illuminate when
The power switch is in ON mode.
■Adjusting the instrument cluster brightness (P. 196)
●The brightness levels that can be selected differ depending on whether the
tail lights are on and surrounding brightness levels, as shown in the table
below.
*: 22 levels of the brightness are displayed on the setting screen. However,
the brightness setting will be the brightest when other than 1st level (the
darkest) is selected. If other than 1st or 22nd level is selected, when the
tail lights are turned on in a dark place, the instrument cluster brightness
setting will be the selected level.
●If the taillights are illuminated in a dark environment, the instrument cluster
light dims. However, when the brightness of the instrument cluster is set to
minimum or maximum (1st or 22nd level of the instrument cluster bright-
ness), even if the taillights are illuminated, the instrument cluster light will
not dim.
■When disconnecting and reconnecting 12-volt battery terminals
The settings of the clock will be reset.
■Calendar setting
●Until the calendar setting is completed, the check screen is displayed every
time the power switch is turned to ON mode.
●After the calendar information is set, it can be changed in the “Meter Custo-
mize” settings. (P. 250)
The tail lights are offThe tail lights are on
In a bright place2 levels*2 levels*
In a dark place22 levels
If calendar recording is interrupted due to
replacement of the 12-volt battery or 12-
volt battery discharge, etc., when the
power switch is turned to ON mode after
maintenance, the calendar setting check
screen is automatically displayed on the
multi-information display.
●If date information is not set, the electric-
ity and fuel consumption record cannot
be stored correctly. Also, the charging
schedule function can not operate prop-
erly. When the calendar setting check
screen is displayed, make sure to com-
plete the calendar setting. (P. 247)