Page 57 of 72

55†LEGAL DISCL AIMERS ON BACK INSIDE COVER | *IF EQUIPPEDALWAYS CHECK THE OWNER ’S MANUAL FOR COMPLETE OPER ATING INFORMATION AND SAFET Y WARNINGS
SEATING
S E AT I N G
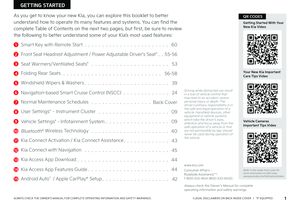
Front Seat Headrest Adjustment†1 2
Up/down adjustment:
•To raise the headrest, pull headrest up A to the desired position
•To lower the headrest, press the button B, then press the headrest down C
Forward/backward adjustment*:
•Pull the headrest forward/backward D to one of three positions
•When forward, to move the headrest to the furthest backward position, pull it fully forward then release
Driver Position Memory System*†1 2
The integrated system stores into memory the position of the Driver ’s Seat and the Outside Rearview Mirrors
To store positions into memory, first place the Gear Shift into P (Park) while the Engine Start/Stop button is in the ON position Then:
1 Adjust the Driver ’s Seat and the Outside Mirrors
2 Press the SET button E on the control panel System will beep once
3 Press one of the memory buttons F within 5 seconds The system will beep twice when memory has been stored
SET
12
� �#�V�U �U�P�O�T���M�P�D�B�U�F�E���P�O���%�S�J�W�F�S �s�T���%�P�P�S���1�B�O�F�M�
��
REMINDER: Do not at tempt to operate the driver position memor y system while the vehicle is moving This could result in loss of control of the vehicle
REMINDERS:
•
The headrest only moves up and down as described above It does not adjust for ward or backward
•
Do not operate the vehicle with the headrests removed Headrests can provide critical neck and head suppor t in an accident
Refer to section 4 in the Owner ’s Manual for more information
Refer to section 5 in the Owner ’s Manual for more information
EF
For easy adjustments, hold a headrest post with one hand while using the other hand to pull the headrest from underneath
QUICK TIP
(Type A)(Type A)
B
C
A
D
Refer to the inside front cover for more information on QR codes www youtube com/KiaFeatureVideos
Power Adjustable Driver’s Seat with Memory Settings Video
QR CODE
Page 58 of 72

56†LEGAL DISCL AIMERS ON BACK INSIDE COVER | *IF EQUIPPEDSORENTO HYBRID / PLUG-IN HYBRID FEATURES & FUNCTIONS GUIDE
SEATING
S E AT I N G
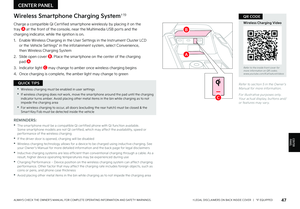
Power Adjustable Driver’s Seat†1 2 / Power Lumbar†1 2
Move/Press the controls to adjust the Seat forward/backward, the Seat Cushion height, the Seatback recline, the Lumbar forward/backward or the Seat Cushion Extension*
SeatbackLumbarSeat Cushion Extension*SeatSeat Cushion
Images are for illustrative purposes only and may not reflect actual feature or operation Your seat controls may differ from those in the illustrations
Do not at tempt to adjust the seat while the vehicle is moving This could result in loss of control of the vehicle
Refer to section 4 in the Owner ’s Manual for more information
REMINDER: Do not at tempt to adjust the seat while the vehicle is moving This could result in loss of control of the vehicle
AA
AB
B
C
C
D
D
Folding 2nd-Row Seat
Lower the 2nd-Row Seat Headrest to the lowest position
Pull up on the Seatback folding lever E or strap* and fold the Seatback down
Unfolding 2nd-Row Seat
Lift the folding Seatback lever E and move the Seatback backward to the desired position F
2nd-Row Folding Seat†1 2
REMINDER: The lever must return to its original position for the Seatback to lock
Refer to section 4 in the Owner ’s Manual for more information
E
F
•When you return the Seatback to its original position, ensure it locks (clicks) into place
•It may be necessar y to slide the front Seat for ward and adjust the front Seatbacks to fully lower rear seats
•Lower Rear Headrests to the lowest position
QUICK TIPS
Refer to the inside front cover for more information on QR codes www youtube com/KiaFeatureVideos
Power Adjustable Driver’s Seat with Memory Settings Video
2nd-Row Seats Video
QR CODE
Page 59 of 72
57†LEGAL DISCL AIMERS ON BACK INSIDE COVER | *IF EQUIPPEDALWAYS CHECK THE OWNER ’S MANUAL FOR COMPLETE OPER ATING INFORMATION AND SAFET Y WARNINGS
SEATING
S E AT I N G
(Located on rear quar ter-trim panels)
Press buttons A to release and automatically fold 2nd-Row Seatback down
2nd-Row Auto-Folding Seat*†1 2
For more information on 2nd-Row Auto Folding Seat operation, refer to the Owner ’s Manual
Refer to section 4 in the Owner ’s Manual for more information Refer to the inside front cover for more information on QR codes www youtube com/KiaFeatureVideos
2nd-Row Seats Video
Unfastening Center Seatbelt Video
QR CODE
Refer to section 4 in the Owner ’s Manual for more information
Unfastening Center Seat Belt†1 3
1 If Seat Belt is buckled, press the release button on the buckle
2 To retract the 2nd-Row Center Seatbelt B into the headliner, press the “release button” on the buckle by inserting the seat belt tongue plate C in the small slot on the center buckle D
B
C
D
LR
LR�"
Page 60 of 72

58†LEGAL DISCL AIMERS ON BACK INSIDE COVER | *IF EQUIPPEDSORENTO HYBRID / PLUG-IN HYBRID FEATURES & FUNCTIONS GUIDE
SEATING
S E AT I N G
One-Touch Slide & Fold 2nd-Row Seats†1 2
To get in and out of the 3rd Row Seat, adjust the 2nd Row Seat by pressing the One-Touch Slide & Fold 2nd Row Seats (located on top A and side B of the 2nd-row seatback):
1 Set the front seatback to the most upright position, and slide the seat forward, if needed
2 Lower the 2nd Row Seat Headrest to the lowest position
3 Insert the seatbelt buckle into the pocket between the rear seatback and the cushion
4 Press the One-Touch Slide & Fold buttons to slide the Seat forward
Refer to section 4 in the Owner ’s Manual for more information
REMINDER: Do not use the One-Touch Slide & Fold but tons while the 2nd-row passenger seat is occupied
3rd-Row Folding Seat*†1 2
Folding 3rd-Row Seat
1 Fully lower the headrest C
2 Pull the Seat folding strap D located on the Seatback
3 Fold the Seat down
Refer to section 4 in the Owner ’s Manual for more information
AB
C
D
Refer to the inside front cover for more information on QR codes www youtube com/KiaFeatureVideos
One-Touch Slide & Fold 2nd-Row Seats Video
QR CODE
The strap can be used in the back of the 2nd Row Seat to slide and fold the 2nd Row Seats
QUICK TIPS
Page 61 of 72
59†LEGAL DISCL AIMERS ON BACK INSIDE COVER | *IF EQUIPPEDALWAYS CHECK THE OWNER ’S MANUAL FOR COMPLETE OPER ATING INFORMATION AND SAFET Y WARNINGS
Sun Visor†1 6
Use the Sun Visor to shield from direct light through the front or side windows Slide or swing the Sun Visor out and adjust as needed
REMINDERS:
•Sun Visor may not shield from all direct light
•The Sun Visor may impair visibilit y if not adjusted properly
•
Do not operate the vehicle if the Sun Visor is impairing your visibility
•
Be aware of the seating position when adjusting or swinging Sun Visor around to and from the front or side windows
Mechanical Key shown
OTHER KEY FEATURES
OTHER KEY F E AT U R E S
•Turn clockwise once to unlock the Driver ’s Door
•Turn clockwise again within 4 seconds to unlock All Doors
•Turn counterclockwise once to lock All Doors
Double-Turn Lock/Unlock All
Refer to section 5 in the Owner ’s Manual for more information
Refer to section 5 in the Owner ’s Manual for more information
Page 62 of 72

60†LEGAL DISCL AIMERS ON BACK INSIDE COVER | *IF EQUIPPEDSORENTO HYBRID / PLUG-IN HYBRID FEATURES & FUNCTIONS GUIDE
HOLD
HOLD
HOLDHOLD
A Press to lock All Doors
B Press to unlock the Driver ’s Door Press twice within 4 seconds to unlock All Doors and the Liftgate
C
Manual Liftgate*: Press and hold for more than 1 second to unlock the Liftgate Then lift by the handle to manually open the Liftgate
Smart Key with Remote Start†6
REMINDERS:
•
The Liftgate does not automatically open when the C but ton is pressed
•
The Liftgate unlocks when the Smar t Key fob is within close proximit y of the vehicle
Remote but ton configuration may var y depending on vehicle options
Power Liftgate*: Press and hold for the Power Liftgate to open automatically Press again at any time to stop Press and hold again to automatically close
D Remote Start*: Lock the doors by pressing the door lock button A within 32 feet distance from the vehicle Within four (4) seconds of pressing the door lock button A, press and hold the Remote Start button D for more than two (2) seconds to start the vehicle To stop the Remote Start operation, press the button again If driver does enter vehicle within ten minutes of starting the vehicle, the engine will automatically turn off
E Press and hold for more than a half second for the Panic Alarm To turn off the Alarm, press any button
F Press to release Mechanical Key
G Mechanical Key
Driver’s Door Lock/Unlock button H:
•Press button once to unlock the Driver ’s Door
•Press again within 4 seconds to unlock all doors
•
Press again to lock all doors
Mechanical Key G:
•Press the button F on the back of the key fob to release the Mechanical Key
•Remove the key cover, using the mechanical key
•Use to lock/unlock the Driver ’s Door I
•Use to lock the glove box
Remote but ton configuration may var y depending on vehicle options
Refer to section 5 in the Owner ’s Manual for more information
REMINDER: When reinser ting the mechanical key, make sure it is pushed all the way in until there is a click sound
A
B
C
D
E
F
G
HI
Refer to the inside front cover for more information on QR codes www youtube com/KiaFeatureVideos
Remote Start - Smart Key Video
Kia Smart & Folding Key Fobs Video
QR CODE
•The Smar t Key ’s signal can be blocked by the normal operation of a cellular phone or smar tphone To help prevent this, store each device separately
•If the Smar t Key bat ter y is weak or not working properly, hold the Smar t Key fob up to the Engine Star t/Stop but ton (Lock but ton side closest) and press to star t the engine
QUICK TIPS
OTHER KEY FEATURES
OTHER KEY F E AT U R E S
Page 63 of 72

61†LEGAL DISCL AIMERS ON BACK INSIDE COVER | *IF EQUIPPEDALWAYS CHECK THE OWNER ’S MANUAL FOR COMPLETE OPER ATING INFORMATION AND SAFET Y WARNINGS
HOLD
HOLD
HOLDHOLD
HOLD
Smart Power Liftgate†1 0
Opening from Inside the Vehicle:
Press and hold the Smart Power Liftgate Open/Close button A to automatically open/close the Liftgate
Smart Key:
To open the Smart Power Liftgate, press and hold the Liftgate button B until the Liftgate begins to open Press and hold again to automatically close
Opening from Outside the Vehicle:
To open the Smart Power Liftgate automatically, press the Rear Hatch Release button C on the exterior of the Liftgate
Automatically close by pressing the Power Liftgate Close button D
Power Liftgate Opening Height Adjustment
The height setting of a fully opened liftgate (tailgate) can be adjusted by the following steps:
1 Position the liftgate manually to the preferred height
2 Press the Smart Power Liftgate Close button D more than 3 seconds
3 A system beep will sound twice indicating the height setting has been saved
The liftgate will then open to the set height To change setting again, repeat steps 1-3
(Located on Liftgate inside lip near latch)
(Located on lower Liftgate exterior)
(Button located on Driver’s Panel)
See section 5 in the Owner ’s Manual for more information
Remote but ton configuration may var y depending on vehicle options
REMINDER: When closing, be mindful of any objects or persons
Refer to the inside front cover for more information on QR codes www youtube com/KiaFeatureVideos
Smart Liftgate Operation, Opening Height/Speed Adjustment Video
Kia Smart & Folding Key Fobs Video
QR CODE
REMINDER: Pulling the Liftgate upward by the handle or pressing the but ton a second time will interrupt the automatic opening of the Power Liftgate
A
B
C
D
OTHER KEY FEATURES
OTHER KEY F E AT U R E S
Page 64 of 72

62†LEGAL DISCL AIMERS ON BACK INSIDE COVER | *IF EQUIPPEDSORENTO HYBRID / PLUG-IN HYBRID FEATURES & FUNCTIONS GUIDE
See section 5 in the Owner ’s Manual for more information
The Smart Power Liftgate with Auto Open can be operated from several controls to either open, close or lock the Liftgate The Smart Power Liftgate will close the Liftgate, lock all doors and Liftgate and then arm the vehicle
When the Smart Key fob is on your person and you are near the back of the vehicle, within close proximity, the hazard lights will blink and a chime will sound for about 3 seconds as an alert that the Smart Power Liftgate is about to open Then the alert system will blink and chime two additional times before opening the Smart Power Liftgate
The Smart Power Liftgate feature is off by default To enable the Smart Power Liftgate, go to User Settings mode in the LCD Instrument Cluster or the Vehicle Settings* in the Infotainment System
REMINDERS:
•All doors are closed and locked after about 15 seconds
•The Smar t Power Liftgate feature will not operate when:
-
The doors are recently closed and locked, and the Smar t Key is still detected after 15 seconds near the vehicle or within 60 inches of the door handles
-A door is not locked or closed
-The Smar t Key is in the vehicle
•
Press any but ton on the Smar t Key fob during the Detect and Aler t stage, or move out of the detection area, to deactivate the Smar t Power Liftgate function
•
When the ignition is on, the Smar t Power Liftgate will only operate with the gear shift in the Park (P) position
•The Smar t Key must be outside of the vehicle for the Smar t Liftgate with Auto Open to operate
•Ensure obstacles and people are out of the way of the Liftgate
•When closing, be mindful of any objects or persons
Smart Power Liftgate†1 0 (continued)
Refer to the inside front cover for more information on QR codes www youtube com/KiaFeatureVideos
Smart Liftgate Operation, Opening Height/Speed Adjustment Video
QR CODE
•
During the Smar t Liftgate open aler t, the Smar t Liftgate can be deactivated with the Smar t Key by pressing any but ton on the key fob or moving away from the detection area
•
The open height and speed can be adjusted For information on how to set the open height and speed, see your owner ’s manual
QUICK TIPS
OTHER KEY FEATURES
OTHER KEY F E AT U R E S