2023 HYUNDAI IONIQ 5 speed
[x] Cancel search: speedPage 594 of 680

Emergency Situations
8-16
ONE1081010
5. Plug the compressor power cord (4) into the vehicle power outlet.
NOTICE
Only use the front passenger side
power outlet when connecting the
power cord.
6. With the vehicle ON (
indicator ON), switch on
the compressor and let it run for
approximately 5~7 minutes to fill the
sealant up to proper pressure. (refer
to the Tire and Wheels, chapter 2).
The inflation pressure of the tire after
filling is unimportant and will be
checked/corrected later.
Be careful not to overinflate the tire
and stay away from the tire when filling it.
CAUTION
Tire pressure
Do not attempt to drive your vehicle if
the tire pressure is below 200 kPa (29
psi). This could result in an accident due
to sudden tire failure. 7.
Switch off the compressor.
8. Detach the hoses from the sealant bottle connector and from the tire
valve.
Return the Tire Mobility Kit to its storage
location in the vehicle.
OLMF064106
9. Immediately drive approximately 4~6
miles (7~10 km or, about 10min) to
evenly distribute the sealant in the
tire.
Do not exceed a speed of 50 mph (80
km/h). If possible, do not fall below a
speed of 12 mph (20 km/h).
While driving, if you experience any
unusual vibration, ride disturbance or
noise, reduce your speed and drive with
caution until you can safely pull off of the
side of the road.
Call for road side service or towing.
Page 600 of 680

Emergency Situations
8-22
Emergency Towing
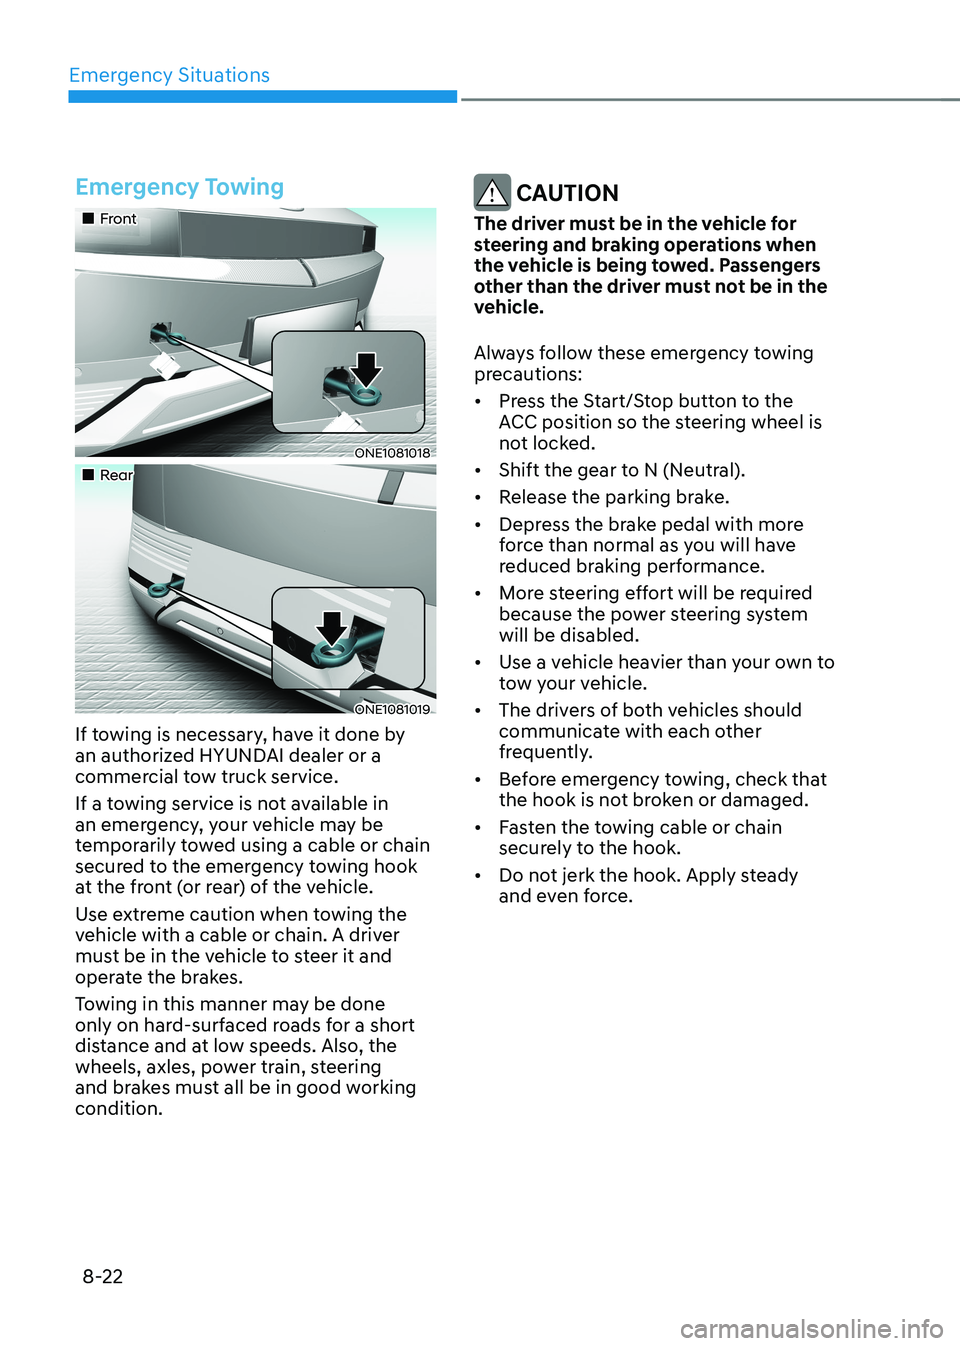
„„Front
ONE1081018
„„Rear
ONE1081019
If towing is necessary, have it done by
an authorized HYUNDAI dealer or a
commercial tow truck service.
If a towing service is not available in
an emergency, your vehicle may be
temporarily towed using a cable or chain
secured to the emergency towing hook
at the front (or rear) of the vehicle.
Use extreme caution when towing the
vehicle with a cable or chain. A driver
must be in the vehicle to steer it and
operate the brakes.
Towing in this manner may be done
only on hard-surfaced roads for a short
distance and at low speeds. Also, the
wheels, axles, power train, steering
and brakes must all be in good working condition.
CAUTION
The driver must be in the vehicle for
steering and braking operations when
the vehicle is being towed. Passengers
other than the driver must not be in the
vehicle.
Always follow these emergency towing
precautions: • Press the Start/Stop button to the
ACC position so the steering wheel is
not locked.
• Shift the gear to N (Neutral).
• Release the parking brake.
• Depress the brake pedal with more
force than normal as you will have
reduced braking performance.
• More steering effort will be required
because the power steering system will be disabled.
• Use a vehicle heavier than your own to
tow your vehicle.
• The drivers of both vehicles should
communicate with each other
frequently.
• Before emergency towing, check that
the hook is not broken or damaged.
• Fasten the towing cable or chain
securely to the hook.
• Do not jerk the hook. Apply steady
and even force.
Page 601 of 680

08
8-23
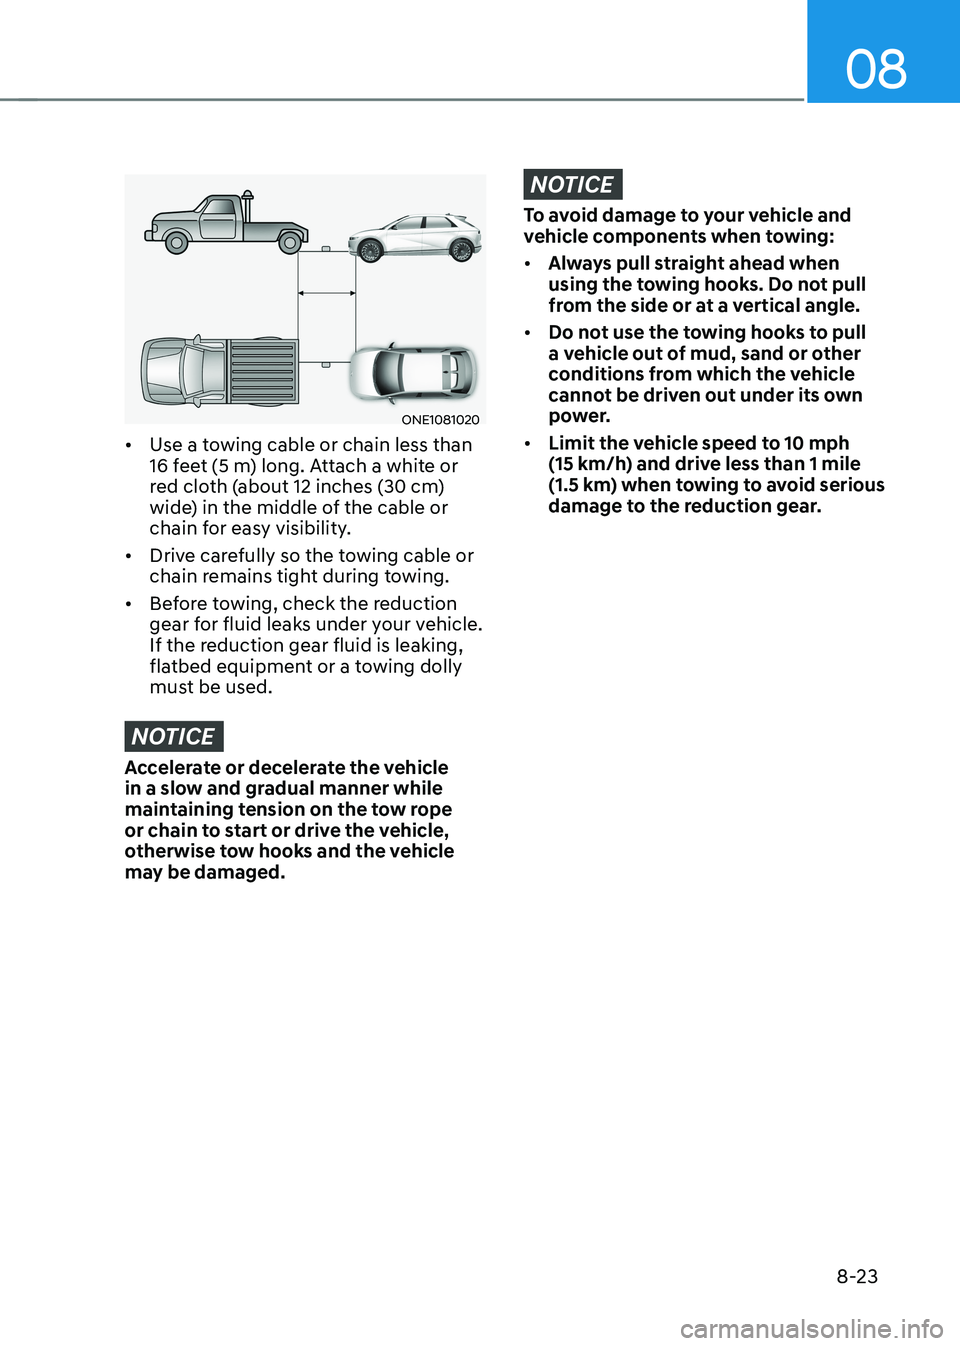
ONE1081020
• Use a towing cable or chain less than
16 feet (5 m) long. Attach a white or
red cloth (about 12 inches (30 cm)
wide) in the middle of the cable or
chain for easy visibility.
• Drive carefully so the towing cable or
chain remains tight during towing.
• Before towing, check the reduction
gear for fluid leaks under your vehicle.
If the reduction gear fluid is leaking,
flatbed equipment or a towing dolly
must be used.
NOTICE
Accelerate or decelerate the vehicle
in a slow and gradual manner while
maintaining tension on the tow rope
or chain to start or drive the vehicle,
otherwise tow hooks and the vehicle
may be damaged.
NOTICE
To avoid damage to your vehicle and
vehicle components when towing: • Always pull straight ahead when
using the towing hooks. Do not pull
from the side or at a vertical angle.
• Do not use the towing hooks to pull
a vehicle out of mud, sand or other
conditions from which the vehicle
cannot be driven out under its own
power.
• Limit the vehicle speed to 10 mph
(15 km/h) and drive less than 1 mile
(1.5 km) when towing to avoid serious
damage to the reduction gear.
Page 608 of 680

09
9 -7
Follow Normal Maintenance Schedule if the vehicle is usually operated where none of
the following conditions apply. If any of the following conditions apply, you must follow
the Maintenance Under Severe Usage Conditions. • Repeated driving short distance of less than 5 miles (8 km) in normal temperature or
less than 10 miles (16 km) in freezing temperature
• Driving on rough, dusty, muddy, unpaved, graveled or salt-spread roads
• Driving in areas using salt or other corrosive materials or in very cold weather
• Driving in heavy dust conditions
• Driving in heavy traffic area
• Driving in heavy traffic area with the ambient temperature higher than 32 ºC (90 ºF)
while consuming more than 50% of electric energy.
• Towing a trailer or using a camper, or driving with loads on the roof
• Driving as a patrol car, taxi, other commercial use of vehicle towing
• Frequently driving under high speed or rapid acceleration/deceleration
• Frequently driving in stop-and-go condition
If your vehicle is operated under the above conditions, you should inspect, replace
or refill more frequently than the following Normal Maintenance Schedule. After the
periods or distance shown in the chart, continue to follow the prescribed maintenance
intervals.
NOTICE
After 10 years or 100,000 miles, use severe maintenance schedule.
scheduled Maintenance services
Page 611 of 680

Maintenance
9-10
Maintenance Under Severe Usage Conditions
The following items must be serviced more frequently on cars mainly used under
severe driving conditions.
Refer to the chart below for the appropriate maintenance intervals.
R : Replace I : Inspect and if necessary, adjust, correct, clean or replace
Maintenance itemMaintenance
operation Maintenance intervals Driving
condition
Reduction gear fluid REvery 80,000 miles
(12,000 km) C, D, E, F, G,
H, I, J
Steering gear rack, linkage and boots I
Inspect more frequently
depending on the condition C, D, E, F, G
Front suspension ball joints I
Inspect more frequently
depending on the condition C, D, E, F, G
Disc brakes and pads, calipers and rotors I
Inspect more frequently
depending on the condition C, D, E, G, H
Driveshaft and boots IInspect more frequently
depending on the condition C, D, E, F,
G, H, I , J, M
Climate control air filter RReplace more frequently
depending on the condition C, E
Severe driving conditions
A. Repeatedly driving short distance of less than 5 miles (8 km) in normal temperature or less than 10 miles (16 km) in freezing temperature
B. Low speed driving for long distances
C. Driving on rough, dusty, muddy, unpaved, graveled or salt spread roads
D. Driving in areas using salt or other corrosive materials or in very cold weather
E. Driving in heavy dust condition
F. Driving in heavy traffic area
G. Driving on uphill, downhill, or mountain roads repeatedly
H. Towing a trailer, or using a camper or roof rack
I. Driving as a patrol car, taxi, other commercial use or vehicle towing
J. Driving over 106 mph (170 km/h)
K. Frequently driving in stop-and-go conditions
M. Driving more than 10 years or 100,000 miles
Page 613 of 680

Maintenance
9-12
„„Standard coolant
ONE1091002
„„Low conductivity coolant
ONE1091003
Check the condition and connections
of all cooling system hoses and
heater hoses. Replace any swollen or
deteriorated hoses.
The coolant level should be filled
between the MAX or F and the MIN
or L marks on the side of the coolant
reservoir when the parts in the motor
compartment is cool.
If the coolant is low, have the vehicle
inspected by an authorized HYUNDAI
dealer.
Use only designated coolant water for
electric vehicles, adding other types
of water or antifreeze can damage the
vehicle.
WARNING
Since specific coolant water (Blue color,
Low conductivity) is applied for electric
vehicles, replenishment of other
antifreeze or water may cause problems
to the vehicle.
WARNING
The electric motor for the
cooling fan may continue to
operate or start up when the
vehicle is not running and can
cause serious injury.
Keep hands, clothing and tools
away from the rotating fan
blades of the cooling fan.
The electric motor for the cooling
fan is controlled by vehicle coolant
temperature, refrigerant pressure and
vehicle speed. As the vehicle coolant
temperature decreases, the electric
motor will automatically shut off. This is
a normal condition.
coolant
Page 624 of 680

09
9-23
WARNING
Recommended pressures must be
maintained for the best ride, vehicle
handling, and minimum tire wear.
Over-inflation or under-inflation can
reduce tire life, adversely affect vehicle
handling, and lead to sudden tire failure
that could result in loss of vehicle
control resulting in an accident.
Severe under-inflation can lead to
severe heat build-up, causing blowouts,
tread separation and other tire failures
that can result in the loss of vehicle
control resulting in an accident. This
risk is much higher on hot days and
when driving for long periods at high speeds.
CAUTION
• Under-inflation results in excessive
wear, poor handling and reduced
electric energy economy. Wheel
deformation is also possible. Keep
your tire pressures at the proper
levels. If a tire frequently needs
refilling, have it checked by an
authorized HYUNDAI dealer.
• Over-inflation produces a harsh ride,
excessive wear at the center of the
tire tread, and a greater possibility of
damage from road hazards.
Check Tire Inflation Pressure
Check your tires, including the spare tire,
once a month or more.
How to check
Use a good quality tire pressure gauge
to check tire pressure. You can not tell
if your tires are properly inflated simply
by looking at them. Radial tires may look
properly inflated when they are under-
inflated.
Remove the valve cap from the tire valve
stem. Press the tire gauge firmly onto the
valve to get a pressure measurement. If
the cold tire inflation pressure matches
the recommended pressure on the
tire and loading information label, no
further adjustment is necessary. If the
pressure is low, add air until you reach
the recommended pressure. Make sure
to put the valve caps back on the valve
stems. Without the valve cap, dirt or
moisture could get into the valve core
and cause air leakage. If a valve cap is
missing, install a new one as soon as possible.
If you overfill the tire, release air by
pushing on the metal stem in the
center of the tire valve. Recheck the tire
pressure with the tire gauge. Be sure
to put the valve caps back on the valve
stems. Without the valve cap, dirt or
moisture could get into the valve core
and cause air leakage. If a valve cap is
missing, install a new one as soon as possible.
Page 628 of 680

09
9-27
Example tire size designation:
(These numbers are provided as an
example only; your tire size designator
could vary depending on your vehicle.) 235/55R19 105W
235 - Tire width in millimeters.
55 - Aspect ratio. The tire’s section
height as a percentage of its width.
R - Tire construction code (Radial).
19 - Rim diameter in inches.
105 - Load Index, a numerical code associated with the maximum load
the tire can carry.
W - Speed Rating Symbol. See the speed rating chart in this section for
additional information.
Wheel size designation
Wheels are also marked with important
information that you need if you ever
have to replace one. The following
explains what the letters and numbers in
the wheel size designation mean.
Example wheel size designation:
7.5J X 19
7.5 - Rim width in inches.
J - Rim contour designation.
19 - Rim diameter in inches.
Tire speed ratings
The chart below lists many of the
different speed ratings currently being
used for passenger vehicle tires. The
speed rating is part of the tire size
designation on the sidewall of the tire.
This symbol corresponds to that tire’s
designed maximum safe operating speed.
Speed Rating Symbol Maximum Speed
S 112 mph (180 km/h)
T 118 mph (190 km/h)
H 130 mph (210 km/h)
V 149 mph (240 km/h)
W 168 mph (270 km/h) Y 186 mph (300 km/h)
3. Checking tire life (TIN : Tire Identification Number)
Any tires that are over six years old,
based on the manufacturing date,
(including the spare tire) should be
replaced by new ones. You can find the
manufacturing date on the tire sidewall
(possibly on the inside of the wheel),
displaying the DOT Code. The DOT Code
is a series of numbers on a tire consisting
of numbers and English letters. The
manufacturing date is designated by the
last four digits (characters) of the DOT code.
DOT : XXXX XXXX OOOO
The front part of the DOT shows a plant
code number, tire size and tread pattern
and the last four numbers indicate week
and year manufactured.
For example:
DOT XXXX XXXX 5221 represents that the
tire was produced in the 52nd week of 2021.