2023 HYUNDAI IONIQ 5 speed
[x] Cancel search: speedPage 573 of 680

07
7-171
Limitations of Remote Smart Parking
Assist
In the following circumstances, Remote
Smart Parking Assist performance to
park or exit the vehicle may be limited,
there may be a risk of collision, or
Remote Smart Parking Assist may turn
off. Park or exit the vehicle manually if
necessary. •
An object is attached to the steering wheel
• The vehicle is installed with a snow
chain, spare tire or different size wheel
• Tire pressure is lower or higher than
the standard tire pressure
• Your vehicle is loaded with cargo
longer or wider than your vehicle or a
trailer is connected to your vehicle
• There is a problem with the wheel
alignment
• Your vehicle is leaned severely to one side
• Your vehicle is equipped with a trailer
hitch
• The license plate is installed
differently from the original location
• There is a person, animal or object
above or below the ultrasonic sensor
when Remote Smart Parking Assist is
activated
• The parking space is curved or diagonal
• There is an obstacle such as a person,
animal or object (trash can, bicycle,
motorcycle, shopping cart, narrow
pillar, etc.) near the parking space •
There is a circular pillar or narrow
pillar, or a pillar surrounded by objects
such as fire extinguisher, etc., near the parking space
• The road surface is bumpy (curbstone,
speed bump, etc.)
• The road is slippery
• The parking space is near a vehicle
with higher ground clearance or big,
such as a truck, etc.
• The parking space is Inclined
• There is heavy wind
• Operating Remote Smart Parking
Assist on uneven roads, gravel roads,
bushes, etc.
• The performance of the ultrasonic
sensor is affected by extremely hot or
cold weather
• The ultrasonic sensor is covered with
snow or water
• An object that generates ultrasonic
waves is nearby
• A wireless device with a transmission
function operates near the ultrasonic
sensors
• Your vehicle is affected by another
vehicle’s Parking Distance Warning
• The sensor is mounted or positioned
incorrectly by an impact to the bumper
• When the ultrasonic sensor cannot
detect the following objects:
- Sharp or slim objects, such as ropes, chains or small poles
- Objects smaller than 40 in. (100 cm) in length and narrower than 6 in. (14
cm) in diameter
- Objects which tend to absorb sensor frequency, such as clothes,
spongy material or snow
- A narrow object such as a corner of a square pillar
- Person, animal or object near the ultrasonic sensor
Page 580 of 680
Emergency Situations
8-2
ONE1081001
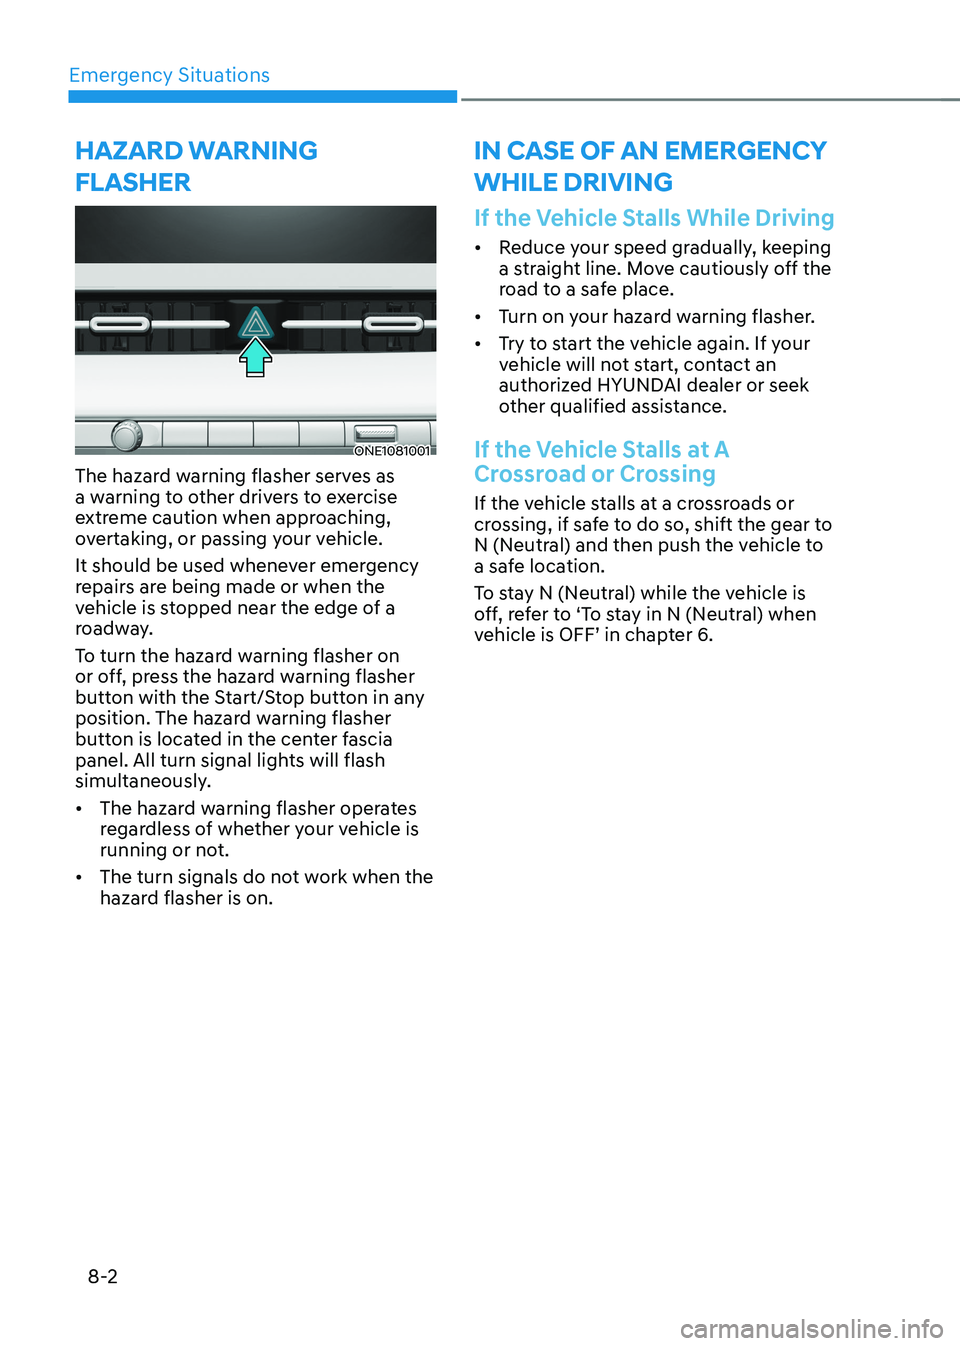
The hazard warning flasher serves as
a warning to other drivers to exercise
extreme caution when approaching,
overtaking, or passing your vehicle.
It should be used whenever emergency
repairs are being made or when the
vehicle is stopped near the edge of a
roadway.
To turn the hazard warning flasher on
or off, press the hazard warning flasher
button with the Start/Stop button in any
position. The hazard warning flasher
button is located in the center fascia
panel. All turn signal lights will flash
simultaneously. • The hazard warning flasher operates
regardless of whether your vehicle is
running or not.
• The turn signals do not work when the
hazard flasher is on.
If the Vehicle Stalls While Driving
• Reduce your speed gradually, keeping
a straight line. Move cautiously off the
road to a safe place.
• Turn on your hazard warning flasher.
• Try to start the vehicle again. If your
vehicle will not start, contact an
authorized HYUNDAI dealer or seek
other qualified assistance.
If the Vehicle Stalls at A
Crossroad or Crossing
If the vehicle stalls at a crossroads or
crossing, if safe to do so, shift the gear to
N (Neutral) and then push the vehicle to
a safe location.
To stay N (Neutral) while the vehicle is
off, refer to ‘To stay in N (Neutral) when
vehicle is OFF’ in chapter 6.
Hazard warning
flasHer in case of an emergency wHile driving
Page 581 of 680
08
8-3
If You Have a Flat Tire While Driving
If a tire goes flat while you are driving: • Take your foot off the accelerator
pedal and let the vehicle slow down
while driving straight ahead. Do not
apply the brakes immediately or
attempt to pull off the road as this
may cause loss of vehicle control
resulting in an accident. When the
vehicle has slowed to such a speed
that it is safe to do so, brake carefully
and pull off the road. Drive off the
road as far as possible and park on
firm, level ground. If you are on a
divided highway, do not park in the
median area between the two traffic lanes.
• When the vehicle is stopped, press
the hazard warning flasher button,
shift the gear to P (Park), apply the
regenerative brake, and press the
Start/Stop button to the OFF position.
• Have all passengers get out of the
vehicle. Be sure they all get out on the
side of the vehicle that is away from
traffic.
• When changing a flat tire, follow the
instructions provided later in this
chapter.
if tHe veHicle will not
s ta rt
Confirm the EV Battery is not
Low on the Charge Gauge
• Be sure the gear is in P (Park). The
vehicle starts only when the gear is in
P (Park).
• Check the 12-volt battery connections
to be sure they are clean and tight.
• Turn on the interior light. If the light
dims or goes out when you operate
the starter, the 12V battery is drained.
Do not push or pull the vehicle to start it.
This could cause damage to your vehicle.
Page 587 of 680
08
8-9
Low Tire Pressure
Warning Light
Low Tire Pressure Position and
Tire Pressure Telltale
ONE1081021L
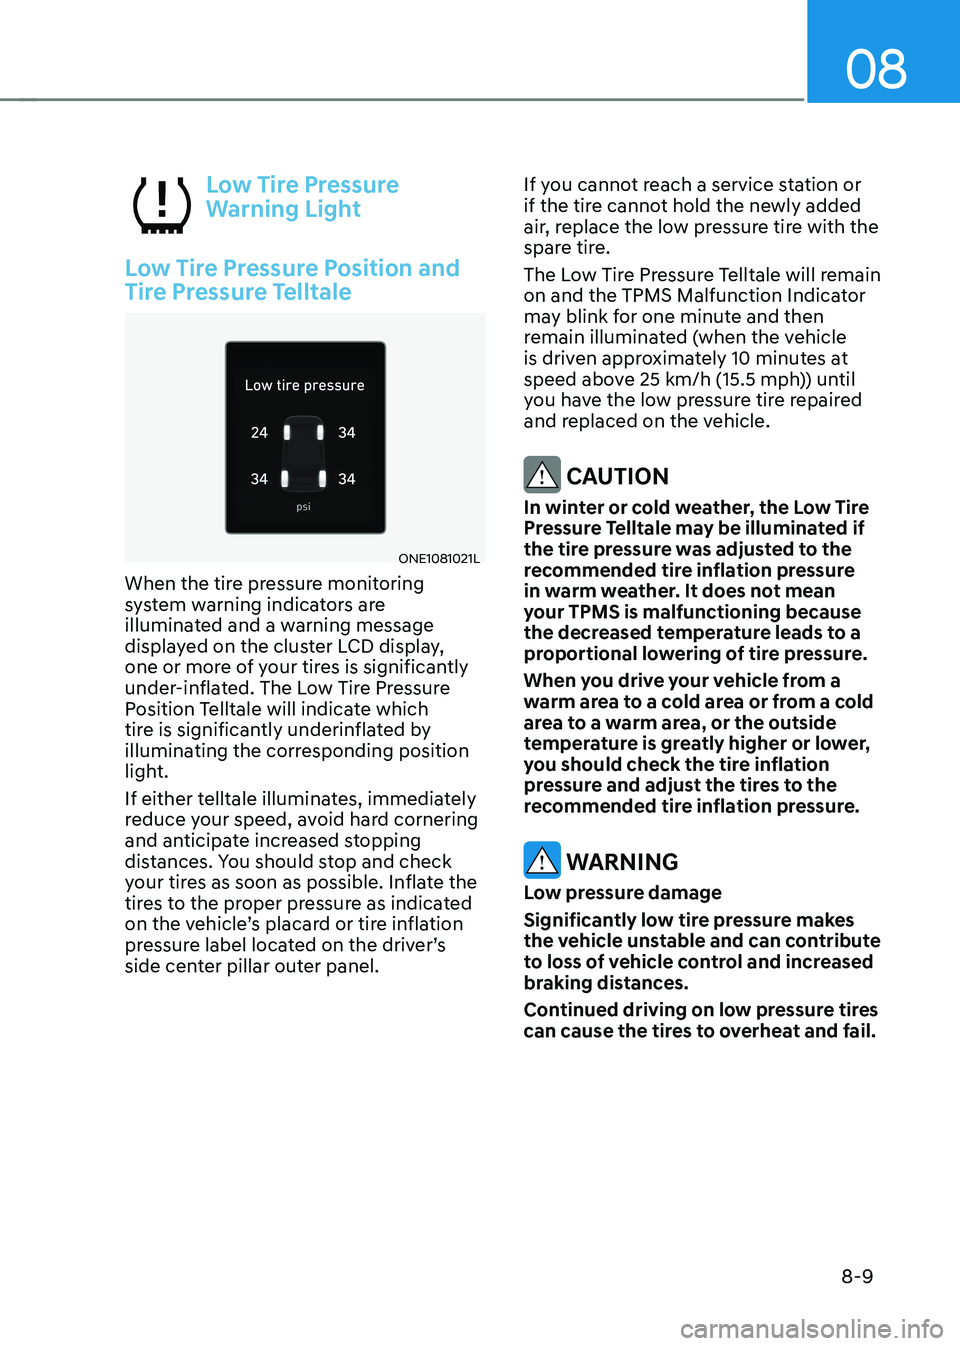
When the tire pressure monitoring
system warning indicators are
illuminated and a warning message
displayed on the cluster LCD display,
one or more of your tires is significantly
under-inflated. The Low Tire Pressure
Position Telltale will indicate which
tire is significantly underinflated by
illuminating the corresponding position
light.
If either telltale illuminates, immediately
reduce your speed, avoid hard cornering
and anticipate increased stopping
distances. You should stop and check
your tires as soon as possible. Inflate the
tires to the proper pressure as indicated
on the vehicle’s placard or tire inflation
pressure label located on the driver’s
side center pillar outer panel. If you cannot reach a service station or
if the tire cannot hold the newly added
air, replace the low pressure tire with the
spare tire.
The Low Tire Pressure Telltale will remain
on and the TPMS Malfunction Indicator
may blink for one minute and then
remain illuminated (when the vehicle
is driven approximately 10 minutes at
speed above 25 km/h (15.5 mph)) until
you have the low pressure tire repaired
and replaced on the vehicle.
CAUTION
In winter or cold weather, the Low Tire
Pressure Telltale may be illuminated if
the tire pressure was adjusted to the
recommended tire inflation pressure
in warm weather. It does not mean
your TPMS is malfunctioning because
the decreased temperature leads to a
proportional lowering of tire pressure.
When you drive your vehicle from a
warm area to a cold area or from a cold
area to a warm area, or the outside
temperature is greatly higher or lower,
you should check the tire inflation
pressure and adjust the tires to the
recommended tire inflation pressure.
WARNING
Low pressure damage
Significantly low tire pressure makes
the vehicle unstable and can contribute
to loss of vehicle control and increased
braking distances.
Continued driving on low pressure tires
can cause the tires to overheat and fail.
Page 588 of 680

Emergency Situations
8-10
TPMS (Tire Pressure
Monitoring System)
Malfunction Indicator
The TPMS Malfunction Indicator
will illuminate after it blinks for
approximately one minute when there
is a problem with the Tire Pressure
Monitoring System.
Have the system checked by an
authorized HYUNDAI dealer as soon as possible.
NOTICE
If there is a malfunction with the TPMS,
the Low Tire Pressure Position Telltale
will not be displayed even though the
vehicle has an under-inflated tire.
NOTICE
The TPMS Malfunction Indicator may
illuminate after blinking for one minute
if the vehicle is near electric power
supply cables or radio transmitters
such as police stations, government
and public offices, broadcasting
stations, military installations, airports,
transmitting towers, etc.
Additionally, the TPMS Malfunction
Indicator may illuminate if snow chains
are used or electronic devices such as
computers, chargers, remote starters,
navigation, etc. This may interfere with
normal operation of the TPMS.
Changing a Tire with TPMS
If you have a flat tire, the Low Tire
Pressure and Position telltales will come
on. Have the flat tire repaired by an
authorized HYUNDAI dealer as soon as
possible or replace the flat tire with the
spare tire.
NOTICE
It is recommended that you do not use a
puncture-repairing agent not approved
by an authorized HYUNDAI dealer or the
equivalent specified for your vehicle
to repair and/or inflate a low pressure
tire. Tire sealant not approved by an
authorized HYUNDAI dealer or the
equivalent specified for your vehicle
may damage the tire pressure sensor.
The spare tire (if equipped) does not
come with a tire pressure monitoring
sensor. When the low pressure tire or
the flat tire is replaced with the spare
tire, the Low Tire Pressure Telltale will
remain on. Also, the TPMS Malfunction
Indicator will illuminate after blinking
for one minute if the vehicle is driven
at speed above 25 km/h (15.5 mph) for
approximately 10 minutes. Once the original wheel equipped with
a tire pressure monitoring sensor is
reinflated to the recommended pressure
and reinstalled on the vehicle, the
Low Tire Pressure Telltale and TPMS
Malfunction Indicator will go off within a
few minutes of driving.
If the indicators do not extinguish after
a few minutes, consult an authorized
HYUNDAI dealer.
Page 590 of 680

Emergency Situations
8-12
ONE1081007
For safe operation, carefully read and
follow the instructions in this manual
before use.
(1) Compressor
(2) Sealant bottle
The tire mobility kit is a temporary fix
to the tire, have the tire inspected by
an authorized HYUNDAI dealer or the
equivalent approved for your vehicle as soon as possible.
CAUTION
When two or more tires are flat, do not
use the tire mobility kit because the
supported one sealant of Tire Mobility
Kit is only used for one flat tire.
WARNING
Do not use the Tire Mobility Kit to repair
punctures in the tire walls. This can
result in an accident due to tire failure.
WARNING
Have your tire repaired as soon as
possible. The tire may lose air pressure
at any time after inflating with the Tire
Mobility Kit.
Introduction
With the Tire Mobility Kit you stay mobile
even after experiencing a tire puncture.
The compressor and sealing compound
system effectively and comfortably seals
most punctures in a passenger car tire
caused by nails or similar objects and
reinflates the tire.
After you ensure that the tire is properly
sealed you can drive cautiously on the
tire (distance up to 120 miles (200 km))
at a max. speed of ( 50 mph (80 km/h))
in order to reach a service station or tire
dealer for the tire replacement.
It is possible that some tires, especially
with larger punctures or damage to the
sidewall, cannot be sealed completely.
Air pressure loss in the tire may adversely
affect tire performance.
For this reason, you should avoid abrupt
steering or other driving maneuvers,
especially if the vehicle is heavily loaded
or if a trailer is in use.
The Tire Mobility Kit is not designed
or intended as a permanent tire repair
method and is to be used for one tire
only.
This instruction shows you step by step
how to temporarily seal the puncture
simply and reliably.
Read the section “Notes on the safe use
of the Tire Mobility Kit”.
WARNING
Do not use the TMK if a tire is severely
damaged by driving run flat or with
insufficient air pressure.
Only punctured areas located within the
tread region of the tire can be sealed using the TMK.
if you haVe a flat tire (with tire mobility Kit,
if equipped)
Page 592 of 680
Emergency Situations
8-14
Components of the Tire Mobility Kit
ODE067044
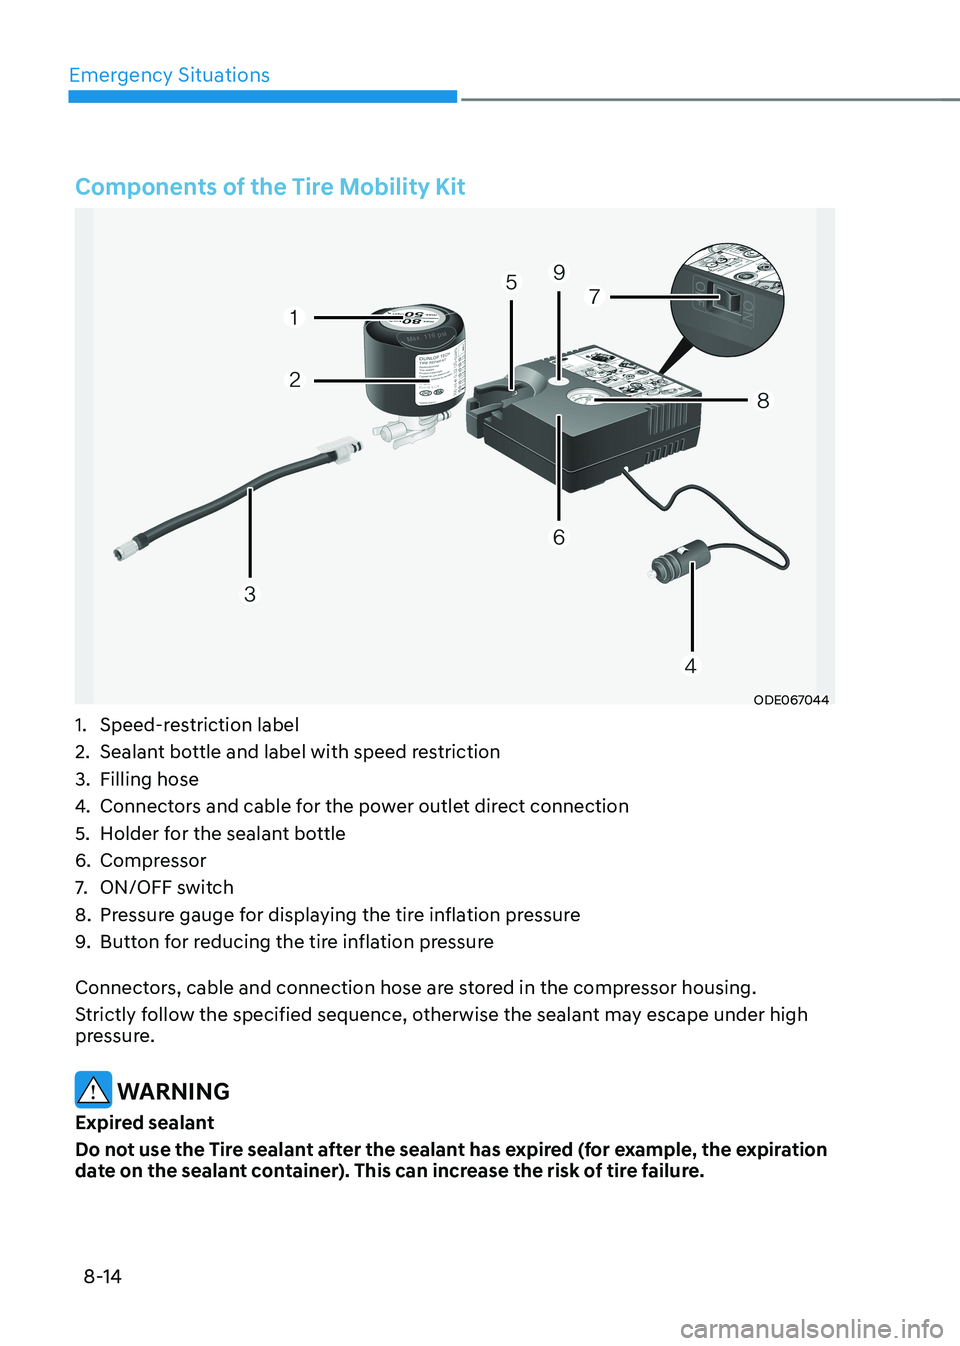
1. Speed-restriction label
2. Sealant bottle and label with speed restriction
3. Filling hose
4. Connectors and cable for the power outlet direct connection
5. Holder for the sealant bottle
6. Compressor
7. ON/OFF switch
8. Pressure gauge for displaying the tire inflation pressure
9. Button for reducing the tire inflation pressure
Connectors, cable and connection hose are stored in the compressor housing.
Strictly follow the specified sequence, otherwise the sealant may escape under high
pressure.
WARNING
Expired sealant
Do not use the Tire sealant after the sealant has expired (for example, the expiration
date on the sealant container). This can increase the risk of tire failure.
Page 593 of 680
08
8-15
WARNING
Sealant • Keep out of reach of children.
• Avoid contact with eyes.
• Do not swallow.
Using the Tire Mobility Kit When
a Tire is Flat
CAUTION
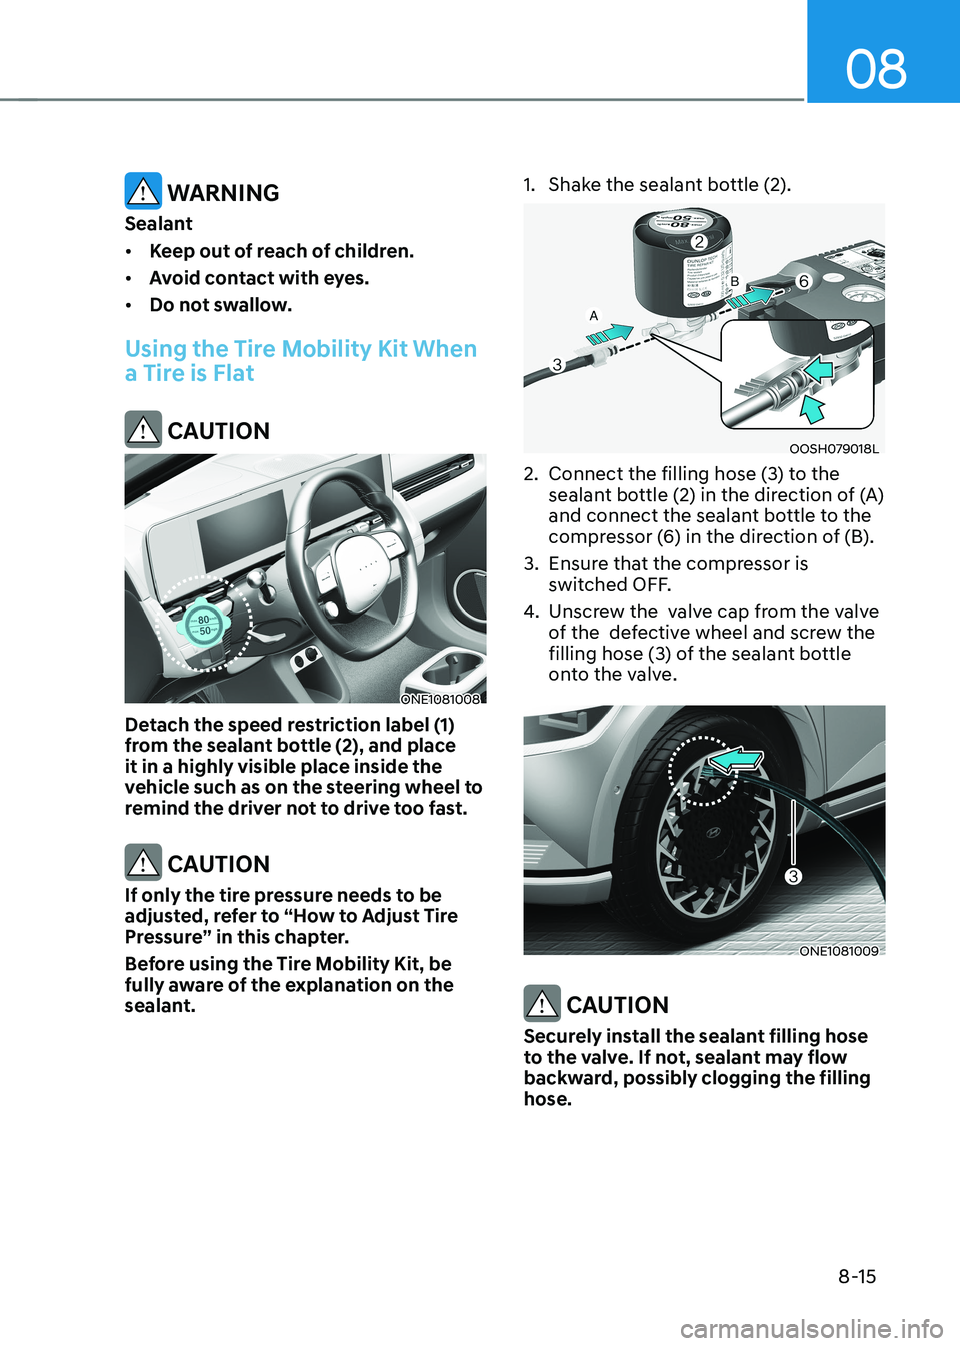
ONE1081008
Detach the speed restriction label (1)
from the sealant bottle (2), and place
it in a highly visible place inside the
vehicle such as on the steering wheel to
remind the driver not to drive too fast.
CAUTION
If only the tire pressure needs to be
adjusted, refer to “How to Adjust Tire
Pressure” in this chapter.
Before using the Tire Mobility Kit, be
fully aware of the explanation on the
sealant. 1. Shake the sealant bottle (2).
OOSH079018L
2. Connect the filling hose (3) to the sealant bottle (2) in the direction of (A)
and connect the sealant bottle to the
compressor (6) in the direction of (B).
3. Ensure that the compressor is switched OFF.
4. Unscrew the valve cap from the valve
of the defective wheel and screw the
filling hose (3) of the sealant bottle
onto the valve.
ONE1081009
CAUTION
Securely install the sealant filling hose
to the valve. If not, sealant may flow
backward, possibly clogging the filling hose.