2023 FORD F650/750 trailer
[x] Cancel search: trailerPage 141 of 378

GENERAL INFORMATION
Note: Occasional brake noise is normal. If
a metal-to-metal, continuous grinding or
continuous squeal sound is present, the
brake linings may be worn-out. Have the
system checked as soon as possible. If the
vehicle has continuous vibration or shudder
in the steering wheel while braking, have the
system checked as soon as possible.
All standard equipment brakes are
self-adjusting. Automatic adjustment,
when required, occurs whenever you apply
and release the brakes during forward or
reverse operation.
Know the required stopping distances for
all driving conditions you may encounter.
For longer brake lining life, take full
advantage of engine braking power when
coming to a stop.
Wet brakes result in reduced braking
efficiency. Gently press the brake pedal a
few times when driving from a car wash or
standing water to dry the brakes.
If the brakes do not grip well:
• Check brake adjustment.
• Check the brake linings for excessive
wear.
• Check the system air pressure on
vehicles with air brakes.
• Let the brakes cool if you have been
using them excessively, as in mountain
driving or after several fast, high-speed
stops.
• If you have been driving through deep
water, gently apply the brakes several
times while your vehicle is moving
slowly.
Brake Over Accelerator
In the event the accelerator pedal
becomes stuck or entrapped, apply steady
and firm pressure to the brake pedal to
slow the vehicle and reduce engine power.
If you experience this condition, apply the
brakes and bring your vehicle to a safe
stop. Move the transmission to park (P),
switch the engine off and apply the parking
brake. Inspect the accelerator pedal for
any interference. If none are found and the
condition persists, have your vehicle towed
to the nearest authorized dealer
Anti-lock Brake System
This system helps you maintain steering
control during emergency stops by keeping
the brakes from locking.
If the light does not illuminate
during start up, remains on or
flashes, the system may be
disabled. It also momentarily illuminates
when you switch the ignition on to confirm
the lamp is functional. If it does not
illuminate when you switch the ignition on,
or begins to flash at any time, have the
system checked.
E210335
If you connect a PLC trailer with
the ignition on, the trailer ABS
light also illuminates. If the light
fails to illuminate, if it remains on after you
start the vehicle or continues to flash, have
the system serviced immediately.
See Warning Lamps and Indicators
(page 66).
137
Brakes
Page 149 of 378
TRAILER BRAKES (IF EQUIPPED)
Trailer Brake Hand Control (If Equipped)
WARNING: The hand control
should never be used to apply the brakes
when the tractor and trailer are parked
unattended. Air may leak from the
system and the vehicle could possibly
move, resulting in possible property
damage, personal injury or death.
E210339
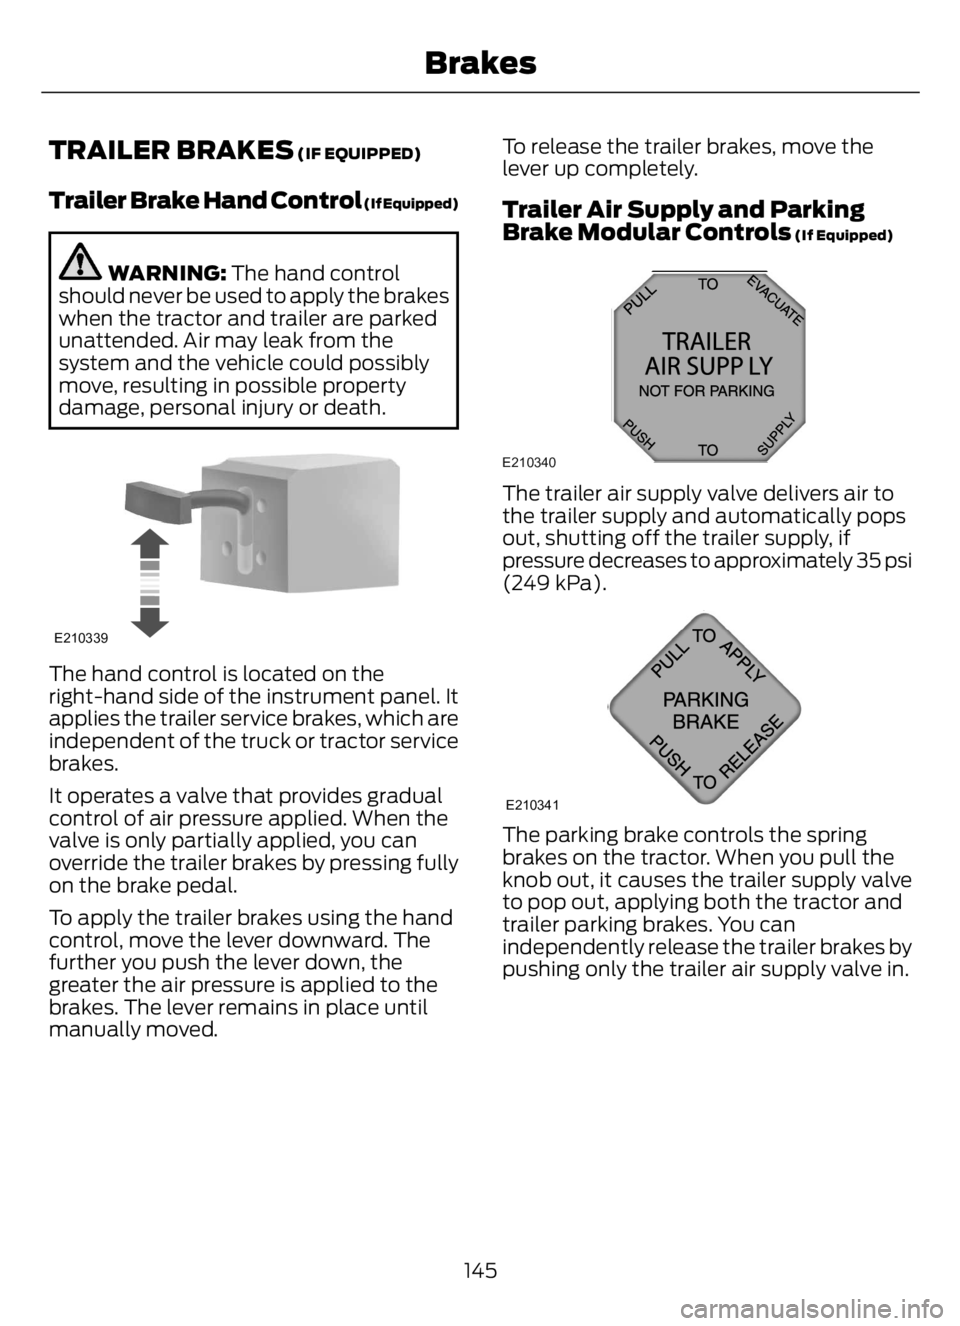
The hand control is located on the
right-hand side of the instrument panel. It
applies the trailer service brakes, which are
independent of the truck or tractor service
brakes.
It operates a valve that provides gradual
control of air pressure applied. When the
valve is only partially applied, you can
override the trailer brakes by pressing fully
on the brake pedal.
To apply the trailer brakes using the hand
control, move the lever downward. The
further you push the lever down, the
greater the air pressure is applied to the
brakes. The lever remains in place until
manually moved.To release the trailer brakes, move the
lever up completely.
Trailer Air Supply and Parking
Brake Modular Controls (If Equipped)
E210340
The trailer air supply valve delivers air to
the trailer supply and automatically pops
out, shutting off the trailer supply, if
pressure decreases to approximately 35 psi
(249 kPa).
E210341
The parking brake controls the spring
brakes on the tractor. When you pull the
knob out, it causes the trailer supply valve
to pop out, applying both the tractor and
trailer parking brakes. You can
independently release the trailer brakes by
pushing only the trailer air supply valve in.
145
Brakes
Page 150 of 378
Initial Charge
E210342
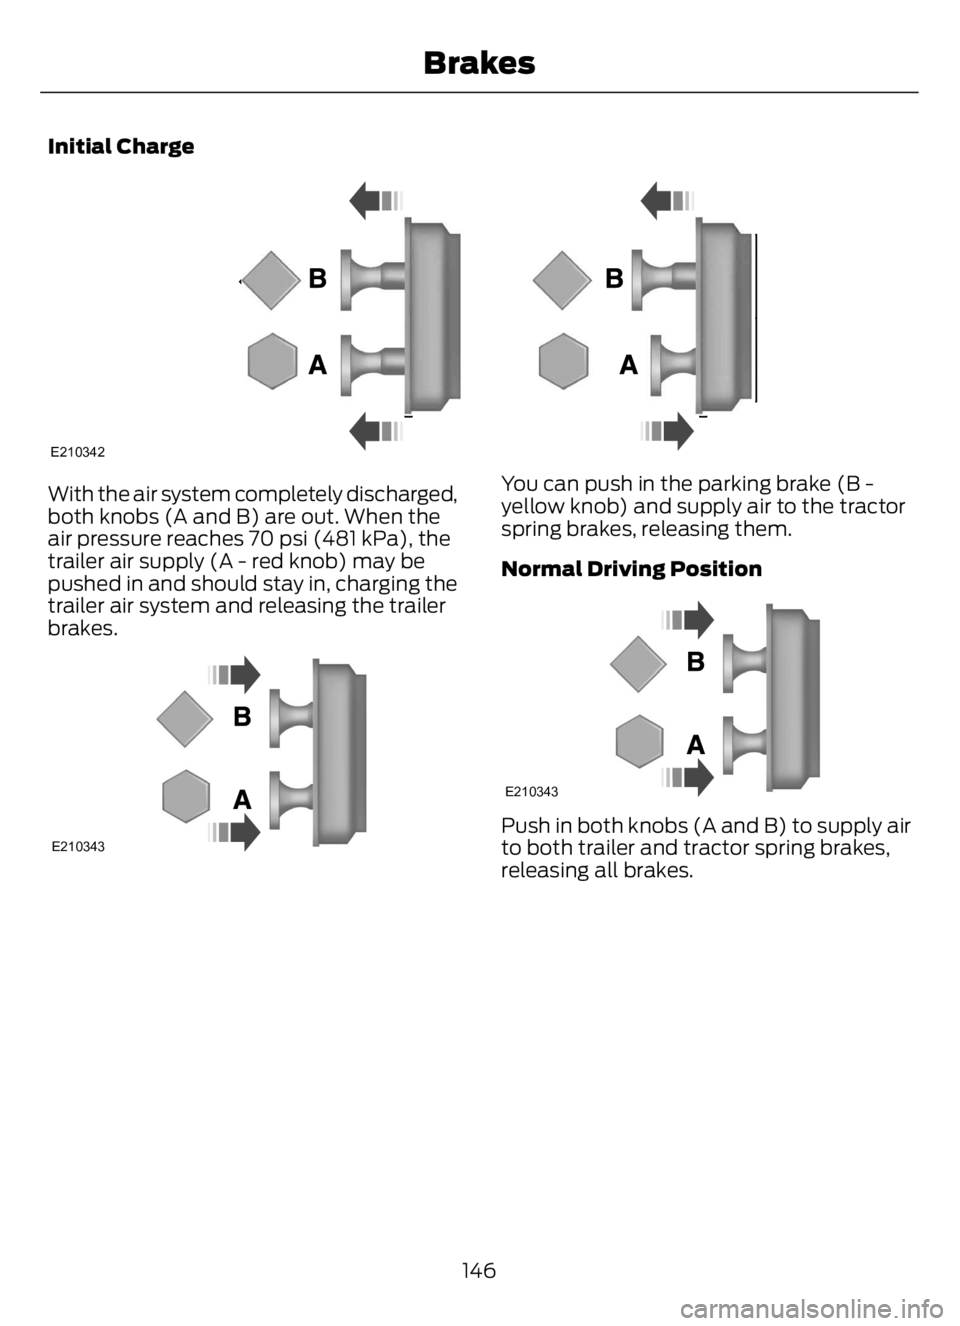
With the air system completely discharged,
both knobs (A and B) are out. When the
air pressure reaches 70 psi (481 kPa), the
trailer air supply (A - red knob) may be
pushed in and should stay in, charging the
trailer air system and releasing the trailer
brakes.
E210343
You can push in the parking brake (B -
yellow knob) and supply air to the tractor
spring brakes, releasing them.
Normal Driving Position
E210343
Push in both knobs (A and B) to supply air
to both trailer and tractor spring brakes,
releasing all brakes.
146
Brakes
Page 151 of 378
System Park
E210344
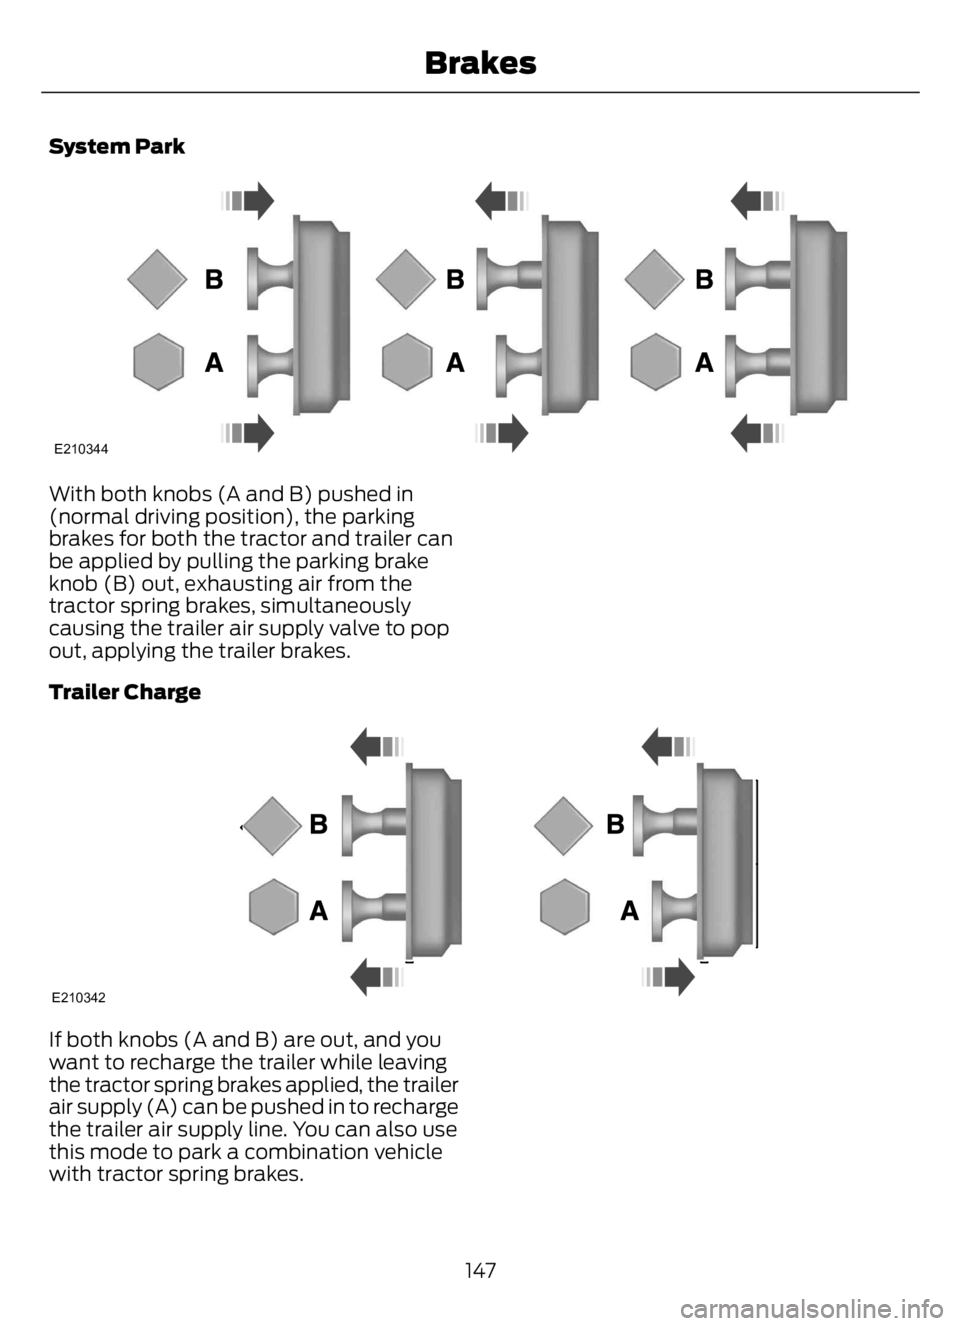
With both knobs (A and B) pushed in
(normal driving position), the parking
brakes for both the tractor and trailer can
be applied by pulling the parking brake
knob (B) out, exhausting air from the
tractor spring brakes, simultaneously
causing the trailer air supply valve to pop
out, applying the trailer brakes.
Trailer Charge
E210342
If both knobs (A and B) are out, and you
want to recharge the trailer while leaving
the tractor spring brakes applied, the trailer
air supply (A) can be pushed in to recharge
the trailer air supply line. You can also use
this mode to park a combination vehicle
with tractor spring brakes.
147
Brakes
Page 152 of 378
Automatic Application
E210345
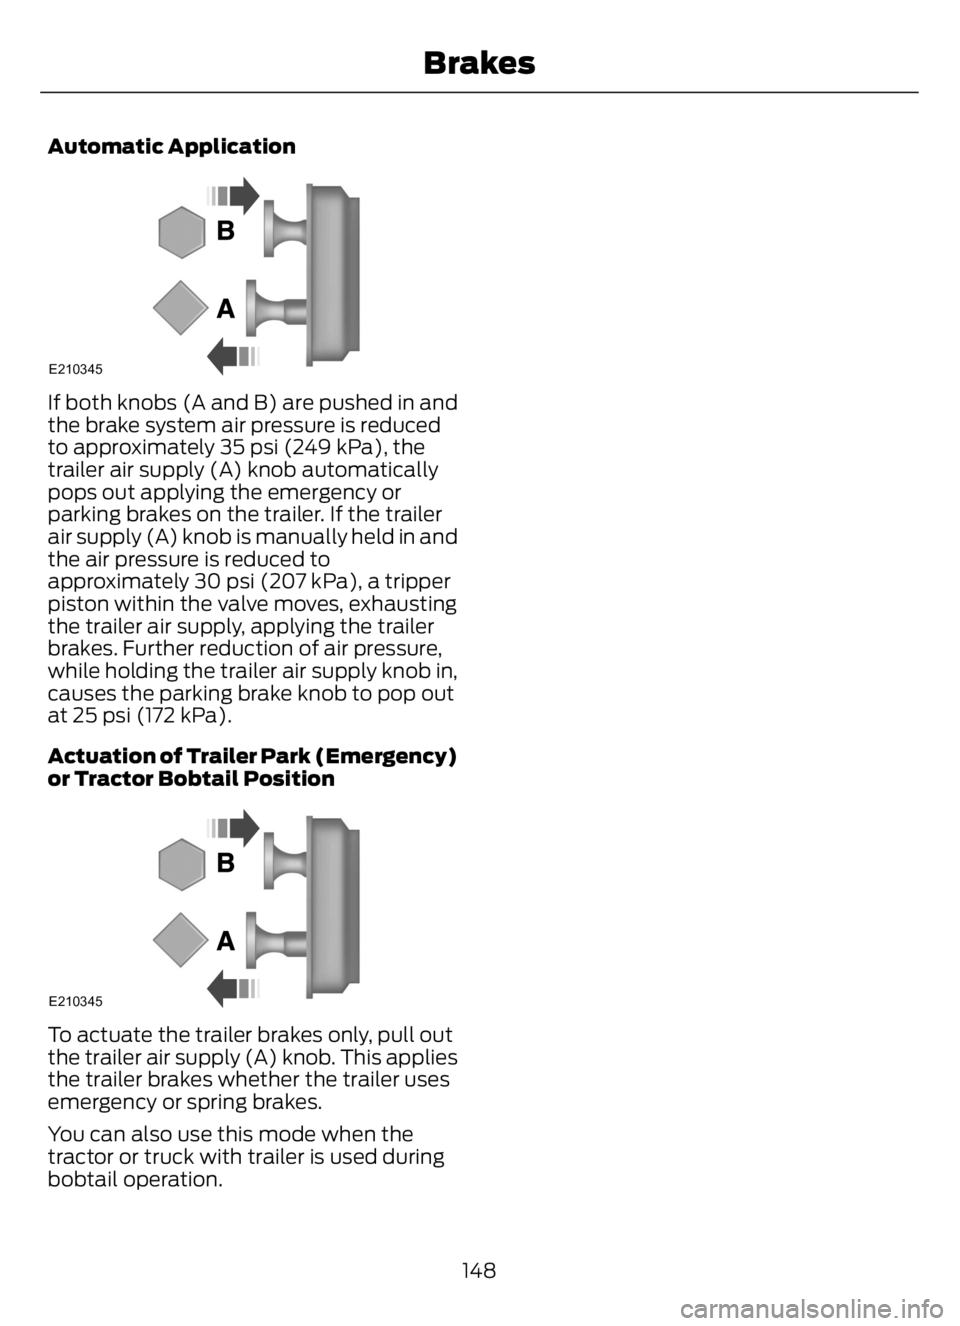
If both knobs (A and B) are pushed in and
the brake system air pressure is reduced
to approximately 35 psi (249 kPa), the
trailer air supply (A) knob automatically
pops out applying the emergency or
parking brakes on the trailer. If the trailer
air supply (A) knob is manually held in and
the air pressure is reduced to
approximately 30 psi (207 kPa), a tripper
piston within the valve moves, exhausting
the trailer air supply, applying the trailer
brakes. Further reduction of air pressure,
while holding the trailer air supply knob in,
causes the parking brake knob to pop out
at 25 psi (172 kPa).
Actuation of Trailer Park (Emergency)
or Tractor Bobtail Position
E210345
To actuate the trailer brakes only, pull out
the trailer air supply (A) knob. This applies
the trailer brakes whether the trailer uses
emergency or spring brakes.
You can also use this mode when the
tractor or truck with trailer is used during
bobtail operation.
148
Brakes
Page 158 of 378
• Your load shifts due to improper
retention, accident damage or the
inherently mobile nature of some loads,
for example, hanging meat, live
animals or partially laden tankers.
• Your vehicle or load has an unusually
high or off-set center of gravity.
• Your brakes are not properly adjusted
or maintained.
• One side of your vehicle drops off the
pavement at an angle that is too great
to be counteracted by a reduction in
speed.
To Maximize the Effectiveness Of
Stability Control
• Make sure that the weight of your load
is evenly distributed, from front to back,
side to side and you secure it properly
at all times.
• Exercise extreme caution at all times
while driving and avoid sharp turns,
sudden steering inputs or abrupt lane
changes at high speeds, particularly if:
• Hauling loads that can shift.
• Your vehicle or load has a high or
off-set center of gravity when
loaded.
• You are towing doubles or triples.
Electronic Stability Control Usage with
Tractor/Trailer
The electronic stability control system is
designed to work with trailer air brake
systems. We do not recommend its use
with any other trailer brake system.
Electronic Stability Control and Towing
with Non-tractor Trucks (Straight or
Kick-up Frame)
Non-tractor trucks (straight or kick-up
frame) with air brake electronic stability
control, should not be used for towing any
type of trailer.Chassis Modifications
Stability control is specifically calibrated
and validated only for your vehicle's
original configuration. If you alter your
vehicle's chassis components, for example,
a wheel base extension or reduction, tag
axle addition or removal, a major body
change such as conversion of a tractor into
a truck. Ford Motor Company is not
responsible for the performance of the
stability control system if you modify any
major components such as axle,
suspension or steering system.
154
Stability Control
Page 159 of 378

USING ADAPTIVE CRUISE
CONTROL
WARNING: You are responsible for
controlling your vehicle at all times. The
system is designed to be an aid and does
not relieve you of your responsibility to
drive with due care and attention. Failure
to follow this instruction could result in
the loss of control of your vehicle,
personal injury or death.
WARNING: Do not use adaptive
cruise control on winding roads, in heavy
traffic or when the road surface is
slippery. This could result in loss of
vehicle control, serious injury or death.
WARNING: Pay close attention to
changing road conditions such as
entering or leaving a highway, on roads
with intersections or roundabouts, roads
without visible lanes of travel, roads that
are unpaved, or steep slopes. Failure to
follow this instruction could result in the
loss of control of your vehicle, personal
injury or death.
WARNING: Do not use the system
in poor visibility, for example fog, heavy
rain, spray or snow.
WARNING: Do not use the system
when towing a trailer that has
aftermarket electronic trailer brake
controls. Failure to follow this instruction
could result in the loss of control of your
vehicle, personal injury or death.
WARNING: Do not use tire sizes
other than those recommended because
this can affect the normal operation of
the system. Failure to do so may result
in a loss of vehicle control, which could
result in serious injury.
WARNING: The system may not
detect stationary or slow moving
vehicles below 6 mph (10 km/h).
WARNING: The system does not
detect pedestrians or objects in the road.
WARNING: The system does not
detect oncoming vehicles in the same
lane.
WARNING: The system is not a
crash warning or avoidance system.
WARNING: Do not use the system
with a snow plow blade installed.
The system adjusts your vehicle speed to
maintain the set gap between you and the
vehicle in front of you in the same lane.
You can select four gap settings.
The system uses a radar sensor that
projects a beam directly in front of your
vehicle.
E262918
The adaptive cruise controls are on the
steering wheel.
Switching Adaptive Cruise Control
On
E265296
Press and release the button.
155
Cruise Control - Vehicles With: Adaptive Cruise Control
Page 162 of 378

The system may apply the brakes to slow
the vehicle to the new set speed. The set
speed displays continuously in the
information display when the system is
active.
Canceling the Set Speed
E265298
Press and release the button or
tap the brake pedal.
The set speed does not erase.
Resuming the Set Speed
Press and release the button.
Your vehicle speed returns to the
previously set speed and gap setting. The
set speed displays continuously in the
information display when the system is
active.
Note:Only use resume if you are aware of
the set speed and intend to return to it.
Automatic Cancellation
The system is not functional at vehicle
speeds below 12 mph (20 km/h). An
audible alarm sounds and the automatic
braking releases if the vehicle drops below
this speed.
Automatic cancellation can occur when
the tires lose traction or you apply the
parking brake.
Note:If your vehicle speed drops too low,
an audible warning sounds and a message
appears in the information display.
Automatic braking releases.
Hilly Condition and Trailer Tow
Usage
You should select a lower gear when the
system is active in situations such as
prolonged downhill driving on steep
grades, for example in mountainous areas.
The system needs additional engine
braking in these situations to reduce the
load on the vehicle’s regular brake system
to prevent it from overheating.
Note:An audible alarm sounds and the
system shuts down if it applies brakes for
an extended period of time. This allows the
brakes to cool. The system functions
normally again after the brakes cool.
Note:When towing with adaptive cruise
control, switch on Diesel engine brake.
Switching Adaptive Cruise Control
Off
E265297
Press and release the button
when the system is in standby
mode, or switch the ignition off.
Note:The set speed and gap setting is
erased when you switch the system off.
Detection Issues
WARNING: On rare occasions,
detection issues can occur due to the
road infrastructures, for example bridges,
tunnels and safety barriers. In these
cases, the system may brake late or
unexpectedly. At all times, you are
responsible for controlling your vehicle,
supervising the system and intervening,
if required.
WARNING: If the system
malfunctions, have your vehicle checked
as soon as possible.
158
Cruise Control - Vehicles With: Adaptive Cruise Control