2023 FORD F650/750 gear oil
[x] Cancel search: gear oilPage 14 of 378

• The gearshift lever must be in P (Park)
or N (Neutral) in order for the starter
to operate.
• Try operating the starter switch several
times. This operation may clean
potentially corroded contacts or make
the switch temporarily operable until
you can reach the dealer.
• If all electrical connections are tight
and you need assistance to start, See
Jump Starting the Vehicle (page 190).
If engine cranks but won’t start
Prolonged starter cranking (in excess of 10
seconds) could cause damage to the
starter motor or the high-pressure fuel
pump.
• Check the fuel gauge. You may be out
of fuel. If the gauge shows that there
is fuel in the tank, the trouble may be
in the electrical system or the fuel
system. If equipped with an auxiliary
tank, be sure that the tank control
switch is set for the tank with fuel and
not on an empty tank.
• Leaving your ignition key turned to on
for over two minutes without starting
may make starting difficult because
the glow plugs will cease activation.
Reset the system by turning the ignition
key to off and then back to on again.
Note:If the system is out of fuel and the
engine will not start, do not continue
cranking the engine. Continued cranking can
damage the high-pressure fuel pump.
If the engine runs hot
The following could cause the engine to
overheat:
• Lack of coolant
• Dirty cooling system.
• Plugged radiator fins, A/C condenser
and/or oil cooler
• Malfunctioning fan drive• Driving with frozen coolant
• Sticking thermostat
• Overloading or pulling heavy trailers
during hot weather
• Grill or radiator air blockage
• Slipping or missing drive belt
• Plugged or very dirty air filter
If fuses burn out
WARNING: Replacement fuses and
circuit breakers must always be the
same rating as the original equipment
shown. Never replace a fuse or circuit
breaker with one of a higher rating.
Higher rated fuses or circuit breakers
could allow circuit overloading in the
event of a circuit malfunction, resulting
in severe vehicle damage or personal
injury due to fire.
Burned-out or blown fuses usually indicate
an electrical short-circuit, although a fuse
may occasionally burn out from vibration.
Insert a second fuse. If this fuse
immediately burns out and you cannot
locate the cause, return your vehicle to
your dealer for a circuit check. See
Changing a Fuse (page 208).
Selective catalytic reduction system
speed limit and Idle-only modes
If the vehicle’s speed is limited or in an
idle-only mode, the selective catalytic
reduction system may be limiting the
vehicle’s functions due to low or
contaminated DEF. Check the DEF. See
Selective Catalytic Reductant System
(page 118).
SYMBOLS GLOSSARY
These are some of the symbols you may
see on your vehicle.
10
Introduction
Page 188 of 378

ECONOMICAL DRIVING
Your fuel economy is affected by several
things, such as how you drive, the
conditions you drive under, and how you
maintain your vehicle.
You may improve your fuel economy by
keeping these things in mind:
• Accelerate and slow down in a smooth,
moderate fashion.
• Drive at steady speeds without
stopping.
• Anticipate stops; slowing down may
eliminate the need to stop.
• Close the windows for high-speed
driving.
• Drive at reasonable speeds. Traveling
at 55 mph (90 km/h) uses 15% less
fuel than traveling at 65 mph
(105 km/h).
• Keep the tires properly inflated and use
only the recommended size.
• Use the recommended engine oil.
• Perform all regularly scheduled
maintenance.
Avoid these actions; they reduce your fuel
economy:
• Sudden accelerations or hard
accelerations.
• Warm up your vehicle on cold
mornings.
• Use the air conditioner.
• Use the speed control in hilly terrain.
• Rest your foot on the brake pedal while
driving.
• Carry unnecessary weight.
Approximately 1 mpg [0.4 km/L] is lost
for every 400 lb (180 kg) of weight
carried.
• Driving with the wheels out of
alignment.Conditions
• Adding certain accessories to your
vehicle may reduce fuel economy. For
example bug deflectors, rollbars, light
bars, running boards, ski racks or
luggage racks.
• Using fuel blended with alcohol may
lower fuel economy.
• Fuel economy may decrease with lower
temperatures during the first 5–10 mi
(12–16 km) of driving.
• Driving on flat terrain offers improved
fuel economy as compared to driving
on hilly terrain.
• Transmissions give their best fuel
economy when operated in the top
cruise gear and with steady pressure
on the gas pedal.
COLD WEATHER
PRECAUTIONS
Note:Idling in cold weather does not heat
the engine to its normal operating
temperature. Long periods of idling,
especially in cold weather, can cause a
buildup of deposits which can cause engine
damage.
Changing to a lighter grade engine oil also
makes starting easier under these
conditions. Refer to Engine oil
specifications. See Engine Oil Capacity
and Specification (page 292).
Diesel fuel is adjusted seasonally for cold
temperatures. Diesel fuel which has not
been properly formulated for the ambient
conditions may gel which can clog the fuel
filters. One indication that the fuel filter(s)
may be clogged is if the engine starts, stalls
after a short time, and then does not
restart. If you have been using biodiesel,
you may need to use a fuel with lower
biodiesel content, try another brand, or
discontinue using biodiesel. Do not use
184
Driving Hints
Page 191 of 378

Avoid driving too fast during the first
1,000 mi (1,600 km). Vary your speed
frequently and change up through the
gears early. Do not labor the engine.
Drive your new vehicle at least 1,000 mi
(1,600 km) before towing a trailer. Make
sure you use the specified engine oil. See
Engine Oil Capacity and Specification
(page 292).
Do not add friction modifier compounds
or special break-in oils during the first few
thousand miles (kilometers) of operation.
These additives may prevent piston ring
seating.
DRIVING THROUGH WATER
WARNING: Do not drive through
flowing or deep water as you may lose
control of your vehicle.
Note:Driving through standing water can
cause vehicle damage.
Note:Engine damage can occur if water
enters the air filter.
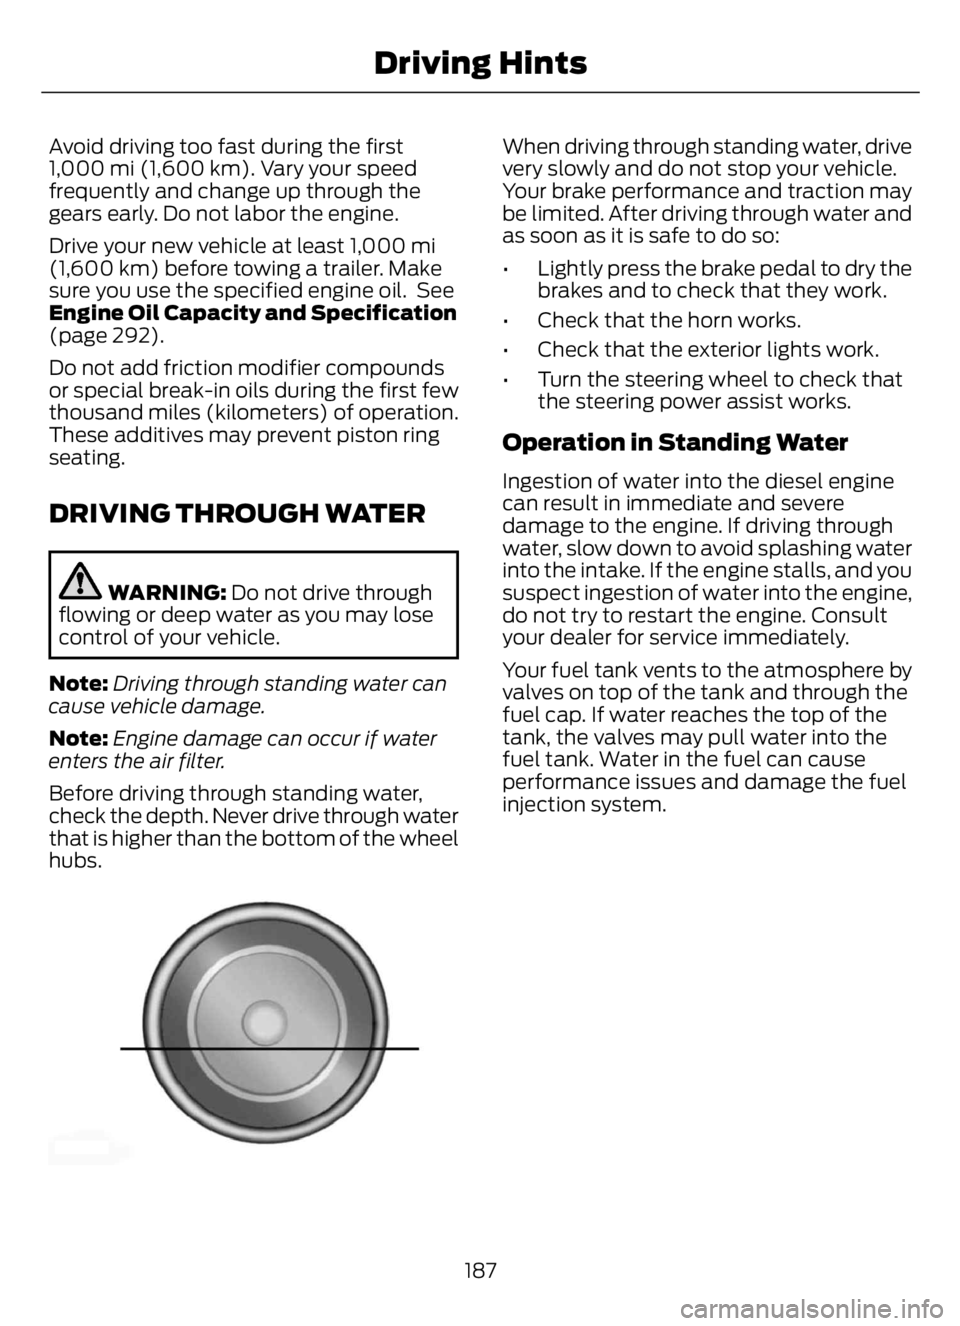
Before driving through standing water,
check the depth. Never drive through water
that is higher than the bottom of the wheel
hubs.
E176913E176913
When driving through standing water, drive
very slowly and do not stop your vehicle.
Your brake performance and traction may
be limited. After driving through water and
as soon as it is safe to do so:
• Lightly press the brake pedal to dry the
brakes and to check that they work.
• Check that the horn works.
• Check that the exterior lights work.
• Turn the steering wheel to check that
the steering power assist works.
Operation in Standing Water
Ingestion of water into the diesel engine
can result in immediate and severe
damage to the engine. If driving through
water, slow down to avoid splashing water
into the intake. If the engine stalls, and you
suspect ingestion of water into the engine,
do not try to restart the engine. Consult
your dealer for service immediately.
Your fuel tank vents to the atmosphere by
valves on top of the tank and through the
fuel cap. If water reaches the top of the
tank, the valves may pull water into the
fuel tank. Water in the fuel can cause
performance issues and damage the fuel
injection system.
187
Driving Hints
Page 215 of 378

Engine compartment (with engine off)
Inspect for glazing, fraying or cracking. There should be no
more than 5-7 cracks per rib, per 1 in (2.5 cm) Belts (fan, alternator,
water pump and air
conditioning
compressor)
Inspect for signs of fluid puddles or dripping fluid on the
ground under the engine, or the underside of the engine. Fluid leaks
Inspect for debris that may have collected on the HVAC air
inlet grille or inside the exterior module as this may reduce
system performance. HVAC air inlet
Engine starting (with parking brake applied)
Before entering the cab, verify that the vehicle is equipped
with spare electrical fuses (if used), three red reflective
triangles, a properly charged and rated fire extinguisher and
wheel chocks. Safety and emergency
equipment
Walk around the vehicle and verify all steps and grab handles,
inside and out (as well as behind), are tight and clean. Use
extreme caution and a three-point stance at all times.
Inspect door latches for proper closing, latching and locking.
Set the parking brake. Make sure the gearshift lever is in
neutral (N) or park (P) (if equipped with a park position). Starting the engine
Diesel engine: Turn the key to the on position. Turn the key
to start when the wait to start indicator light in the instrument
cluster turns off.
Gasoline engine: Turn the key to start, and then release it
as soon as the engine starts.
Verify pressure builds to normal operating range. Engine oil pressure
A tone indicating low air pressure should sound immediately
after the engine starts but before the compressor has built-
up pressure. The tone should stop when the air pressure
reaches 70 psi (483 kPa). Let the air pressure build to
governed cutout pressure, which should occur between
115–130 psi (793–896 kPa). Low air pressure warning
tone (if equipped with an
air compressor)
Press the accelerator and verify that it operates smoothly,
without any binding or irregular feel. Release the pedal and
verify the engine returns to idle speed immediately. Accelerator
211
Vehicle Inspection Guide
Page 263 of 378

Follow the tire manufacturer's
recommended cold inflation pressure for
the tire size, load range (ply rating) and
steer axle loading typical for their operation
(each steer axle tire equals ½ steer axle
loading).
Special applications may warrant a setting
based on experience with the type of tire
operating loads and conditions. Radial tires
are more sensitive to toe-in setting than
bias ply tires. Fine tuning school bus
alignment to line-haul truck standards
does not drastically improve tire tread life.
STEERING SYSTEM
INSPECTION
WARNING: Failure to maintain the
steering system in proper condition can
cause reduced steering ability resulting
in property damage, personal injury or
death.
Note:Have any steering problems
immediately corrected by a qualified service
technician.
Ask your service technician to examine the
steering mechanism. Only minor
adjustments may be necessary.
Regular inspections should include:
• Checking the tie rod, drag link end
clamp bolts and ball joints for proper
tightness.
• Checking for installation and spread of
cotter pins and tightness of nuts at
both ends of the tie rod and drag link.
• Checking that the pitman arm (steering
arm at steering gear) mounting is tight
and locked. Check system for leaks or
hose chafing. Repair immediately, if
necessary.• Maintaining proper steering gear and
power steering pump lubricant levels.
• Checking steering column joint bolts
and steering linkage, particularly for
body-to-chassis clearance.
Steering Column Joint Bolts
As a good maintenance practice, check
steering column joint bolt tightness every
60,000 mi (96,000 km) or annually,
whichever occurs first. Do not overtighten
the bolts.
Hydraulic System
Whenever draining and refilling the power
steering's hydraulic system for any reason,
bleed air from the system before returning
the vehicle to service. Failure to bleed the
hydraulic system properly can result in
degradation of power system performance.
Consult an authorized dealer who is aware
of the proper procedures for filling and
bleeding the system.
SUSPENSION SYSTEM
INSPECTION
Note:Do not adjust air suspension height
to any setting other than the specified
setting. Altering the height setting changes
the driveline angle and may result in
unwarrantable component damage, such
as transmission component damage.
Verify drive axle air suspension height and
height control valve performance at engine
oil change intervals.
Periodically check:
• Condition of spring leaves for evidence
of fatigue, bending or breakage.
• Condition of suspension mounting
brackets and bushings.
• Torque rod mounting fasteners for
tightness.
259
Maintenance
Page 272 of 378

• With your foot on the brake, shift
through all the gears while the engine
is running.
• We recommend that you change the
engine oil before you use your vehicle
again.
Fuel system
• Fill the fuel tank with high-quality fuel
until the first automatic shutoff of the
fuel pump nozzle.
Cooling system
• Protect against freezing temperatures.
• When removing your vehicle from
storage, check coolant fluid level.
Confirm that there are no cooling
system leaks and that fluid is at the
recommended level.
Disconnecting Your 12 Volt Battery
• Check and recharge as necessary. Keep
connections clean.
• If storing your vehicle for more than 30
days without recharging the battery,
we recommend that you disconnect
the battery cables to maintain battery
charge for quick starting.
Note:It is necessary to reset memory
features if you disconnect the battery
cables.
Brakes
• Make sure the brakes and parking brake
release fully.
Tires
• Maintain recommended air pressure.
Miscellaneous
• Make sure all linkages, cables, levers
and pins under your vehicle are covered
with grease to prevent rust.
• Move vehicles at least 25 ft (7.5 m)
every 15 days to lubricate working parts
and prevent corrosion.
Removing Vehicle From Storage
When your vehicle is ready to come out of
storage, do the following:
• Wash your vehicle to remove any dirt
or grease film build-up on window
surfaces.
• Check windshield wipers for any
deterioration.
• Check under the hood for any foreign
material that may have collected
during storage such as mice or squirrel
nests.
• Check the exhaust for any foreign
material that may have collected
during storage.
• Check tire pressures and set tire
inflation per the Tire Label.
• Check brake pedal operation. Drive
your vehicle 15 ft (4.5 m) back and
forth to remove rust build-up.
• Check fluid levels (including coolant,
oil and gas) to make sure there are no
leaks, and fluids are at recommended
levels.
• If you remove the battery, clean the
battery cable ends and check for
damage.
Contact an authorized dealer if you have
any concerns or issues.
268
Vehicle Care
Page 375 of 378

Engine Oil Capacity and Specification -
7.3L.................................................................295
Engine Oil Check - 6.7L Diesel.................224
Engine Oil Check - 7.3L..............................225
Engine Oil Dipstick - 6.7L Diesel.............224
Engine Oil Dipstick - 7.3L...........................224
Engine Specifications - 6.7L
Diesel............................................................288
Engine Specifications - 7.3L....................289
Entering, Exiting or Climbing on This
Vehicle.............................................................20
Environment......................................................21
Essential Towing Checks..........................180
Event Data Recording
See: Data Recording.............................................13Exhaust Brake................................................143
Exhaust System Inspection.....................255
Export Unique Options................................20
Exterior Mirrors...............................................60
F
Fastening the Seatbelts..............................38
Federal Highway Administration
Regulation......................................................20
Fifth Wheel Operation.................................181
Flat Tire
See: Changing a Road Wheel.......................284Ford Credit..........................................................17
Ford Protect....................................................317
Frame and Tow Hook Inspection..........260
Front Seat Armrest........................................94
Fuel and Refueling.......................................105
Fuel Consumption.........................................113
Fuel Filter - 7.3L............................................249
Fuel Quality - Diesel....................................106
Fuel Quality - Gasoline..............................109
Fuel Shutoff...................................................189
Fuel Tank Capacity - Diesel.....................298
Fuel Tank Capacity - Gasoline...............299
Fuel Tank Selector Switch..........................114
Fuses................................................................200
Fuse Specification Chart..........................200
G
Gauges...............................................................63Gearbox
See: Transmission..............................................128General Driving Points................................183
General Information on Radio
Frequencies...................................................45
General Maintenance Information........319
Getting Assistance Outside the U.S. and
Canada..........................................................197
Getting the Services You Need...............194
H
HandbrakeSee: Parking Brake.............................................138Hazard Flashers............................................189
Headlamp Adjusting
See: Adjusting the Headlamps.....................247Headlamp Exit Delay....................................55
Headlamp Removal
See: Removing a Headlamp..........................250HeadrestSee: Head Restraints..........................................88Head Restraints..............................................88
Heated Exterior Mirrors................................87
Heating
See: Climate Control...........................................85Hill Start Assist...............................................141
Hints on Controlling the Interior
Climate...........................................................86
Hints on Driving With Anti-Lock
Brakes............................................................138
Hood Lock
See: Opening and Closing the Hood..........220Horn.....................................................................52
How Does the Pneumatic Locking
Differential Work........................................135
Hydraulic Power Steering Fluid Capacity
and Specification.....................................306
I
Ignition Switch..............................................100
In California (U.S. Only).............................195
Information Display Control.......................52
Information Displays.....................................70
General Information............................................70Information Messages..................................74
Installing Child Restraints...........................26
371
Index