Page 372 of 658
INTEGRATED TRAILER BRAKECONTROLLER – FREQUENTLYASKED QUESTIONS
How do I determine if there is an issuewith the wiring on my vehicle?
A message displays accompanied bya single tone, when no trailer isconnected. This indicates that theissue is between the trailer brakecontroller and the 7-pin connector atthe bumper.
How do I determine if there is an issuewith the wiring on my trailer?
A message only displays with a trailerconnected. Consult your trailer dealerfor assistance.
368
2023 Expedition (TB8) Canada/United States of America, enUSA, Edition date: 202207, DOMIntegrated Trailer Brake Controller (If Equipped)
Page 375 of 658
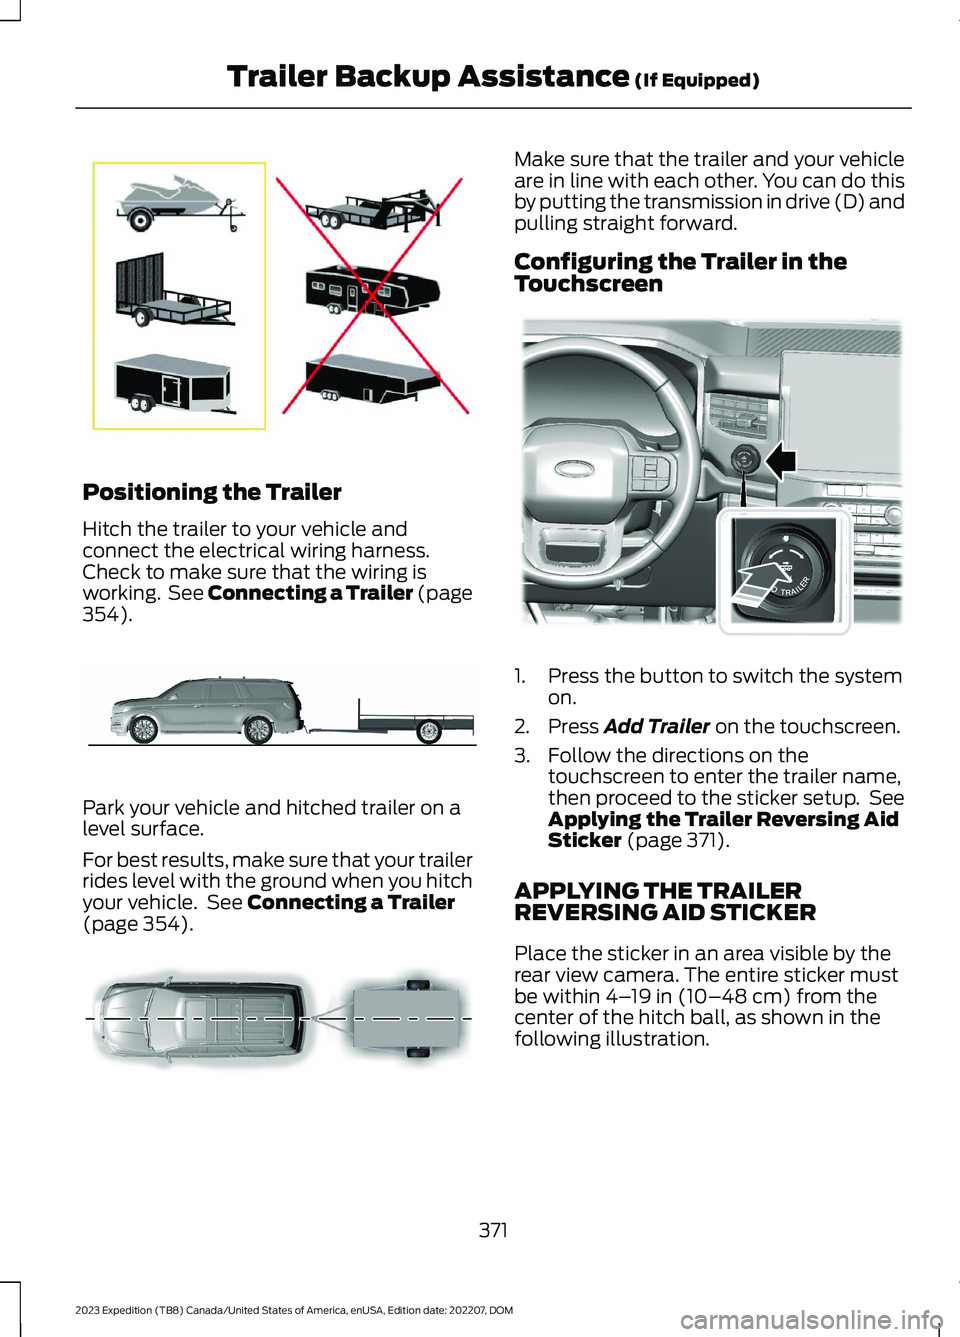
Positioning the Trailer
Hitch the trailer to your vehicle andconnect the electrical wiring harness.Check to make sure that the wiring isworking. See Connecting a Trailer (page354).
Park your vehicle and hitched trailer on alevel surface.
For best results, make sure that your trailerrides level with the ground when you hitchyour vehicle. See Connecting a Trailer(page 354).
Make sure that the trailer and your vehicleare in line with each other. You can do thisby putting the transmission in drive (D) andpulling straight forward.
Configuring the Trailer in theTouchscreen
1.Press the button to switch the systemon.
2.Press Add Trailer on the touchscreen.
3.Follow the directions on thetouchscreen to enter the trailer name,then proceed to the sticker setup. SeeApplying the Trailer Reversing AidSticker (page 371).
APPLYING THE TRAILERREVERSING AID STICKER
Place the sticker in an area visible by therear view camera. The entire sticker mustbe within 4–19 in (10–48 cm) from thecenter of the hitch ball, as shown in thefollowing illustration.
371
2023 Expedition (TB8) Canada/United States of America, enUSA, Edition date: 202207, DOMTrailer Backup Assistance (If Equipped)E209766 E247482 E247481 E349261
Page 376 of 658
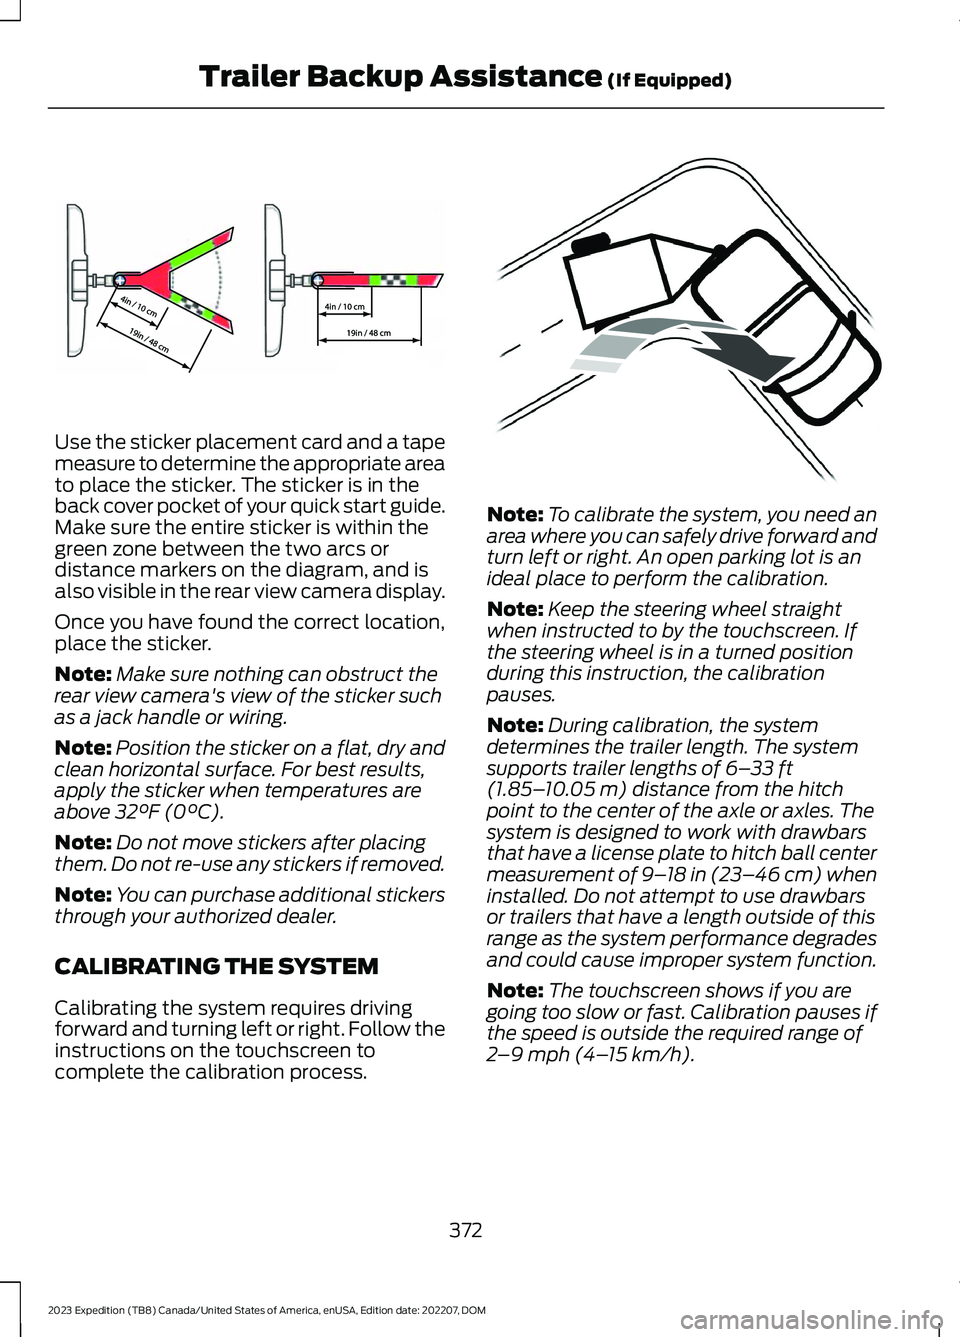
Use the sticker placement card and a tapemeasure to determine the appropriate areato place the sticker. The sticker is in theback cover pocket of your quick start guide.Make sure the entire sticker is within thegreen zone between the two arcs ordistance markers on the diagram, and isalso visible in the rear view camera display.
Once you have found the correct location,place the sticker.
Note:Make sure nothing can obstruct therear view camera's view of the sticker suchas a jack handle or wiring.
Note:Position the sticker on a flat, dry andclean horizontal surface. For best results,apply the sticker when temperatures areabove 32°F (0°C).
Note:Do not move stickers after placingthem. Do not re-use any stickers if removed.
Note:You can purchase additional stickersthrough your authorized dealer.
CALIBRATING THE SYSTEM
Calibrating the system requires drivingforward and turning left or right. Follow theinstructions on the touchscreen tocomplete the calibration process.
Note:To calibrate the system, you need anarea where you can safely drive forward andturn left or right. An open parking lot is anideal place to perform the calibration.
Note:Keep the steering wheel straightwhen instructed to by the touchscreen. Ifthe steering wheel is in a turned positionduring this instruction, the calibrationpauses.
Note:During calibration, the systemdetermines the trailer length. The systemsupports trailer lengths of 6–33 ft(1.85–10.05 m) distance from the hitchpoint to the center of the axle or axles. Thesystem is designed to work with drawbarsthat have a license plate to hitch ball centermeasurement of 9–18 in (23–46 cm) wheninstalled. Do not attempt to use drawbarsor trailers that have a length outside of thisrange as the system performance degradesand could cause improper system function.
Note:The touchscreen shows if you aregoing too slow or fast. Calibration pauses ifthe speed is outside the required range of2–9 mph (4–15 km/h).
372
2023 Expedition (TB8) Canada/United States of America, enUSA, Edition date: 202207, DOMTrailer Backup Assistance (If Equipped)E333148 E352329
Page 387 of 658
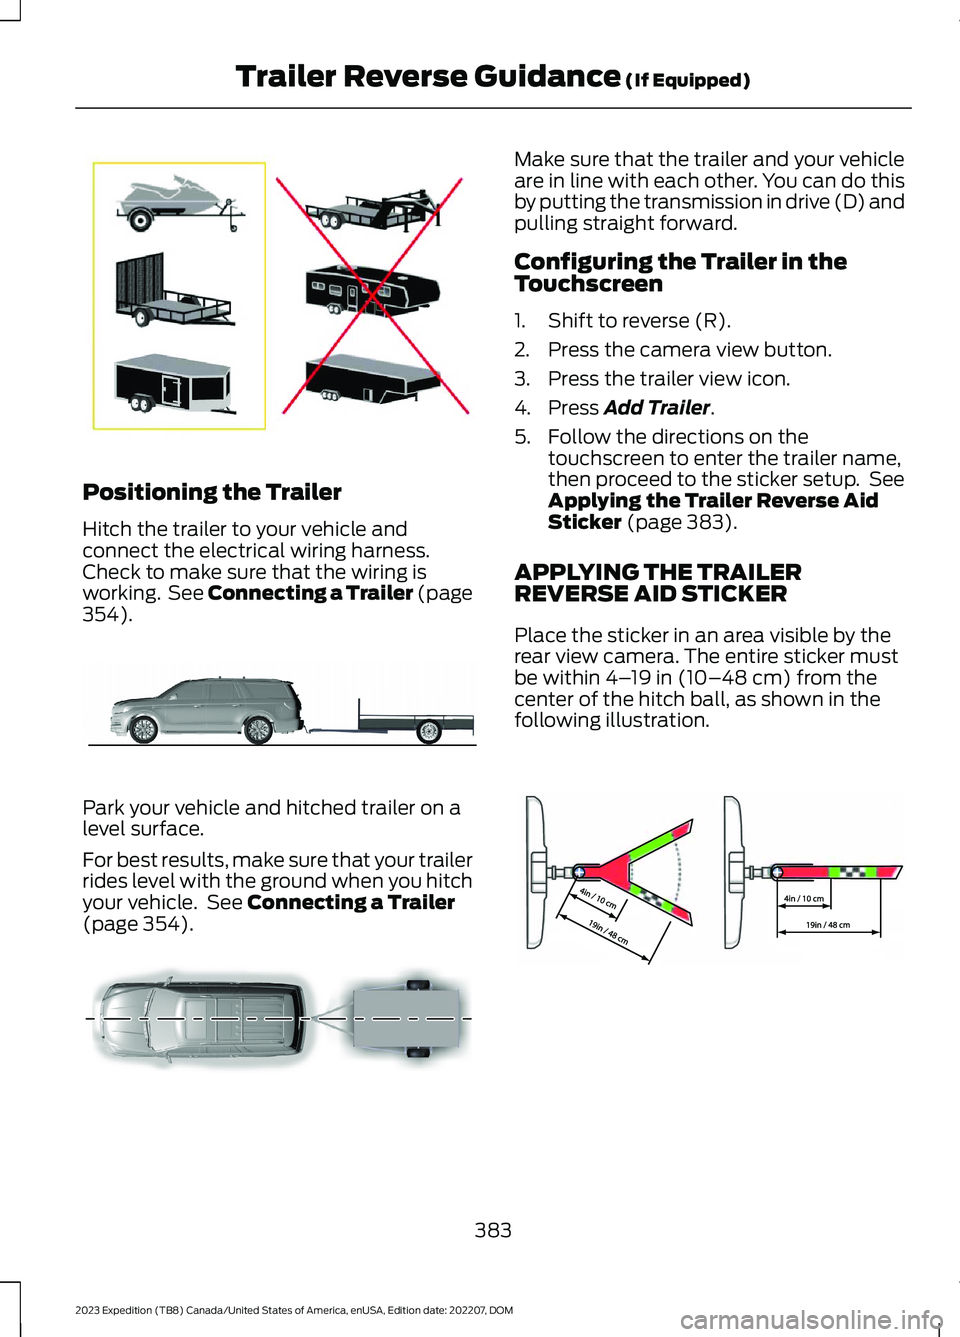
Positioning the Trailer
Hitch the trailer to your vehicle andconnect the electrical wiring harness.Check to make sure that the wiring isworking. See Connecting a Trailer (page354).
Park your vehicle and hitched trailer on alevel surface.
For best results, make sure that your trailerrides level with the ground when you hitchyour vehicle. See Connecting a Trailer(page 354).
Make sure that the trailer and your vehicleare in line with each other. You can do thisby putting the transmission in drive (D) andpulling straight forward.
Configuring the Trailer in theTouchscreen
1.Shift to reverse (R).
2.Press the camera view button.
3.Press the trailer view icon.
4.Press Add Trailer.
5.Follow the directions on thetouchscreen to enter the trailer name,then proceed to the sticker setup. SeeApplying the Trailer Reverse AidSticker (page 383).
APPLYING THE TRAILERREVERSE AID STICKER
Place the sticker in an area visible by therear view camera. The entire sticker mustbe within 4–19 in (10–48 cm) from thecenter of the hitch ball, as shown in thefollowing illustration.
383
2023 Expedition (TB8) Canada/United States of America, enUSA, Edition date: 202207, DOMTrailer Reverse Guidance (If Equipped)E209766 E247482 E247481 E333148
Page 388 of 658
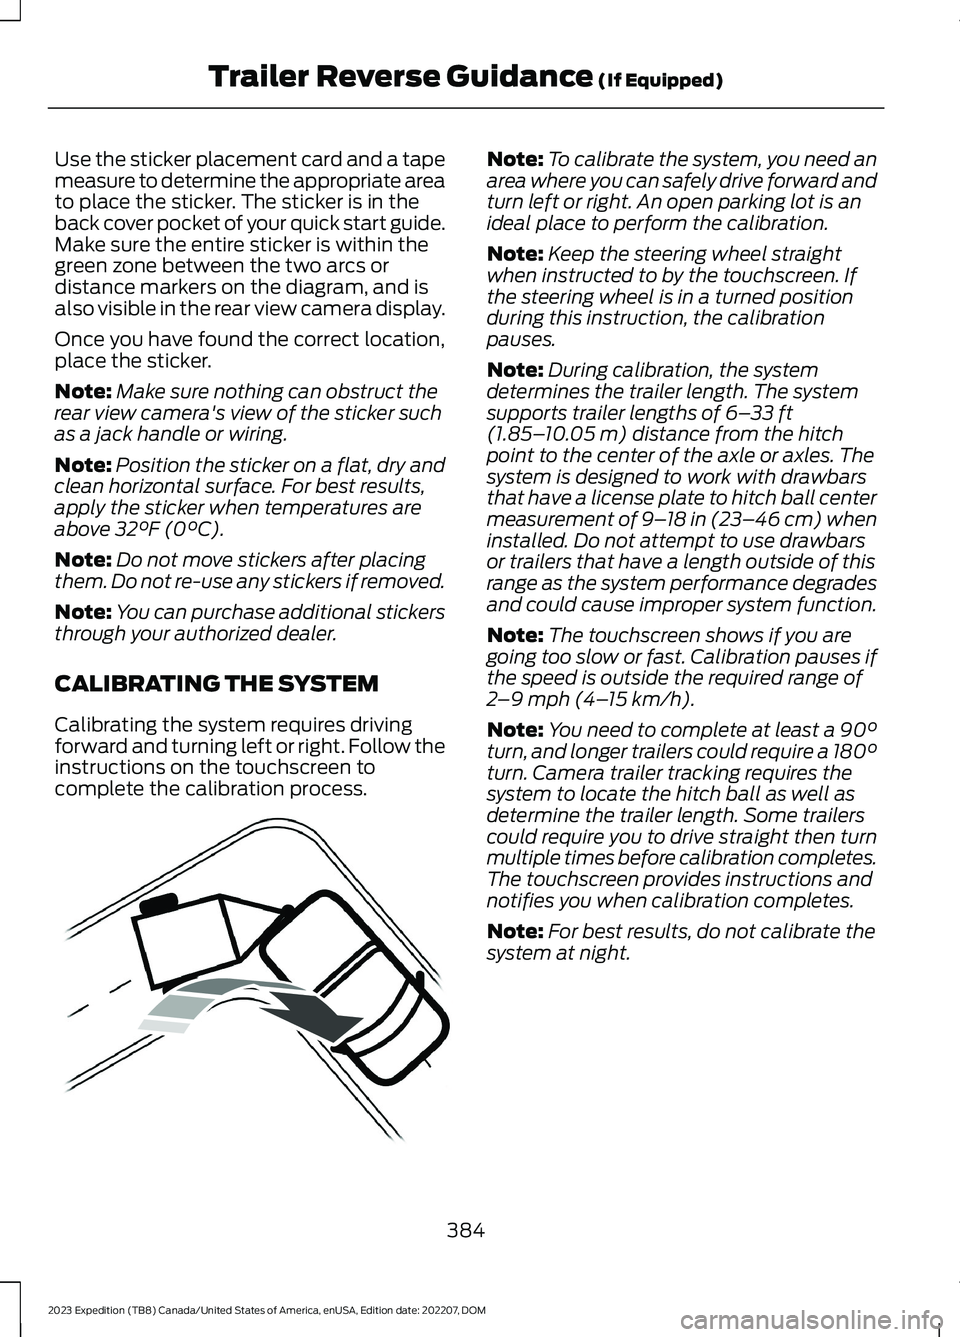
Use the sticker placement card and a tapemeasure to determine the appropriate areato place the sticker. The sticker is in theback cover pocket of your quick start guide.Make sure the entire sticker is within thegreen zone between the two arcs ordistance markers on the diagram, and isalso visible in the rear view camera display.
Once you have found the correct location,place the sticker.
Note:Make sure nothing can obstruct therear view camera's view of the sticker suchas a jack handle or wiring.
Note:Position the sticker on a flat, dry andclean horizontal surface. For best results,apply the sticker when temperatures areabove 32°F (0°C).
Note:Do not move stickers after placingthem. Do not re-use any stickers if removed.
Note:You can purchase additional stickersthrough your authorized dealer.
CALIBRATING THE SYSTEM
Calibrating the system requires drivingforward and turning left or right. Follow theinstructions on the touchscreen tocomplete the calibration process.
Note:To calibrate the system, you need anarea where you can safely drive forward andturn left or right. An open parking lot is anideal place to perform the calibration.
Note:Keep the steering wheel straightwhen instructed to by the touchscreen. Ifthe steering wheel is in a turned positionduring this instruction, the calibrationpauses.
Note:During calibration, the systemdetermines the trailer length. The systemsupports trailer lengths of 6–33 ft(1.85–10.05 m) distance from the hitchpoint to the center of the axle or axles. Thesystem is designed to work with drawbarsthat have a license plate to hitch ball centermeasurement of 9–18 in (23–46 cm) wheninstalled. Do not attempt to use drawbarsor trailers that have a length outside of thisrange as the system performance degradesand could cause improper system function.
Note:The touchscreen shows if you aregoing too slow or fast. Calibration pauses ifthe speed is outside the required range of2–9 mph (4–15 km/h).
Note:You need to complete at least a 90°turn, and longer trailers could require a 180°turn. Camera trailer tracking requires thesystem to locate the hitch ball as well asdetermine the trailer length. Some trailerscould require you to drive straight then turnmultiple times before calibration completes.The touchscreen provides instructions andnotifies you when calibration completes.
Note:For best results, do not calibrate thesystem at night.
384
2023 Expedition (TB8) Canada/United States of America, enUSA, Edition date: 202207, DOMTrailer Reverse Guidance (If Equipped)E352329
Page 629 of 658
ELECTROMAGNETIC
COMPATIBILITY
WARNING: Do not place objectsor mount equipment on or near theairbag cover, on the side of the front orrear seatbacks, or in areas that maycome into contact with a deployingairbag. Failure to follow theseinstructions may increase the risk ofpersonal injury in the event of a crash.
WARNING: Do not fasten antennacables to vehicle wiring, fuel pipes andbrake pipes.
WARNING: Keep antenna andpower cables at least 4 in (10 cm) fromany electronic modules and airbags.
Note:We test and certify your vehicle tomeet electromagnetic compatibilitylegislation. It is your responsibility to makesure that any equipment an authorizeddealer installs on your vehicle complies withapplicable local legislation and otherrequirements. Installation of someaftermarket electronic devices coulddegrade the performance of vehiclefunctions, which use radio frequency signalssuch as broadcast radio receiver, tirepressure monitoring system, push buttonstart,Bluetooth® connectivity or satellitenavigation.
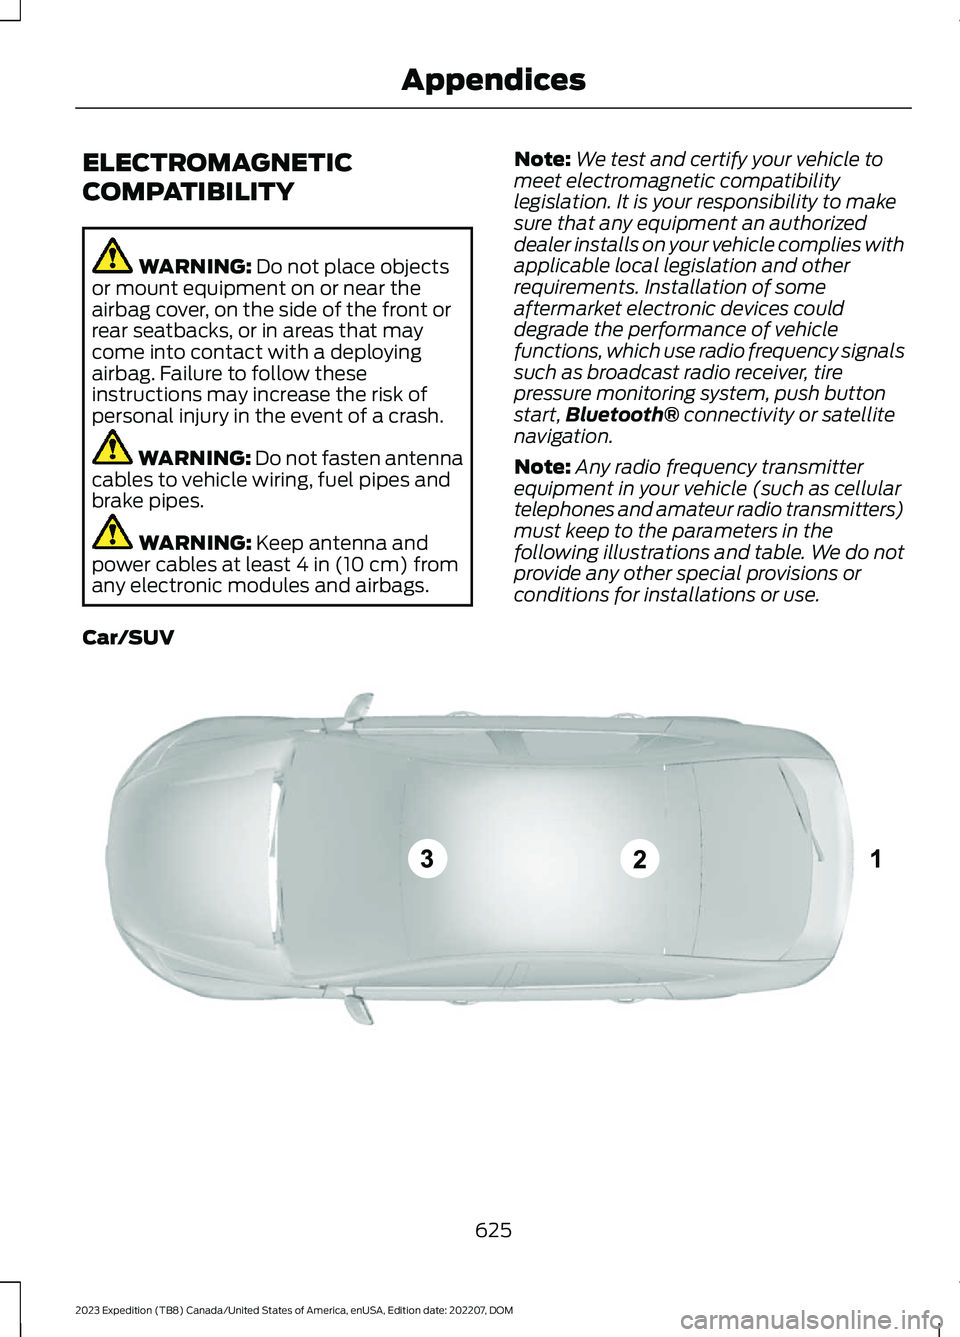
Note:Any radio frequency transmitterequipment in your vehicle (such as cellulartelephones and amateur radio transmitters)must keep to the parameters in thefollowing illustrations and table. We do notprovide any other special provisions orconditions for installations or use.
Car/SUV
625
2023 Expedition (TB8) Canada/United States of America, enUSA, Edition date: 202207, DOMAppendicesE239120