Page 314 of 498

3125-1. MOBILITY
■Final tyre failure
Vibration or loud noises during the
journey may be an indication that
the tyre has finally failed.
Reduce your speed and stop the
vehicle. Parts of the tyre could
detach, which might lead to an acci-
dent.
Do not continue driving, but contact
any authorized Toyota retailer or
Toyota authorized repairer, or any
reliable repairer.
The tyre inflation pressure depends
on the temperature of the tyre.
The tyre inflation pressure
increases as the tyre temperature
increases, for example during driv-
ing or due to exposure to sunlight.
Tyre inflation pressure decreases if
the tyre temperature drops.
Due to the given warning thresh-
olds, therefore, this behaviour may
trigger a warning if there are major
temperature drops.
After a temperature-related warn-
ing, the specified pressures are dis-
played again on the Control Display
after driving a short distance.
No warning can be given in the
event of extreme, sudden tyre fail-
ure caused by external factors.
Tyres with special approval: the
system will not function correctly if
a reset has not been carried out, for
example, a flat ty re is reported in
spite of the correct tyre pressure.
• A wheel without TPM wheel elec-
tronics is fitted, for example
emergency wheel: have the
wheels checked if necessary.
• Malfunction: have the system
checked.
• Fault due to systems or devices
with the same radio frequency:
the system is automatically reac-
tivated upon leaving the field of
interference.
• Tyre Pressure Monitor malfunc-
tion: have the system checked
by any authorized Toyota retailer
or Toyota authorized repairer, or
System limits
Temperature
Sudden loss of tyre inflation pres-
sure
Reset not carried out
Malfunction
Message
The yellow warning lamp
flashes and is then illumi-
nated continuously. A
vehicle message is
shown. Tyre pressure
losses cannot be
detected.
Measure
Page 317 of 498

315
5
5-1. MOBILITY
MOBILITY
cial coding. The bolts can only be
released with the adapter that
matches the coding.
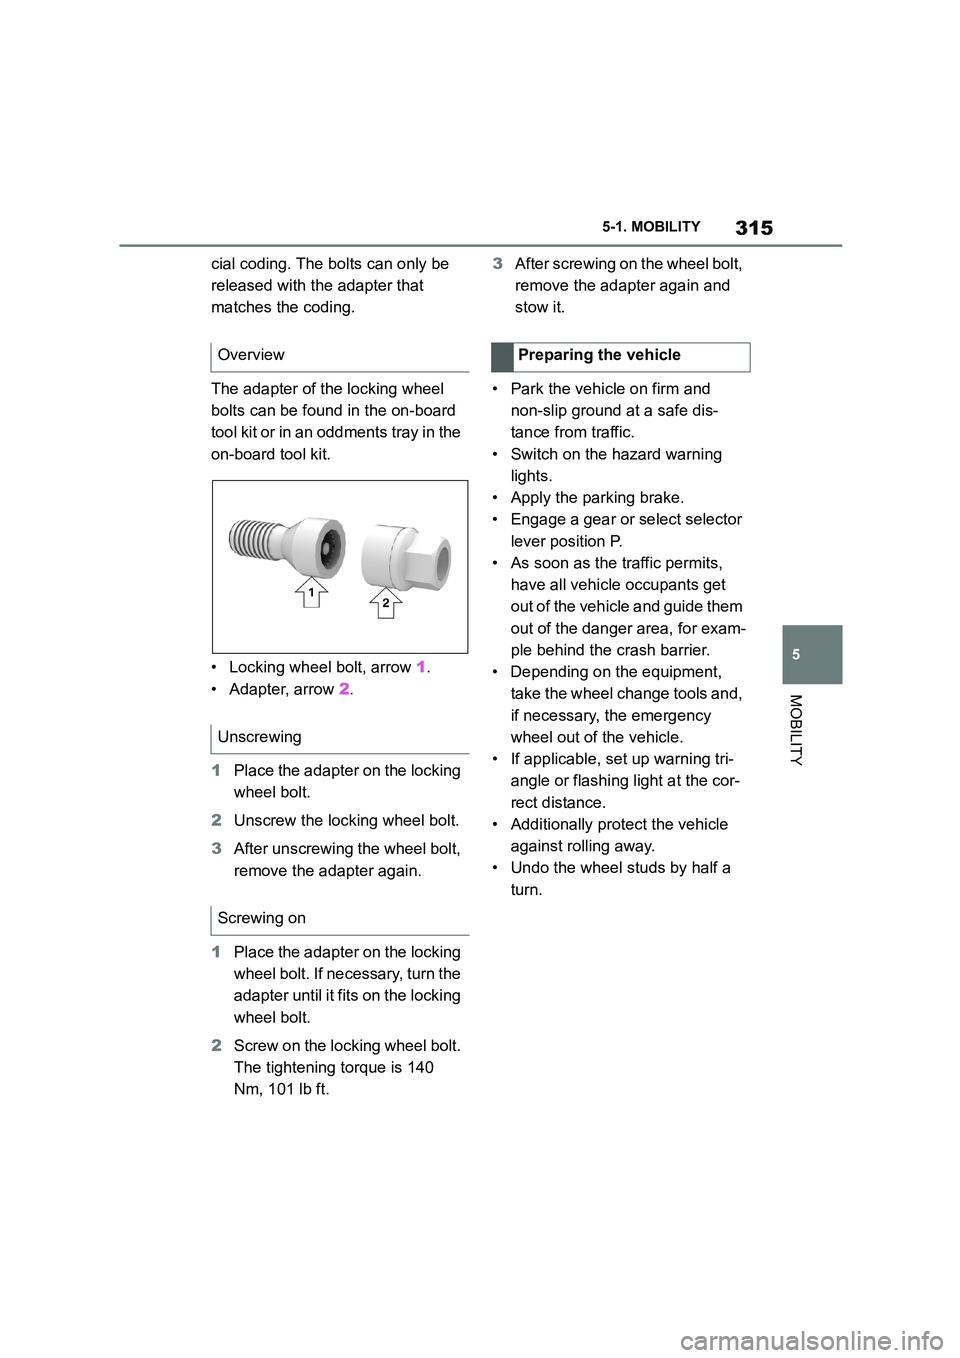
The adapter of the locking wheel
bolts can be found in the on-board
tool kit or in an oddments tray in the
on-board tool kit.
• Locking wheel bolt, arrow 1.
• Adapter, arrow 2.
1 Place the adapter on the locking
wheel bolt.
2 Unscrew the locking wheel bolt.
3 After unscrewing the wheel bolt,
remove the adapter again.
1 Place the adapter on the locking
wheel bolt. If necessary, turn the
adapter until it fi ts on the locking
wheel bolt.
2 Screw on the locking wheel bolt.
The tightening torque is 140
Nm, 101 lb ft.
3 After screwing on the wheel bolt,
remove the adapter again and
stow it.
• Park the vehicle on firm and
non-slip ground at a safe dis-
tance from traffic.
• Switch on the hazard warning
lights.
• Apply the parking brake.
• Engage a gear or select selector
lever position P.
• As soon as the traffic permits,
have all vehicle occupants get
out of the vehicle and guide them
out of the danger area, for exam-
ple behind the crash barrier.
• Depending on the equipment,
take the wheel change tools and,
if necessary, the emergency
wheel out of the vehicle.
• If applicable, set up warning tri-
angle or flashing light at the cor-
rect distance.
• Additionally protect the vehicle
against rolling away.
• Undo the wheel studs by half a
turn.
Overview
Unscrewing
Screwing on
Preparing the vehicle
Page 335 of 498
333
5
5-1. MOBILITY
MOBILITY
The manufacturer of the vehicle
recommends handing the vehicle in
at a take-back point nominated by
the manufacturer at the end of its
lifecycle. The regulations concern-
ing the returning of end-of-life vehi-
cles may vary from country to
country. Additional information is
available from any authorized
Toyota retailer or Toyota authorized
repairer, or any reliable repairer.
Engine warning light
• When the warning light
flashes:
May have engine failure
that may cause damage
to the catalyst device.
Have the vehicle checked
as soon as possible.
• When the warning light
illuminates:
High exhaust gas value.
Have the vehicle checked
as soon as possible.
Recycling
Page 336 of 498
3345-1. MOBILITY
Your vehicle needs to be serviced according to the normal maintenance
schedule.
Maintenance operations:
I = Inspect, correct or replace as necessary
R = Replace, change or lubricate
Scheduled maintenance (except for Europe and
Australia)
Perform maintenance by the schedule as follows:
Maintenance schedule requirements
Maintenance schedule (except for Korea, Mexico and South
Africa)
SERVICE
INTERVAL:ODOMETER READING
MONTHS(Odometer
reading or
months, which-
ever comes
first.)
x1000
km1224364860728496
x1000
miles7.214.421.628.83643.250.457.6
BASIC ENGINE COMPONENTS
1
Engine oil (Include
engine oil filter)
<>
RRRRRRRR12
IGNITION SYSTEM
2Spark plugsRRRR24
FUEL AND EMISSION CONTROL SYSTEMS
3Air filterRRRR24
CHASSIS AND BODY
4Brake padsReplace when the brake warning light
appears.-
5Brake fluidFirst replace at 36 months, then replace at every 24
months.
Page 337 of 498
335
5
5-1. MOBILITY
MOBILITY
6
Horn, headlight flash-
ers and hazard warn-
ing flashers
II48
7Interior lightingII48
8BlowerII48
9Lighting systemII48
10Seat beltsII48
11Wiper and window
washer systemII48
12
Tire settings in the
central information
display (CID)
II48
13Tires (If necessary,
emergency wheel)II48
14Mobility SetII48
15
Warning triangle,
high-visibility jacket
and first-aid kit
II48
16
Washer fluid for the
window washer sys-
tem
II48
17Coolant level and
coolant compositionII48
18
Brake lines and the
brake line connec-
tions
II48
19
Vehicle underbody
and all other visible
components
II48
20Steering componentsII48
SERVICE
INTERVAL:ODOMETER READING
MONTHS(Odometer
reading or
months, which-
ever comes
first.)
x1000
km1224364860728496
x1000
miles7.214.421.628.83643.250.457.6
Page 338 of 498
3365-1. MOBILITY
NOTE:
Replace both the engine oil and oil filter when the engine oil warning light
appears, even if 12 months have not passed or when driven less than
12000 km (7200 miles) since the last oil change.
Maintenance operations:
I = Inspect, correct or replace as necessary
R = Replace, change or lubricate
21Road safety and per-
forming a test driveII48
22Micro filterRRRR24
SERVICE
INTERVAL:ODOMETER READING
MONTHS(Odometer
reading or
months, which-
ever comes
first.)
x1000
km1224364860728496
x1000
miles7.214.421.628.83643.250.457.6
Maintenance schedule (for Korea, Mexico and South Africa)
SERVICE INTER-
VA L :ODOMETER READING
MONTHS(Odometer read-
ing or months,
whichever comes
first.)
x1000
km20406080100120
x1000
miles122436486072
BASIC ENGINE COMPONENTS
1
Engine oil (Include
engine oil filter) <
note.>>
RRRRRR18
IGNITION SYSTEM
2Spark plugsRR54
FUEL AND EMISSION CONTROL SYSTEMS
3Air filterRR54
CHASSIS AND BODY
Page 339 of 498
337
5
5-1. MOBILITY
MOBILITY
4Brake padsReplace when the brake warning light
appears.-
5Brake fluidFirst replace at 36 months, then replace at every 24
months.
6
Horn, headlight flash-
ers and hazard warn-
ing flashers
II36
7Interior lightingII36
8BlowerII36
9Lighting systemII36
10Seat beltsII36
11Wiper and window
washer systemII36
12
Tire settings in the
central information
display (CID)
II36
13Tires (If necessary,
emergency wheel)II36
14Mobility SetII36
15
Warning triangle,
high-visibility jacket
and first-aid kit
II36
16
Washer fluid for the
window washer sys-
tem
II36
17Coolant level and
coolant compositionII36
18Brake lines and the
brake line connectionsII36
SERVICE INTER-
VA L :ODOMETER READING
MONTHS(Odometer read-
ing or months,
whichever comes
first.)
x1000
km20406080100120
x1000
miles122436486072
Page 340 of 498
3385-1. MOBILITY
NOTE:
Replace both the engine oil and oil filter when the engine oil warning light
appears, even if 18 months have not passed or when driven less than
20000 km (12000 miles) since the last oil change.
19
Vehicle underbody
and all other visible
components
II36
20Steering componentsII36
21Road safety and per-
forming a test driveII36
22Micro filterRRRRRR18
SERVICE INTER-
VA L :ODOMETER READING
MONTHS(Odometer read-
ing or months,
whichever comes
first.)
x1000
km20406080100120
x1000
miles122436486072