2022 TOYOTA SUPRA wheel
[x] Cancel search: wheelPage 4 of 498

2TABLE OF CONTENTS
1-1. NOTES
Notes ...................................... 4
2-1. QUICK REFERENCE
Getting in .............................. 26
Adjustment and operation ..... 32
On the move ......................... 36
3-1. CONTROLS
Driving area .......................... 46
Sensors of the vehicle .......... 50
Vehicle operating state ......... 53
Toyota Supra Command ....... 57
General settings.................... 71
Personal settings .................. 75
Connections .......................... 80
Opening and closing ............. 88
Seats, mirrors and steering
wheel ................................ 107
Carrying children safely ...... 121
Driving................................. 144
Displays .............................. 162
Lights .................................. 184
Safety.................................. 192
Driving Stability Control Systems
.......................................... 228
Driver Assistance Systems
.......................................... 232
Driving comfort.................... 259
Air conditioning ................... 260
Interior equipment ............... 269
Storage compartments ....... 273
Boot .................................... 275
4-1. DRIVING HINTS
Driving precautions ............. 280
Saving fuel .......................... 286
5-1. MOBILITY
Refuelling ............................ 290
Wheels and tyres ................ 292
Engine compartment........... 319
Operating fluids................... 322
Maintenance ....................... 330
Scheduled maintenance (except
for Europe and Australia) .. 334
Replacing parts ................... 339
Breakdown Assist ............... 350
General care ....................... 362
6-1. REFERENCE
Technical data ..................... 370
Certification ......................... 376
Alphabetical Index .............. 484
1NOTES
2QUICK REFERENCE
3CONTROLS
4DRIVING HINTS
5MOBILITY
6REFERENCE
Index
Page 13 of 498

11
1
1-1. NOTES
NOTES
or the driver's behaviour.
These include, for example:
• Status reports relating to the
vehicle and its individual compo-
nents, for example wheel speed,
wheel circumferential velocity,
deceleration, lateral accelera-
tion, fastened seat belts.
• Ambient conditions, for example
temperature, rain sensor signals.
The data is processed within the
vehicle and is usually transient. It is
only saved for longer than the oper-
ating period if it is required in order
to perform services agreed with the
customer.
Electronic parts, for example con-
trol devices and vehicle keys, con-
tain components for storing
technical informat ion. Information
about the vehicle's condition, com-
ponent use and wear, maintenance
requirements, events or errors can
be stored temporarily or perma-
nently.
This information generally docu-
ments the condition of a compo-
nent, a module, a system or the
vehicle surroundings, including:
• Operating states of system com-
ponents, for examp le fill levels,
tyre inflation pr essure, battery
status.
• Malfunctions and faults of impor-
tant system components, for
example lights and brakes.
• Responses of the vehicle to par-
ticular driving situations, for
example triggering of an airbag,
activation of th e drive stability
control systems.
• Information on vehicle-damag-
ing events.
The data is required so that the
control units can perform their func-
tions. It is also used for detecting
and rectifying malfunctions, as well
as to optimise vehicle functions.
Most of this data is transient and is
only processed within the vehicle
itself. Only a small proportion of the
data is stored in event or error
memories in response to specific
circumstances.
Convenience functions, such as
seat, climate or light settings, make
every journey even more pleasant.
The personal settings for these
functions can be saved in a profile
within the vehicle and retrieved on
request, for example if the settings
have been changed by another
driver. Depending on the equip-
ment, these profiles can be saved
in the vehicle manufacturer's
secure data systems. When the
driver changes vehicle, these
saved profiles can simply be
applied to a different vehicle.
The vehicle settings saved in the
vehicle profile can be changed or
deleted at any time.
Electronic components
Personal settings
Page 24 of 498

221-1. NOTES
However, other parties such as law
enforcement authorities can link the
EDR data with the sort of person-
ally identifiable data that is routinely
gathered during the investigation of
an accident.
To read out the data recorded by
the EDR, it is necessary to have
special equipment and access to
the vehicle or the EDR. In addition
to the vehicle manufacturer, other
parties such as law enforcement
authorities in possession of special
equipment can read out the infor-
mation if they have access to the
vehicle or the EDR.
Eurasian Economic Union area:
TECHNICAL REGULATION OF
THE CUSTOMS UNION “ON THE
SAFETY OF WHEELED VEHI-
CLES” TR CU 018/2011 Attach-
ment No.3, Section 2
(Requirements for vehicles con-
cerning their interior noise), Table
2.1, Remarks 3
This vehicle may not be used for
public purposes (as taxis, for exam-
ple).
Depending on the national-market
version, the vehicle identification
number is located at different posi-
tions in the vehicle. This chapter
describes all the positions that are
possible for the model range.
The vehicle identification number is
in the engine compartment, on the
right-hand side of the vehicle.
The vehicle identification number is
on the type plate, on the right-hand
Noise levels inside the vehi-
cle
Vehicle identification num-
ber
General
Engine compartment
Right-hand side of type plate
Page 32 of 498

302-1. QUICK REFERENCE
1Wipers
2 Instrument cluster
3 Turn indicator, high-beam head-
lights
4 Light switch element
Indicator and warning lamps can
illuminate in a variety of combina-
tions and colours.
When the engine starts or the
standby state is switched on, the
functionality of some lights is briefly
checked.
1 Exterior mirrors
2 Power window switches
3 Central locking system
4 Unlocking the boot lid
1 Selector lever
2 Controller
3 Auto Start & Stop cancel button
4 Sport mode switch
5 Park Assistant button
6 VSC OFF button
7 Toyota Supra Safety button
8 Parking brake
Toyota Supra Command brings
together the functions of a number
of switches. These functions can be
operated using the Controller and,
depending on the equipment ver-
sion, the touchscreen.
Displays and controls
Around the steering wheel
Indicator and warning lamps
Driver's door
1
2
3
4
321
4
Switch cluster
Toyota Supra Command
Principle
Page 33 of 498

31
2
2-1. QUICK REFERENCE
QUICK REFERENCE
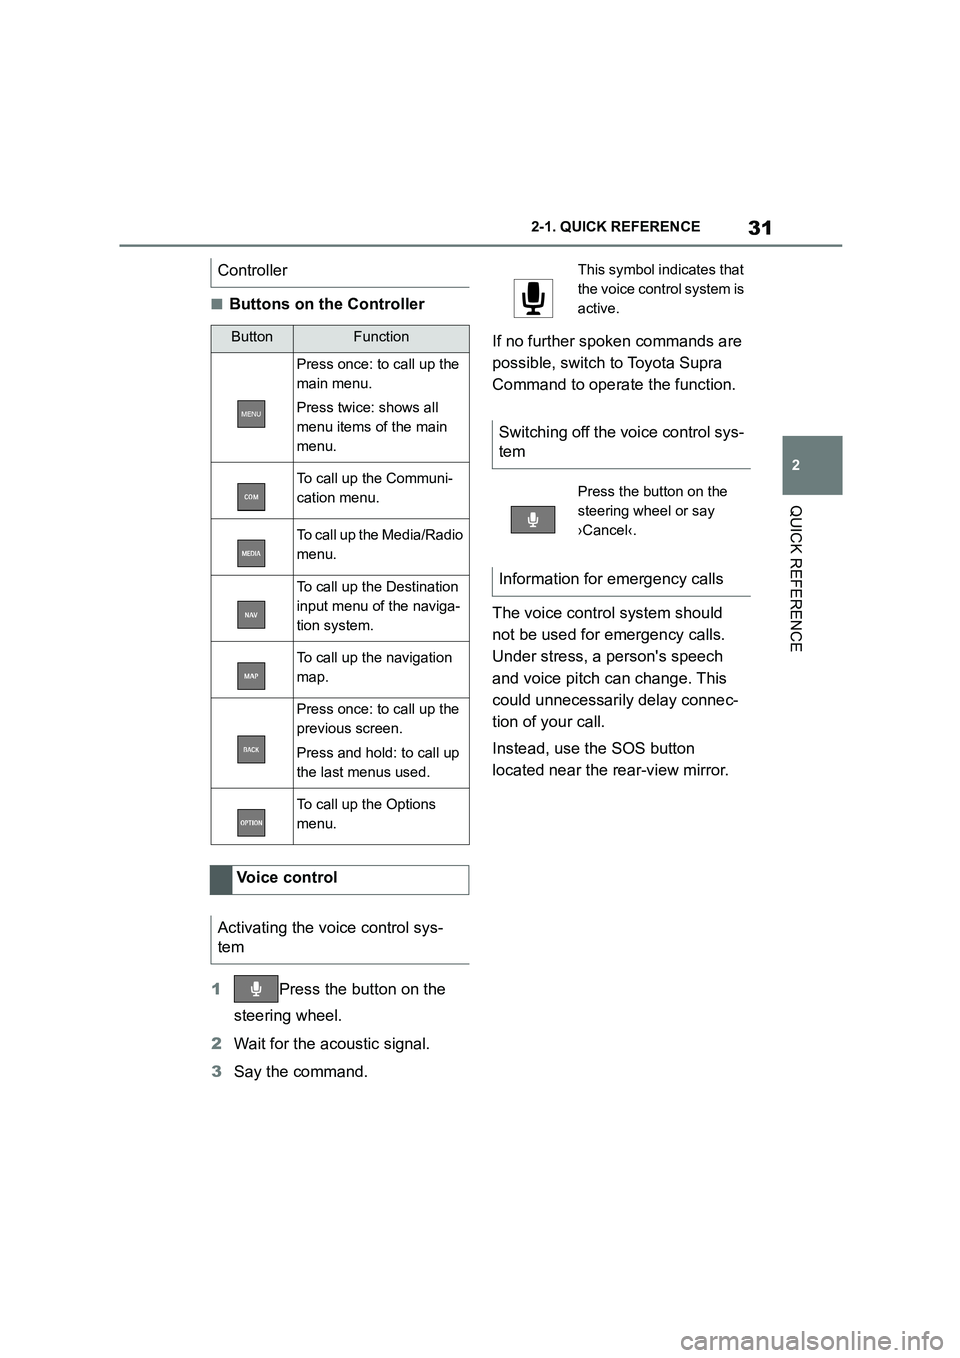
■Buttons on the Controller
1 Press the button on the
steering wheel.
2 Wait for the acoustic signal.
3 Say the command.
If no further spoken commands are
possible, switch to Toyota Supra
Command to operate the function.
The voice control system should
not be used for emergency calls.
Under stress, a person's speech
and voice pitch can change. This
could unnecessarily delay connec-
tion of your call.
Instead, use the SOS button
located near the rear-view mirror.
Controller
ButtonFunction
Press once: to call up the
main menu.
Press twice: shows all
menu items of the main
menu.
To call up the Communi-
cation menu.
To call up the Media/Radio
menu.
To call up the Destination
input menu of the naviga-
tion system.
To call up the navigation
map.
Press once: to call up the
previous screen.
Press and hold: to call up
the last menus used.
To call up the Options
menu.
Voice control
Activating the voice control sys-
tem
This symbol in dicates that
the voice control system is
active.
Switching off the voice control sys-
tem
Press the button on the
steering wheel or say
›Cancel‹.
Information for emergency calls
Page 34 of 498

322-1. QUICK REFERENCE
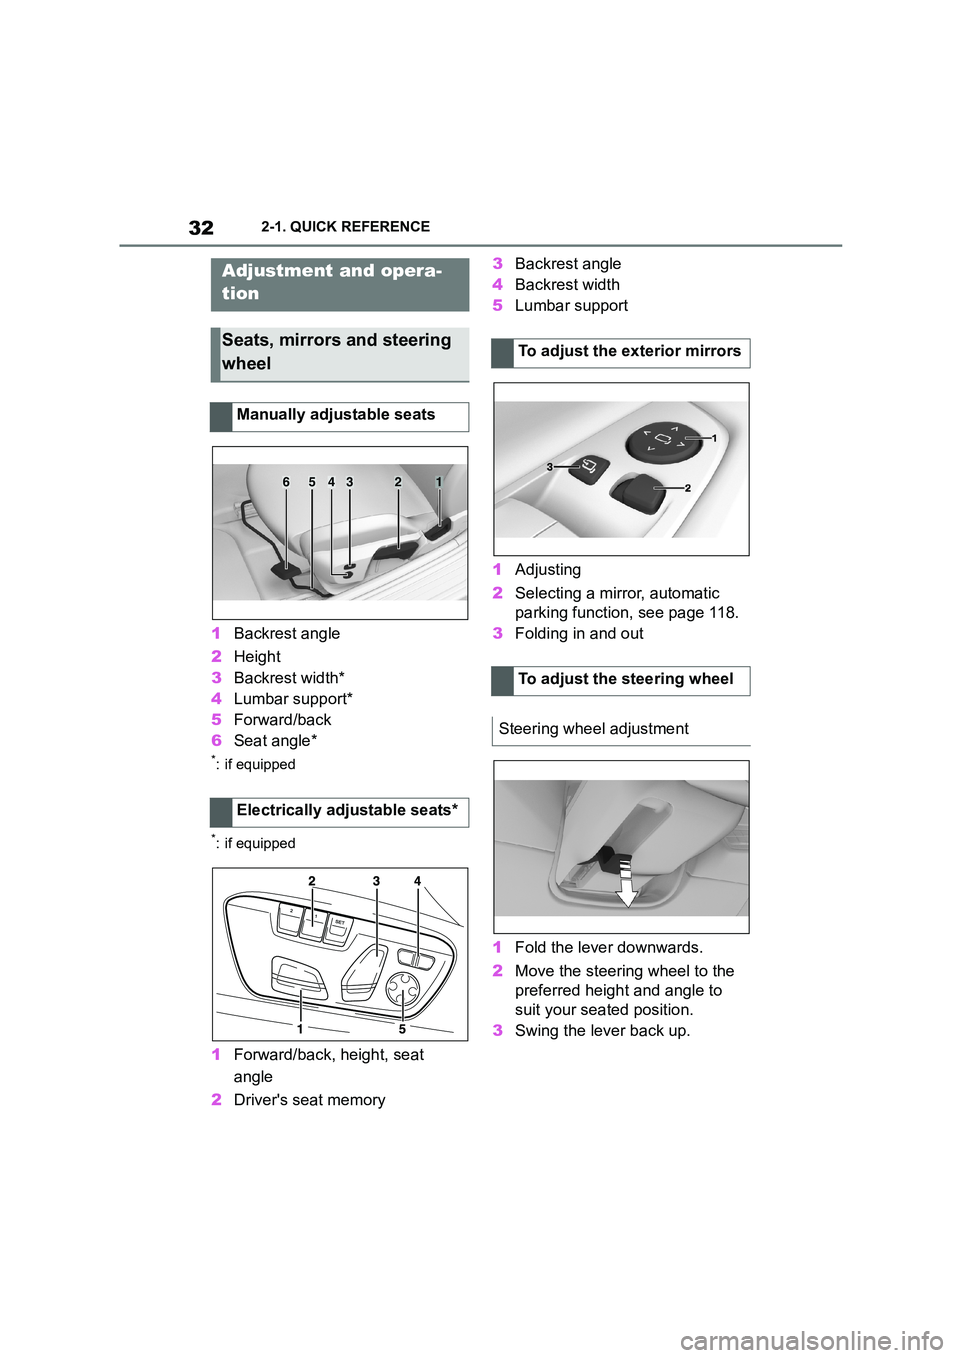
1Backrest angle
2 Height
3 Backrest width*
4 Lumbar support*
5 Forward/back
6 Seat angle*
*: if equipped
*: if equipped
1Forward/back, height, seat
angle
2 Driver's seat memory
3 Backrest angle
4 Backrest width
5 Lumbar support
1 Adjusting
2 Selecting a mirror, automatic
parking function, see page 118.
3 Folding in and out
1 Fold the lever downwards.
2 Move the steering wheel to the
preferred height and angle to
suit your seated position.
3 Swing the lever back up.
Adjustment and opera-
tion
Seats, mirrors and steering
wheel
Manually adjustable seats
Electrically adjustable seats*
654321
To adjust the exterior mirrors
To adjust the steering wheel
Steering wheel adjustment
Page 36 of 498

342-1. QUICK REFERENCE
Once the mobile telephone has
been connected in the vehicle, it
can be operated using the Toyota
Supra Command, the buttons on
the steering wheel and by voice
control.
Via Toyota Supra Command:
1 "My Vehicle"
2 "System settings"
3 "Mobile devices"
4 "Connect new device"
5 Select functions for which you
would like to use the mobile
telephone.
The Bluetooth name of the vehicle is
displayed in the Control Display.
6 To perform other operations on
the mobile telephone; see the
user manual of the mobile tele-
phone: for example finding/con-
necting Bluetooth device or new
device.
The Bluetooth name of the vehicle is
shown on the display of the mobile tele-
phone. Select the Bluetooth name of the vehicle.
7 Depending on the mobile
device, either a control number
is displayed, or you will have to
enter the control number your-
self.
• Compare the control number
shown on the Control Display
with the control number in the
device display.
Confirm the control number in the
device and on the Control Display.
• Enter the same control number
on the device and via Toyota
Supra Command then confirm.
The device is connected and dis-
played in the device list.
Incoming calls can be accepted in
different ways.
• Via Toyota Supra Command:
"Accept"
• Press the button on the
steering wheel.
• Via the selection list in the instru-
ment cluster:
Select using the knurled wheel on the
steering wheel: "Accept"
Via Toyota Supra Command:
1 "Communication"
2 "Dial number"
3 Enter the numbers.
4 Select the symbol. The call is
made using the mobile tele-
Connecting mobile telephone
General
Connecting a mobile telephone
via Bluetooth
Telephony
Accepting a call
Dialling a number
Page 41 of 498

39
2
2-1. QUICK REFERENCE
QUICK REFERENCE
standby state.
■Switching on
Press the lever upwards until the
desired position is reached.
• Rest position of the wipers: posi-
tion 0.
• Rain sensor: position 1.
• Normal wiper speed: position 2.
• Fast wiper speed: position 3.
■Switching off and flick-wiping
Press the lever down.
• To switch off: press the lever
downwards until the home posi-
tion (position 0) is reached.
• To flick-wipe: press the lever
downwards from the home posi-
tion (position 0).
■Activating/deactivating
To activate: press the lever up once
from its home position, arrow 1.
To deactivate: press the lever back
into the home position.
■To adjust the sensitivity
Turn the knurled wheel on the wiper
lever.
Switching the wipers on/off and
flick-wiping
Rain sensor
To clean the windscreen