Page 9 of 320
9
Eco-driving
When filling the fuel tank, do not continue after the third cut-out of the nozzle, to avoid overflow.You will only see the fuel consumption of your new vehicle settle down to a consistent average after the first 1,900 miles (3,000 kilometres).
Optimising the driving range (Electric)
The vehicle’s electrical consumption depends heavily on the route, the vehicle speed and your driving style.Try to remain in the "ECO" zone on the power indicator, by driving smoothly and maintaining a steady speed.Anticipate the need to slow down, and brake smoothly, whenever possible using engine braking with the regenerative braking function, which will move the power indicator into the "CHARGE" zone.Use the air conditioning rather than the heating to demist the passenger compartment.
Page 10 of 320

10
Instrument panels
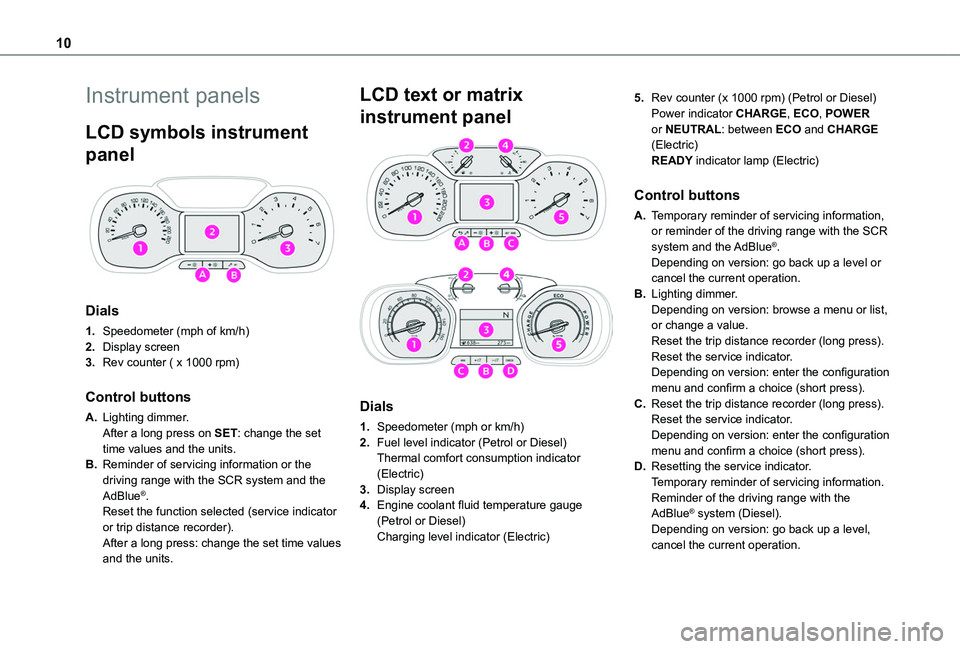
LCD symbols instrument
panel
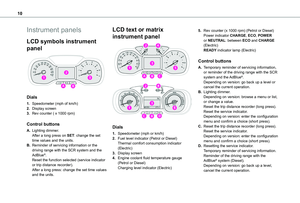
Dials
1.Speedometer (mph of km/h)
2.Display screen
3.Rev counter ( x 1000 rpm)
Control buttons
A.Lighting dimmer.After a long press on SET: change the set time values and the units.
B.Reminder of servicing information or the driving range with the SCR system and the AdBlue®.Reset the function selected (service indicator or trip distance recorder).After a long press: change the set time values and the units.
LCD text or matrix
instrument panel
Dials
1.Speedometer (mph or km/h)
2.Fuel level indicator (Petrol or Diesel)Thermal comfort consumption indicator (Electric)
3.Display screen
4.Engine coolant fluid temperature gauge (Petrol or Diesel)Charging level indicator (Electric)
5.Rev counter (x 1000 rpm) (Petrol or Diesel)Power indicator CHARGE, ECO, POWER or NEUTRAL: between ECO and CHARGE (Electric)READY indicator lamp (Electric)
Control buttons
A.Temporary reminder of servicing information, or reminder of the driving range with the SCR
system and the AdBlue®.Depending on version: go back up a level or cancel the current operation.
B.Lighting dimmer.Depending on version: browse a menu or list, or change a value.Reset the trip distance recorder (long press).Reset the service indicator.Depending on version: enter the configuration menu and confirm a choice (short press).
C.Reset the trip distance recorder (long press).Reset the service indicator.Depending on version: enter the configuration menu and confirm a choice (short press).
D.Resetting the service indicator.Temporary reminder of servicing information.Reminder of the driving range with the AdBlue® system (Diesel).Depending on version: go back up a level, cancel the current operation.
Page 11 of 320

11
Instruments
1
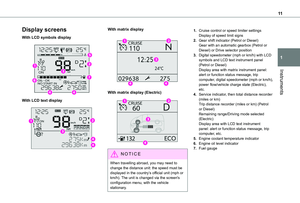
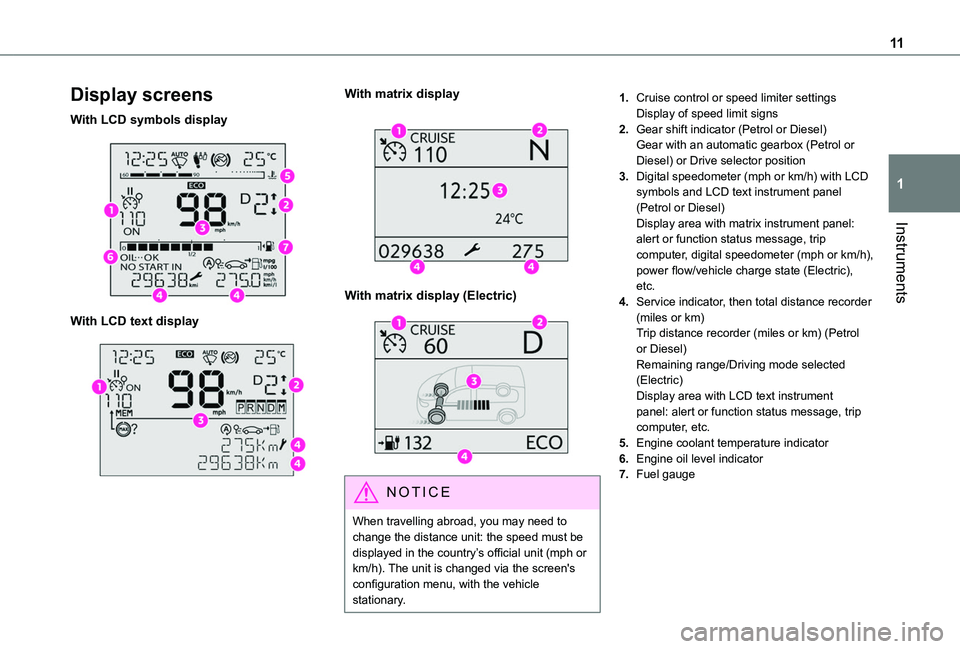
Display screens
With LCD symbols display
With LCD text display
With matrix display
With matrix display (Electric)
NOTIC E
When travelling abroad, you may need to change the distance unit: the speed must be displayed in the country’s official unit (mph or km/h). The unit is changed via the screen's configuration menu, with the vehicle stationary.
1.Cruise control or speed limiter settingsDisplay of speed limit signs
2.Gear shift indicator (Petrol or Diesel)Gear with an automatic gearbox (Petrol or Diesel) or Drive selector position
3.Digital speedometer (mph or km/h) with LCD symbols and LCD text instrument panel (Petrol or Diesel)Display area with matrix instrument panel: alert or function status message, trip computer, digital speedometer (mph or km/h), power flow/vehicle charge state (Electric), etc.
4.Service indicator, then total distance recorder (miles or km)Trip distance recorder (miles or km) (Petrol or Diesel)Remaining range/Driving mode selected (Electric)Display area with LCD text instrument panel: alert or function status message, trip computer, etc.
5.Engine coolant temperature indicator
6.Engine oil level indicator
7.Fuel gauge
Page 12 of 320

12
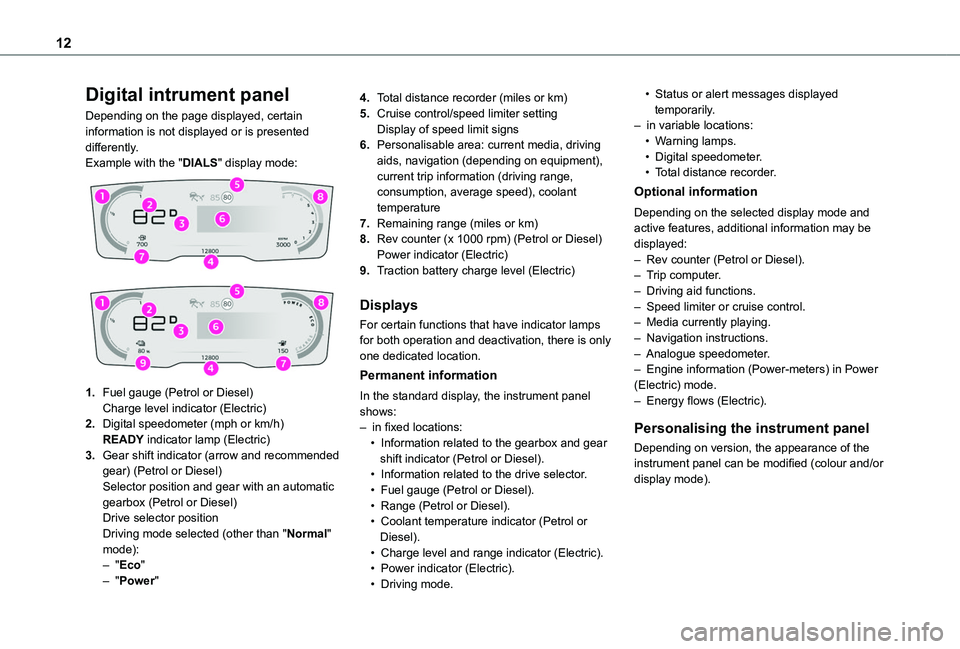
Digital intrument panel
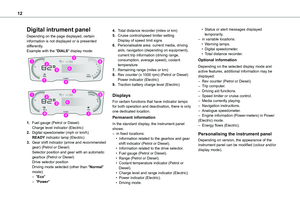
Depending on the page displayed, certain information is not displayed or is presented differently.Example with the "DIALS" display mode:
1.Fuel gauge (Petrol or Diesel)Charge level indicator (Electric)
2.Digital speedometer (mph or km/h)READY indicator lamp (Electric)
3.Gear shift indicator (arrow and recommended gear) (Petrol or Diesel)Selector position and gear with an automatic gearbox (Petrol or Diesel)Drive selector positionDriving mode selected (other than "Normal" mode):– "Eco"– "Power"
4.Total distance recorder (miles or km)
5.Cruise control/speed limiter settingDisplay of speed limit signs
6.Personalisable area: current media, driving aids, navigation (depending on equipment), current trip information (driving range, consumption, average speed), coolant temperature
7.Remaining range (miles or km)
8.Rev counter (x 1000 rpm) (Petrol or Diesel)Power indicator (Electric)
9.Traction battery charge level (Electric)
Displays
For certain functions that have indicator lamps for both operation and deactivation, there is only one dedicated location.
Permanent information
In the standard display, the instrument panel shows:– in fixed locations:• Information related to the gearbox and gear shift indicator (Petrol or Diesel).• Information related to the drive selector.• Fuel gauge (Petrol or Diesel).• Range (Petrol or Diesel).• Coolant temperature indicator (Petrol or Diesel).• Charge level and range indicator (Electric).• Power indicator (Electric).• Driving mode.
• Status or alert messages displayed temporarily.– in variable locations:• Warning lamps.• Digital speedometer.• Total distance recorder.
Optional information
Depending on the selected display mode and active features, additional information may be displayed:– Rev counter (Petrol or Diesel).– Trip computer.– Driving aid functions.– Speed limiter or cruise control.– Media currently playing.– Navigation instructions.– Analogue speedometer.– Engine information (Power-meters) in Power (Electric) mode.– Energy flows (Electric).
Personalising the instrument panel
Depending on version, the appearance of the instrument panel can be modified (colour and/or display mode).
Page 13 of 320

13
Instruments
1
NOTIC E
Display language and unitsThese depend on the touch screen settings.When travelling abroad, the speed must be shown in the official units of the country you are driving in (mph, miles or km/h, km).
WARNI NG
As a safety measure, these adjustments must be carried out with the vehicle stationary.
Choice of display colour (Petrol or Diesel)
Depending on version, the instrument panel display colour depends on the colour scheme chosen in the touch screen.The settings are changed via the Settings touch screen menu.
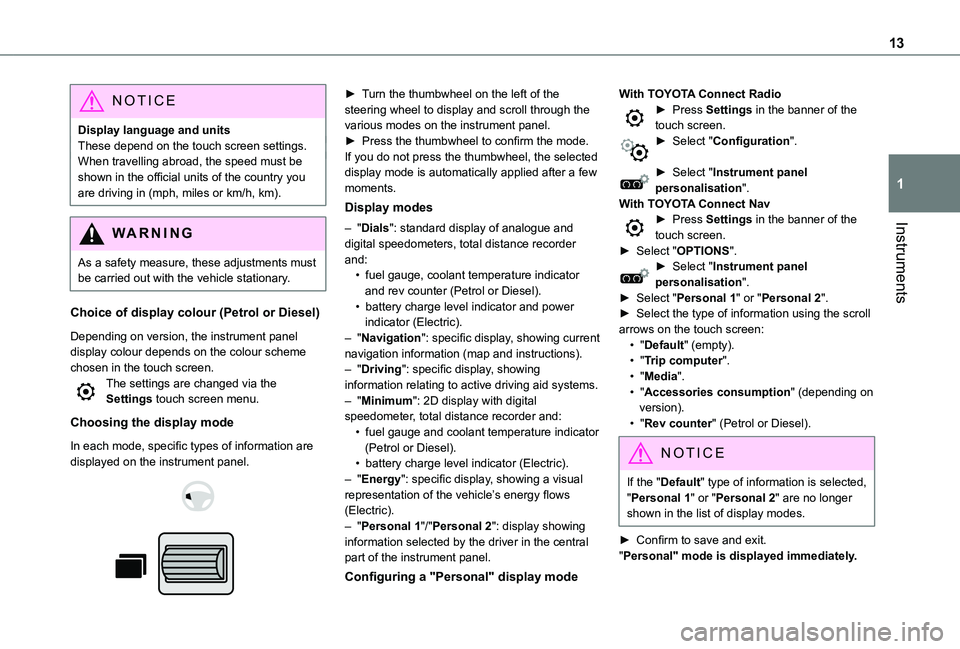
Choosing the display mode
In each mode, specific types of information are displayed on the instrument panel.
► Turn the thumbwheel on the left of the steering wheel to display and scroll through the various modes on the instrument panel.► Press the thumbwheel to confirm the mode.If you do not press the thumbwheel, the selected display mode is automatically applied after a few moments.
Display modes
– "Dials": standard display of analogue and digital speedometers, total distance recorder and:• fuel gauge, coolant temperature indicator and rev counter (Petrol or Diesel).• battery charge level indicator and power indicator (Electric).– "Navigation": specific display, showing current navigation information (map and instructions).– "Driving": specific display, showing information relating to active driving aid systems.– "Minimum": 2D display with digital speedometer, total distance recorder and:• fuel gauge and coolant temperature indicator
(Petrol or Diesel).• battery charge level indicator (Electric).– "Energy": specific display, showing a visual representation of the vehicle’s energy flows (Electric).– "Personal 1"/"Personal 2": display showing information selected by the driver in the central part of the instrument panel.
Configuring a "Personal" display mode
With TOYOTA Connect Radio► Press Settings in the banner of the touch screen.► Select "Configuration".
► Select "Instrument panel personalisation".With TOYOTA Connect Nav► Press Settings in the banner of the touch screen.► Select "OPTIONS".► Select "Instrument panel personalisation".► Select "Personal 1" or "Personal 2".► Select the type of information using the scroll arrows on the touch screen:• "Default" (empty).• "Trip computer".• "Media".• "Accessories consumption" (depending on version).• "Rev counter" (Petrol or Diesel).
NOTIC E
If the "Default" type of information is selected, "Personal 1" or "Personal 2" are no longer shown in the list of display modes.
► Confirm to save and exit."Personal" mode is displayed immediately.
Page 14 of 320

14
The information is displayed immediately on the instrument panel if the corresponding display mode is selected.
NOTIC E
The type of information selected in "Personal 1" mode is not available in "Personal 2" mode.
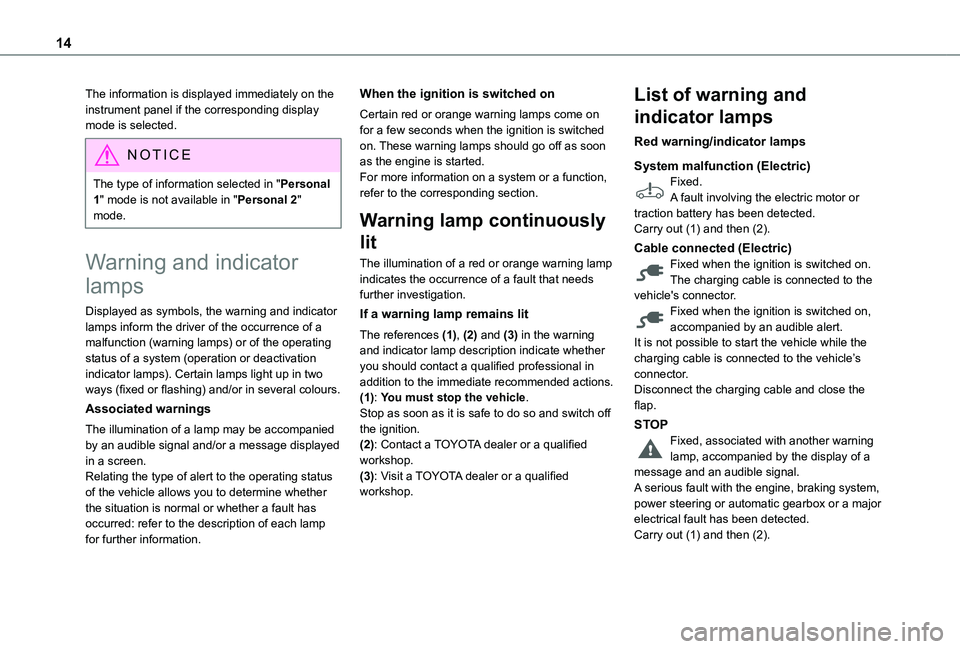
Warning and indicator
lamps
Displayed as symbols, the warning and indicator lamps inform the driver of the occurrence of a malfunction (warning lamps) or of the operating status of a system (operation or deactivation indicator lamps). Certain lamps light up in two ways (fixed or flashing) and/or in several colours.
Associated warnings
The illumination of a lamp may be accompanied by an audible signal and/or a message displayed in a screen.Relating the type of alert to the operating status of the vehicle allows you to determine whether the situation is normal or whether a fault has occurred: refer to the description of each lamp for further information.
When the ignition is switched on
Certain red or orange warning lamps come on for a few seconds when the ignition is switched on. These warning lamps should go off as soon as the engine is started.For more information on a system or a function, refer to the corresponding section.
Warning lamp continuously
lit
The illumination of a red or orange warning lamp indicates the occurrence of a fault that needs further investigation.
If a warning lamp remains lit
The references (1), (2) and (3) in the warning and indicator lamp description indicate whether you should contact a qualified professional in addition to the immediate recommended actions.(1): You must stop the vehicle.Stop as soon as it is safe to do so and switch off the ignition.
(2): Contact a TOYOTA dealer or a qualified workshop.(3): Visit a TOYOTA dealer or a qualified workshop.
List of warning and
indicator lamps
Red warning/indicator lamps
System malfunction (Electric)Fixed.A fault involving the electric motor or traction battery has been detected.Carry out (1) and then (2).
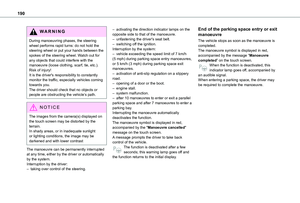
Cable connected (Electric)Fixed when the ignition is switched on.The charging cable is connected to the vehicle's connector.Fixed when the ignition is switched on, accompanied by an audible alert.It is not possible to start the vehicle while the charging cable is connected to the vehicle’s connector.Disconnect the charging cable and close the flap.
STOPFixed, associated with another warning
lamp, accompanied by the display of a message and an audible signal.A serious fault with the engine, braking system, power steering or automatic gearbox or a major electrical fault has been detected.Carry out (1) and then (2).
Page 15 of 320

15
Instruments
1
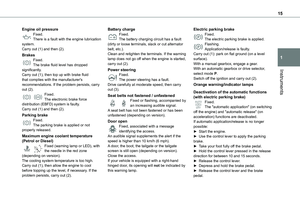
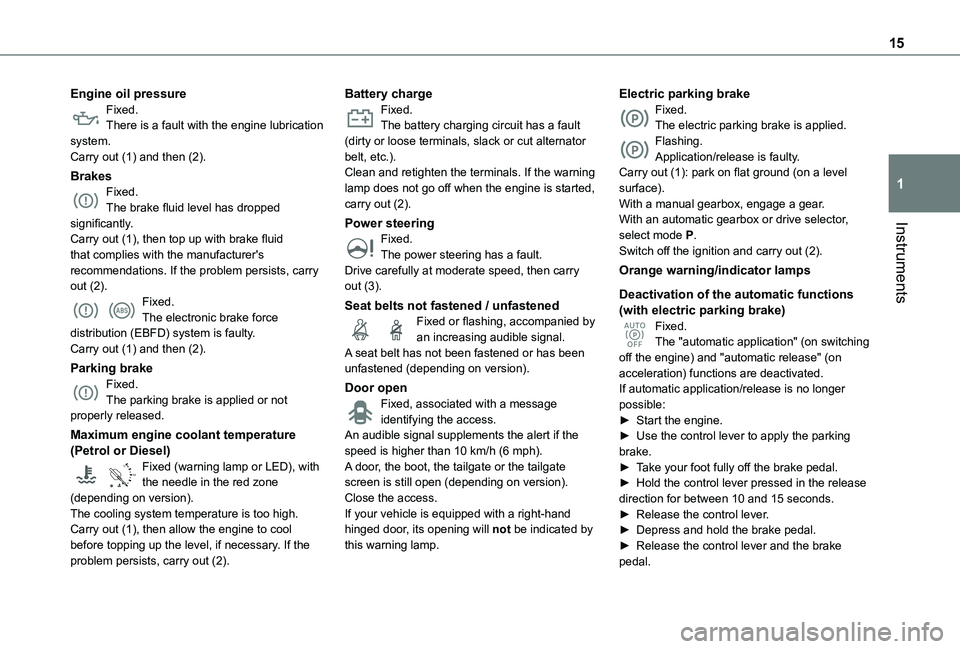
Engine oil pressureFixed.There is a fault with the engine lubrication system.Carry out (1) and then (2).
BrakesFixed.The brake fluid level has dropped significantly.Carry out (1), then top up with brake fluid that complies with the manufacturer's recommendations. If the problem persists, carry out (2).Fixed.The electronic brake force distribution (EBFD) system is faulty.Carry out (1) and then (2).
Parking brakeFixed.The parking brake is applied or not properly released.
Maximum engine coolant temperature
(Petrol or Diesel)
90°CFixed (warning lamp or LED), with the needle in the red zone (depending on version).The cooling system temperature is too high.Carry out (1), then allow the engine to cool before topping up the level, if necessary. If the problem persists, carry out (2).
Battery chargeFixed.The battery charging circuit has a fault (dirty or loose terminals, slack or cut alternator belt, etc.).Clean and retighten the terminals. If the warning lamp does not go off when the engine is started, carry out (2).
Power steeringFixed.The power steering has a fault.Drive carefully at moderate speed, then carry out (3).
Seat belts not fastened / unfastenedFixed or flashing, accompanied by an increasing audible signal.A seat belt has not been fastened or has been unfastened (depending on version).
Door openFixed, associated with a message identifying the access.An audible signal supplements the alert if the
speed is higher than 10 km/h (6 mph).A door, the boot, the tailgate or the tailgate screen is still open (depending on version).Close the access.If your vehicle is equipped with a right-hand hinged door, its opening will not be indicated by this warning lamp.
Electric parking brakeFixed.The electric parking brake is applied.Flashing.Application/release is faulty.Carry out (1): park on flat ground (on a level surface). With a manual gearbox, engage a gear.With an automatic gearbox or drive selector, select mode P.Switch off the ignition and carry out (2).
Orange warning/indicator lamps
Deactivation of the automatic functions (with electric parking brake)Fixed.The "automatic application" (on switching off the engine) and "automatic release" (on acceleration) functions are deactivated.If automatic application/release is no longer possible:► Start the engine.► Use the control lever to apply the parking
brake.► Take your foot fully off the brake pedal.► Hold the control lever pressed in the release direction for between 10 and 15 seconds.► Release the control lever.► Depress and hold the brake pedal.► Release the control lever and the brake pedal.
Page 16 of 320

16
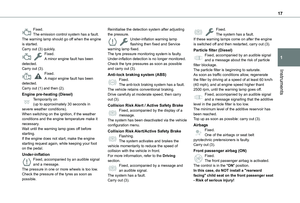
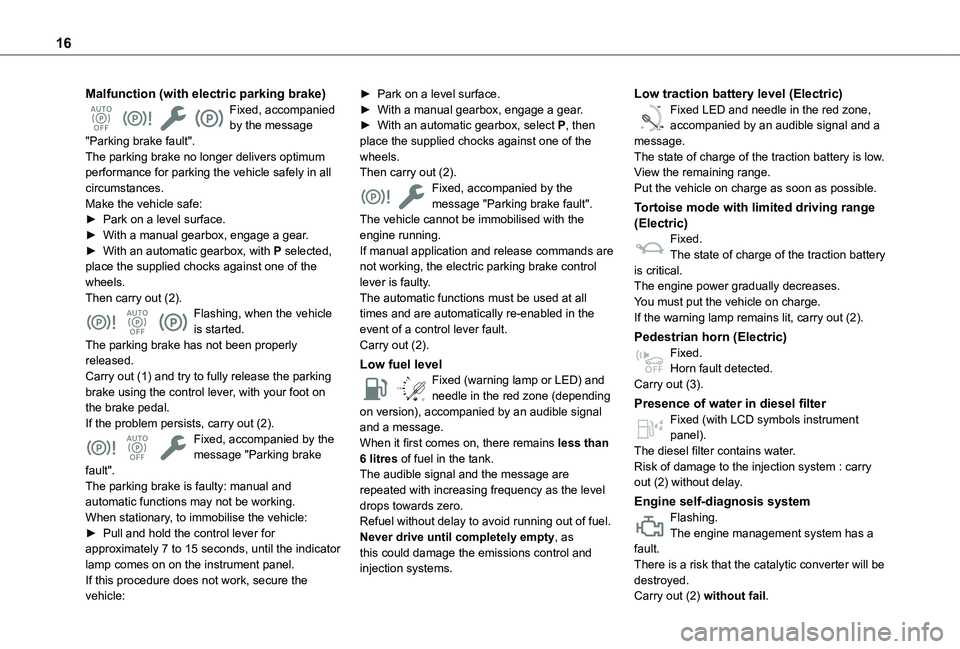
Malfunction (with electric parking brake)Fixed, accompanied by the message "Parking brake fault".The parking brake no longer delivers optimum performance for parking the vehicle safely in all circumstances.Make the vehicle safe:► Park on a level surface.► With a manual gearbox, engage a gear.► With an automatic gearbox, with P selected, place the supplied chocks against one of the wheels.Then carry out (2).Flashing, when the vehicle is started.The parking brake has not been properly released.Carry out (1) and try to fully release the parking brake using the control lever, with your foot on the brake pedal.If the problem persists, carry out (2).Fixed, accompanied by the
message "Parking brake fault".The parking brake is faulty: manual and automatic functions may not be working.When stationary, to immobilise the vehicle:► Pull and hold the control lever for approximately 7 to 15 seconds, until the indicator lamp comes on on the instrument panel.If this procedure does not work, secure the
vehicle:
► Park on a level surface.► With a manual gearbox, engage a gear.► With an automatic gearbox, select P, then place the supplied chocks against one of the wheels.Then carry out (2).Fixed, accompanied by the message "Parking brake fault".The vehicle cannot be immobilised with the engine running.If manual application and release commands are not working, the electric parking brake control lever is faulty.The automatic functions must be used at all times and are automatically re-enabled in the event of a control lever fault.Carry out (2).
Low fuel level
/2
1 1Fixed (warning lamp or LED) and needle in the red zone (depending on version), accompanied by an audible signal and a message.When it first comes on, there remains less than
6 litres of fuel in the tank.The audible signal and the message are repeated with increasing frequency as the level drops towards zero.Refuel without delay to avoid running out of fuel.Never drive until completely empty, as this could damage the emissions control and injection systems.
Low traction battery level (Electric)
0 %
100
Fixed LED and needle in the red zone, accompanied by an audible signal and a message.The state of charge of the traction battery is low.View the remaining range.Put the vehicle on charge as soon as possible.
Tortoise mode with limited driving range (Electric)Fixed.The state of charge of the traction battery is critical.The engine power gradually decreases.You must put the vehicle on charge.If the warning lamp remains lit, carry out (2).
Pedestrian horn (Electric)Fixed.Horn fault detected.Carry out (3).
Presence of water in diesel filterFixed (with LCD symbols instrument panel).
The diesel filter contains water.Risk of damage to the injection system : carry out (2) without delay.
Engine self-diagnosis systemFlashing.The engine management system has a fault.There is a risk that the catalytic converter will be destroyed.
Carry out (2) without fail.