2022 TOYOTA PROACE CITY VERSO display
[x] Cancel search: displayPage 2 of 320
2
■Overview
Overview 4Labels 6
■Eco-driving
1Instruments
Instrument panels 10Warning and indicator lamps 14Indicators 20Trip computer 28Touch screen BLUETOOTH audio system 29Touch screen 30Setting the date and time 32
2Access
Electronic key with remote control function and built-in key, 33Back-up procedures 41Central locking / unlocking 44Doors 46General recommendations for the sliding side doors 47Rear roof flap 48Alarm 49Electric windows 52Tilting rear door windows 53
3Ease of use and comfort
General recommendations for the seats 54Front seats 54Steering wheel adjustment 57Mirrors 582-seat front bench seat 59Rear bench seat (row 2) 61
Rear seats (row 2) 62Rear seats (row 3) 63Interior fittings 65Two-position luggage cover shelf (removable) 71Luggage cover (7-seat) 71Warning triangle 73Extenso cabin 75Crew cab 76Heating and Ventilation 80Heating 81Manual air conditioning 81Dual-zone automatic air conditioning 83Front demisting - defrosting 85Heated windscreen 86Rear screen and/or door mirror demisting/de-icing 86Rear heating and air conditioning 87Additional heating/ventilation system 87A/C preconditioning (Electric) 89
4Lighting and visibility
Lighting control lever 92Direction indicators 93Parking lamps 93Automatic illumination of headlamps 94Daytime running lamps / Sidelamps 94Guide-me-home and welcome lighting 95Automatic lighting systems - General recommendations 95Automatic headlamp dipping 96Headlamp beam height adjustment 97Wiper control lever 97Changing a wiper blade 99Automatic wipers 100
5Safety
General safety recommendations 101Emergency or assistance call 102Hazard warning lamps 104Horn 104Pedestrian horn (Electric) 104Vehicle stability control (VSC) 105Toyota Traction Select 107Hill Assist Descent Control 108Seat belts 11 0Airbags 11 4Child seats 11 7Deactivating the front passenger airbag 11 9ISOFIX child seats 124i-Size child seats 127Manual child lock 128Electric child lock 128
6Driving
Driving recommendations 129Starting/switching off the engine 131Manual parking brake 136Electric parking brake 136Hill start assist 1395-speed manual gearbox 1406-speed manual gearbox 140Automatic gearboxes 141Drive selector (Electric) 147Driving modes 148Gear efficiency indicator 149Stop & Start (Petrol or Diesel) 149Under-inflation detection 151Head-up display 153Driving and manoeuvring aids - General recommendations 154
Page 4 of 320
4
Presentation
Presentation
These illustrations and descriptions are intended as a guide. The presence and location of some components varies according to the version, trim level and country of sale.
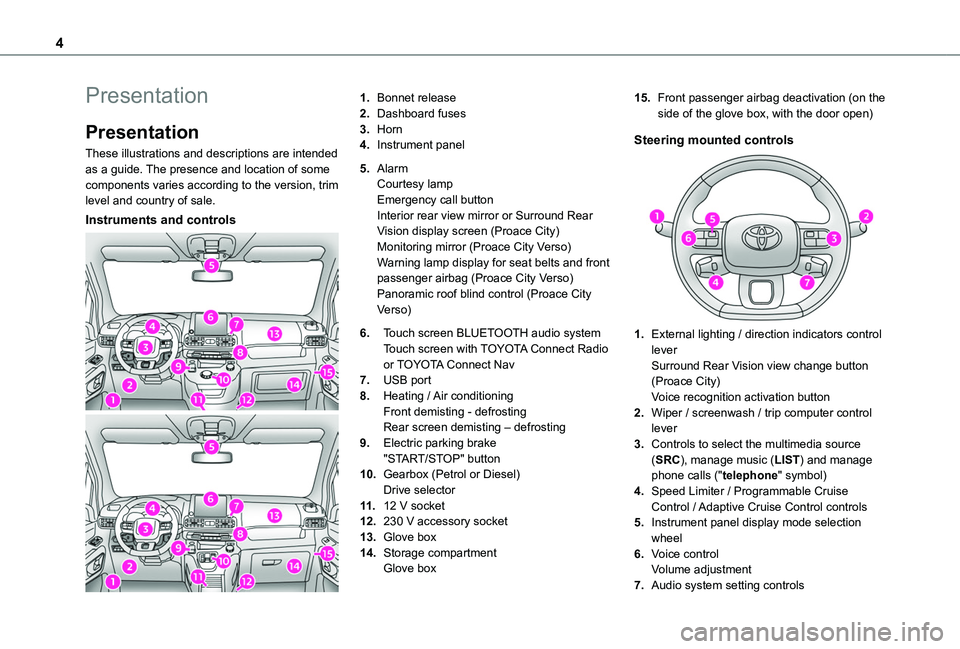
Instruments and controls
1.Bonnet release
2.Dashboard fuses
3.Horn
4.Instrument panel
5.AlarmCourtesy lampEmergency call buttonInterior rear view mirror or Surround Rear Vision display screen (Proace City)Monitoring mirror (Proace City Verso)Warning lamp display for seat belts and front passenger airbag (Proace City Verso)Panoramic roof blind control (Proace City Verso)
6.Touch screen BLUETOOTH audio systemTouch screen with TOYOTA Connect Radio or TOYOTA Connect Nav
7.USB port
8.Heating / Air conditioningFront demisting - defrostingRear screen demisting – defrosting
9.Electric parking brake"START/STOP" button
10.Gearbox (Petrol or Diesel)Drive selector
11 .12 V socket
12.230 V accessory socket
13.Glove box
14.Storage compartmentGlove box
15.Front passenger airbag deactivation (on the side of the glove box, with the door open)
Steering mounted controls
1.External lighting / direction indicators control leverSurround Rear Vision view change button (Proace City)Voice recognition activation button
2.Wiper / screenwash / trip computer control lever
3.Controls to select the multimedia source
(SRC), manage music (LIST) and manage phone calls ("telephone" symbol)
4.Speed Limiter / Programmable Cruise Control / Adaptive Cruise Control controls
5.Instrument panel display mode selection wheel
6.Voice controlVolume adjustment
7.Audio system setting controls
Page 5 of 320
5
Overview
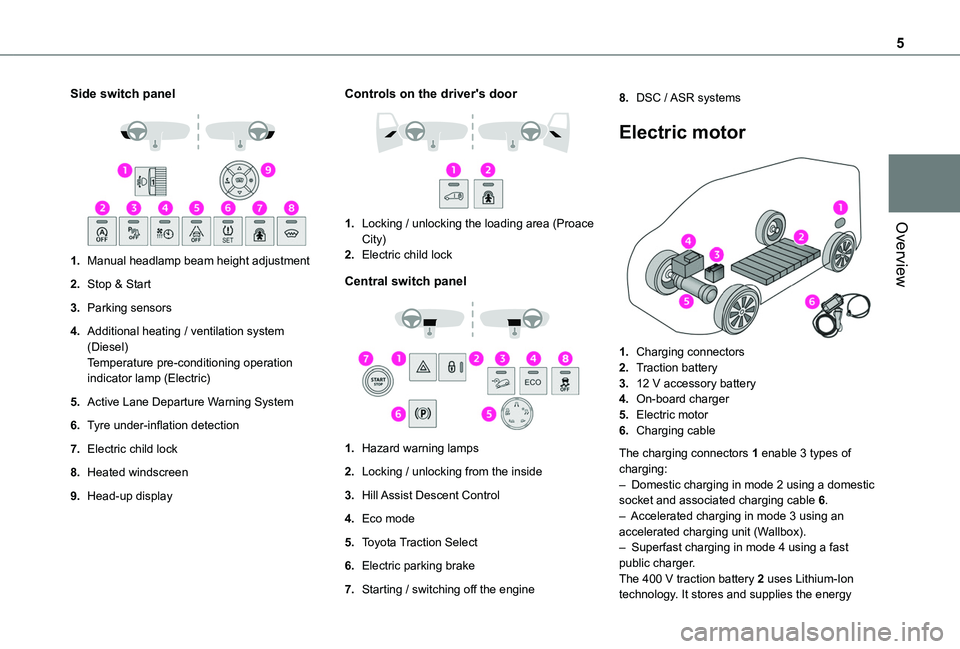
Side switch panel
1.Manual headlamp beam height adjustment
2.Stop & Start
3.Parking sensors
4.Additional heating / ventilation system (Diesel)Temperature pre-conditioning operation indicator lamp (Electric)
5.Active Lane Departure Warning System
6.Tyre under-inflation detection
7.Electric child lock
8.Heated windscreen
9.Head-up display
Controls on the driver's door
1.Locking / unlocking the loading area (Proace City)
2.Electric child lock
Central switch panel
1.Hazard warning lamps
2.Locking / unlocking from the inside
3.Hill Assist Descent Control
4.Eco mode
5.Toyota Traction Select
6.Electric parking brake
7.Starting / switching off the engine
8.DSC / ASR systems
Electric motor
1.Charging connectors
2.Traction battery
3.12 V accessory battery
4.On-board charger
5.Electric motor
6.Charging cable
The charging connectors 1 enable 3 types of charging:– Domestic charging in mode 2 using a domestic socket and associated charging cable 6.– Accelerated charging in mode 3 using an accelerated charging unit (Wallbox).– Superfast charging in mode 4 using a fast public charger.The 400 V traction battery 2 uses Lithium-Ion technology. It stores and supplies the energy
Page 8 of 320
8
Eco-driving
Eco-driving refers to a range of everyday practices that allow the motorist to optimise the vehicle's energy consumption (fuel and/or electricity) and CO2 emissions.
Optimise your use of the gearbox
With a manual gearbox, move off gently and change up promptly. While accelerating, change up early.With an automatic gearbox, favour automatic mode. Do not depress the accelerator pedal heavily or suddenly.The gear shift indicator prompts you to engage the most suitable gear. Whenever this indication is displayed on the instrument panel, follow it straight away.With an automatic gearbox, this indicator appears only in manual mode.
Drive smoothly
Maintain a safe distance between vehicles, use engine braking rather than the brake pedal and
press the accelerator gradually. These practices help to save on energy consumption, reduce CO2 emissions and decrease general traffic noise.Favour the use of the "Eco" driving mode.With an EAT8 gearbox, with the gear selector in D mode, favour "freewheeling" by progressively and completely lifting your foot off the accelerator pedal in order to save fuel.
When the traffic is flowing smoothly, select the cruise control.
Control the use of electrical equipment
Before moving off, if the passenger compartment is too warm, ventilate it by opening the windows and air vents before using the air conditioning.At speeds above 31 mph (50 km/h), close the windows and leave the air vents open.Consider using equipment that can help keep the temperature in the passenger compartment down (e.g. sunroof blind, window blinds).Unless automatically regulated, switch off the air conditioning as soon as the desired temperature has been reached.Switch off the demisting and defrosting functions, if they are not managed automatically.Switch off the heated seat as soon as possible.Adapt the use of headlamps and/or foglamps to the level of visibility, in accordance with current legislation in the country in which you are driving.Avoid running the engine before moving off, particularly in winter (other than in severe wintry
conditions: temperature below -23°C). The vehicle will warm up much faster while driving.As a passenger, avoid connecting your multimedia devices (e.g. film, music, video game) to help reduce the consumption of energy.Disconnect all portable devices before leaving the vehicle.
Limit the causes of excess consumption
Spread loads throughout the vehicle. Place the heaviest items in the boot as close as possible to the rear seats.Limit the loads carried in the vehicle and minimise wind resistance (e.g. roof bars, roof rack, bicycle carrier, trailer). Preferably, use a roof box.Remove roof bars and roof racks after use.At the end of winter, remove snow tyres and refit summer tyres.
Comply with the servicing instructions
Check tyre pressures regularly, with the tyres cold, referring to the label in the door aperture on the driver's side.Carry out this check in particular:– before a long journey.– at each change of season.– after a long period out of use.Do not forget the spare wheel and, where applicable, the tyres on your trailer or caravan.Have your vehicle serviced regularly (e.g. engine
oil, oil filter, air filter, passenger compartment filter, etc.). Observe the schedule of operations in the manufacturer's service schedule.With a Diesel engine, if the SCR system is faulty, your vehicle will emit pollution. Check with any authorized Toyota retailer or Toyota authorized repairer, or any reliable repairer as soon as possible to restore your vehicle's nitrogen oxide emissions to legal levels.
Page 10 of 320
10
Instrument panels
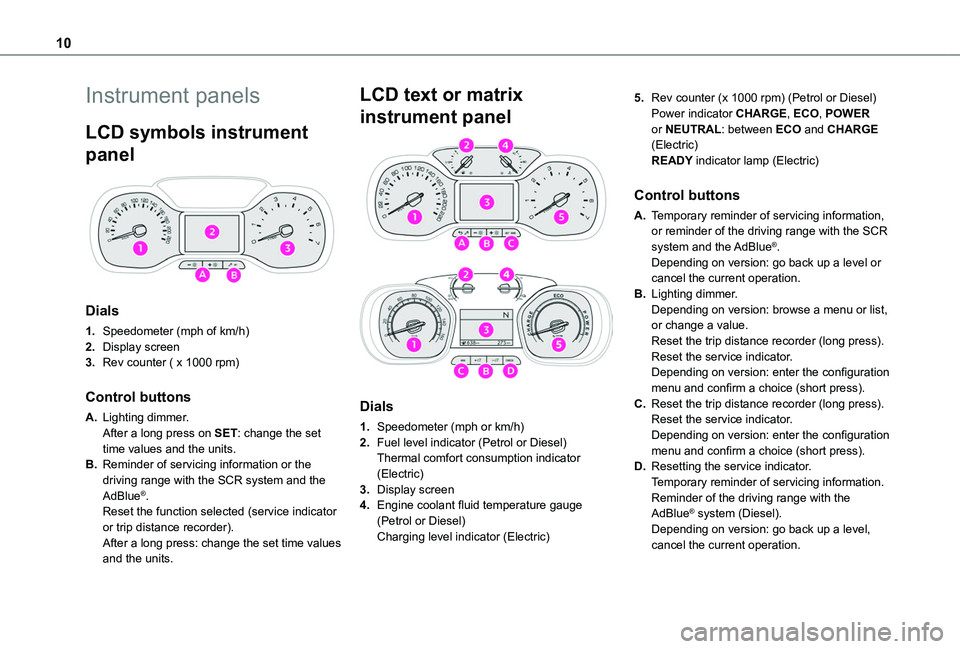
LCD symbols instrument
panel
Dials
1.Speedometer (mph of km/h)
2.Display screen
3.Rev counter ( x 1000 rpm)
Control buttons
A.Lighting dimmer.After a long press on SET: change the set time values and the units.
B.Reminder of servicing information or the driving range with the SCR system and the AdBlue®.Reset the function selected (service indicator or trip distance recorder).After a long press: change the set time values and the units.
LCD text or matrix
instrument panel
Dials
1.Speedometer (mph or km/h)
2.Fuel level indicator (Petrol or Diesel)Thermal comfort consumption indicator (Electric)
3.Display screen
4.Engine coolant fluid temperature gauge (Petrol or Diesel)Charging level indicator (Electric)
5.Rev counter (x 1000 rpm) (Petrol or Diesel)Power indicator CHARGE, ECO, POWER or NEUTRAL: between ECO and CHARGE (Electric)READY indicator lamp (Electric)
Control buttons
A.Temporary reminder of servicing information, or reminder of the driving range with the SCR
system and the AdBlue®.Depending on version: go back up a level or cancel the current operation.
B.Lighting dimmer.Depending on version: browse a menu or list, or change a value.Reset the trip distance recorder (long press).Reset the service indicator.Depending on version: enter the configuration menu and confirm a choice (short press).
C.Reset the trip distance recorder (long press).Reset the service indicator.Depending on version: enter the configuration menu and confirm a choice (short press).
D.Resetting the service indicator.Temporary reminder of servicing information.Reminder of the driving range with the AdBlue® system (Diesel).Depending on version: go back up a level, cancel the current operation.
Page 11 of 320
11
Instruments
1
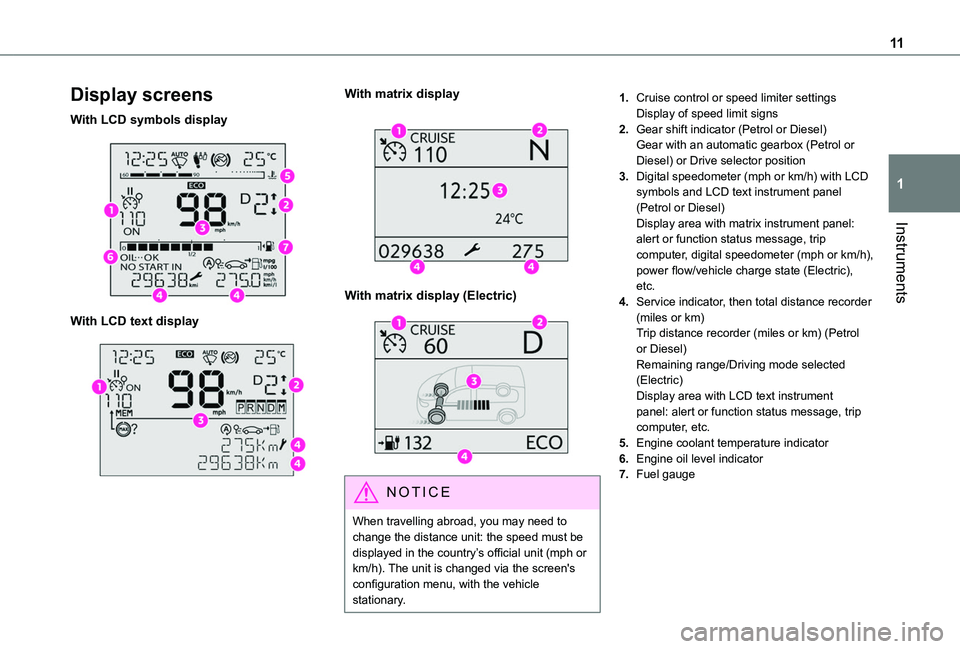
Display screens
With LCD symbols display
With LCD text display
With matrix display
With matrix display (Electric)
NOTIC E
When travelling abroad, you may need to change the distance unit: the speed must be displayed in the country’s official unit (mph or km/h). The unit is changed via the screen's configuration menu, with the vehicle stationary.
1.Cruise control or speed limiter settingsDisplay of speed limit signs
2.Gear shift indicator (Petrol or Diesel)Gear with an automatic gearbox (Petrol or Diesel) or Drive selector position
3.Digital speedometer (mph or km/h) with LCD symbols and LCD text instrument panel (Petrol or Diesel)Display area with matrix instrument panel: alert or function status message, trip computer, digital speedometer (mph or km/h), power flow/vehicle charge state (Electric), etc.
4.Service indicator, then total distance recorder (miles or km)Trip distance recorder (miles or km) (Petrol or Diesel)Remaining range/Driving mode selected (Electric)Display area with LCD text instrument panel: alert or function status message, trip computer, etc.
5.Engine coolant temperature indicator
6.Engine oil level indicator
7.Fuel gauge
Page 12 of 320
12
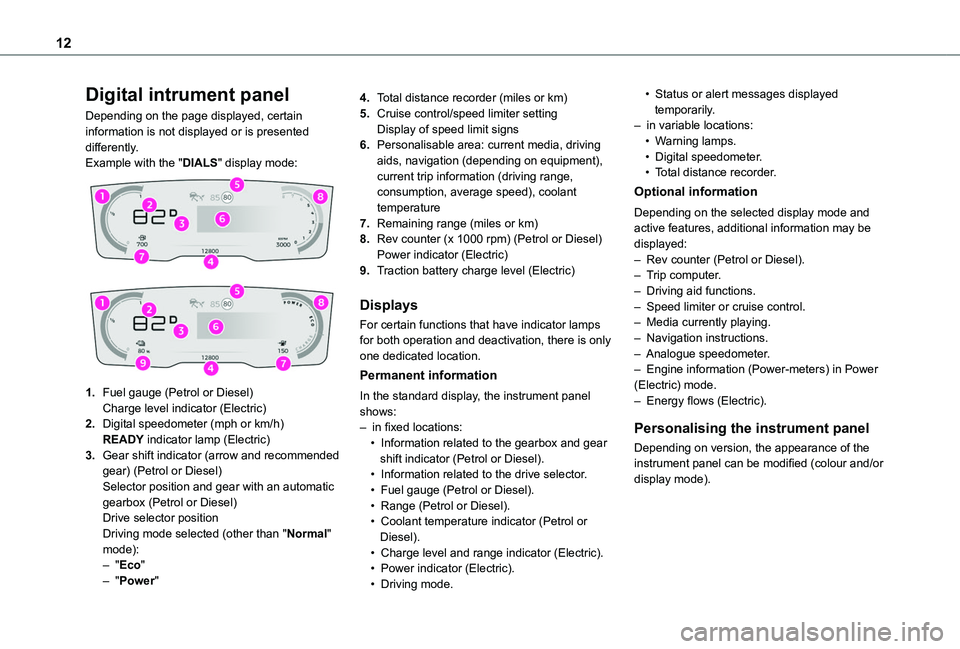
Digital intrument panel
Depending on the page displayed, certain information is not displayed or is presented differently.Example with the "DIALS" display mode:
1.Fuel gauge (Petrol or Diesel)Charge level indicator (Electric)
2.Digital speedometer (mph or km/h)READY indicator lamp (Electric)
3.Gear shift indicator (arrow and recommended gear) (Petrol or Diesel)Selector position and gear with an automatic gearbox (Petrol or Diesel)Drive selector positionDriving mode selected (other than "Normal" mode):– "Eco"– "Power"
4.Total distance recorder (miles or km)
5.Cruise control/speed limiter settingDisplay of speed limit signs
6.Personalisable area: current media, driving aids, navigation (depending on equipment), current trip information (driving range, consumption, average speed), coolant temperature
7.Remaining range (miles or km)
8.Rev counter (x 1000 rpm) (Petrol or Diesel)Power indicator (Electric)
9.Traction battery charge level (Electric)
Displays
For certain functions that have indicator lamps for both operation and deactivation, there is only one dedicated location.
Permanent information
In the standard display, the instrument panel shows:– in fixed locations:• Information related to the gearbox and gear shift indicator (Petrol or Diesel).• Information related to the drive selector.• Fuel gauge (Petrol or Diesel).• Range (Petrol or Diesel).• Coolant temperature indicator (Petrol or Diesel).• Charge level and range indicator (Electric).• Power indicator (Electric).• Driving mode.
• Status or alert messages displayed temporarily.– in variable locations:• Warning lamps.• Digital speedometer.• Total distance recorder.
Optional information
Depending on the selected display mode and active features, additional information may be displayed:– Rev counter (Petrol or Diesel).– Trip computer.– Driving aid functions.– Speed limiter or cruise control.– Media currently playing.– Navigation instructions.– Analogue speedometer.– Engine information (Power-meters) in Power (Electric) mode.– Energy flows (Electric).
Personalising the instrument panel
Depending on version, the appearance of the instrument panel can be modified (colour and/or display mode).
Page 13 of 320
13
Instruments
1
NOTIC E
Display language and unitsThese depend on the touch screen settings.When travelling abroad, the speed must be shown in the official units of the country you are driving in (mph, miles or km/h, km).
WARNI NG
As a safety measure, these adjustments must be carried out with the vehicle stationary.
Choice of display colour (Petrol or Diesel)
Depending on version, the instrument panel display colour depends on the colour scheme chosen in the touch screen.The settings are changed via the Settings touch screen menu.
Choosing the display mode
In each mode, specific types of information are displayed on the instrument panel.
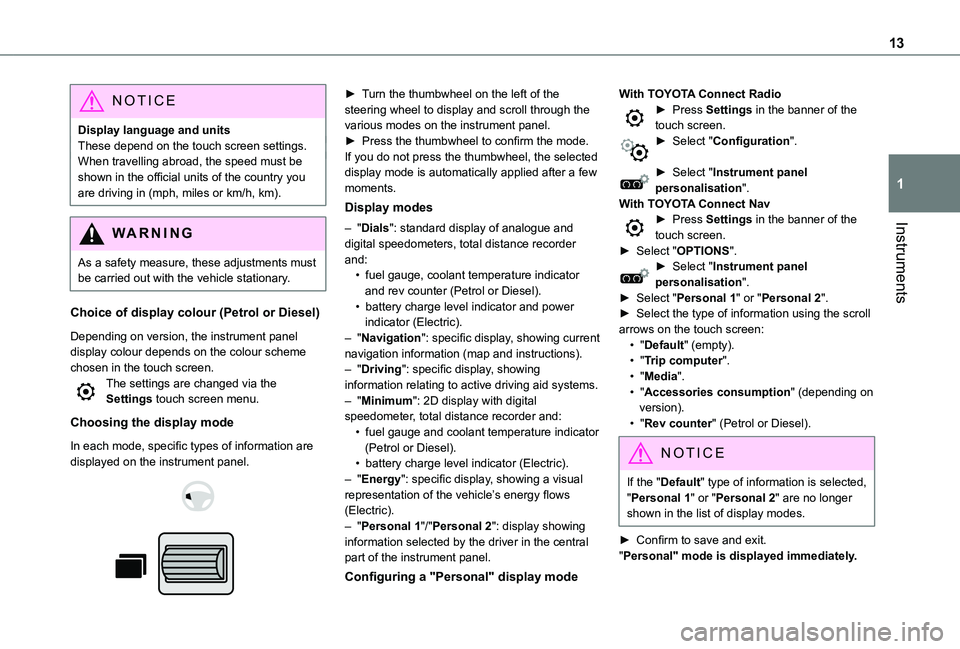
► Turn the thumbwheel on the left of the steering wheel to display and scroll through the various modes on the instrument panel.► Press the thumbwheel to confirm the mode.If you do not press the thumbwheel, the selected display mode is automatically applied after a few moments.
Display modes
– "Dials": standard display of analogue and digital speedometers, total distance recorder and:• fuel gauge, coolant temperature indicator and rev counter (Petrol or Diesel).• battery charge level indicator and power indicator (Electric).– "Navigation": specific display, showing current navigation information (map and instructions).– "Driving": specific display, showing information relating to active driving aid systems.– "Minimum": 2D display with digital speedometer, total distance recorder and:• fuel gauge and coolant temperature indicator
(Petrol or Diesel).• battery charge level indicator (Electric).– "Energy": specific display, showing a visual representation of the vehicle’s energy flows (Electric).– "Personal 1"/"Personal 2": display showing information selected by the driver in the central part of the instrument panel.
Configuring a "Personal" display mode
With TOYOTA Connect Radio► Press Settings in the banner of the touch screen.► Select "Configuration".
► Select "Instrument panel personalisation".With TOYOTA Connect Nav► Press Settings in the banner of the touch screen.► Select "OPTIONS".► Select "Instrument panel personalisation".► Select "Personal 1" or "Personal 2".► Select the type of information using the scroll arrows on the touch screen:• "Default" (empty).• "Trip computer".• "Media".• "Accessories consumption" (depending on version).• "Rev counter" (Petrol or Diesel).
NOTIC E
If the "Default" type of information is selected, "Personal 1" or "Personal 2" are no longer shown in the list of display modes.
► Confirm to save and exit."Personal" mode is displayed immediately.