2022 TOYOTA GR SUPRA air condition
[x] Cancel search: air conditionPage 231 of 356
2313-1. CONTROLS
3
CONTROLS
quickly removed from the wind-
shield and the front side win-
dows.
The LED is illuminated with the
system switched on.
The air flow can be adjusted
manually with the system
switched on.
The function is available with the
engine running.
The rear window defroster
switches off automatically after a
certain period of time.
The microfilter removes dust
and pollen from the incoming air.
Have this filter changed during
vehicle maintenance, refer to
page 301.The air flow directions can be
individually adjusted.
The air flow directions can be
adjusted for direct or indirect
ventilation.
Open the vents and position
them to ensure effective climate
control.
The air flow is directed towards
the passengers. The air flow
heats or cools noticeably,
depending on the adjusted tem-
perature.
The air flow is not directed
towards the passengers. The
car's interior is warmed or
cooled indirectly, depending on
the set temperature.
Switching on/off
Press the button.
If there is any window
condensation, press the
button on the driver's
side or switch on the air
conditioning. Make sure
that air can flow to the
windshield.
Rear window defroster
Press the button. The
LED lights up.
Microfilter
Ventilation
Concept
Adjusting the ventilation
General information
Direct ventilation
Indirect ventilation
Page 232 of 356
2323-1. CONTROLS
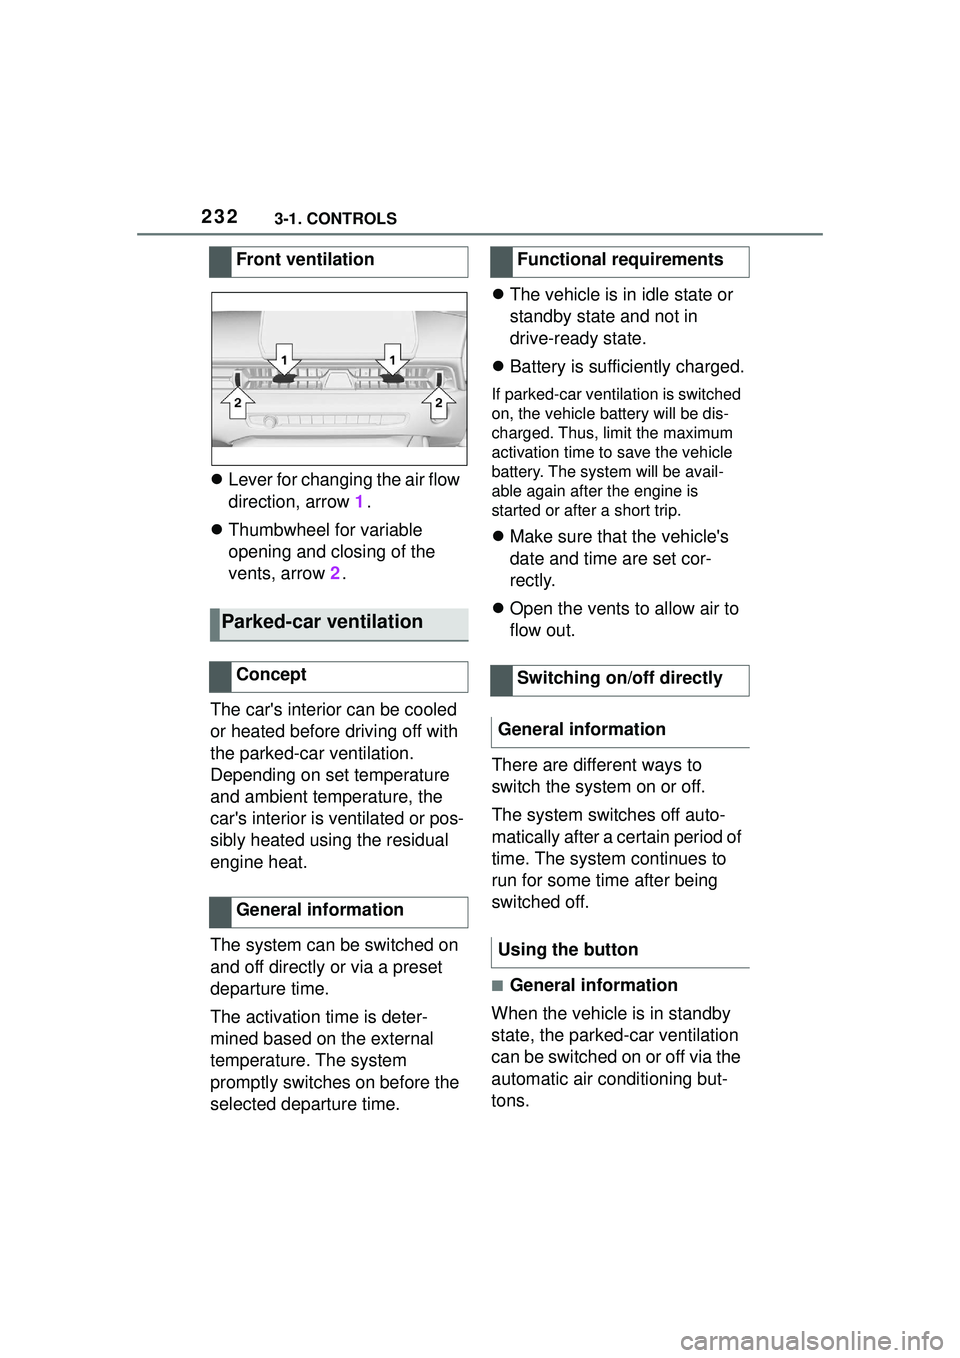
Lever for changing the air flow
direction, arrow 1.
Thumbwheel for variable
opening and closing of the
vents, arrow 2.
The car's interior can be cooled
or heated before driving off with
the parked-car ventilation.
Depending on set temperature
and ambient temperature, the
car's interior is ventilated or pos-
sibly heated using the residual
engine heat.
The system can be switched on
and off directly or via a preset
departure time.
The activation time is deter-
mined based on the external
temperature. The system
promptly switches on before the
selected departure time.
The vehicle is in idle state or
standby state and not in
drive-ready state.
Battery is sufficiently charged.
If parked-car ventilation is switched
on, the vehicle battery will be dis-
charged. Thus, limit the maximum
activation time to save the vehicle
battery. The system will be avail-
able again after the engine is
started or after a short trip.
Make sure that the vehicle's
date and time are set cor-
rectly.
Open the vents to allow air to
flow out.
There are different ways to
switch the system on or off.
The system switches off auto-
matically after a certain period of
time. The system continues to
run for some time after being
switched off.
■General information
When the vehicle is in standby
state, the parked-car ventilation
can be switched on or off via the
automatic air conditioning but-
tons.
Front ventilation
Parked-car ventilation
Concept
General information
Functional requirements
Switching on/off directly
General information
Using the button
Page 233 of 356

2333-1. CONTROLS
3
CONTROLS
■Switching on
Press any button except:
Rear window defroster.
Lower air flow button side.
Seat heating.
Menu.
■Switching off
The system switches off after
leaving and locking the vehicle.
Press and hold the bot-
tom button.
1 "My Vehicle"
2 "Vehicle settings"
3 "Climate functions"
4 "Comfort ventilation"
5 "Activate now" Different departure times can be
adjusted to ensure a comfort-
able interior temperature in the
vehicle at the time of departure.
One-time departure time: the
time can be set.
The system is switched on once.
Departure time with week-
day: time and day of the week
can be set.
On the desired weekdays, the sys-
tem will be switched on promptly
before the set departure time.
The departure time is prese-
lected in two steps:
Set departure times.
Activate departure times.
A minimum of 10 minutes
should pass between set-
ting/activating the departure
time and the planned departure
time to allow a sufficient period
of time for the climate control.
■Via Toyota Supra Command
1 "My Vehicle"
2 "Vehicle settings"
3 "Climate functions"
4 "Comfort ventilation"
5 Select the desired departure
time.
Via Toyota Supra Command
Display
SymbolDescription
Symbol on the auto-
matic air conditioning
indicates the system is
switched on.
REST is displayed on
the automatic air condi-
tioning. The residual
engine heat is used.
Departure time
Concept
Setting the departure time
Page 234 of 356
2343-1. CONTROLS
6Set the departure time.
7 Select day of the week, if
needed.
■Functional requirement
If a departure time is to influ-
ence the switching on of
parked-car ventilation, the
respective departure time must
be activated first.
■Via Toyota Supra Command
1 "My Vehicle"
2 "Vehicle settings"
3 "Climate functions"
4 "Comfort ventilation"
5 "For departure time"
6 Activate the desired depar-
ture time.
The symbol on the automatic
air conditioning signals an acti-
vated departure time. This chapter describes all stan-
dard, country-specific and
optional features offered with
the series. It also describes fea-
tures and functions that are not
necessarily available in your
vehicle, e.g., due to the selected
options or country versions. This
also applies to safety-related
functions and systems. When
using these functions and sys-
tems, the applicable laws and
regulations must be observed.
The integrated Universal
Remote Control in the interior
mirror can operate up to 3 func-
tions of remote-controlled sys-
tems such as garage door
drives, barriers, or lighting sys-
tems.
The Integrated Universal
Remote Control replaces up to 3
different hand-held transmitters.
To operate the remote control,
the buttons on the interior mirror
must be programmed with the
Activating the departure time
Display
Interior equipment
Vehicle features and
options
Integrated Universal
Remote Control
Concept
General information
Page 255 of 356
2554-1. DRIVING TIPS
4
DRIVING TIPS
other vehicles, etc. Increase
the distance between your
vehicle and preceding vehi-
cles and drive safely at a
lower speed than normal,
avoiding sudden accelera-
tion, braking or steering oper-
ations.
Use the rear defroster and air
conditioning system to pre-
vent the windows from fog-
ging up.
Hydroplaning is more likely to
occur when driving on ruts or
through large puddles.
On wet or slushy roads, a
wedge of water can form
between the tires and road sur-
face.
This phenomenon is referred to
as hydroplaning. It is character-
ized by a partial or complete
loss of contact between the tires
and the road surface, ultimately
undermining your ability to steer
and brake the vehicle.
When driving through water, fol-
low the following:
Deactivate Auto Start/Stop
function.
Drive through calm water only.
Drive through water only if it is
not deeper than maximum 9.8
inches/25 cm.
Drive through water no faster
than walking speed, up to 3
mph/5 km/h.
The vehicle is equipped with an
Antilock Braking System ABS as
a standard feature.
Perform an emergency stop in
situations that require such.
Steering is still responsive. You
can still avoid any obstacles with
a minimum of steering effort.
Pulsation of the brake pedal and
sounds from the hydraulic cir-
cuits indicate that the Antilock
Braking System ABS is in its
active mode.
In certain braking situations, the
Hydroplaning
Driving through water
General information
Safety information
NOTICE
When driving too quickly through
too deep water, water can enter
into the engine compartment, the
electrical system or the transmis-
sion. There is a risk of damage to
property. When driving through
water, do not exceed the maxi-
mum indicated water level and the
maximum speed for driving
through water.
Braking safely
General information
Page 257 of 356
2574-1. DRIVING TIPS
4
DRIVING TIPS
Infrequent use of the brakes.
Aggressive, acidic, or alka-
line cleaning agents.
Corrosion buildup on the brake
discs will cause a pulsating
effect on the brakes in their
response - generally this cannot
be corrected.
When using the automatic air
conditioning, condensation
water develops and collects
underneath the vehicle.
Higher mechanical and thermal
loads during racetrack operation
lead to increased wear. This
wear is not covered by the war-
ranty. The vehicle is not
designed for use in motor sports
competition.
Have vehicle checked by your
Toyota dealer before and after
driving on a racetrack. This chapter describes all stan-
dard, country-specific and
optional features offered with
the series. It also describes fea-
tures and functions that are not
necessarily available in your
vehicle, e.g., due to the selected
options or country versions. This
also applies to safety-related
functions and systems. When
using these functions and sys-
tems, the applicable laws and
regulations must be observed.
The vehicle contains advanced
technologies for the reduction of
consumption and emission val-
ues.
The fuel consumption depends
on various factors, such as driv-
ing style, road conditions, main-
tenance or environmental
factors.
Carrying out certain measures,
such as a moderate driving style
and regular maintenance, can
influence fuel consumption and
the environmental impact.
Condensation water under
the parked vehicle
Driving on racetracks
Saving fuel
Vehicle features and
options
Reducing fuel consump-
tion
General information
Page 258 of 356
2584-1. DRIVING TIPS
Additional weight increases fuel
consumption.
Attached parts on the vehicle
impair the aerodynamics and
increase the fuel consumption.
Open windows increase air
resistance and therefore lead to
greater fuel consumption.
Tires can affect consumption in
various ways, for instance tire
size may influence consump-
tion.
Check and, if needed, correct
the tire inflation pressure at least
twice a month and before start-
ing on a long trip.
Low tire inflation pressure
increases rolling resistance and
thus raises fuel consumption
and tire wear.Do not wait for the engine to
warm-up while the vehicle
remains stationary. Start driving
right away, but at moderate
engine speeds.
This is the quickest way of
warming the cold engine up to
operating temperature.
Driving smoothly and proactively
reduces fuel consumption.
Avoid unnecessary acceleration
and braking.
By maintaining a suitable dis-
tance to the vehicle driving
ahead of you.
Driving at low engine speeds
lowers fuel consumption and
reduces wear.
If necessary, observe the vehi-
cle's gear shift indicator, refer to
page 142.
When approaching a red light,
take your foot off the accelerator
and let the vehicle coast to a
halt.
For going downhill take your foot
off the accelerator and let the
Remove unnecessary
cargo
Remove attached parts fol-
lowing use
Closing the windows
Tires
General information
Check the tire inflation pres-
sure regularly
Drive away without delay
Look well ahead when
driving
Avoid high engine speeds
Use coasting conditions
Page 272 of 356

2725-1. MOBILITY
equipped with low-profile tires.
Indications of tire damage or
other vehicle malfunctions:
• Unusual vibrations.
• Unusual tire or running noises.
• Unusual handling such as a strong tendency to pull to the
left or right.
Damage can be caused by the
following situations, for instance:
• Driving over curbs.
• Road damage.
• Tire inflation pressure too low.
• Vehicle overloading.
• Incorrect tire storage.
Have mounting and wheel bal-
ancing carried out by your Toy-
ota dealer.
The following properties are rec-
ommended and approved by the
manufacturer of the vehicle for
the approved wheels and tires
per vehicle type and special
equipment:
• Wheel and tire combinations.
• Rim designs.
• Tire sizes.
• Tire brands.
You can ask a manufacturer ser-
vice center or another qualified
service center or repair shop
about the approved wheels and
Safety information
WARNING
Damaged tires can lose tire infla-
tion pressure, which can lead to
loss of vehicle control. There is a
risk of an accident. If tire damage
is suspected while driving, imme-
diately reduce speed and stop.
Have wheels and tires checked.
For this purpose, drive carefully to
the nearest your Toyota dealer.
Have vehicle towed or trans-
ported as needed. Do not repair
damaged tires, but have them
replaced.
WARNING
Tires can become damaged by
driving over obstacles, e.g., curbs
or road damage, at high speed.
Larger wheels have a smaller tire
crosssection. The smaller the tire
cross-section, the higher the risk
of tire damage. There is a danger
of accidents and property dam-
age. If possible, avoid driving over
objects or road conditions that
may damage tires, or drive over
them slowly and carefully.
Changing wheels and
tires
Mounting and wheel bal-
ancing
Approved wheels and tires
General information