2022 TOYOTA COROLLA brakes
[x] Cancel search: brakesPage 470 of 678
4688-2. Steps to take in an emergency
5Securely attach cables or chains
to the towing eyelet.
Take care not to damage the vehicle
body.
6 Enter the vehicle being towed
and start the engine.
If the engine does not start, turn the
engine switch to ON.
7 Shift the shift lever to N and
release the parking brake.
Vehicles with electric parking brake:
Turn automatic mode off. P. 1 7 4
When the shift lever cannot be shifted
(vehicles with a Multidrive): P. 1 6 6
■While towing
If the engine is not running, the power
assist for the brakes and steering will
not function, making steering and brak- ing more difficult.
■Wheel nut wrench
Vehicles with wheel nut wrench: Wheel
nut wrench is installed in trunk. ( P.482, 498)
WA R N I N G
Observe the following precautions.
Failure to do so may result in death or
serious injury.
■While towing
●When towing using cables or chains, avoid sudden starts, etc.
which place excessive stress on the
towing eyelets, cables or chains. The towing eyelets, cables or
chains may become damaged, bro-
ken debris may hit people, and cause serious damage.
●Vehicles without smart entry & start system: Do not tu rn the engine
switch to the “LOCK” position.
There is a possibility that the steer-
ing wheel is locked and cannot be operated.
●Vehicles with smart entry & start system: Do not turn the engine
switch off.
There is a possibility that the steer- ing wheel is locked and cannot be
operated.
■Installing towing eyelets to the
vehicle
Make sure that towing eyelets are installed securely.
If not securely installed, towing eye-
lets may come loose during towing.
NOTICE
■To prevent damage to the vehicle during emergency towing
Do not secure cables or chains to the
suspension components.
Page 482 of 678
4808-2. Steps to take in an emergency
■Warning messages
The warning messages explained below
may differ from the actual messages
according to operation conditions and vehicle specifications.
■Warning buzzer
A buzzer may sound when a message is
displayed. The buzzer may not be audible if the
vehicle is in a noisy location or if the
audio system volume is high.
WA R N I N G
●Vehicles with a compact spare tire:
If the tire pressure warning light
comes on even after tire inflation pressure adjustment, it is probable
that you have a flat tire. Check the
tires. If a tire is flat, change it with the spare tire and have the flat tire
repaired by the nearest any author-
ized Toyota retailer or Toyota
authorized repairer, or any reliable repairer.
●Vehicles with emergency tire punc-ture repair kit: If the tire pressure
warning light comes on even after
tire inflation pressure adjustment, it is probable that you have a flat tire.
Check the tires. If a tire is flat, repair
the flat tire by using emergency tire puncture repair kit.
●Avoid abrupt maneuvering and braking.
If the vehicle tires deteriorate, you
could lose control of the steering wheel or the brakes.
■If a blowout or sudden air leak-age should occur
The tire pressure warning system
may not activate immediately.
NOTICE
■To ensure the tire pressure warn- ing system operates properly
Do not install tires with different speci-
fications or makers, as the tire pres- sure warning system may not operate
properly.
If a war ning message is
displayed
The multi-information display
shows warnings for system
malfunctions and incorrectly
performed operations, and
messages that indicate a need
for maintenance. When a mes-
sage is displayed, perform the
appropriate corrective action
for the message.
If a warning message is dis-
played again after the appro-
priate actions have been
performed, contact any author-
ized Toyota retailer or Toyota
authorized repairer, or any reli-
able repairer.
Additionally, if a warning light
comes on or flashes at the
same time that a warning mes-
sage is displayed, take the
appropriate corrective action
for the warning light. ( P.471)
Page 498 of 678
4968-2. Steps to take in an emergency
2 Check that the air pressure indicator
shows the specified air pressure.
If the air pressure is under the desig-
nated pressure, turn the compressor
switch on (type A) or (on) (type B)
again and repeat the inflation procedure
until the specified air pressure is
reached.
■After a tire is repaired with the emergency tire puncture repair kit
●The tire pressure warning valve and transmitter should be replaced.
●Even if the tire inflation pressure is at the recommended level, the tire pres-
sure warning light may come on/flash.
WA R N I N G
■Do not drive the vehicle with a
flat tire
Do not continue driving with a flat tire.
Driving even a short distance with a
flat tire can damage the tire and the wheel beyond repair.
Driving with a flat tire may cause a cir-
cumferential groove on the side wall. In such a case, t he tire may explode
when using a repair kit.
■When fixing the flat tire
●Stop your vehicle in a safe and flat
area.
●Do not touch the wheels or the area
around the brakes immediately after the vehicle has been driven.
After the vehicle has been driven,
the wheels and the area around the brakes may be extremely hot.
Touching these areas with hands,
feet or other body parts may result in burns.
●Connect the valve and hose securely with the tire installed on
the vehicle. If the hose is not prop-
erly connected to the valve, air leakage may occur as sealant may
be sprayed out.
●If the hose comes off the valve while inflating the tire, there is a risk
that the hose will move abruptly due
to air pressure.
●After inflation of the tire has com-
pleted, the sealant may splatter when the hose is disconnected or
some air is let out of the tire.
●Follow the operation procedure to
repair the tire. If the procedures not
followed, the sealant may spray out.
●Keep back from the tire while it is
being repaired, as there is a chance of it bursting while the repair opera-
tion is being performed. If you
notice any cracks or deformation of
the tire, turn off (type A) or (off)
(type B) the compressor switch and
stop the repair operation immedi- ately.
●The repair kit may overheat if oper-ated for a long period of time. Do
not operate the repair kit continu-
ously for more than 40 minutes.
●Parts of the repair kit become hot
during operation. Be careful when handling the repair kit during and
after operation. Do not touch the
metal part around the connecting area between the bottle and com-
pressor. It will be extremely hot.
●Do not attach the vehicle speed
warning sticker to an area other
than the one indicated. If the sticker is attached to an area where an
SRS airbag is located, such as the
pad of the steering wheel, it may
prevent the SRS airbag from oper- ating properly.
Page 506 of 678
5048-2. Steps to take in an emergency
1Remove any dirt or foreign mat-
ter from the wheel contact sur-
face.
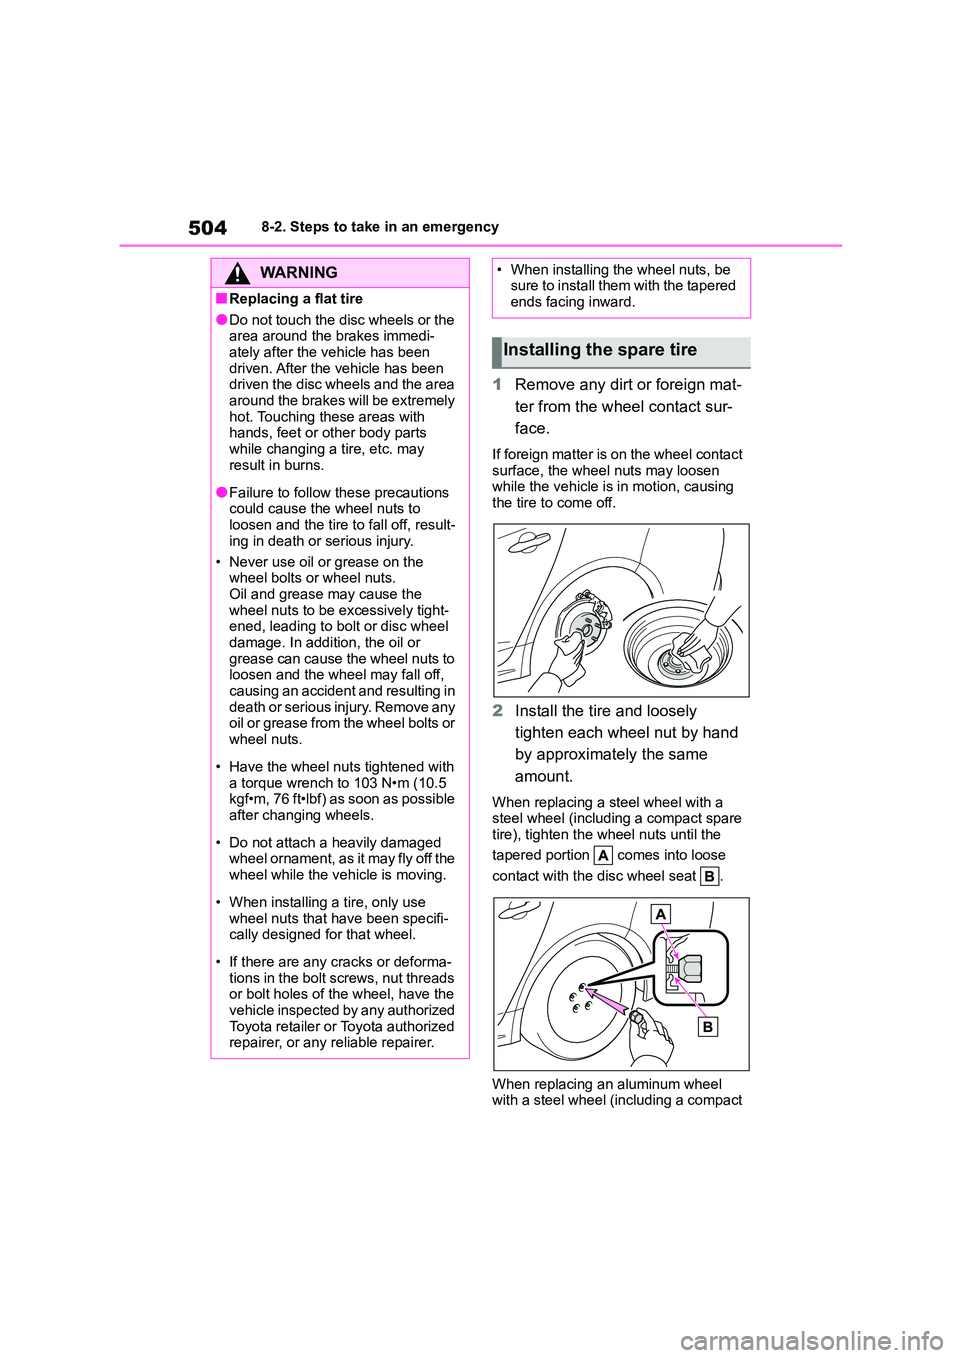
If foreign matter is on the wheel contact
surface, the wheel nuts may loosen while the vehicle is in motion, causing
the tire to come off.
2 Install the tire and loosely
tighten each wheel nut by hand
by approximately the same
amount.
When replacing a steel wheel with a
steel wheel (including a compact spare
tire), tighten the wheel nuts until the
tapered portion comes into loose
contact with the disc wheel seat .
When replacing an aluminum wheel
with a steel wheel (including a compact
WA R N I N G
■Replacing a flat tire
●Do not touch the disc wheels or the
area around the brakes immedi- ately after the vehicle has been
driven. After the vehicle has been
driven the disc wheels and the area around the brakes will be extremely
hot. Touching these areas with
hands, feet or other body parts
while changing a tire, etc. may result in burns.
●Failure to follow these precautions could cause the wheel nuts to
loosen and the tire to fall off, result-
ing in death or serious injury.
• Never use oil or grease on the
wheel bolts or wheel nuts.
Oil and grease may cause the wheel nuts to be excessively tight-
ened, leading to bolt or disc wheel
damage. In addition, the oil or grease can cause the wheel nuts to
loosen and the wheel may fall off,
causing an accident and resulting in death or serious injury. Remove any
oil or grease from the wheel bolts or
wheel nuts.
• Have the wheel nuts tightened with
a torque wrench to 103 N•m (10.5 kgf•m, 76 ft•lbf) as soon as possible
after changing wheels.
• Do not attach a heavily damaged
wheel ornament, as it may fly off the
wheel while the vehicle is moving.
• When installing a tire, only use
wheel nuts that have been specifi- cally designed for that wheel.
• If there are any cracks or deforma- tions in the bolt screws, nut threads
or bolt holes of the wheel, have the
vehicle inspected by any authorized Toyota retailer or Toyota authorized
repairer, or any reliable repairer.
• When installing the wheel nuts, be sure to install them with the tapered
ends facing inward.
Installing the spare tire
Page 534 of 678
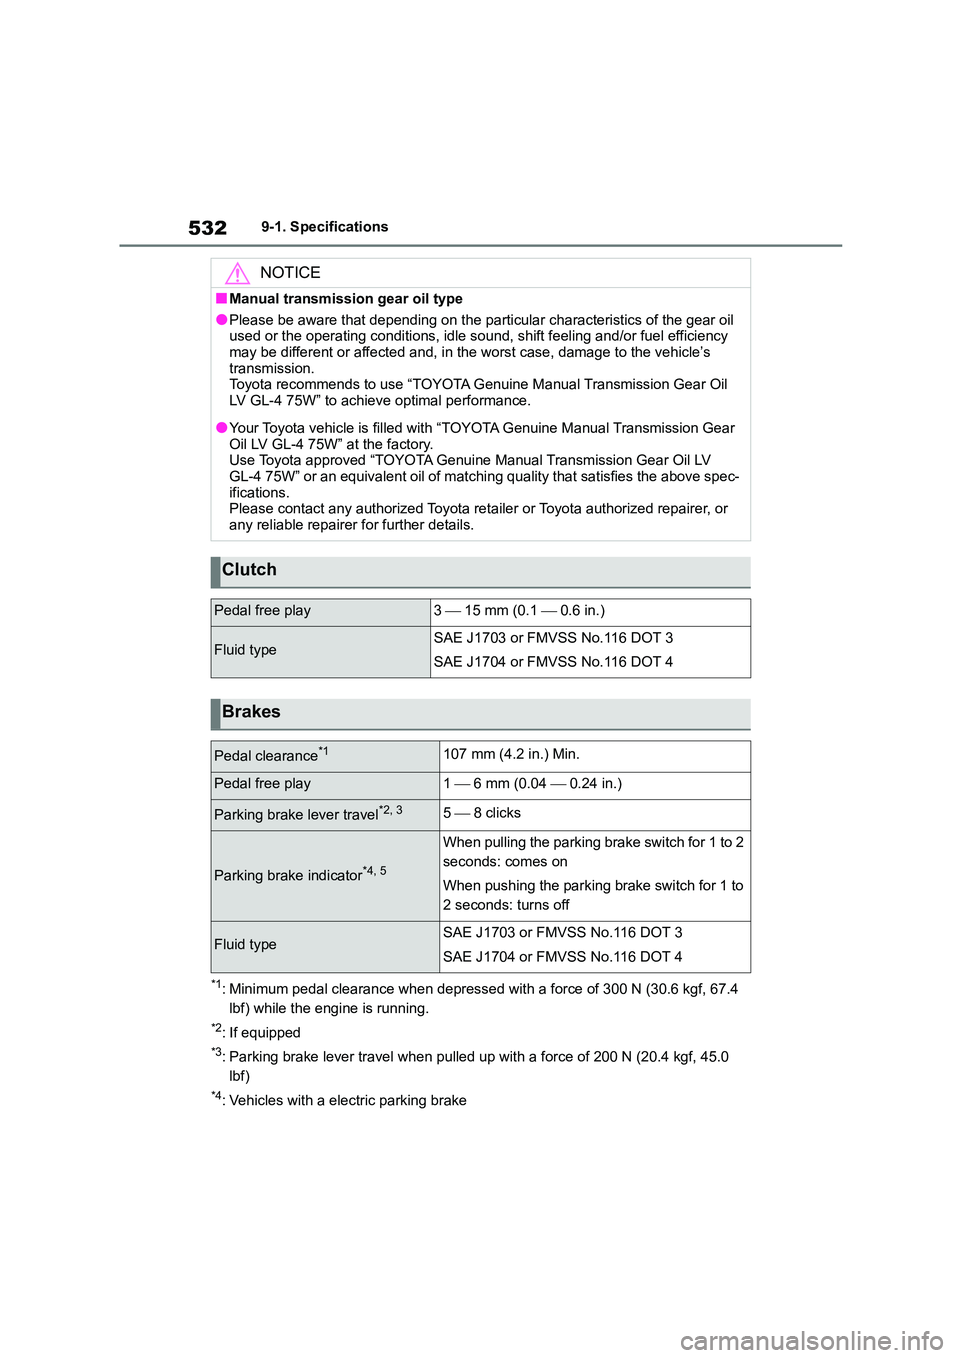
5329-1. Specifications
*1: Minimum pedal clearance when depressed with a force of 300 N (30.6 kgf, 67.4
lbf) while the engine is running.
*2: If equipped
*3: Parking brake lever travel when pulled up with a force of 200 N (20.4 kgf, 45.0
lbf)
*4: Vehicles with a electric parking brake
NOTICE
■Manual transmission gear oil type
●Please be aware that depending on the particular characteristics of the gear oil
used or the operating conditions, idle sound, shift feeling and/or fuel efficiency may be different or affected and, in the worst case, damage to the vehicle’s
transmission.
Toyota recommends to use “TOYOTA Genuine Manual Transmission Gear Oil LV GL-4 75W” to achieve optimal performance.
●Your Toyota vehicle is filled with “TOYOTA Genuine Manual Transmission Gear
Oil LV GL-4 75W” at the factory. Use Toyota approved “TOYOTA Genuine Manual Transmission Gear Oil LV
GL-4 75W” or an equivalent oil of matching quality that satisfies the above spec-
ifications. Please contact any authorized Toyota retailer or Toyota authorized repairer, or
any reliable repairer for further details.
Clutch
Pedal free play3 15 mm (0.1 0.6 in.)
Fluid typeSAE J1703 or FMVSS No.116 DOT 3
SAE J1704 or FMVSS No.116 DOT 4
Brakes
Pedal clearance*1107 mm (4.2 in.) Min.
Pedal free play1 6 mm (0.04 0.24 in.)
Parking brake lever travel*2, 35 8 clicks
Parking brake indicator*4, 5
When pulling the parking brake switch for 1 to 2
seconds: comes on
When pushing the parking brake switch for 1 to
2 seconds: turns off
Fluid typeSAE J1703 or FMVSS No.116 DOT 3
SAE J1704 or FMVSS No.116 DOT 4