2022 TOYOTA COROLLA brakes
[x] Cancel search: brakesPage 290 of 678
2884-5. Using the driving support systems
*: If equipped
■Function summary
The Simple Inte lligent Parking
Assist System automatically oper-
ates the steering wheel to provide
support when backing into an area
near a target parking spot, and
when departing from a parallel
parking spot. (Shift lever operations
and speed adjustment when mov-
ing forward or backing up are not
performed automatically.)
The Simple Intelligent Parking
Assist System does not park the
vehicle automatically. It is a sys-
tem that provides support when
pulling out of a perpendicular or
parallel parking spot.
The Simple Intelligent Parking
Assist System provides steering
wheel operation assistance to
guide the vehicle toward the
selected intended parking spot.
The selected intended parking
spot may not always be reacha-
ble, depending on road and vehi-
cle conditions at the time of
parking, and the distance to the
intended parking spot.
■Linking with the PKSB (Park-
ing Support Brake) system (if
equipped)
While the Simple Intelligent Parking
Assist System is operating, if the
system detects an obstacle that
could result in a collision, the emer-
gency brakes operate, regardless
of whether the PKSB (Parking Sup-
port Brake) system is on or off.
( P. 2 8 9 )
S-IPA (Simple Intelligent
Parking Assist System)*
Simple Intelligent Parking
Assist System
WA R N I N G
■When using the Simple Intelli-
gent Parking Assist System
●When backing up or proceeding for- ward, be sure to directly confirm the
safety of the area to the front or
rear, and the area around the vehi- cle, and slowly back up or proceed
forward while adjusting the vehicle
speed by depressing the brake pedal.
●If it seems the vehicle may make contact with a pedestrian, another
vehicle or any other obstacles, stop
the vehicle by depressing the brake pedal, and then press the S-IPA
switch ( P.290) to turn the system
off.
Page 318 of 678

3164-5. Using the driving support systems
■ABS (Anti-lock Brake System)
Helps to prevent wheel lock when
the brakes are applied suddenly, or
if the brakes are applied while driv-
ing on a slippery road surface
■Brake assist
Generates an increased level of
braking force after the brake pedal
is depressed when the system
detects a panic stop situation
■VSC (Vehicle St ability Control)
Helps the driver to control skidding
when swerving suddenly or turning
on slippery road surfaces.
■VSC+ (Vehicle Stability Con-
trol+)
Provides cooperative control of the
ABS, TRC, VSC and EPS.
Helps to maintain directional stabil-
ity when swerving on slippery road
surfaces by controlling steering per-
formance.
■TRC (Traction Control)
Helps to maintain drive power and
prevent the drive wheels from spin-
ning when starting the vehicle or
accelerating on slippery roads
■Active Cornering Assist (ACA)
Helps to prevent the vehicle from
drifting to the outer side by perform-
ing inner wheel brake control when
attempting to acce lerate while turn-
ing
■Hill-start assist control
Helps to reduce the backward
movement of the vehicle when
starting on an uphill
■EPS (Electric Po wer Steering)
Employs an electric motor to
reduce the amount of effort needed
to turn the steering wheel.
■Emergency brake signal
When the brakes are applied sud-
denly, the emergency flashers auto-
matically flash to alert the vehicle
behind.
■Secondary Collision Brake (if
equipped)
When the SRS airbag sensor
detects a collisi on and the system
operates, the brakes and brake
lights are automatically controlled
to reduce the vehicle speed and
help reduce the poss ibility of further
damage due to a secondary colli-
sion.
Driving assist systems
To keep driving safety and per-
formance, the following sys-
tems operate au tomatically in
response to various driving sit-
uations. Be aware, however,
that these systems are supple-
mentary and should not be
relied upon too heavily when
operating the vehicle.
Summary of the driving
assist systems
Page 321 of 678

319
4
4-5. Using the driving support systems
Driving
■Automatic system cancelation of
emergency brake signal
The emergency brake signal will be
canceled in any of the following situa-
tions:
●The emergency flashers are turned
on.
●The system judges from the vehicle
deceleration that is not a sudden brak- ing operation
■Secondary Collision Brake operat-
ing conditions (if equipped)
The system operates when the SRS airbag sensor detects a collision while
the vehicle is in motion.
However, the system does not operate in any of the following situations.
●The vehicle speed is below 10 km/h (6 mph)
●Components are damaged
■Secondary Collision Brake auto-matic cancellation (if equipped)
The system is automati cally canceled in
any of the following situations.
●The vehicle speed drops below
approximately 10 km/h (6 mph)
●A certain amount of time elapses dur-
ing operation
●The accelerator pedal is depressed a
large amount
WA R N I N G
■The ABS does not operate effec- tively when
●The limits of tire gripping perfor-
mance have been exceeded (such as excessively worn tires on a snow
covered road).
●The vehicle hydroplanes while driv-
ing at high speed on wet or slick
roads.
■Stopping distance when the ABS is operating may exceed that of
normal conditions
The ABS is not designed to shorten the vehicle’s stopping distance.
Always maintain a safe distance from
the vehicle in front of you, especially in the following situations:
●When driving on dirt, gravel or snow-covered roads
●When driving with tire chains
●When driving over bumps in the
road
●When driving over roads with pot-
holes or uneven surfaces
■TRC/VSC may not operate effec-
tively when
Directional control and power may not
be achievable while driving on slip-
pery road surfaces, even if the TRC/VSC system is operating. Drive
the vehicle carefu lly in conditions
where stability and power may be lost.
■Active Cornering Assist does not operate effectively when
●Do not overly rely on Active Corner-
ing Assist. Active Cornering Assist may not operate effectively when
accelerating down slopes or driving
on slippery road surfaces.
●When Active Cornering Assist fre-
quently operates, Active Cornering Assist may temporarily stop operat-
ing to ensure proper operation of
the brakes, TRC and VSC.
■Hill-start assist control does not
operate effectively when
●Do not overly rely on hill-start assist control. Hill-start assist control may
not operate effectively on steep
inclines and roads covered with ice.
Page 322 of 678
3204-5. Using the driving support systems
WA R N I N G
●Unlike the parking brake, hill-start
assist control is not intended to hold
the vehicle stationary for an extended period of time. Do not
attempt to use hill-start assist con-
trol to hold the vehicle on an incline, as doing so may lead to an acci-
dent.
■When the TRC/VSC is activated
The slip indicator light flashes. Always
drive carefully. Reckless driving may
cause an accident. Exercise particular care when the indicator light flashes.
■When the TRC/VSC systems are turned off
Be especially careful and drive at a
speed appropriate to the road condi- tions. As these are the systems to
help ensure vehicle stability and driv-
ing force, do not turn the TRC/VSC systems off unless necessary.
■Replacing tires
Make sure that all tires are of the
specified size, brand, tread pattern
and total load capacity. In addition, make sure that the tires are inflated to
the recommended tire inflation pres-
sure level. The ABS, TRC and VSC systems will
not function correctly if different tires
are installed on the vehicle. Contact any authorized Toyota retailer
or Toyota authorized repairer, or any
reliable repairer for further information when replacing tires or wheels.
■Handling of tires and the suspen-sion
Using tires with any kind of problem
or modifying the suspension will affect the driving assist systems, and may
cause a system to malfunction.
If you make no extreme correction
with the steering or brakes, your vehi-
cle and trailer should stabilize. (P.153)
■Secondary Collision Brake (if equipped)
Do not rely solely upon the Secondary
Collision Brake. This system is designed to help reduce the possibil-
ity of further damage due to a second-
ary collision, however, that effect changes according to various condi-
tions. Overly relying on the system
may result in death or serious injury.
Page 324 of 678
3224-6. Driving tips
Perform the following according to
the driving conditions:
Do not try to forcibly open a win-
dow or move a wiper that is fro-
zen. Pour warm water over the
frozen area to melt the ice. Wipe
away the water immediately to
prevent it from freezing.
To ensure proper operation of
the climate control system fan,
remove any snow that has accu-
mulated on the air inlet vents in
front of the windshield.
Check for and remove any
excess ice or snow that may
have accumulated on the exte-
rior lights, vehicle’s roof, chassis,
around the tires or on the brakes.
Remove any snow or mud from
the bottom of your shoes before
getting in the vehicle.
Accelerate the vehicle slowly, keep
a safe distance between you and
the vehicle ahead, and drive at a
reduced speed suitable to road
conditions.
Park the vehicle and shift the
shift lever to P (Multidrive), or 1
or R (manual transmission) with-
out setting the parking brake.
The parking brake may freeze
up, preventing it from being
released. If the vehicle is parked
without setting the parking brake,
make sure to block the wheels.
Failure to do so may be danger-
ous because it may cause the
vehicle to move unexpectedly,
possibly leading to an accident.
Vehicles with a Multidrive: If the
vehicle is parked without setting
the parking brake, confirm that
the shift lever cannot be moved
out of P*.
*: The shift lever will be locked if it is
attempted to be shifted from P to any
other position without depressing the
brake pedal. If the shift lever can be
shifted from P, there may be a prob-
lem with the shift lock system. Have
the vehicle inspected by any author-
ized Toyota retailer or Toyota author-
ized repairer, or any reliable repairer
or legitimate tire retailers immedi-
ately.
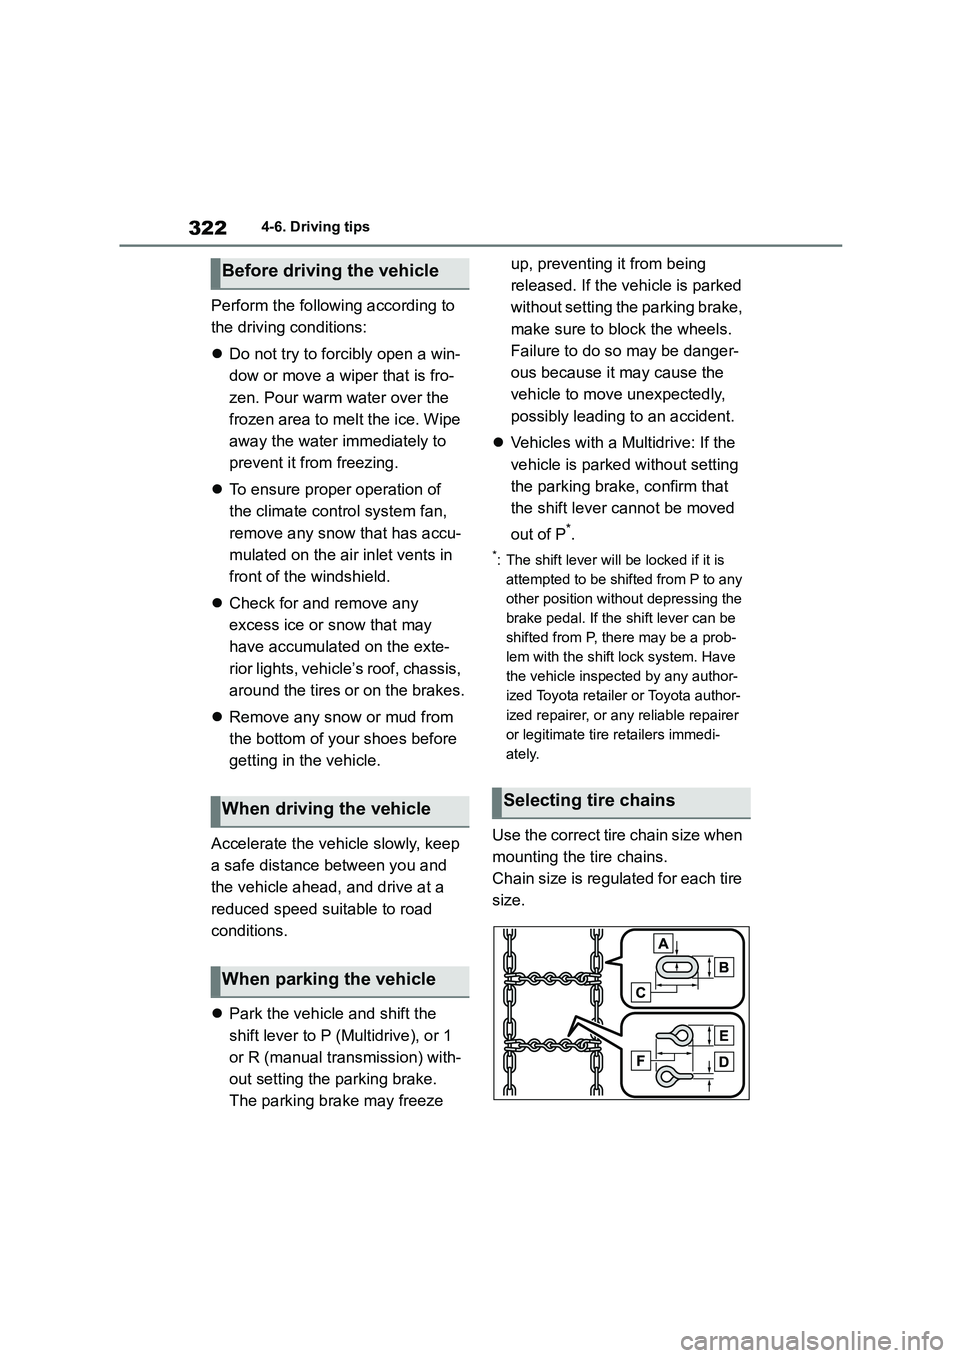
Use the correct tire chain size when
mounting the tire chains.
Chain size is regulated for each tire
size.
Before driving the vehicle
When driving the vehicle
When parking the vehicle
Selecting tire chains
Page 412 of 678
4107-1. Maintenance and care
7-1.Maintenance and care
Working from top to bottom, lib-
erally apply water to the vehicle
body, wheel wells and underside
of the vehicle to remove any dirt
and dust.
Wash the vehicle body using a
sponge or soft cloth, such as a
chamois.
For hard-to-remove marks, use
car wash soap and rinse thor-
oughly with water.
Wipe away any water.
Wax the vehicle when the water-
proof coating deteriorates.
If water does not bead on a clean sur-
face, apply wax when the vehicle body
is cool.
■Automatic car washes
●Fold the mirrors before washing the
vehicle. Start washing from the front of
the vehicle. Make sure to extend the mirrors before driving.
●Brushes used in automatic car washes may scratch the vehicle sur-
face, parts (wheel, etc.) and harm
your vehicle’s paint.
■High pressure car washes
As water may enter the cabin, do not
bring the nozzle tip near the gaps
around the doors or perimeter of the
windows, or spray these areas continu-
ously.
■When using a car wash (vehicles with entry function)
If the door handle becomes wet while
the electronic key is within the effective range, the door may lock and unlock
repeatedly. In that case, follow the fol-
lowing correction procedures to wash the vehicle:
●Place the key in a position 2 m (6 ft.) or more separate from the vehicle
while the vehicle is being washed.
(Take care to ensure that the key is not stolen.)
●Set the electronic key to battery-sav-ing mode to disable the smart entry &
start system. ( P.122)
■Wheels and wheel ornaments
●Remove any dirt immediately by using
a neutral detergent.
●Wash detergent off with water immedi-
ately after use.
●To protect the paint from damage,
make sure to observe the following
precautions. • Do not use acidic, alkaline or abrasive
detergent
• Do not use hard brushes • Do not use detergent on the wheels
when they are hot, such as after driv-
ing or parking in hot weather
■Brake pads and calipers
Rust may form if the vehicle is parked
with wet brake pads or disc rotors, caus-
ing them to stick. Before parking the vehicle after it is washed, drive slowly
and apply the brakes several times to
dry the parts.
■Bumpers
Do not scrub with abrasive cleaners.
■Plated portions
If dirt cannot be removed, clean the
parts as follows:
●Use a soft cloth dampened with an
approximately 5% solution of neutral
detergent and water to clean the dirt
Cleaning and protecting
the vehicle exterior
Perform cleaning in a manner
appropriate to each compo-
nent and its material.
Cleaning instructions
Page 465 of 678
463
8
8-1. Essential information
When trouble arises
turning the engine switch to
ACC.
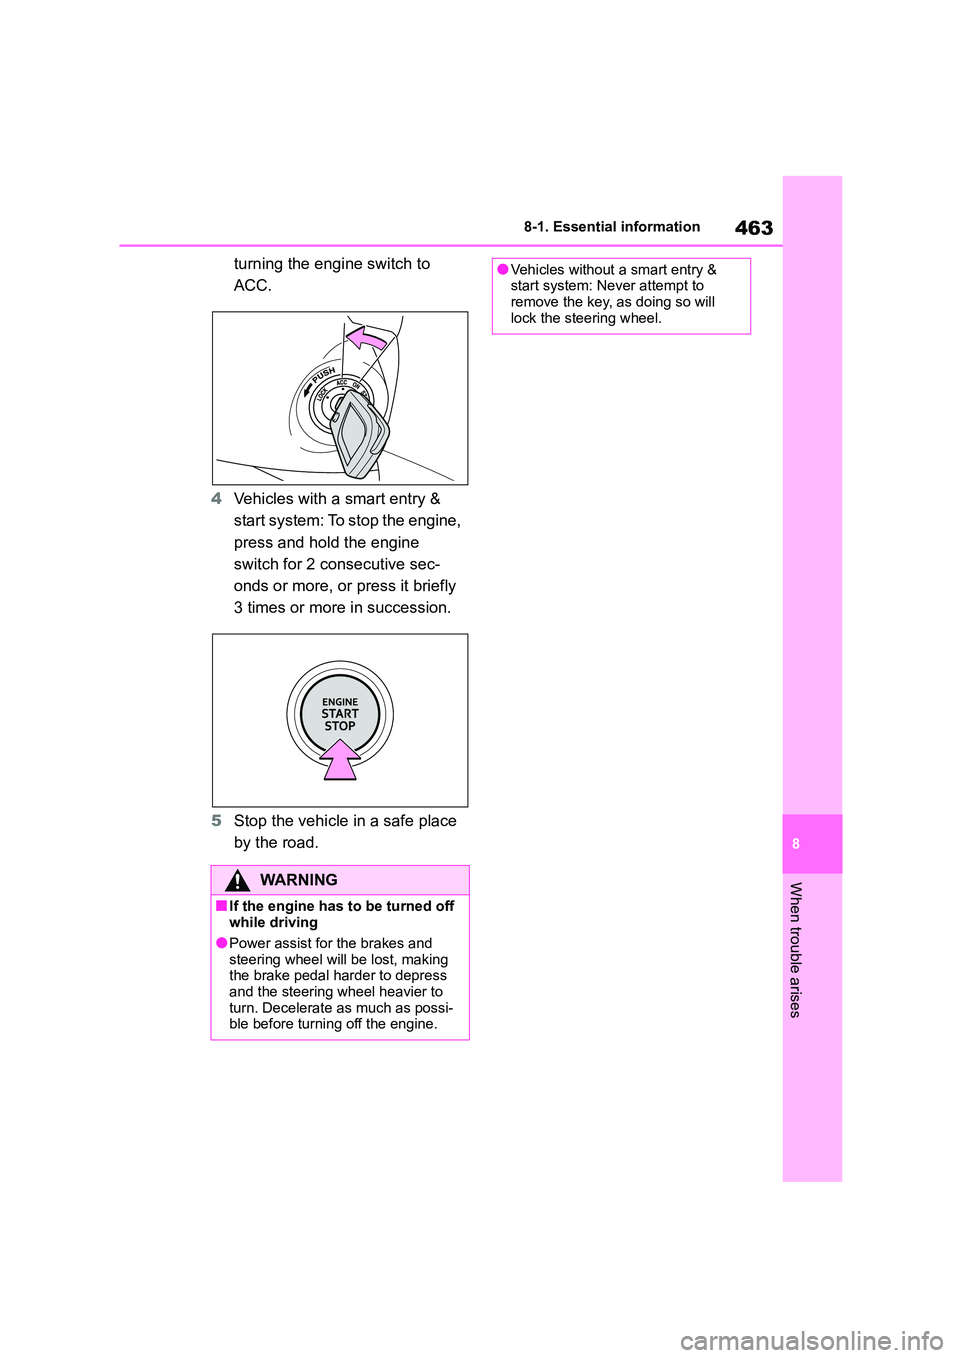
4 Vehicles with a smart entry &
start system: To stop the engine,
press and hold the engine
switch for 2 consecutive sec-
onds or more, or press it briefly
3 times or more in succession.
5 Stop the vehicle in a safe place
by the road.
WA R N I N G
■If the engine has to be turned off while driving
●Power assist for the brakes and
steering wheel will be lost, making the brake pedal harder to depress
and the steering wheel heavier to
turn. Decelerate as much as possi- ble before turning off the engine.
●Vehicles without a smart entry & start system: Never attempt to
remove the key, as doing so will
lock the steering wheel.
Page 469 of 678
467
8
8-2. Steps to take in an emergency
When trouble arises
strapping belts.
If a tow truck is not available in an
emergency, your vehicle may be
temporarily towed using cables or
chains secured to the emergency
towing eyelets. This should only be
attempted on hard surfaced roads
for at most 80 km (50 miles) at
under 30 km/h (18 mph).
A driver must be in the vehicle to
steer and operate the brakes. The
vehicle’s wheels, drive train, axles,
steering and brakes must be in
good condition.
For vehicles with a Multidrive, only
the front towing eyelet may be
used.
To have your vehicle towed by
another vehicle, the towing eyelet
must be installed to your vehicle.
Install the towing eyelet using the
following procedure.
1 Take out the wheel nut wrench
(if equipped) and towing eyelet.
( P.484, 499)
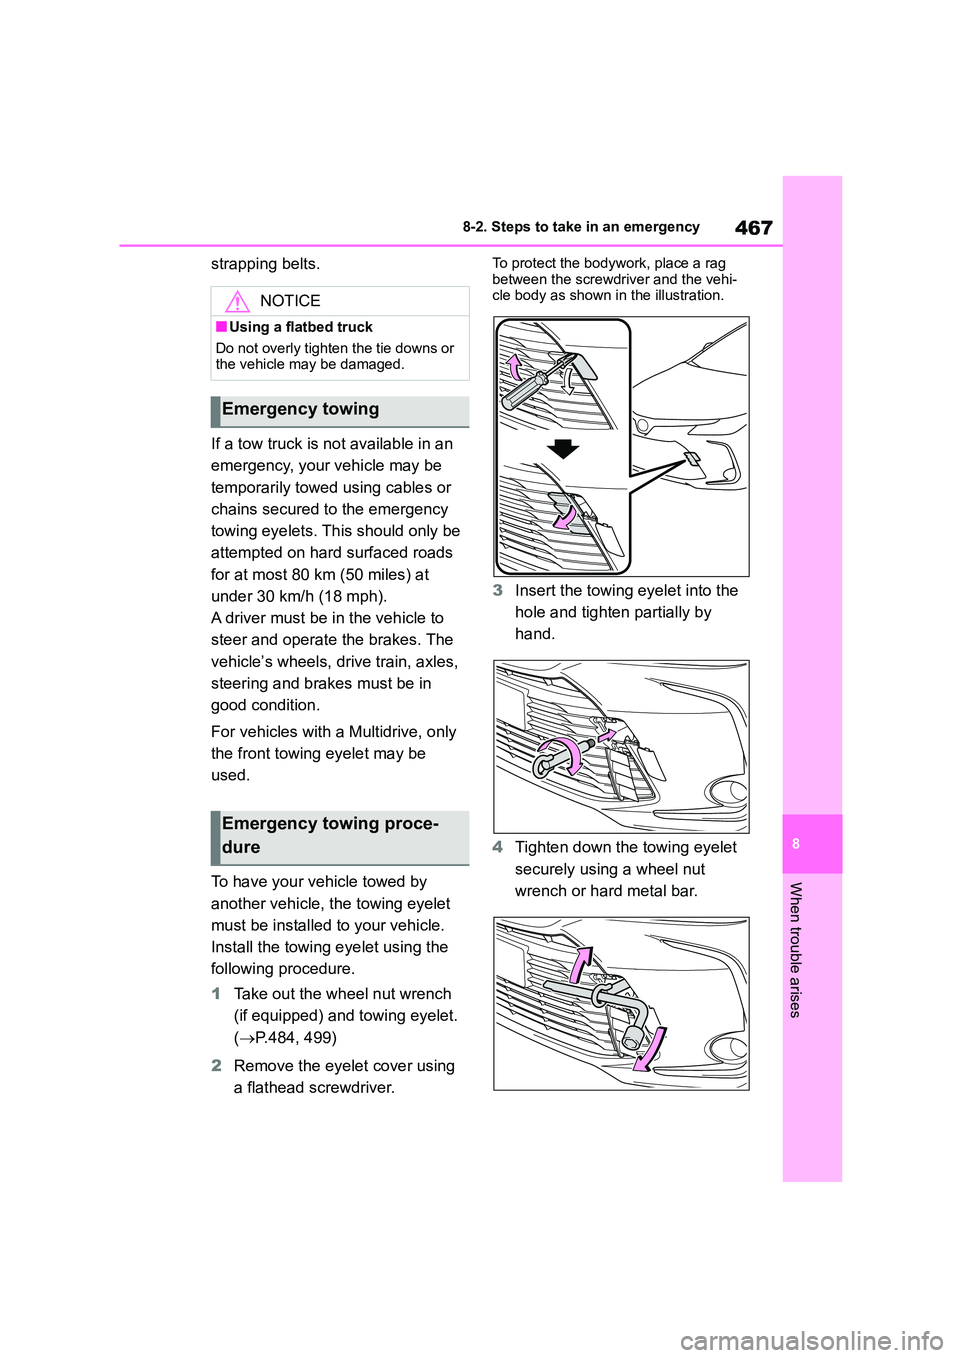
2 Remove the eyelet cover using
a flathead screwdriver.
To protect the bodywork, place a rag
between the screwdriver and the vehi- cle body as shown in the illustration.
3 Insert the towing eyelet into the
hole and tighten partially by
hand.
4 Tighten down the towing eyelet
securely using a wheel nut
wrench or hard metal bar.
NOTICE
■Using a flatbed truck
Do not overly tighten the tie downs or the vehicle may be damaged.
Emergency towing
Emergency towing proce-
dure