2022 TOYOTA COROLLA height
[x] Cancel search: heightPage 35 of 678
33
1
1-1. For safe use
For safety and security
the release button .
■Emergency locking retractor (ELR)
The retractor will lock the belt during a sudden stop or on impact. It may also
lock if you lean forward too quickly. A
slow, easy motion will allow the belt to extend so that you can move around
fully.
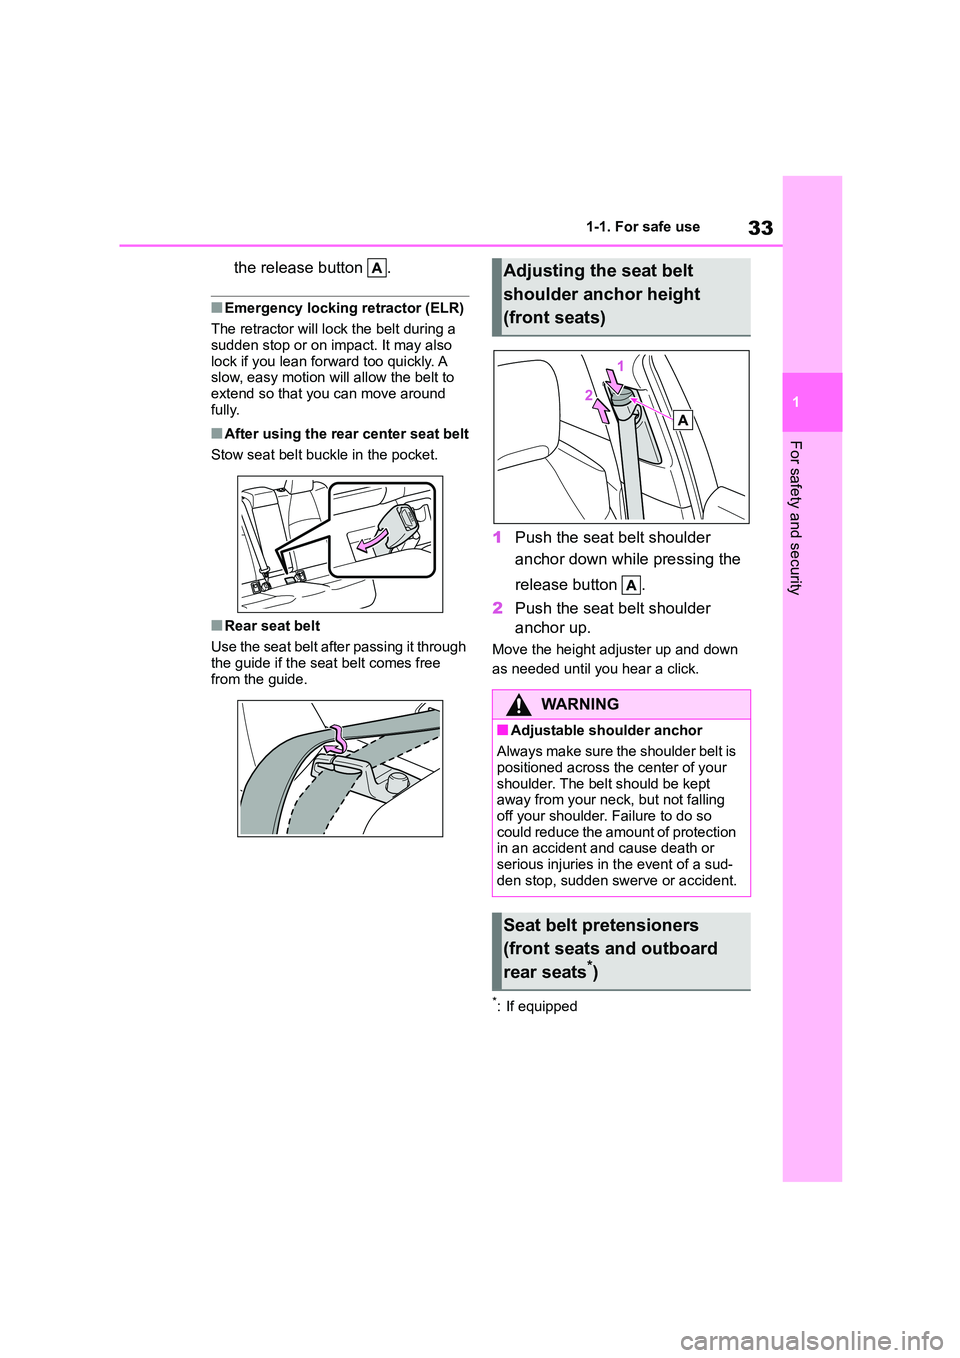
■After using the rear center seat belt
Stow seat belt buckle in the pocket.
■Rear seat belt
Use the seat belt after passing it through the guide if the seat belt comes free
from the guide.
1 Push the seat belt shoulder
anchor down while pressing the
release button .
2 Push the seat belt shoulder
anchor up.
Move the height adjuster up and down
as needed until you hear a click.
*: If equipped
Adjusting the seat belt
shoulder anchor height
(front seats)
WA R N I N G
■Adjustable shoulder anchor
Always make sure the shoulder belt is
positioned across the center of your
shoulder. The belt should be kept away from your neck, but not falling
off your shoulder. Failure to do so
could reduce the amount of protection in an accident and cause death or
serious injuries in the event of a sud-
den stop, sudden sw erve or accident.
Seat belt pretensioners
(front seats and outboard
rear seats*)
Page 51 of 678
49
1
1-2. Child safety
For safety and security
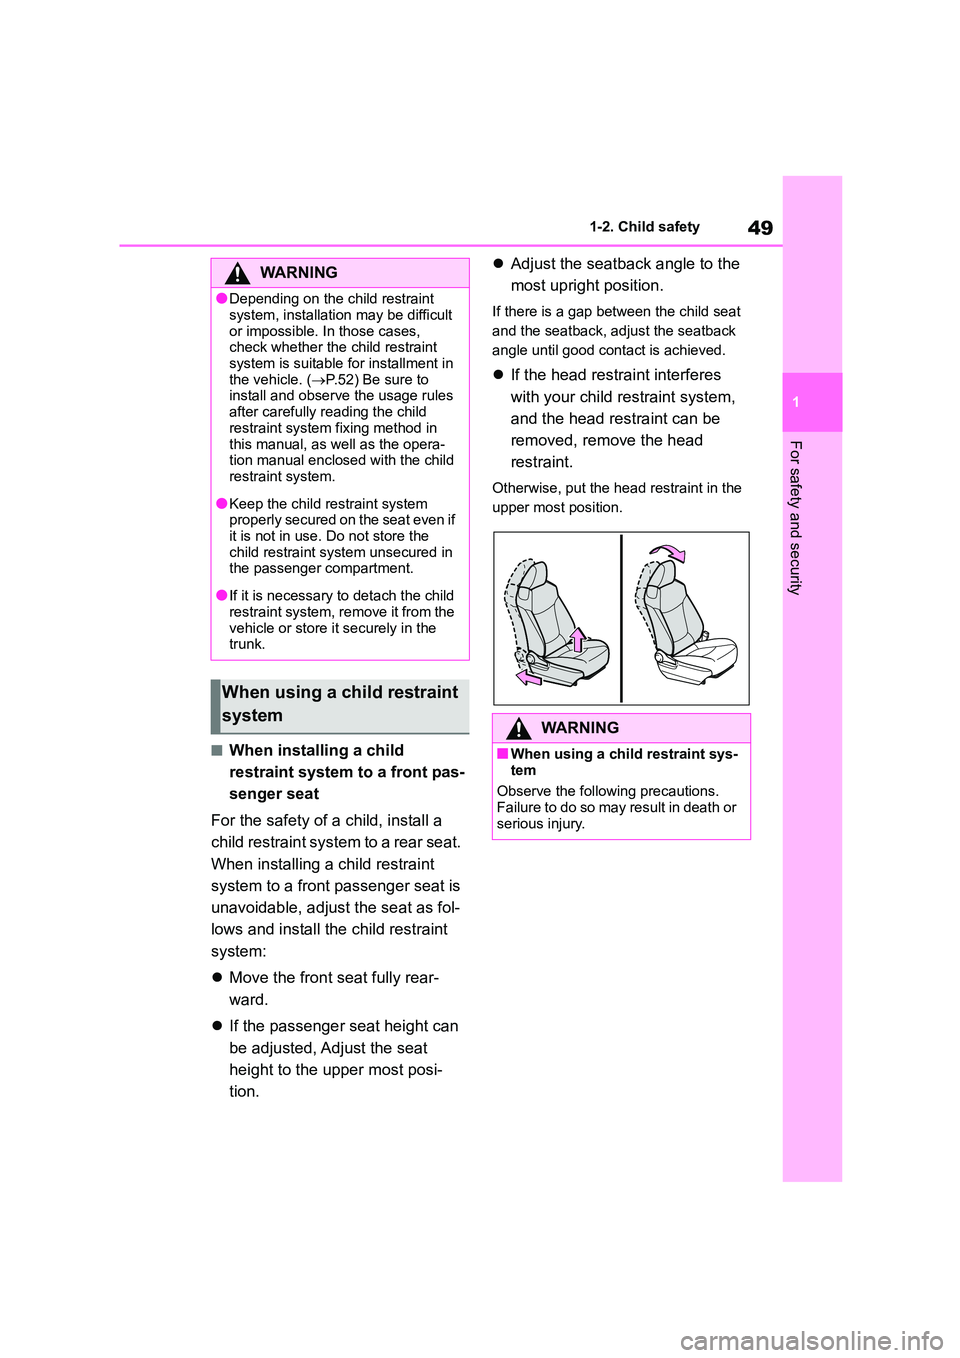
■When installing a child
restraint system to a front pas-
senger seat
For the safety of a child, install a
child restraint system to a rear seat.
When installing a child restraint
system to a front passenger seat is
unavoidable, adjust the seat as fol-
lows and install t he child restraint
system:
Move the front seat fully rear-
ward.
If the passenger seat height can
be adjusted, Adjust the seat
height to the upper most posi-
tion.
Adjust the seatback angle to the
most upright position.
If there is a gap between the child seat
and the seatback, adjust the seatback
angle until good contact is achieved.
If the head restraint interferes
with your child restraint system,
and the head restraint can be
removed, remove the head
restraint.
Otherwise, put the head restraint in the
upper most position.
WA R N I N G
●Depending on the child restraint
system, installation may be difficult
or impossible. In those cases, check whether the child restraint
system is suitable for installment in
the vehicle. ( P.52) Be sure to install and observe the usage rules
after carefully reading the child
restraint system fixing method in
this manual, as well as the opera- tion manual enclosed with the child
restraint system.
●Keep the child re straint system
properly secured on the seat even if
it is not in use. Do not store the child restraint system unsecured in
the passenger compartment.
●If it is necessary to detach the child
restraint system, remove it from the
vehicle or store it securely in the trunk.
When using a child restraint
systemWA R N I N G
■When using a child restraint sys-
tem
Observe the following precautions. Failure to do so may result in death or
serious injury.
Page 55 of 678
53
1
1-2. Child safety
For safety and security
indicated.
UN(ECE) R129 approval mark*3
The height range of the child
who is applicable as well as
available weights for an
UN(ECE) R129 approval mark
is indicated.
2 Checking the category of the
child restraint system.
Check the approval mark of the
child restraint system for which
of the following categories the
child restraint system is suitable.
Also, if there are any uncertain-
ties, check the user’s guide
included with th e child restraint
system or contact the retailer of
the child rest raint system.
• “universal”
• “semi-universal”
• “restricted”
• “vehicle specific”
*1: UN(ECE) R44 and UN(ECE) R129
are U.N. regulations for child
restraint systems.
*2: The child restraint systems men-
tioned in the table may not be availa-
ble outside of the EU area.
*3: The displayed mark may differ
depending on the product.
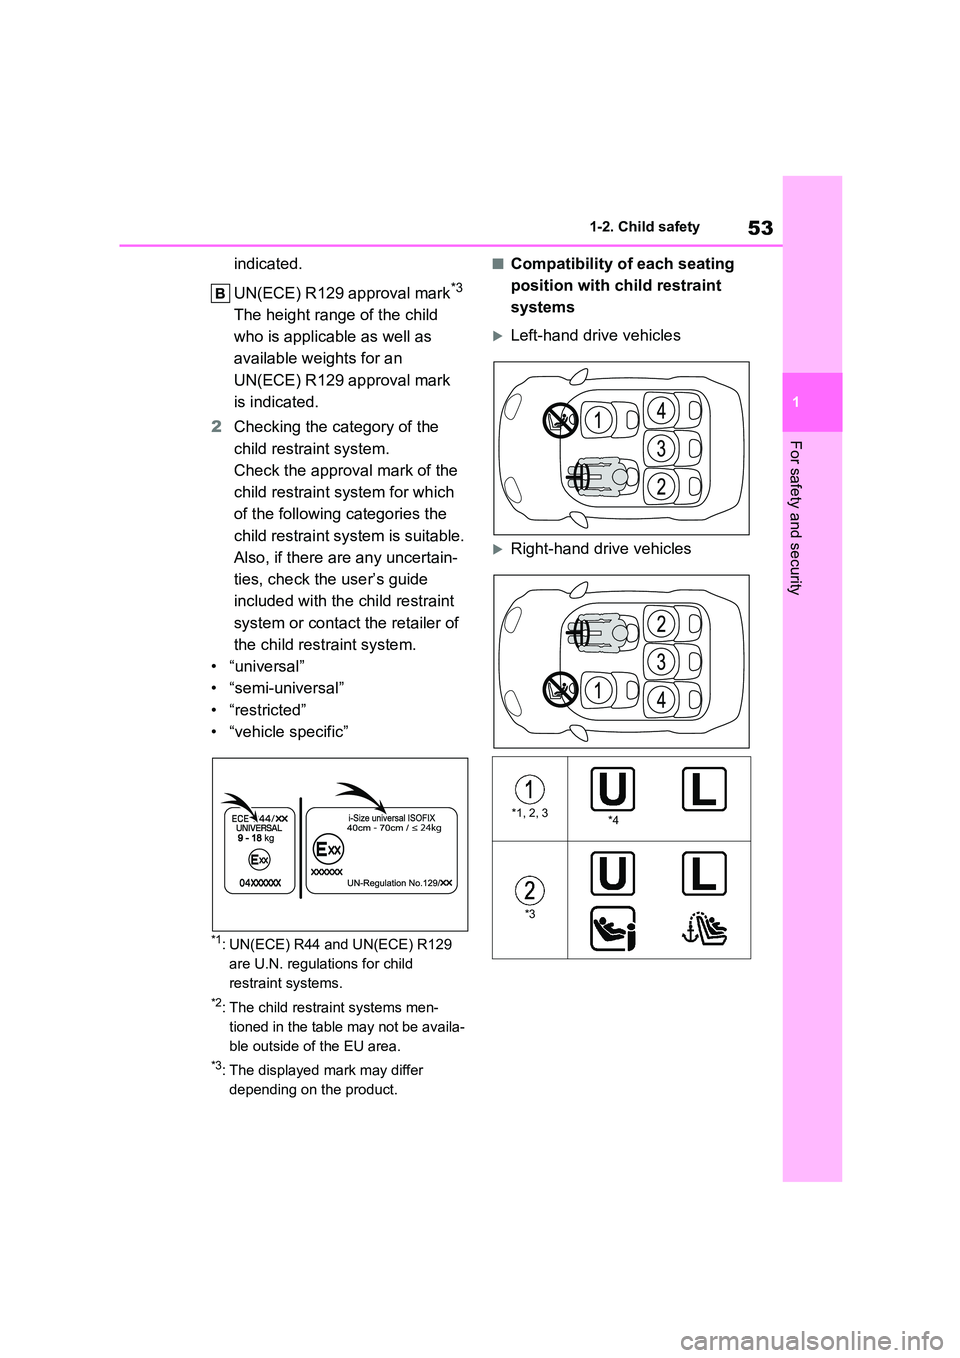
■Compatibility of each seating
position with child restraint
systems
Left-hand drive vehicles
Right-hand drive vehicles
*1, 2, 3*4
*3
Page 56 of 678
541-2. Child safety
*1: Move the front seat fully rearward. If
the passenger seat height can be
adjusted, move it to the upper most
position.
*2: Adjust the seatback angle to the
most upright position. When install-
ing a forward-facing child seat, if
there is a gap between the child seat
and the seatback, adjust the
seatback angle until good contact is
achieved.
*3: If the head restraint interferes with
your child restra int system, and the
head restraint can be removed,
remove the head restraint.
Otherwise, put the head restraint in
the upper most position.
*4: Use only a front-fa cing child restraint
system when the airbag manual
on-off switch is on.
*5: Not suitable for ch ild restraint system
with support leg.
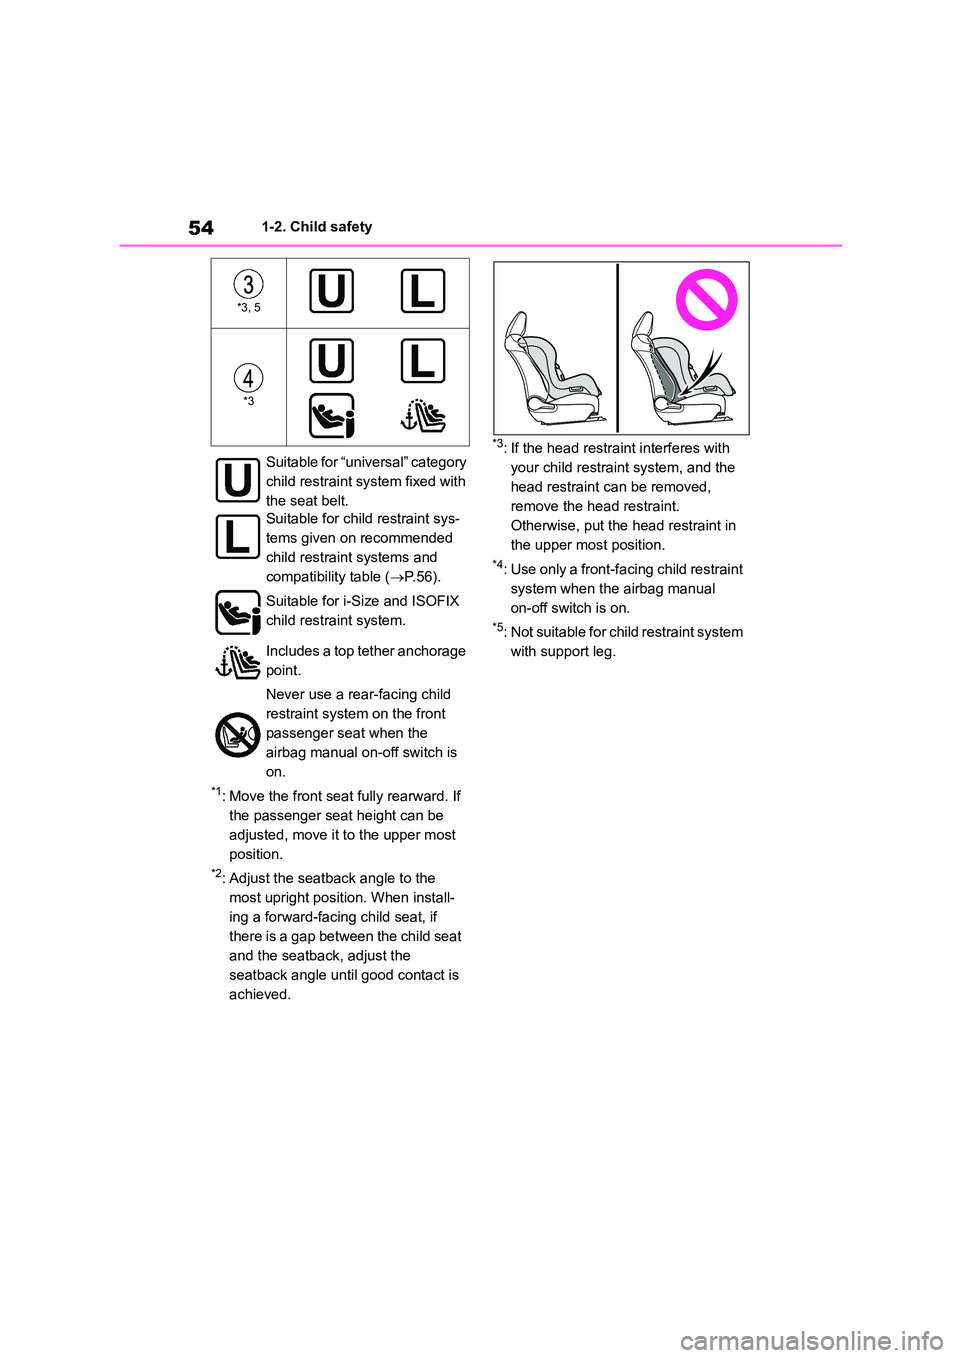
*3, 5
*3
Suitable for “universal” category
child restraint syst em fixed with
the seat belt.
Suitable for child restraint sys-
tems given on recommended
child restraint systems and
compatibility table ( P. 5 6 ) .
Suitable for i-Size and ISOFIX
child restraint system.
Includes a top tether anchorage
point.
Never use a rear-facing child
restraint system on the front
passenger seat when the
airbag manual on-off switch is
on.
Page 57 of 678
55
1
1-2. Child safety
For safety and security
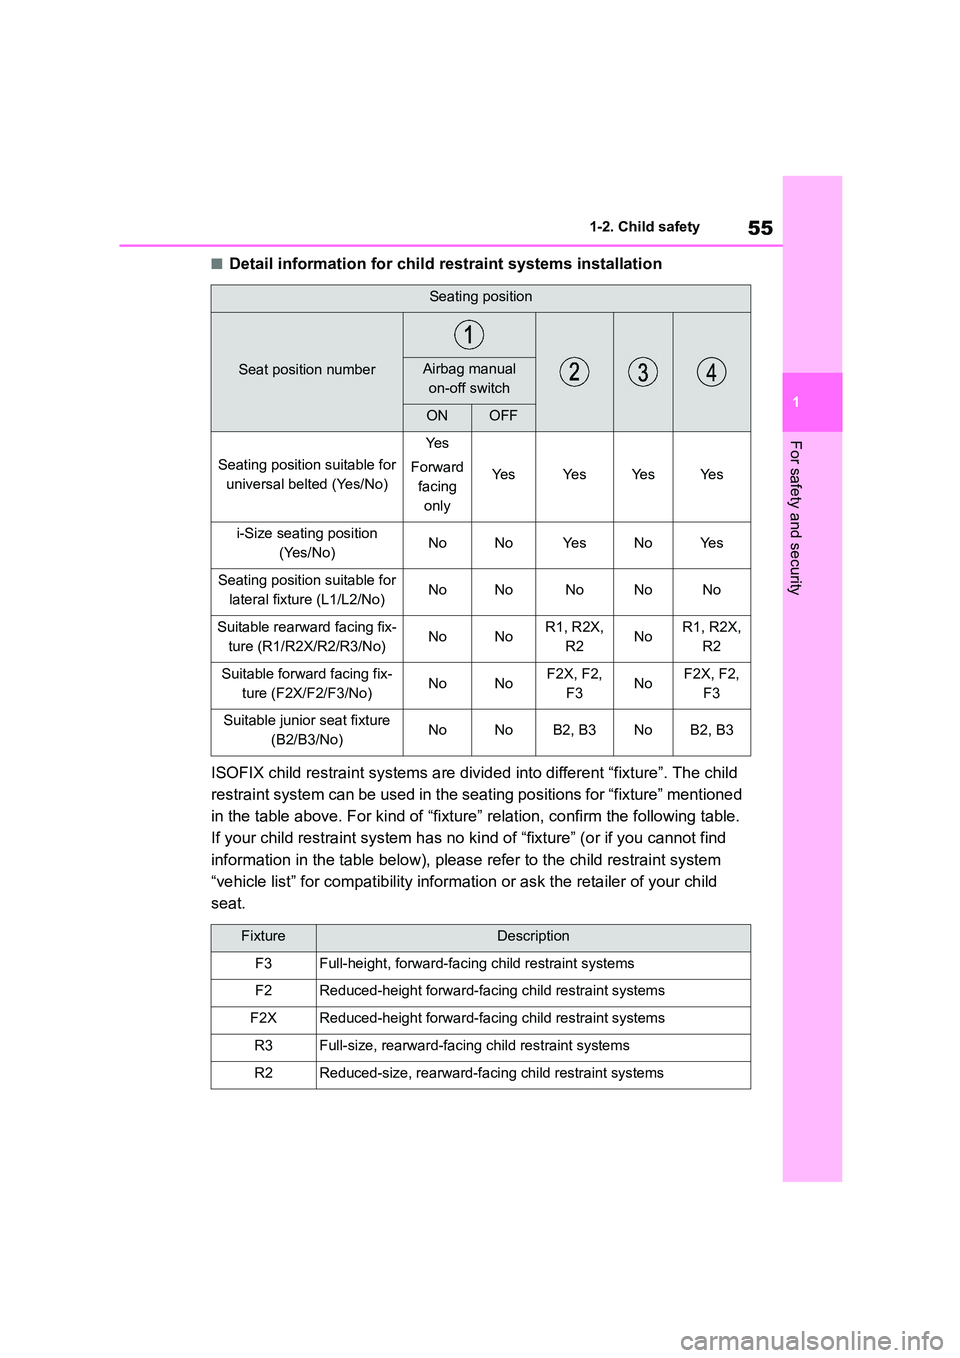
■Detail information for child restraint systems installation
ISOFIX child restraint systems are divid ed into different “fixture”. The child
restraint system can be used in the se ating positions for “fixture” mentioned
in the table above. For kind of “fixtu re” relation, confirm the following table.
If your child restraint system has no ki nd of “fixture” (or if you cannot find
information in the table below), please refer to the child restraint system
“vehicle list” for compatib ility information or ask the retailer of your child
seat.
Seating position
Seat position numberAirbag manual
on-off switch
ONOFF
Seating position suitable for
universal belted (Yes/No)
Ye s
Forward
facing
only
Ye sYe sYe sYe s
i-Size seating position
(Yes/No)NoNoYe sNoYe s
Seating position suitable for
lateral fixture (L1/L2/No)NoNoNoNoNo
Suitable rearward facing fix-
ture (R1/R2X/R2/R3/No)NoNoR1, R2X,
R2NoR1, R2X,
R2
Suitable forward facing fix-
ture (F2X/F2/F3/No)NoNoF2X, F2,
F3NoF2X, F2,
F3
Suitable junior seat fixture
(B2/B3/No)NoNoB2, B3NoB2, B3
FixtureDescription
F3Full-height, forward-faci ng child restraint systems
F2Reduced-height forward-facing child restraint systems
F2XReduced-height forward-facing child restraint systems
R3Full-size, rearward-facing child restraint systems
R2Reduced-size, rearward-facing child restraint systems
Page 128 of 678
1263-3. Adjusting the seats
3-3.Adjusting the seats
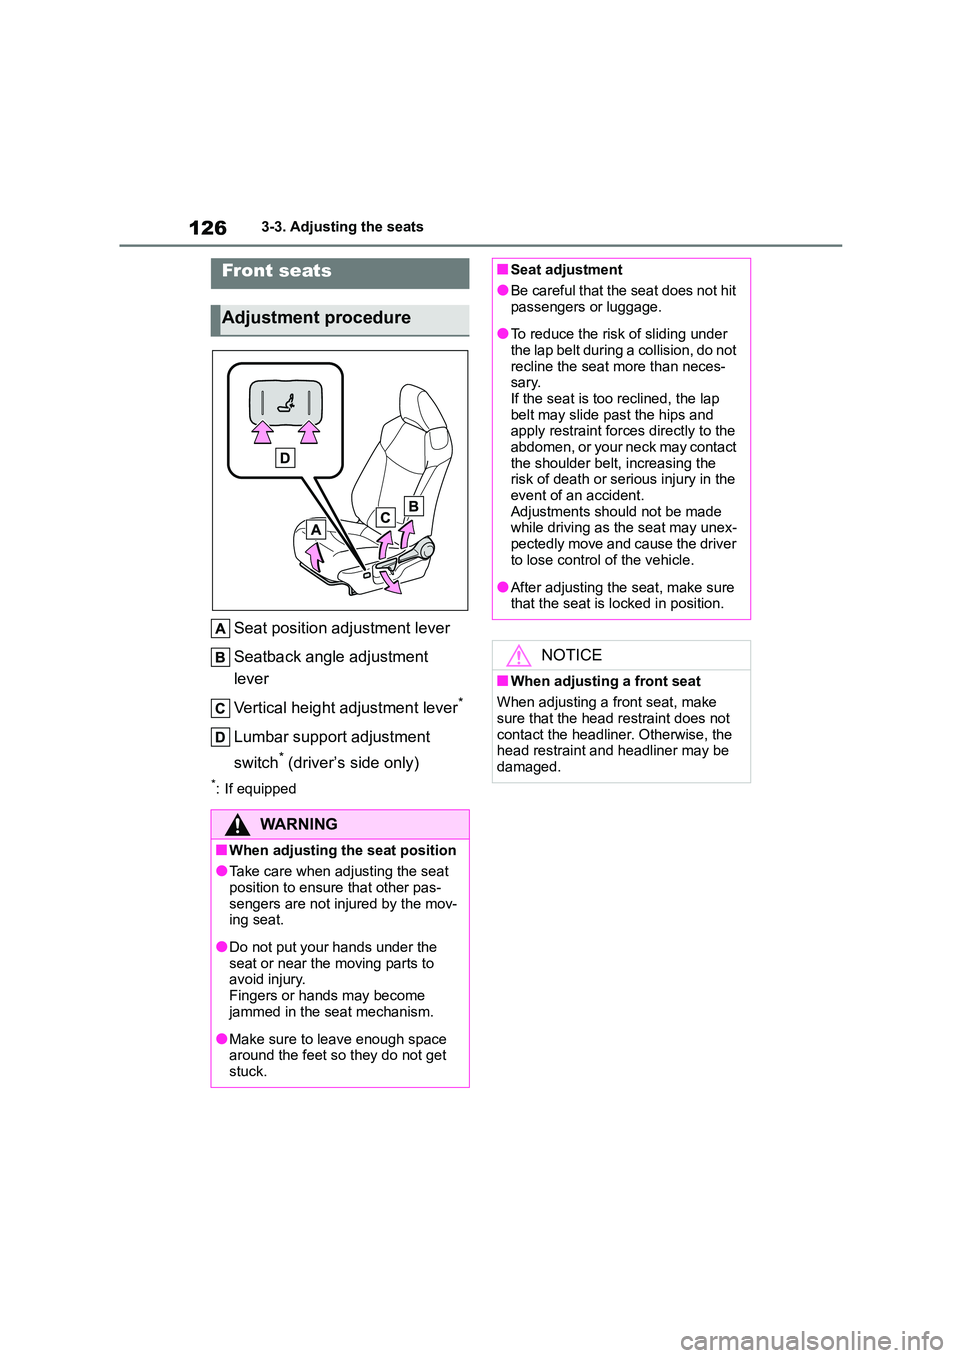
Seat position adjustment lever
Seatback angle adjustment
lever
Vertical height adjustment lever*
Lumbar support adjustment
switch* (driver’s side only)
*: If equipped
Front seats
Adjustment procedure
WA R N I N G
■When adjusting the seat position
●Take care when adjusting the seat position to ensure that other pas-
sengers are not injured by the mov-
ing seat.
●Do not put your hands under the
seat or near the moving parts to avoid injury.
Fingers or hands may become
jammed in the seat mechanism.
●Make sure to leave enough space
around the feet so they do not get
stuck.
■Seat adjustment
●Be careful that the seat does not hit
passengers or luggage.
●To reduce the risk of sliding under
the lap belt during a collision, do not
recline the seat more than neces- sary.
If the seat is too reclined, the lap
belt may slide past the hips and apply restraint forces directly to the
abdomen, or your neck may contact
the shoulder belt, increasing the risk of death or serious injury in the
event of an accident.
Adjustments should not be made while driving as the seat may unex-
pectedly move and cause the driver
to lose control of the vehicle.
●After adjusting the seat, make sure
that the seat is locked in position.
NOTICE
■When adjusting a front seat
When adjusting a front seat, make
sure that the head restraint does not
contact the headliner. Otherwise, the head restraint and headliner may be
damaged.
Page 131 of 678
129
3
3-3. Adjusting the seats
Before driving
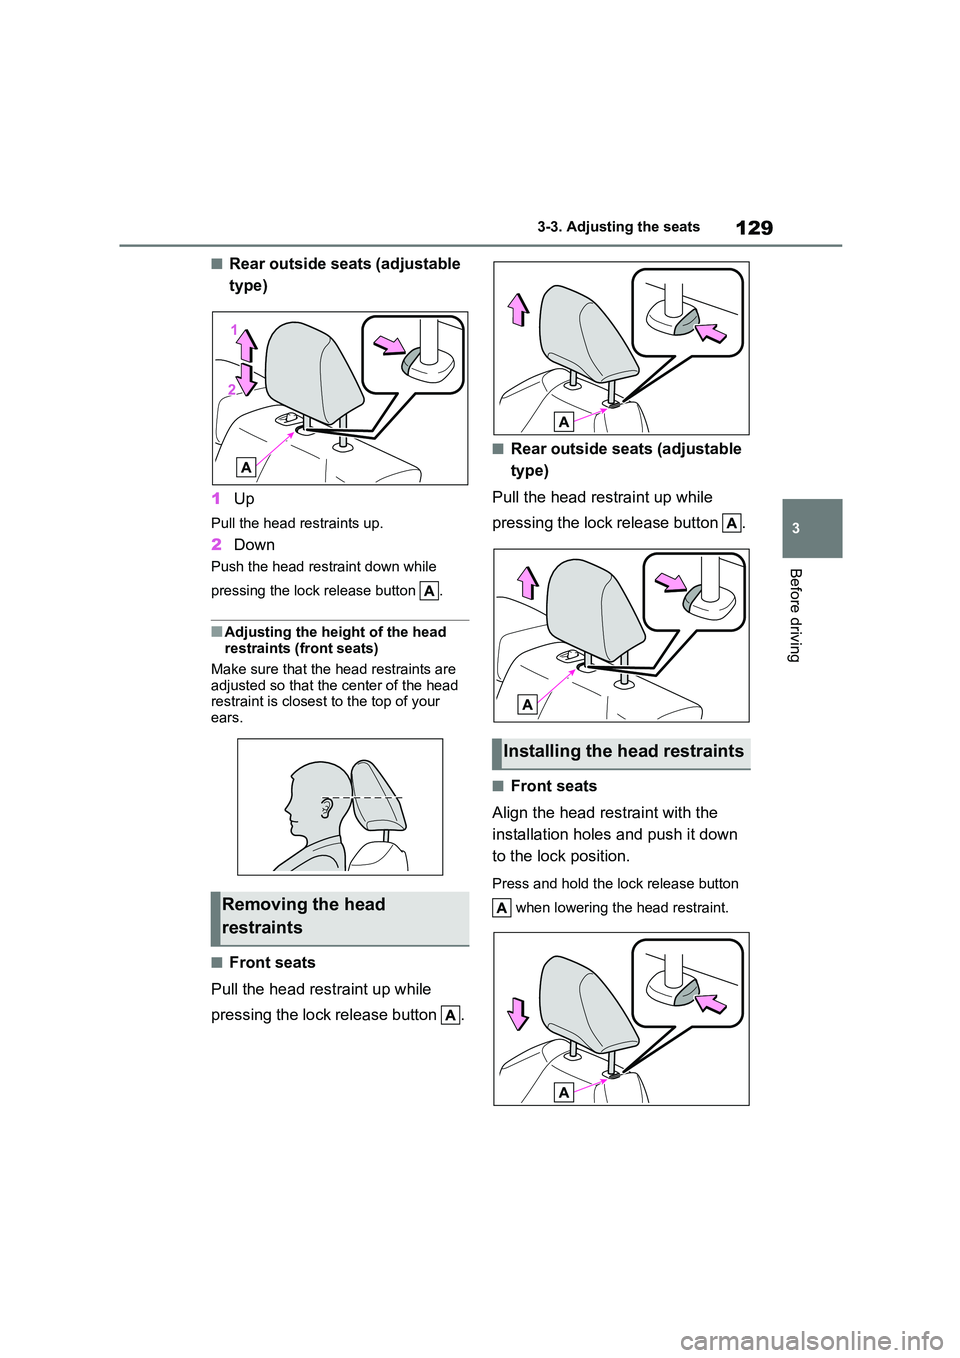
■Rear outside seats (adjustable
type)
1 Up
Pull the head restraints up.
2Down
Push the head restraint down while
pressing the lock release button .
■Adjusting the height of the head
restraints (front seats)
Make sure that the head restraints are
adjusted so that the center of the head
restraint is closest to the top of your ears.
■Front seats
Pull the head restraint up while
pressing the lock release button .
■Rear outside seats (adjustable
type)
Pull the head restraint up while
pressing the lock release button .
■Front seats
Align the head re straint with the
installation holes and push it down
to the lock position.
Press and hold the lock release button
when lowering the head restraint.Removing the head
restraints
Installing the head restraints
Page 134 of 678
1323-4. Adjusting the steering wheel and mirrors
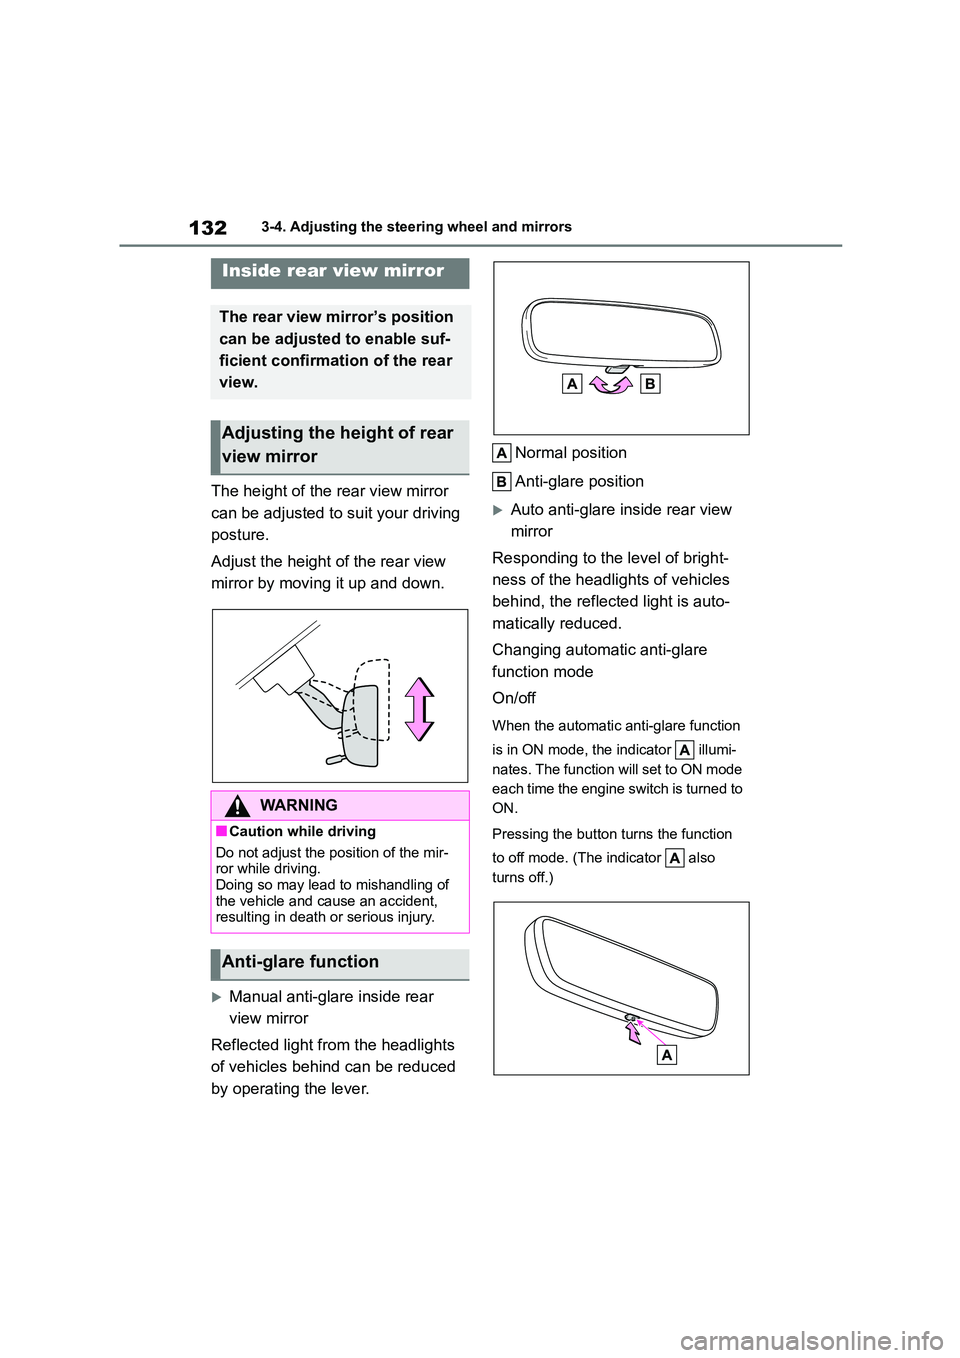
The height of the rear view mirror
can be adjusted to suit your driving
posture.
Adjust the height of the rear view
mirror by moving it up and down.
Manual anti-glare inside rear
view mirror
Reflected light from the headlights
of vehicles behind can be reduced
by operating the lever.
Normal position
Anti-glare position
Auto anti-glare inside rear view
mirror
Responding to the level of bright-
ness of the headlig hts of vehicles
behind, the reflected light is auto-
matically reduced.
Changing automatic anti-glare
function mode
On/off
When the automatic anti-glare function
is in ON mode, the indicator illumi-
nates. The function will set to ON mode
each time the engine switch is turned to
ON.
Pressing the button turns the function
to off mode. (The indicator also
turns off.)
Inside rear view mirror
The rear view mirror’s position
can be adjusted to enable suf-
ficient confirmation of the rear
view.
Adjusting the height of rear
view mirror
WA R N I N G
■Caution while driving
Do not adjust the position of the mir-
ror while driving. Doing so may lead to mishandling of
the vehicle and cause an accident,
resulting in death or serious injury.
Anti-glare function