2022 TOYOTA COROLLA headlights
[x] Cancel search: headlightsPage 222 of 678
2204-5. Using the driving support systems
WA R N I N G
●When tires of a size other than
specified are installed.
●Vehicle is driven in traffic lanes
other than that highways and free-
ways.
●When your vehicle is towing a
trailer or during emergency towing
■Preventing LDA system malfunc-
tions and operations performed
by mistake
●Do not modify the headlights or
place stickers, etc. on the surface of
the lights.
●Do not modify the suspension etc. If
the suspension etc. needs to be replaced, contact any authorized
Toyota retailer or Toyota authorized
repairer, or any reliable repairer.
●Do not install or place anything on
the hood or grille. Also, do not install a grille guard (bull bars, kan-
garoo bar, etc.).
●If your windshield needs repairs,
contact any authorized Toyota
retailer or Toyota authorized repairer, or any reliable repairer.
■Conditions in which functions may not operate properly
In the following situations, the func-
tions may not operate properly and the vehicle may depart from its lane.
Drive safely by always paying careful
attention to your surroundings and operate the steering wheel to correct
the path of the vehicle without relying
solely on the functions.
●Vehicle is being driven around a
sharp curve.
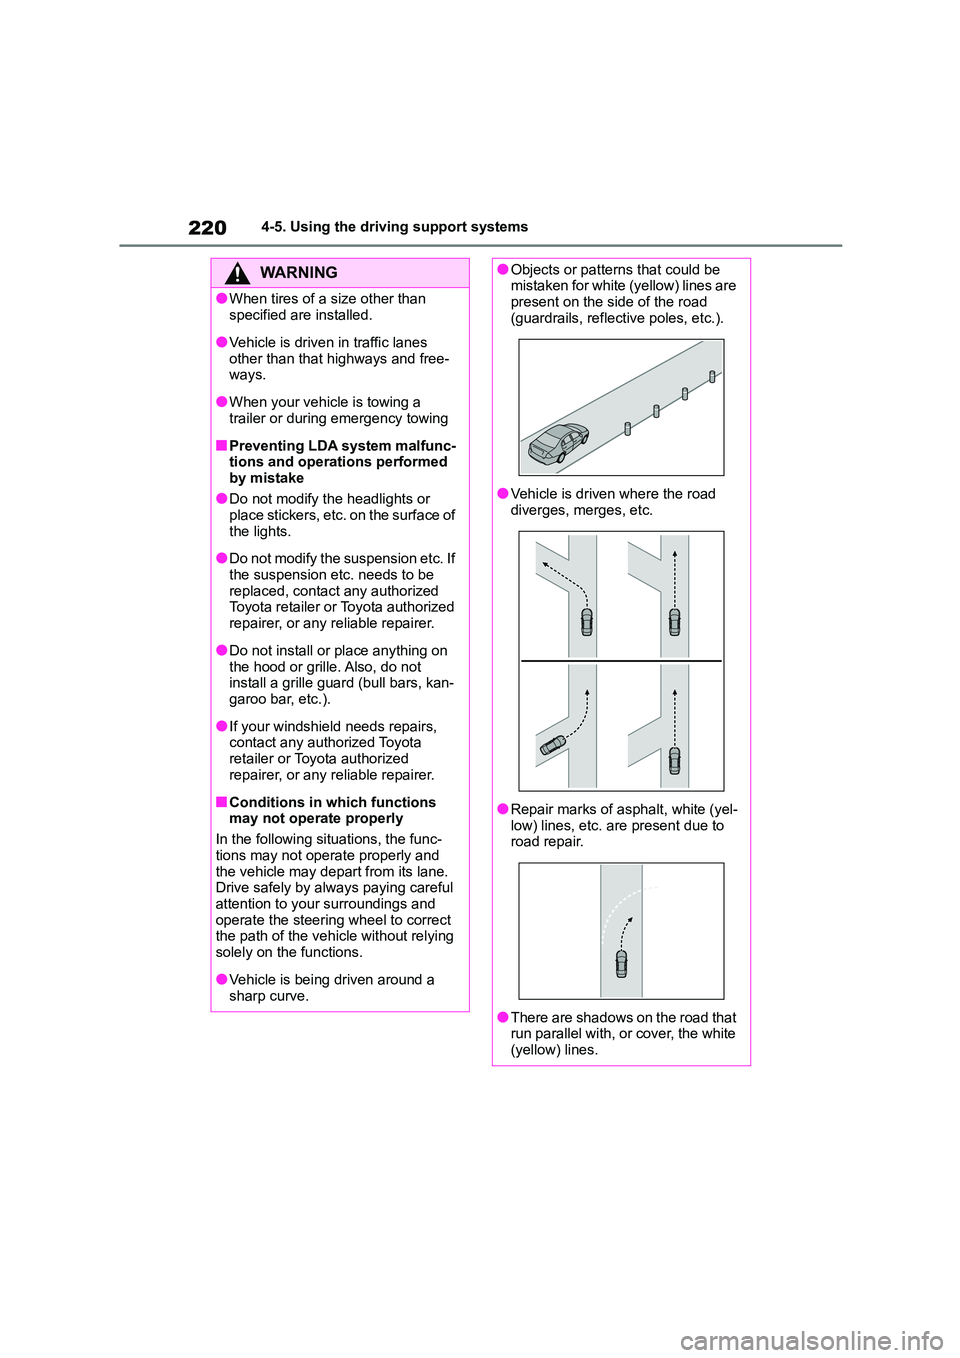
●Objects or patterns that could be mistaken for white (yellow) lines are
present on the side of the road
(guardrails, reflective poles, etc.).
●Vehicle is driven where the road
diverges, merges, etc.
●Repair marks of asphalt, white (yel- low) lines, etc. are present due to
road repair.
●There are shadows on the road that
run parallel with, or cover, the white
(yellow) lines.
Page 223 of 678
221
4
4-5. Using the driving support systems
Driving
■Lane departure alert function
When the system determines that
the vehicle might depart from its
lane or course*, a warning is dis-
played on the multi-information dis-
play, and a warning buzzer will
sound to alert the driver.
When the warning buzzer sounds,
check the area around your vehicle and
carefully operate the steering wheel to
move the vehicle back to the center of
the lane.
Vehicle with BSM: When the system
determines that the vehicle might
depart from its lane and that the possi-
WA R N I N G
●The vehicle is driven in an area
without white (yellow) lines, such as
in front of a tollgate or checkpoint, or at an intersection, etc.
●The white (yellow) lines are cracked, “Raised pavement
marker” or stones are present.
●The white (yellow) lines cannot be seen or are difficult to see due to
sand, etc.
●The vehicle is driven on a road sur-
face that is wet due to rain, pud-
dles, etc.
●The traffic lines are yellow (which
may be more difficult to recognize than lines that are white).
●The white (yellow) lines cross over a curb, etc.
●The vehicle is driven on a bright surface, such as concrete.
●If the edge of the road is not clear or straight.
●The vehicle is driven on a surface that is bright due to reflected light,
etc.
●The vehicle is driven in an area
where the brightness changes sud-
denly, such as at the entrances and exits of tunnels, etc.
●Light from the headlights of an oncoming vehicle, the sun, etc.
enters the camera.
●The vehicle is driven on a slope.
●The vehicle is driven on a road which tilts left or right, or a winding
road.
●The vehicle is driven on an
unpaved or rough road.
●The traffic lane is excessively nar-
row or wide.
●The vehicle is extremely tilted due to carrying heavy luggage or having
improper tire pressure.
●The distance to the preceding vehi-
cle is extremely short.
●The vehicle is moving up and down
a large amount due to road condi-
tions during driving (poor roads or road seams).
●When driving in a tunnel or at night with the headlights off or when a
headlight is dim due to its lens
being dirty or it being misaligned.
●The vehicle is struck by a cross-
wind.
●The vehicle has just changed lanes
or crossed an intersection.
●Tires which differ by structure, man-
ufacturer, brand or tread pattern are used.
●Snow tires, etc. are equipped.
Functions included in LDA
system
Page 331 of 678
329
5
5-2. Using the audio system
Audio system
5-2.Using the audio system
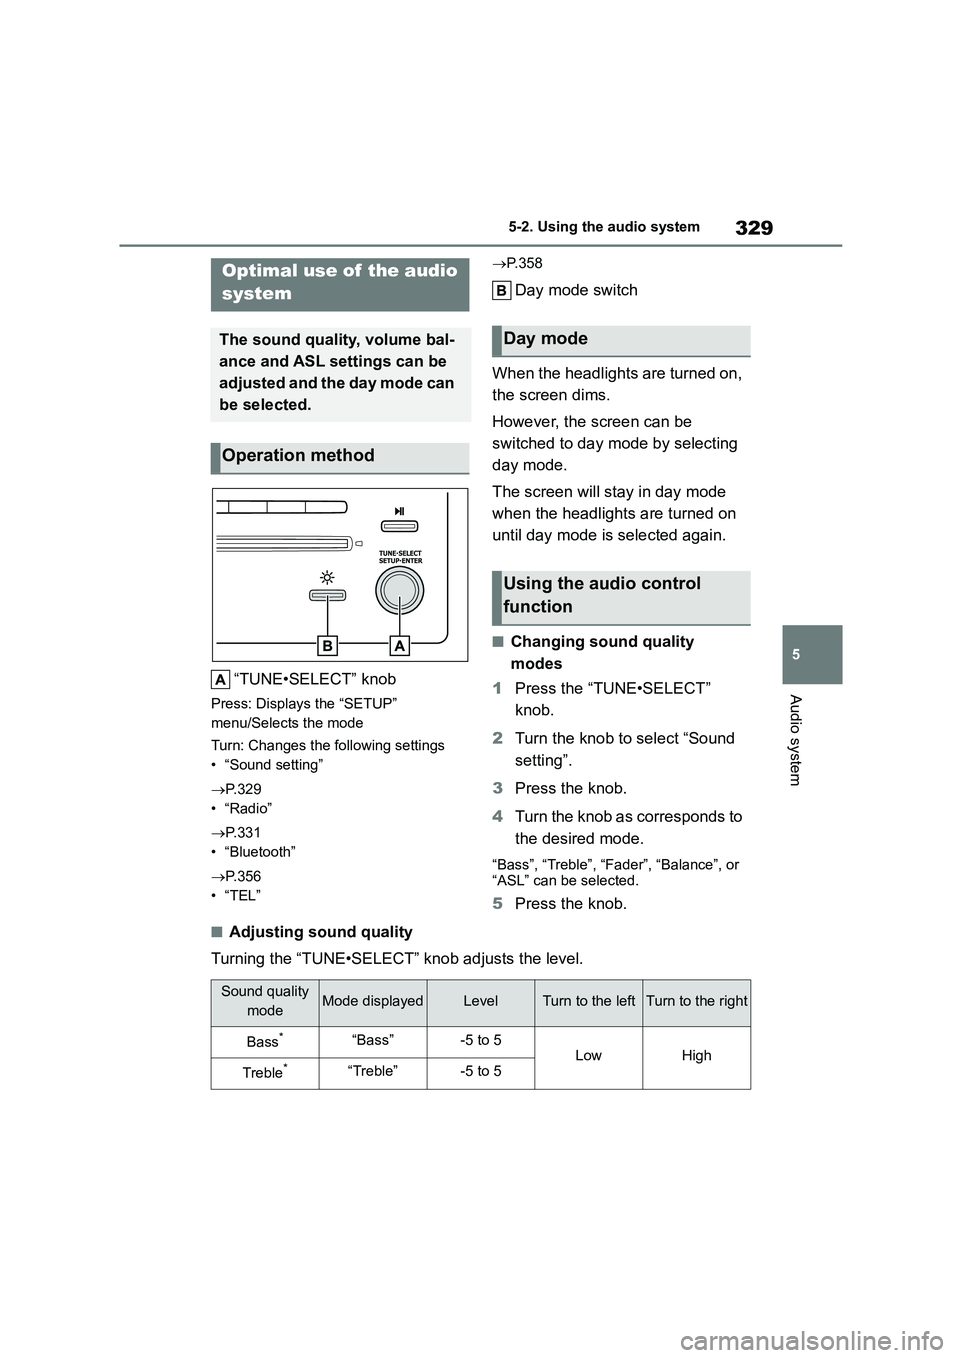
“TUNE•SELECT” knob
Press: Displays the “SETUP”
menu/Selects the mode
Turn: Changes the following settings
• “Sound setting”
P.329
•“Radio”
P.331
• “Bluetooth”
P.356
•“TEL”
P. 3 5 8
Day mode switch
When the headlights are turned on,
the screen dims.
However, the screen can be
switched to day mode by selecting
day mode.
The screen will stay in day mode
when the headlights are turned on
until day mode is selected again.
■Changing sound quality
modes
1 Press the “TUNE•SELECT”
knob.
2 Turn the knob to select “Sound
setting”.
3 Press the knob.
4 Turn the knob as corresponds to
the desired mode.
“Bass”, “Treble”, “Fader”, “Balance”, or
“ASL” can be selected.
5 Press the knob.
■Adjusting sound quality
Turning the “TUNE•SELECT” knob adjusts the level.
Optimal use of the audio
system
The sound quality, volume bal-
ance and ASL settings can be
adjusted and the day mode can
be selected.
Operation method
Day mode
Using the audio control
function
Sound quality
modeMode displayedLevelTurn to the leftTurn to the right
Bass*“Bass”-5 to 5LowHigh
Treble*“Treble”-5 to 5
Page 457 of 678
455
7
7-3. Do-it-yourself maintenance
Maintenance and care
Check the wattage of the light bulb
to be replaced. ( P.535)
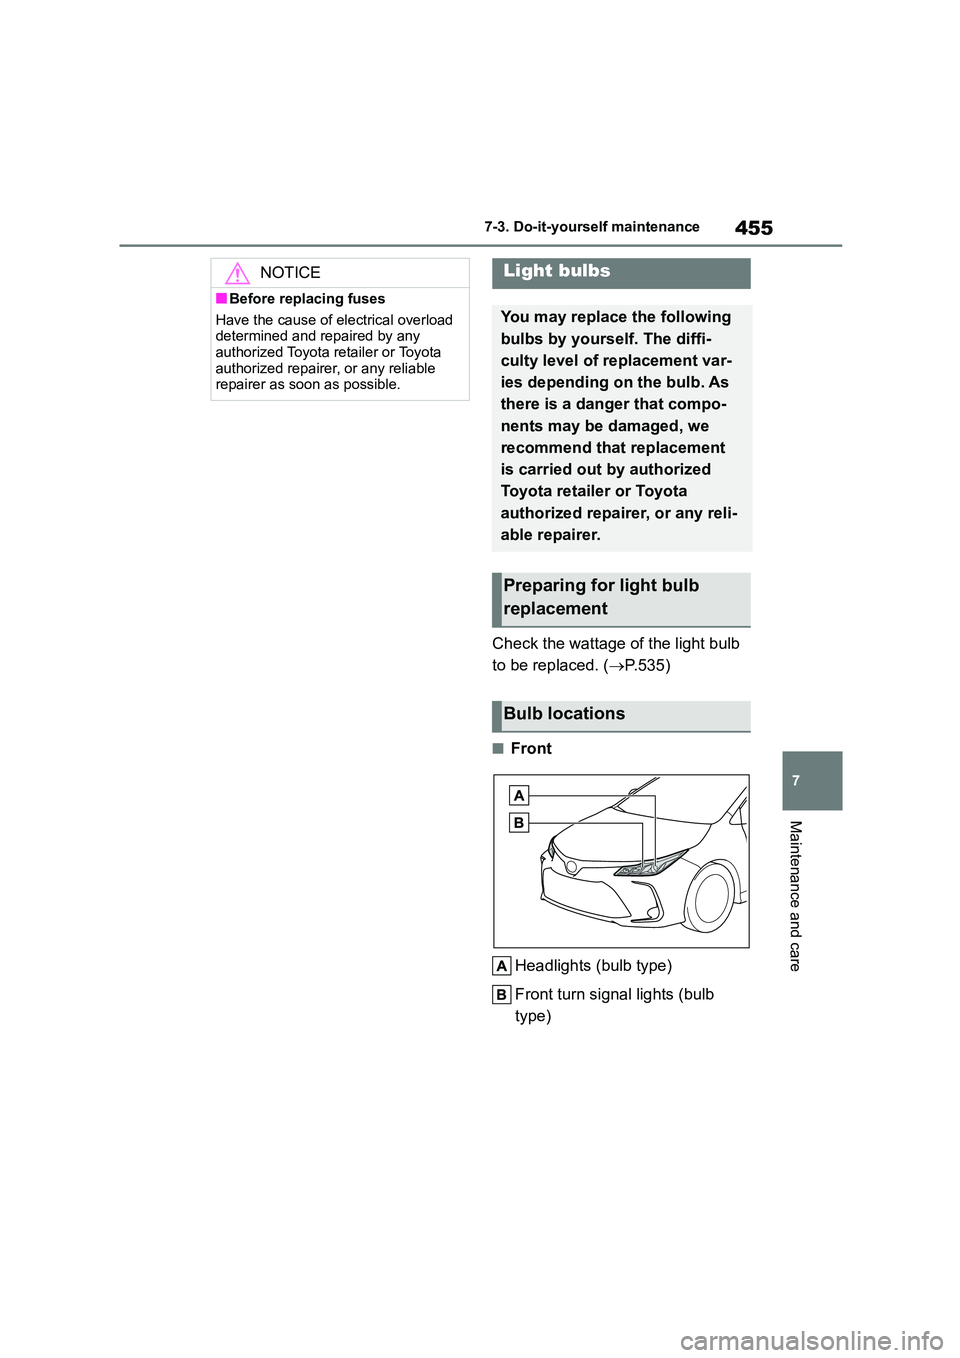
■Front
Headlights (bulb type)
Front turn signal lights (bulb
type)
NOTICE
■Before replacing fuses
Have the cause of electrical overload
determined and repaired by any authorized Toyota retailer or Toyota
authorized repairer, or any reliable
repairer as soon as possible.
Light bulbs
You may replace the following
bulbs by yourself. The diffi-
culty level of replacement var-
ies depending on the bulb. As
there is a danger that compo-
nents may be damaged, we
recommend that replacement
is carried out by authorized
Toyota retailer or Toyota
authorized repairer, or any reli-
able repairer.
Preparing for light bulb
replacement
Bulb locations
Page 458 of 678
4567-3. Do-it-yourself maintenance
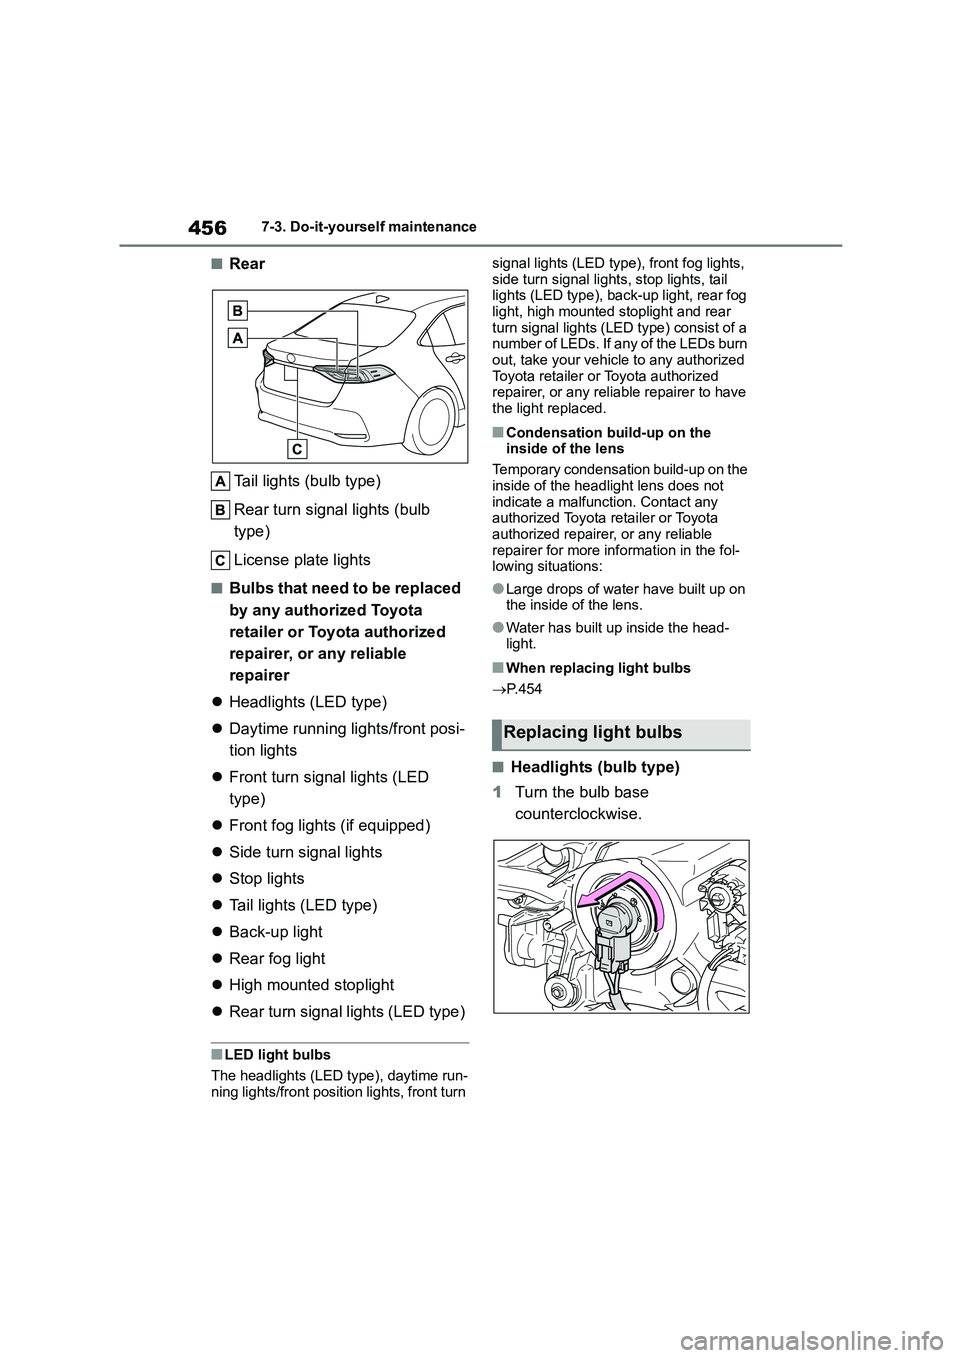
■Rear
Tail lights (bulb type)
Rear turn signal lights (bulb
type)
License plate lights
■Bulbs that need to be replaced
by any authorized Toyota
retailer or Toyota authorized
repairer, or any reliable
repairer
Headlights (LED type)
Daytime running lights/front posi-
tion lights
Front turn signal lights (LED
type)
Front fog lights (if equipped)
Side turn signal lights
Stop lights
Tail lights (LED type)
Back-up light
Rear fog light
High mounted stoplight
Rear turn signal lights (LED type)
■LED light bulbs
The headlights (LED type), daytime run- ning lights/front position lights, front turn
signal lights (LED type), front fog lights,
side turn signal lights, stop lights, tail lights (LED type), back-up light, rear fog
light, high mounted stoplight and rear
turn signal lights (LED type) consist of a number of LEDs. If any of the LEDs burn
out, take your vehicle to any authorized
Toyota retailer or Toyota authorized repairer, or any reliable repairer to have
the light replaced.
■Condensation build-up on the
inside of the lens
Temporary condensation build-up on the
inside of the headlight lens does not
indicate a malfunction. Contact any authorized Toyota retailer or Toyota
authorized repairer, or any reliable
repairer for more information in the fol- lowing situations:
●Large drops of water have built up on the inside of the lens.
●Water has built up inside the head-light.
■When replacing light bulbs
P. 4 5 4
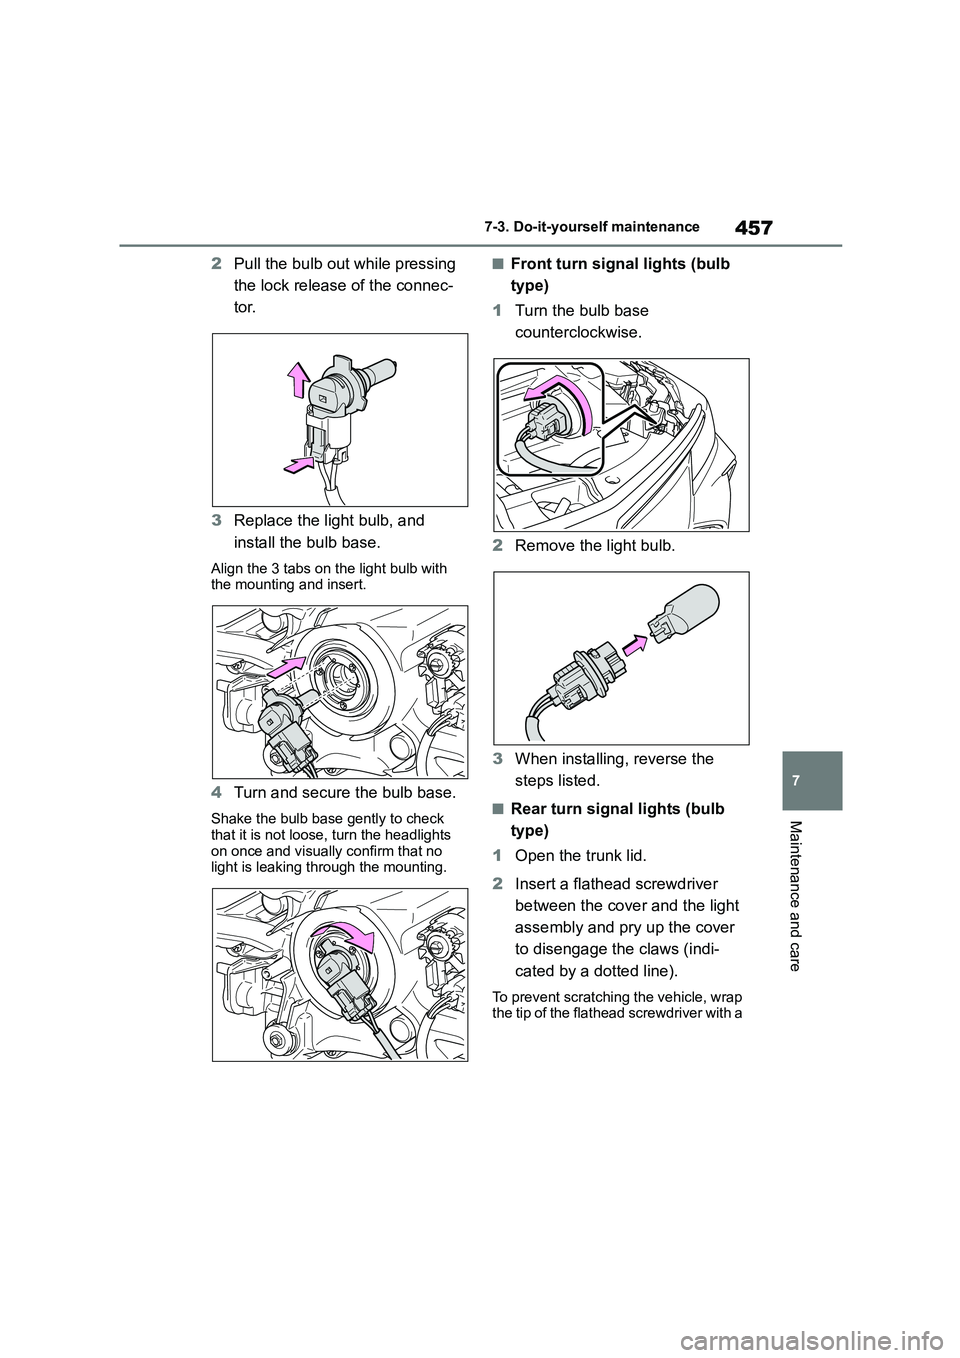
■Headlights (bulb type)
1 Turn the bulb base
counterclockwise.
Replacing light bulbs
Page 459 of 678
457
7
7-3. Do-it-yourself maintenance
Maintenance and care
2 Pull the bulb out while pressing
the lock release of the connec-
tor.
3 Replace the light bulb, and
install the bulb base.
Align the 3 tabs on the light bulb with the mounting and insert.
4 Turn and secure the bulb base.
Shake the bulb base gently to check that it is not loose, turn the headlights
on once and visually confirm that no
light is leaking through the mounting.
■Front turn signal lights (bulb
type)
1 Turn the bulb base
counterclockwise.
2 Remove the light bulb.
3 When installing, reverse the
steps listed.
■Rear turn signal lights (bulb
type)
1 Open the trunk lid.
2 Insert a flathead screwdriver
between the cover and the light
assembly and pry up the cover
to disengage the claws (indi-
cated by a dotted line).
To prevent scratching the vehicle, wrap
the tip of the flathead screwdriver with a
Page 511 of 678
509
8
8-2. Steps to take in an emergency
When trouble arises
One of the following may be the
cause of the problem:
There may not be sufficient fuel
in the vehicle’s tank. Refuel the
vehicle.
The engine may be flooded. Try
to restart the engine again fol-
lowing correct starting proce-
dures. ( P.159, 160)
There may be a malfunction in
the engine immobilizer system.
( P. 7 4 )
One of the following may be the
cause of the problem:
The battery may be discharged.
( P.513)
The battery terminal connec-
NOTICE
■Be careful when driving over
bumps with the compact spare
tire installed on the vehicle.
The vehicle becomes lower when
driving with the compact spare tire
compared to when driving with stand- ard tires. Be careful when driving over
uneven road surfaces.
■Driving with tire chains and the compact spare tire
Do not fit tire chains to the compact
spare tire. Tire chains may damage the vehicle body and adversely affect
driving performance.
■When replacing the tires
When removing or fitting the wheels,
tires or the tire pressure warning valve and transmitter, contact any
authorized Toyota retailer or Toyota
authorized repairer, or any reliable repairer as the tire pressure warning
valve and transmitter may be dam-
aged if not handled correctly.
■To avoid damage to the tire pres-
sure warning valves and trans- mitters
When a tire is repaired with liquid
sealants, the tire pressure warning valve and transmitter may not operate
properly. If a liquid sealant is used,
contact any authorized Toyota retailer or Toyota authorized repairer, or any
reliable repairer or other qualified ser-
vice shop as soon as possible. Make sure to replace the tire pressure warn-
ing valve and transmitter when
replacing the tire. ( P.441)
If the engine will not
star t
If the engine will not start even
though correct starting proce-
dures are being followed
( P.159, 160), consider each of
the following points:
The engine will not start
even though the starter
motor operates normally.
The starter motor turns over
slowly, the interior lights
and headlights are dim, or
the horn does not sound or
sounds at a low volume.
Page 512 of 678
5108-2. Steps to take in an emergency
tions may be loose or corroded.
( P.427)
The engine starting system may be
malfunctioning due to an electrical
problem such as electronic key bat-
tery depletion or a blown fuse.
However, an interim measure is
available to start the engine.
( P.510)
One of the following may be the
cause of the problem:
The battery may be discharged.
( P.513)
One or both of the battery termi-
nals may be disconnected.
( P.427)
There may be a malfunction in
the steering lock system.
Contact any authorized Toyota retailer
or Toyota authorized repairer, or any
reliable repairer if the problem cannot
be repaired, or if repair procedures are
unknown.
When the engine does not start, the
following steps can be used as an
interim measure to start the engine
if the engine switch is functioning
normally.
Do not use this starting procedure
except in case of emergency.
1 Set the parking brake. (P.172,
173)
2 Check that the shift lever is in P
(Multidrive) or N (manual trans-
mission).
3 Turn the engine switch to ACC.
4 Press and hold the engine
switch for about 15 seconds
while depressing the brake
pedal (Multidrive) or clutch
pedal (manual transmission)
firmly.
Even if the engine can be started using
the above steps, the system may be
malfunctioning. Have the vehicle
inspected by any authorized Toyota
retailer or Toyota authorized repairer, or
any reliable repairer.
The starter motor does not
turn over (vehicles with a
smart entry & start system)
The starter motor does not
turn over, the interior lights
and headlights do not turn
on, or the horn does not
sound.
Emergency start function
(vehicles with a smart entry
& start system)