Page 452 of 678
4507-3. Do-it-yourself maintenance
nal facing up.
4 Install the battery cover with the
tab facing up.
Push the entire edge of the battery
cover into the key.
5 Install the key cover.
Align the key cover with the key and
then press it straight into the key.
Make sure that the key cover is securely installed without any gaps
between it and the key.
6 Operate the or switch
and check that the doors can be
locked/unlocked.
Vehicles with a smart entry &
start system
1 Release the lock and remove
the mechanical key.
2 Remove the key cover.
To prevent damage to the key, cover
the tip of the flathead screwdriver with a rag.
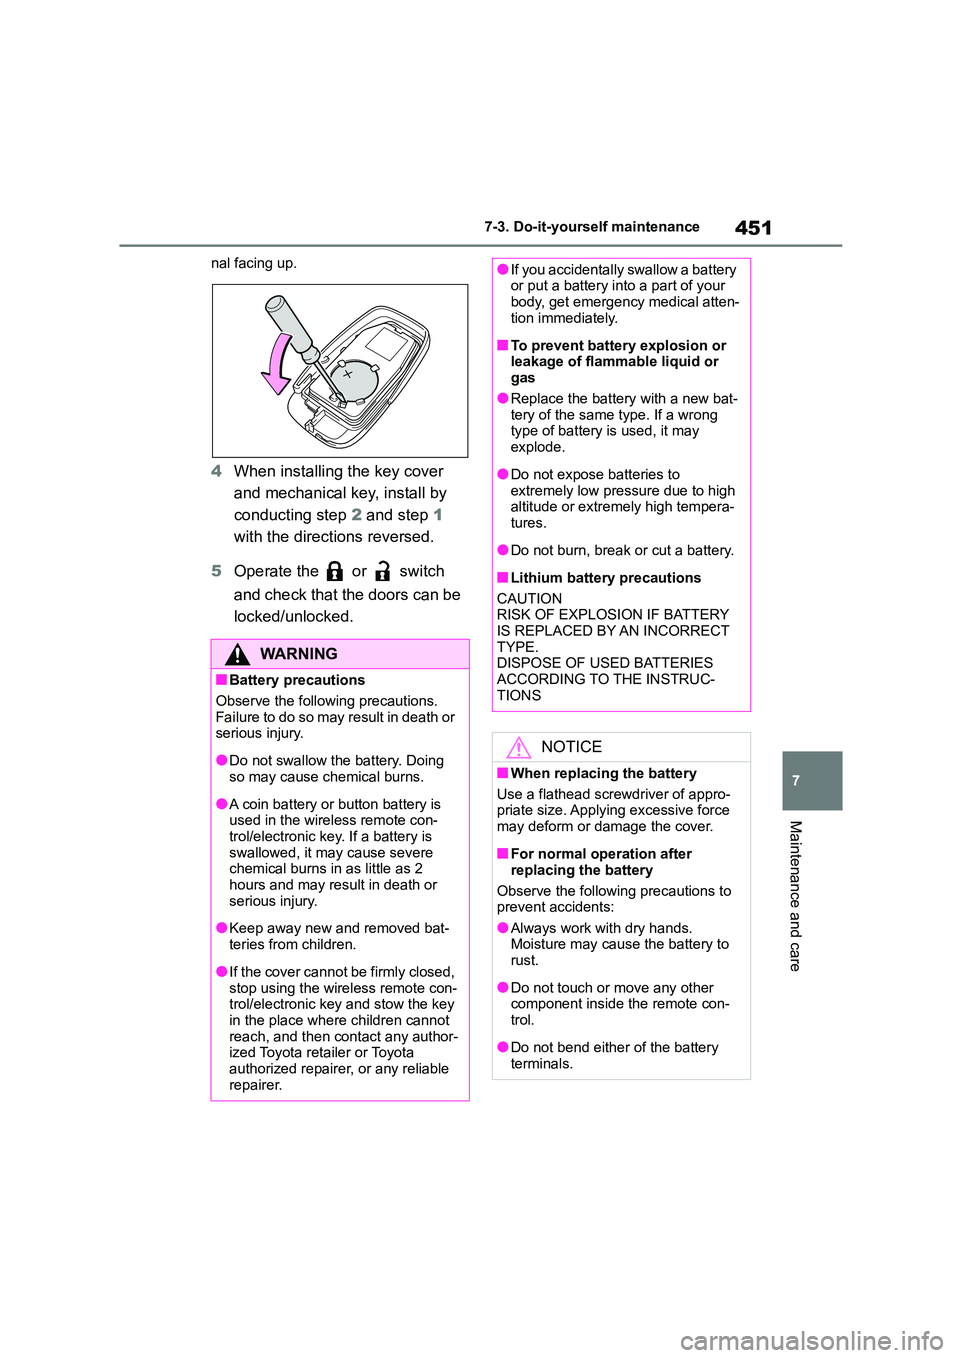
3 Remove the depleted battery
using a small flathead screw-
driver.
When removing the cover, the elec- tronic key module may stick to the
cover and the battery may not be visi-
ble. In this case, remove the electronic key module in order to remove the bat-
tery.
Insert a new battery with the “+” termi-
Page 453 of 678

451
7
7-3. Do-it-yourself maintenance
Maintenance and care
nal facing up.
4 When installing the key cover
and mechanical key, install by
conducting step 2 and step 1
with the directions reversed.
5 Operate the or switch
and check that the doors can be
locked/unlocked.
WA R N I N G
■Battery precautions
Observe the following precautions.
Failure to do so may result in death or
serious injury.
●Do not swallow the battery. Doing
so may cause chemical burns.
●A coin battery or button battery is
used in the wireless remote con- trol/electronic key. If a battery is
swallowed, it may cause severe
chemical burns in as little as 2 hours and may result in death or
serious injury.
●Keep away new and removed bat-
teries from children.
●If the cover cannot be firmly closed,
stop using the wireless remote con-
trol/electronic key and stow the key in the place where children cannot
reach, and then contact any author-
ized Toyota retailer or Toyota authorized repairer, or any reliable
repairer.
●If you accidentally swallow a battery or put a battery into a part of your
body, get emergency medical atten-
tion immediately.
■To prevent battery explosion or
leakage of flammable liquid or gas
●Replace the battery with a new bat-
tery of the same type. If a wrong type of battery is used, it may
explode.
●Do not expose batteries to
extremely low pressure due to high
altitude or extremely high tempera- tures.
●Do not burn, break or cut a battery.
■Lithium battery precautions
CAUTION RISK OF EXPLOSION IF BATTERY
IS REPLACED BY AN INCORRECT
TYPE. DISPOSE OF USED BATTERIES
ACCORDING TO THE INSTRUC-
TIONS
NOTICE
■When replacing the battery
Use a flathead screwdriver of appro-
priate size. Applying excessive force
may deform or damage the cover.
■For normal operation after
replacing the battery
Observe the following precautions to
prevent accidents:
●Always work with dry hands. Moisture may cause the battery to
rust.
●Do not touch or move any other
component inside the remote con-
trol.
●Do not bend either of the battery
terminals.
Page 458 of 678

4567-3. Do-it-yourself maintenance
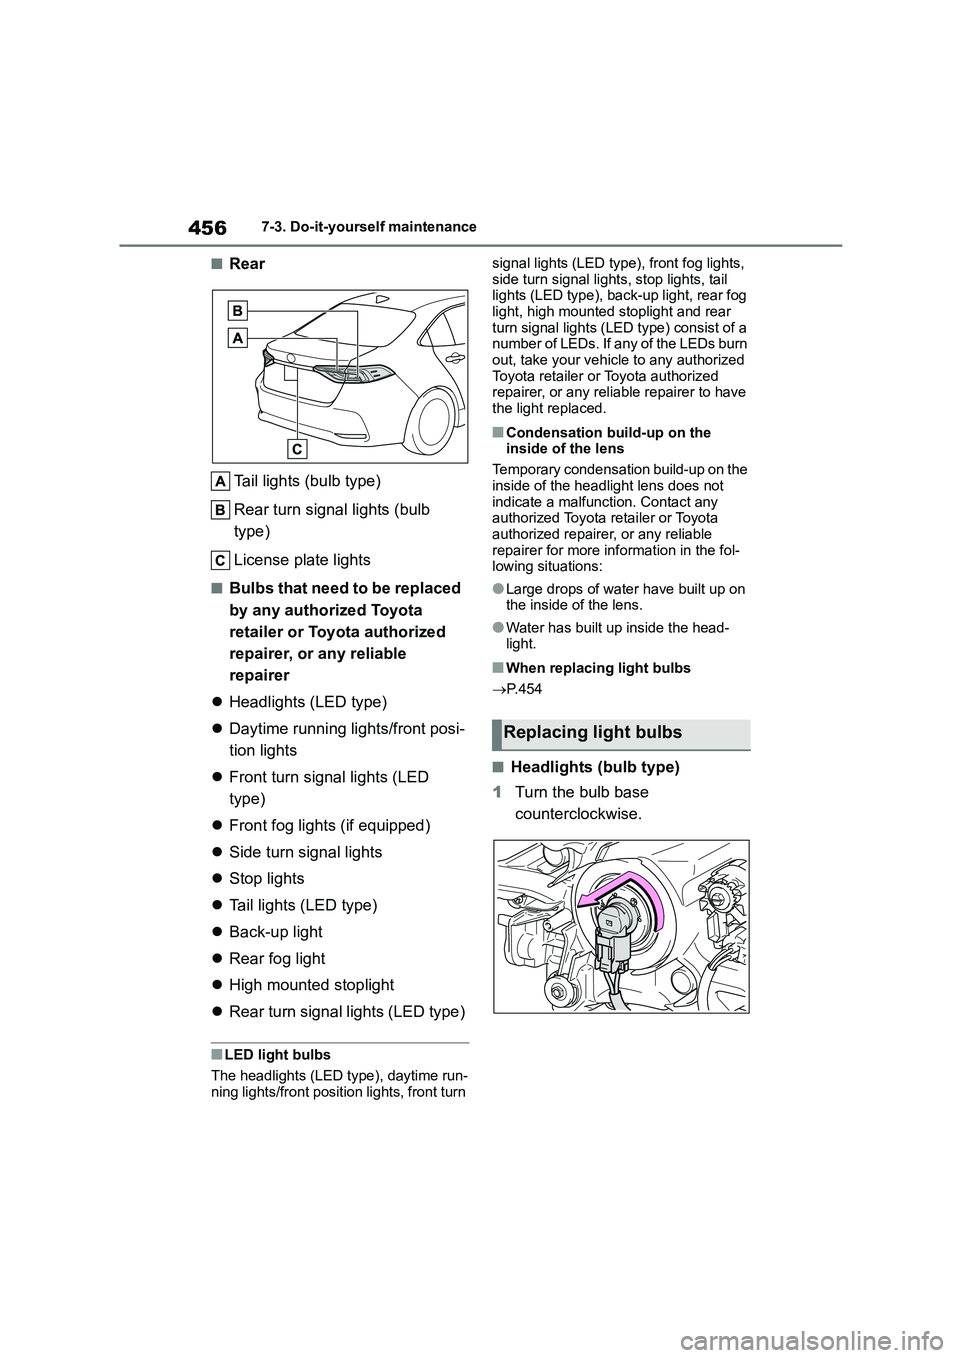
■Rear
Tail lights (bulb type)
Rear turn signal lights (bulb
type)
License plate lights
■Bulbs that need to be replaced
by any authorized Toyota
retailer or Toyota authorized
repairer, or any reliable
repairer
Headlights (LED type)
Daytime running lights/front posi-
tion lights
Front turn signal lights (LED
type)
Front fog lights (if equipped)
Side turn signal lights
Stop lights
Tail lights (LED type)
Back-up light
Rear fog light
High mounted stoplight
Rear turn signal lights (LED type)
■LED light bulbs
The headlights (LED type), daytime run- ning lights/front position lights, front turn
signal lights (LED type), front fog lights,
side turn signal lights, stop lights, tail lights (LED type), back-up light, rear fog
light, high mounted stoplight and rear
turn signal lights (LED type) consist of a number of LEDs. If any of the LEDs burn
out, take your vehicle to any authorized
Toyota retailer or Toyota authorized repairer, or any reliable repairer to have
the light replaced.
■Condensation build-up on the
inside of the lens
Temporary condensation build-up on the
inside of the headlight lens does not
indicate a malfunction. Contact any authorized Toyota retailer or Toyota
authorized repairer, or any reliable
repairer for more information in the fol- lowing situations:
●Large drops of water have built up on the inside of the lens.
●Water has built up inside the head-light.
■When replacing light bulbs
P. 4 5 4
■Headlights (bulb type)
1 Turn the bulb base
counterclockwise.
Replacing light bulbs
Page 459 of 678
457
7
7-3. Do-it-yourself maintenance
Maintenance and care
2 Pull the bulb out while pressing
the lock release of the connec-
tor.
3 Replace the light bulb, and
install the bulb base.
Align the 3 tabs on the light bulb with the mounting and insert.
4 Turn and secure the bulb base.
Shake the bulb base gently to check that it is not loose, turn the headlights
on once and visually confirm that no
light is leaking through the mounting.
■Front turn signal lights (bulb
type)
1 Turn the bulb base
counterclockwise.
2 Remove the light bulb.
3 When installing, reverse the
steps listed.
■Rear turn signal lights (bulb
type)
1 Open the trunk lid.
2 Insert a flathead screwdriver
between the cover and the light
assembly and pry up the cover
to disengage the claws (indi-
cated by a dotted line).
To prevent scratching the vehicle, wrap
the tip of the flathead screwdriver with a
Page 460 of 678
4587-3. Do-it-yourself maintenance
cloth, etc.
3 Pull the cover toward the rear of
the vehicle and remove the
cover.
4 Remove the 2 screws and then
remove the light assembly by
pulling it straight back.
5 Turn the bulb base
counterclockwise.
6 Remove the light bulb.
7 When installing the light bulb,
install it by conducting steps 6
and 5 with the directions
reversed.
8 Install the light assembly and
then install the 2 screws.
Align the guide and pin on the
light assembly with the mounting when installing it.
9 Install the cover.
Page 461 of 678
459
7
7-3. Do-it-yourself maintenance
Maintenance and care
■Tail lights (bulb type)
1 Open the trunk lid, remove the
clips, and pull back the cover.
2 Turn the bulb base
counterclockwise and remove it.
3 Remove the light bulb.
4 When installing, reverse the
steps listed.
■License plate lights
1 Open the trunk lid, remove the
clips, and pull back the cover.
2 Turn the bulb base
counterclockwise.
3 Remove the light bulb.
4 When installing, reverse the
steps listed.
Page 462 of 678
4607-3. Do-it-yourself maintenance
WA R N I N G
■Replacing light bulbs
●Turn off the lights. Do not attempt to
replace the bulb immediately after turning off the lights. The bulbs
become very hot and may cause
burns.
●Do not touch the glass portion of
the light bulb with bare hands.
When it is unavoidable to hold the glass portion, use and hold with a
clean dry cloth to avoid getting
moisture and oils on the bulb. Also, if the bulb is scratched or dropped,
it may blow out or crack.
●Fully install light bulbs and any
parts used to secure them. Failure
to do so may result in heat damage, fire, or water entering the light unit.
This may damage the lights or
cause condensation to build up on the lens.
■To prevent damage or fire
Make sure bulbs are fully seated and
locked.
Page 465 of 678
463
8
8-1. Essential information
When trouble arises
turning the engine switch to
ACC.
4 Vehicles with a smart entry &
start system: To stop the engine,
press and hold the engine
switch for 2 consecutive sec-
onds or more, or press it briefly
3 times or more in succession.
5 Stop the vehicle in a safe place
by the road.
WA R N I N G
■If the engine has to be turned off while driving
●Power assist for the brakes and
steering wheel will be lost, making the brake pedal harder to depress
and the steering wheel heavier to
turn. Decelerate as much as possi- ble before turning off the engine.
●Vehicles without a smart entry & start system: Never attempt to
remove the key, as doing so will
lock the steering wheel.