2022 TOYOTA COROLLA ECO mode
[x] Cancel search: ECO modePage 8 of 678
6
Please note that this manual
applies to all models and explains
all equipment, including options.
Therefore, you may find some
explanations for equipment not
installed on your vehicle.
All specifications provided in this
manual are current at the time of
printing. However, because of the
Toyota policy of continual product
improvement, we reserve the right
to make changes at any time with-
out notice.
Depending on specifications, the
vehicle shown in the illustrations
may differ from your vehicle in
terms of equipment.
Both genuine Toyota and a wide
variety of other spare parts and
accessories for Toyota vehicles are
currently available on the market.
Should it be determined that any of
the genuine Toyota parts or acces-
sories supplied with the vehicle
need to be replaced, Toyota recom-
mends that genuine Toyota parts or
accessories, be used to replace
them. Other parts or accessories of
matching quality can also be used.
Toyota cannot accept any liability or
guarantee spare parts and acces-
sories which are not genuine
Toyota products, nor for replace-
ment or installati on involving such
parts. In addition, damage or per-
formance problems resulting from
the use of non-genuine Toyota
spare parts or accessories may not
be covered under warranty.
The installation of an RF-transmit-
ter system in your vehicle could
affect electronic systems such as:
Multiport fuel injection sys-
tem/sequential multiport fuel
injection system
Toyota Safety Sense (if
equipped)
Cruise control system (if
equipped)
Anti-lock brake system
SRS airbag system
Seat belt pretensioner system
Be sure to check with any author-
ized Toyota retailer or Toyota
authorized repairer, or any reliable
repairer for precautionary meas-
ures or special instructions regard-
ing installation of an RF-transmitter
system.
Further information regarding fre-
quency bands, power levels,
antenna positions and installation
provisions for the installation of
For your infor mation
Main Owner’s Manual
Accessories, spare parts
and modification of your
To y o t a
Installation of an RF-trans-
mitter system
Page 30 of 678
281-1. For safe use
1-1.For safe use
Use only floor mats designed spe-
cifically for vehicles of the same
model and model year as your vehi-
cle. Fix them securely in place onto
the carpet.
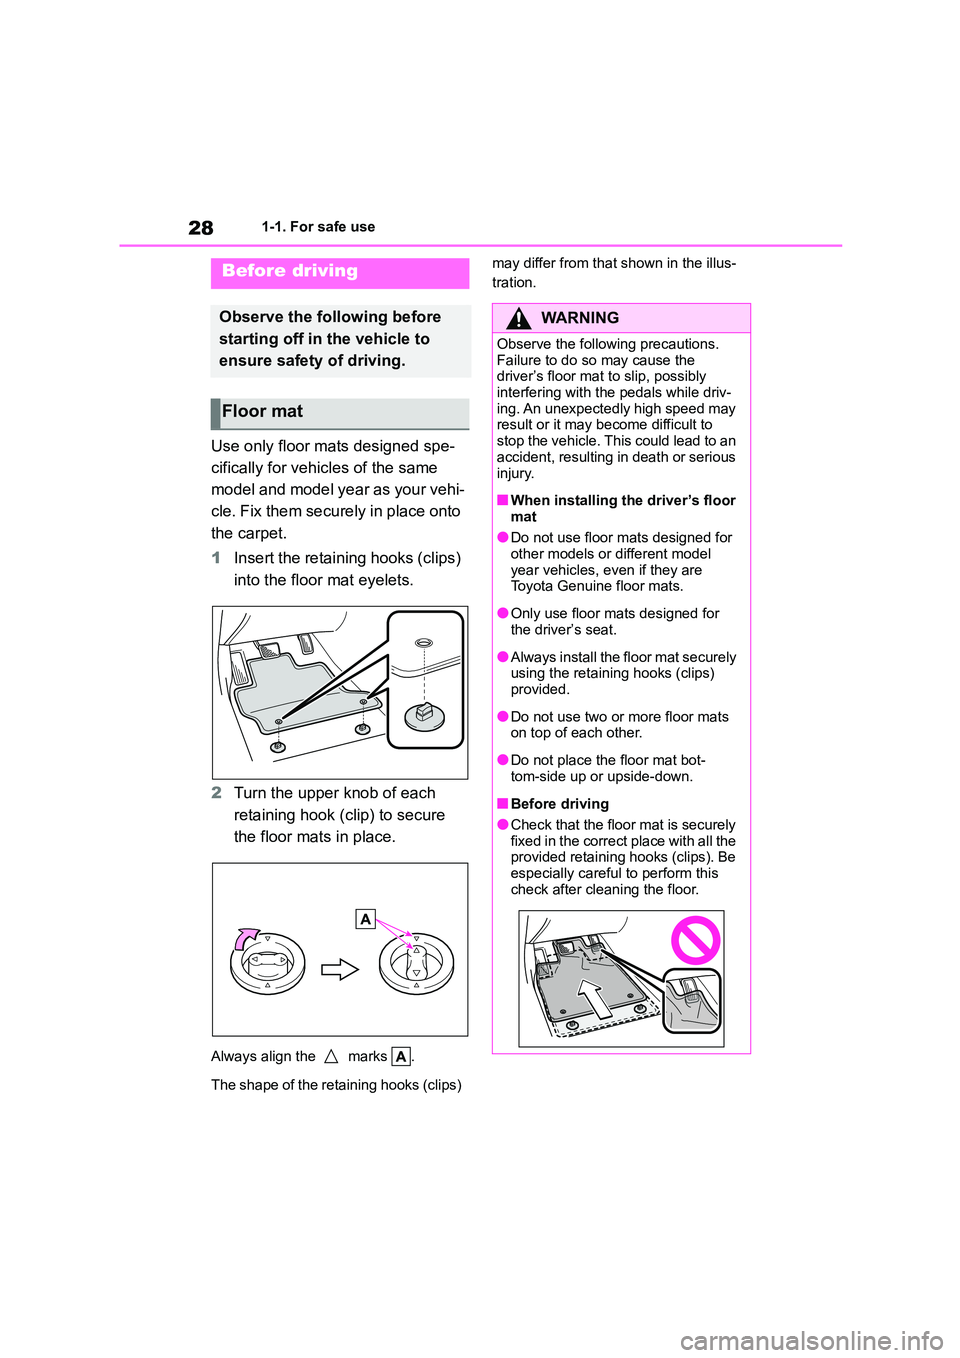
1 Insert the retaining hooks (clips)
into the floor mat eyelets.
2 Turn the upper knob of each
retaining hook (clip) to secure
the floor mats in place.
Always align the marks .
The shape of the retaining hooks (clips)
may differ from that shown in the illus-
tration.Before driving
Observe the following before
starting off in the vehicle to
ensure safety of driving.
Floor mat
WA R N I N G
Observe the following precautions.
Failure to do so may cause the driver’s floor mat to slip, possibly
interfering with the pedals while driv-
ing. An unexpectedly high speed may result or it may become difficult to
stop the vehicle. This could lead to an
accident, resulting in death or serious
injury.
■When installing the driver’s floor
mat
●Do not use floor mats designed for
other models or different model
year vehicles, even if they are Toyota Genuine floor mats.
●Only use floor mats designed for the driver’s seat.
●Always install the floor mat securely using the retaining hooks (clips)
provided.
●Do not use two or more floor mats
on top of each other.
●Do not place the floor mat bot-
tom-side up or upside-down.
■Before driving
●Check that the floor mat is securely
fixed in the correct place with all the provided retaining hooks (clips). Be
especially careful to perform this
check after cleaning the floor.
Page 67 of 678

65
1
1-3. Emergency assistance
For safety and security
tance required.
Make sure to open the cover before
pressing the “SOS” button.
If you accidentally press the “SOS” but-
ton, tell the operator that you are not
experiencing an emergency.
*: In some cases, the call cannot be
made. ( P. 6 5 )
When the engine switch is turned to
ON, the red indicato r light will illumi-
nate for 10 seconds. Then, the
green indicator light will illuminate
for 2 seconds and remain illumi-
nated if the system is functioning
properly. The indicator lights indi-
cate the following:
If the green indicator light illumi-
nates and stays on, the system is
enabled.
If the green indicator light
flashes, an automatic or manual
Emergency Call is being made.
If the red indicator light illumi-
nates and a buzzer sounds 5
times (on some models) at any
time other than immediately after
the engine switch is turned to
ON, the system may be malfunc-
tioning or the backup battery
may be depleted.
If the red indicator light blinks for
approximately 30 seconds during
an Emergency Call, the call has
been disconnected or the cellular
network signal is weak.
■Free/Open Source Software Infor-
mation
This product contains Free/Open
Source Software (FOSS).
The license information and/or the source code of such FOSS can be found
at the following URL.
http://www.opensourceautomotive.com/dcm/toyota/
http://www.opensourceautomotive.com/
dcm/toyota/19MC/Indicator lights
WA R N I N G
■When the Emergency Call may not be made
●It may not be possible to make
Emergency Calls in any of the fol- lowing situations. In such cases,
report to emergency services pro-
vider (112 system etc.) by other means such as nearby public
phones.
• Even when the vehicle is in the cel- lular phone service area, it may be
difficult to connect to the eCall con-
trol center if the reception is poor or the line is busy. In such cases, even
though the system attempts to con-
nect to the eCall control center, you may not be able to connect to the
eCall control center to make Emer-
gency Calls and contact emergency services.
• When the vehicle is out of the cellu-
lar phone service area, the Emer- gency Calls cannot be made.
Page 86 of 678
842-1. Instrument cluster
*1: These lights come on when the
engine switch is turned to ON to indi-
cate that a system check is being
performed. They will turn off after the
engine is started, or after a few sec-
onds. There may be a malfunction in
a system if the lights do not come
on, or turn off. Have the vehicle
inspected by any authorized Toyota
retailer or Toyota authorized repairer,
or any reliable repairer.
*2: This light comes on when the system
is turned off.
*3: Depending on the operating condi-
tion, the color and illuminating/flash-
ing state of the light change.
*4: This light illuminates on the outside
rear view mirrors.
*5: This light illuminates on the
multi-information display.
*6: When the outside temperature is
approximately 3°C (37°F) or lower,
this indicator will flash for approxi-
mately 10 seconds, then stay on.
*7: This light illuminates on the center
panel.
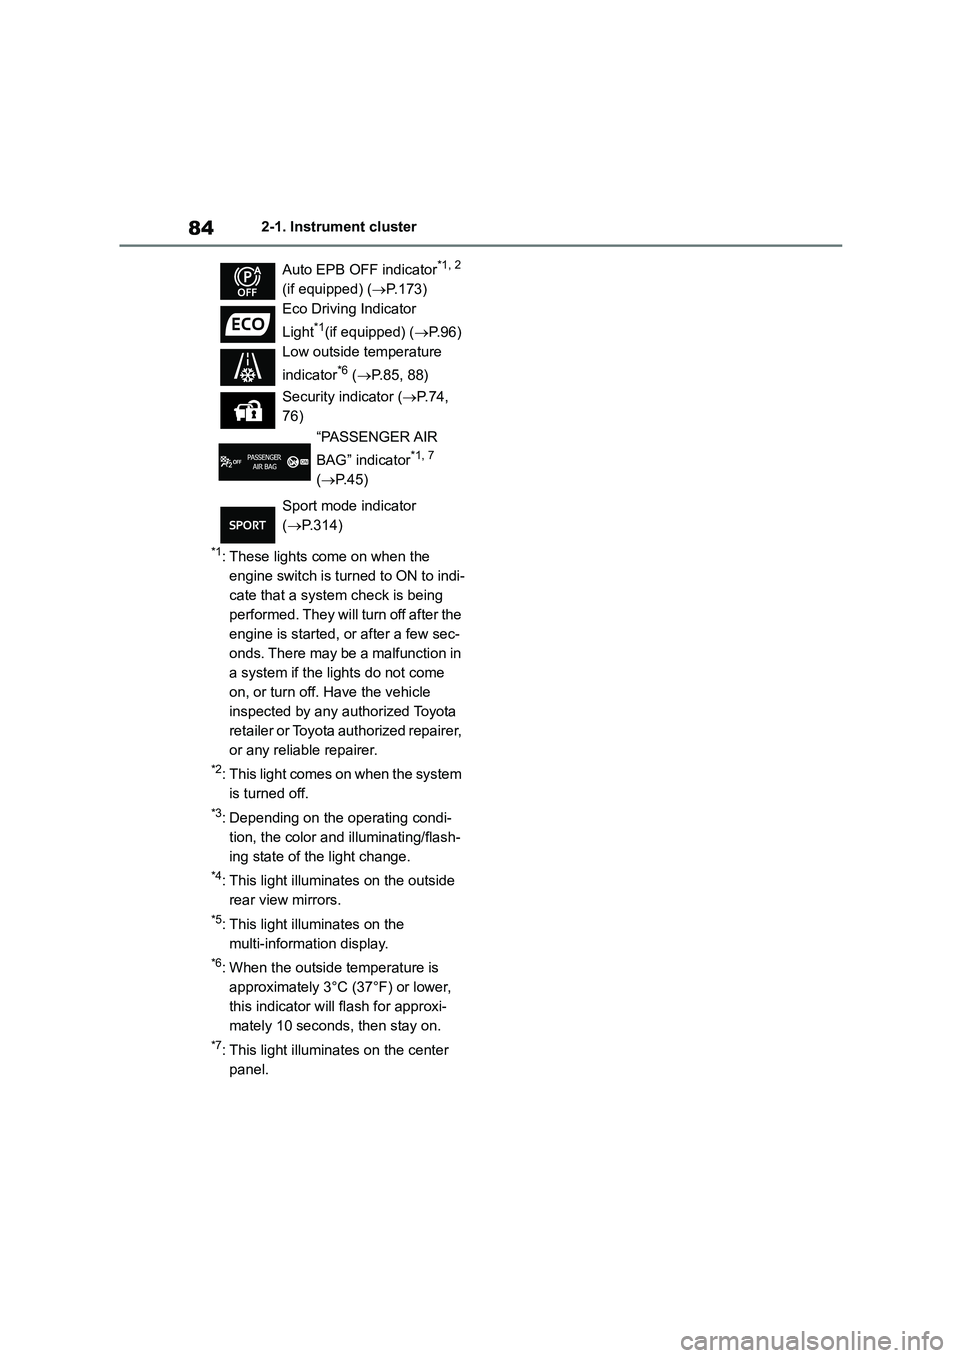
Auto EPB OFF indicator*1, 2
(if equipped) ( P.173)
Eco Driving Indicator
Light*1(if equipped) ( P.96)
Low outside temperature
indicator*6 ( P.85, 88)
Security indicator ( P. 7 4 ,
76)
“PASSENGER AIR
BAG” indicator*1, 7
( P. 4 5 )
Sport mode indicator
( P.314)
Page 98 of 678
962-1. Instrument cluster
driven may differ from that displayed.
When only a small amount of fuel is
added to the tank, the display may not
be updated.
When refueling, turn the engine switch
off. If the vehicle is refueled without
turning the engine switch off, the dis-
play may not be updated.
The average fuel economy display
can be changed in . ( P. 9 8 )
Average fuel economy (after
start)
Displays the average fuel consumption
since engine start.
Average fuel economy (after
refuel)
Displays the average fuel consumption
since the vehicle was refueled.
■Eco Driving Indicator/Driving
range (if equipped)
Eco Driving Indicator
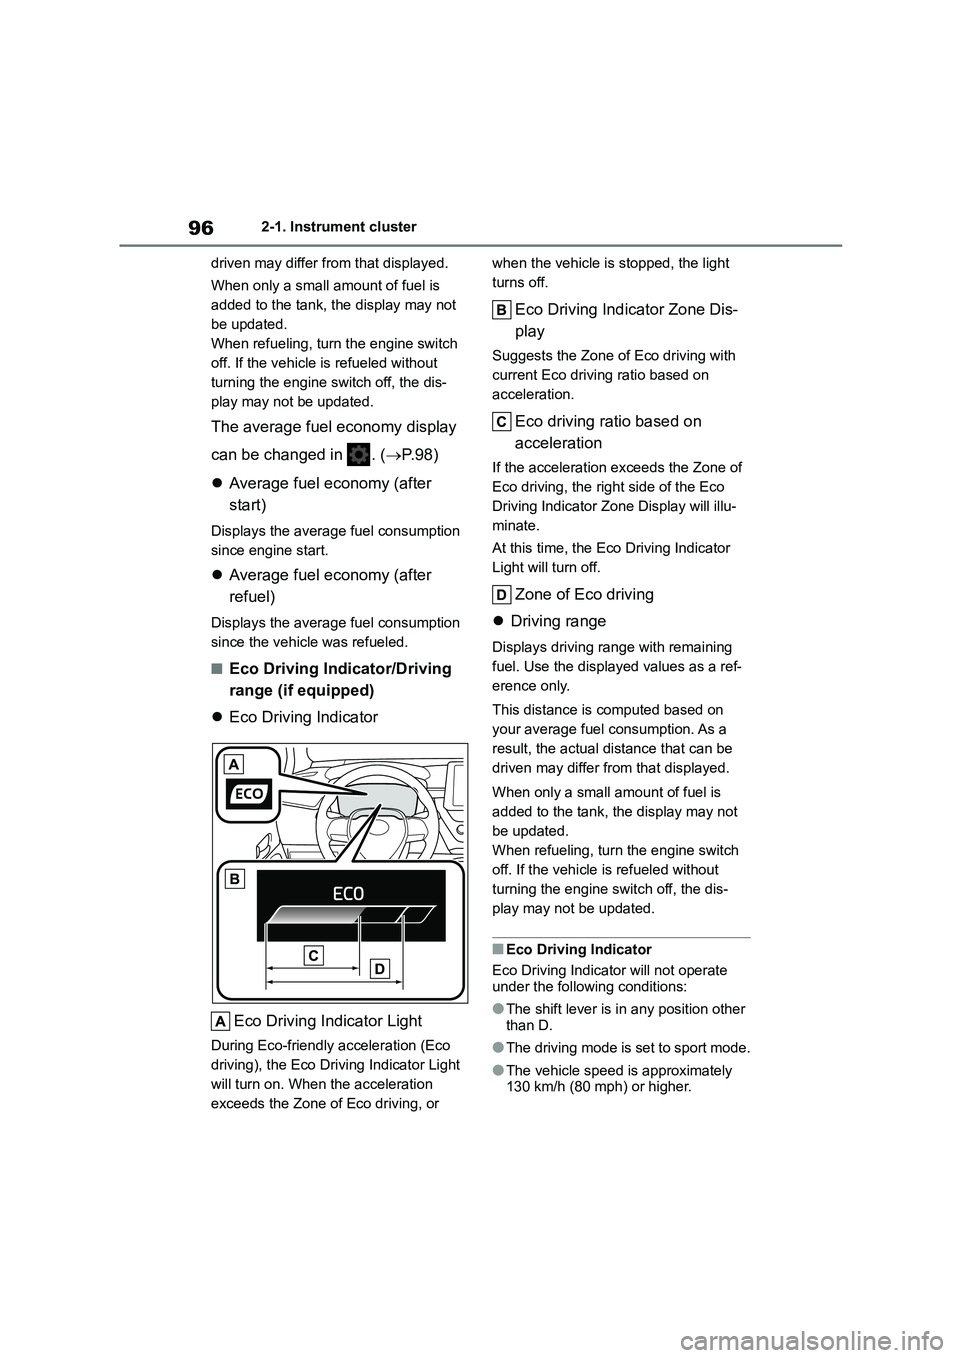
Eco Driving Indicator Light
During Eco-friendly acceleration (Eco
driving), the Eco Driving Indicator Light
will turn on. When the acceleration
exceeds the Zone of Eco driving, or
when the vehicle is stopped, the light
turns off.
Eco Driving Indicator Zone Dis-
play
Suggests the Zone of Eco driving with
current Eco driving ratio based on
acceleration.
Eco driving ratio based on
acceleration
If the acceleration exceeds the Zone of
Eco driving, the right side of the Eco
Driving Indicator Zone Display will illu-
minate.
At this time, the Eco Driving Indicator
Light will turn off.
Zone of Eco driving
Driving range
Displays driving range with remaining
fuel. Use the displayed values as a ref-
erence only.
This distance is computed based on
your average fuel consumption. As a
result, the actual distance that can be
driven may differ from that displayed.
When only a small amount of fuel is
added to the tank, the display may not
be updated.
When refueling, turn the engine switch
off. If the vehicle is refueled without
turning the engine switch off, the dis-
play may not be updated.
■Eco Driving Indicator
Eco Driving Indicator will not operate under the following conditions:
●The shift lever is in any position other than D.
●The driving mode is set to sport mode.
●The vehicle speed is approximately
130 km/h (80 mph) or higher.
Page 111 of 678
109
3
3-1. Key information
Before driving
Vehicles with a smart entry & start
system
●The standard battery life is 1 to 2
years.
●If the battery becomes low, an alarm
will sound in the cabin and a message will be shown on the multi-information
display when the engine is stopped.
●To reduce key battery depletion when
the electronic key is to not be used for
long periods of time, set the electronic key to the batter y-saving mode.
( P.122)
●As the electronic key always receives
radio waves, the battery will become
depleted even if the electronic key is not used. The following symptoms
indicate that the electronic key battery
may be depleted. Replace the battery when necessary. ( P.449)
• The smart entry & start system or the
wireless remote control does not oper- ate.
• The detection area becomes smaller.
• The LED indicator on the key surface does not turn on.
●To avoid serious deterioration, do not leave the electronic key within 1 m (3
ft.) of the following electrical appli-
ances that produce a magnetic field: •TVs
• Personal computers
• Cellular phones, cordless phones and battery chargers
• Recharging cellular phones or cord-
less phones • Table lamps
• Induction cookers
●If the electronic key is near the vehicle
for longer than necessary, even if the
smart entry & start system is not oper-
ated, the key battery may become depleted faster than normal.
■Replacing the battery
P.449
■If “New Key Registered Contact
Your Dealer if You Did Not Register a New Key” is shown on the
multi-information display (vehicles
with a smart entry & start system)
This message will be displayed each
time the driver’s door is opened when
the doors are unlocked from the outside for approximately 10 days after a new
electronic key has been registered.
If this message is displayed but you have not had a new electronic key regis-
tered, ask any authorized Toyota retailer
or Toyota authorized repairer, or any reli- able repairer to check if an unknown
electronic key (other than those in your
possession) has been registered.
■If a wrong key is used
The key cylinder rotates freely, isolated
from the internal mechanism.
NOTICE
■To prevent key damage
●Do not drop the keys, subject them to strong shocks or bend them.
●Do not expose the keys to high temperatures for long periods of
time.
●Do not get the keys wet or wash
them in an ultrasonic washer etc.
●Vehicles with a smart entry & start
system: Do not attach metallic or
magnetic materials to the keys or place the keys close to such materi-
als.
●Do not disassemble the keys.
●Do not attach a sticker or anything else to the surface of the key.
●Vehicles with a smart entry & start system: Do not place the keys near
objects that produce magnetic
fields, such as TVs, audio systems and induction cookers.
Page 123 of 678
121
3
3-2. Opening, closing and locking the doors
Before driving
*: If equipped
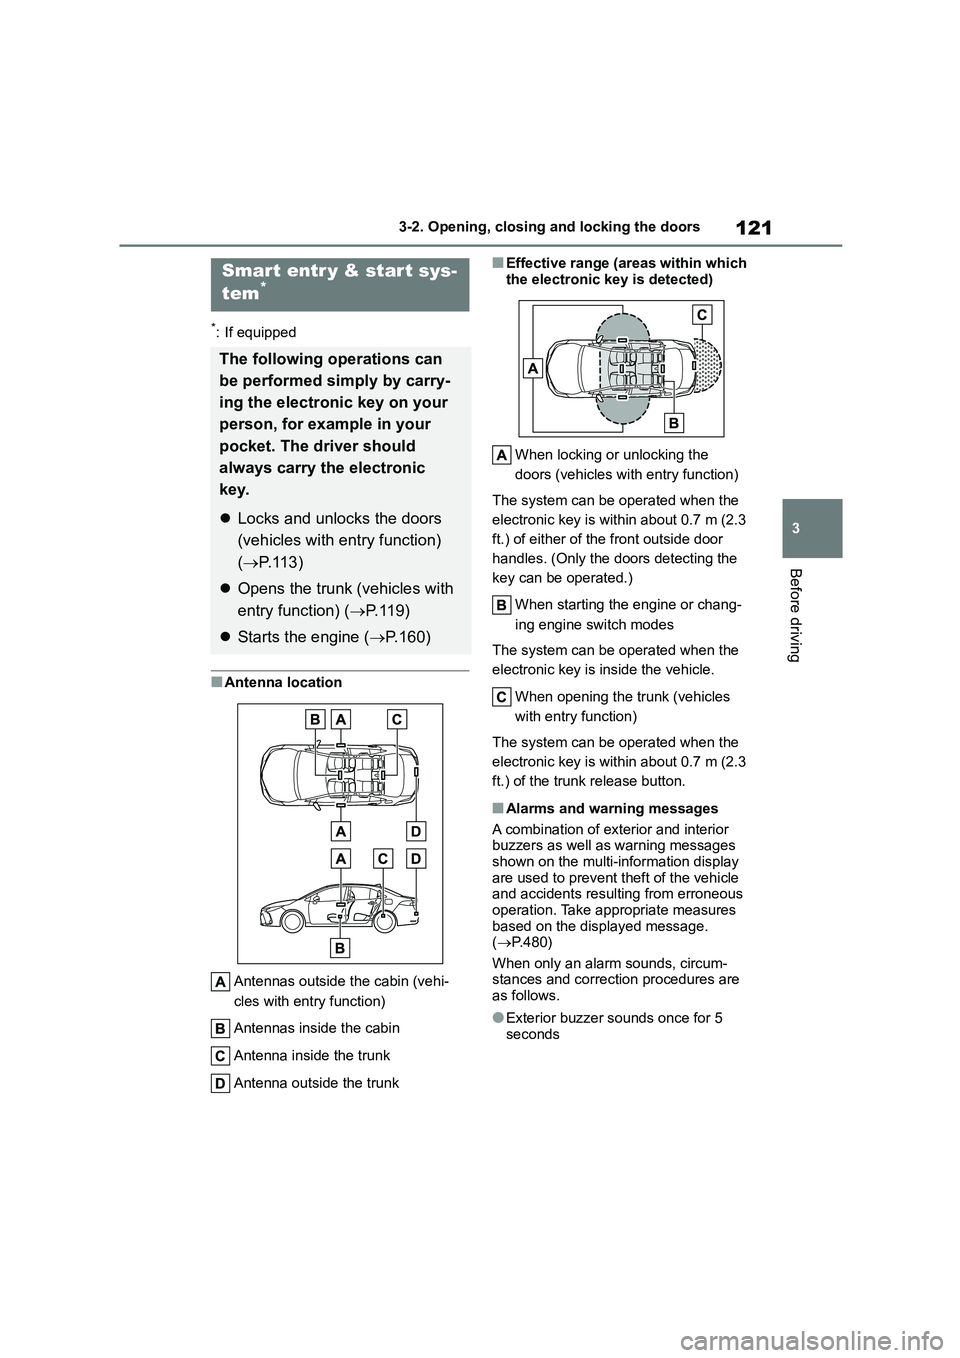
■Antenna location
Antennas outside the cabin (vehi-
cles with entry function)
Antennas inside the cabin
Antenna inside the trunk
Antenna outside the trunk
■Effective range (areas within which
the electronic key is detected)
When locking or unlocking the
doors (vehicles with entry function)
The system can be operated when the
electronic key is within about 0.7 m (2.3
ft.) of either of the front outside door
handles. (Only the doors detecting the
key can be operated.)
When starting the engine or chang-
ing engine switch modes
The system can be operated when the
electronic key is inside the vehicle.
When opening the trunk (vehicles
with entry function)
The system can be operated when the
electronic key is within about 0.7 m (2.3
ft.) of the trunk release button.
■Alarms and warning messages
A combination of exterior and interior buzzers as well as warning messages
shown on the multi-information display
are used to prevent theft of the vehicle and accidents resulting from erroneous
operation. Take appropriate measures
based on the displayed message. ( P.480)
When only an alarm sounds, circum-
stances and correction procedures are as follows.
●Exterior buzzer sounds once for 5 seconds
Smart entr y & start sys-
tem*
The following operations can
be performed simply by carry-
ing the electronic key on your
person, for example in your
pocket. The driver should
always carry the electronic
key.
Locks and unlocks the doors
(vehicles with entry function)
( P.113)
Opens the trunk (vehicles with
entry function) ( P. 1 1 9 )
Starts the engine (P.160)
Page 125 of 678
123
3
3-2. Opening, closing and locking the doors
Before driving
with, or is covered by the following
metallic objects • Cards to which aluminum foil is
attached
• Cigarette boxes that have aluminum foil inside
• Metallic wallets or bags
•Coins • Hand warmers made of metal
• Media such as CDs and DVDs
●When other wireless keys (that emit
radio waves) are being used nearby
●When carrying the electronic key
together with the following devices
that emit radio waves • Another vehicle’s electronic key or a
wireless key that emits radio waves
• Personal computers or personal digi- tal assistants (PDAs)
• Digital audio players
• Portable game systems
●If window tint with a metallic content or
metallic objects are attached to the rear window
●When the electronic key is placed near a battery charger or electronic
devices
●When the vehicle is parked in a pay
parking spot where radio waves are
emitted
If the doors cannot be locked/unlocked
using the smart en try & start system,
lock/unlock the doors by performing any of the following (vehicles with entry func-
tion):
●Bring the electronic key close to either
front door handle and operate the
entry function.
●Operate the wireless remote control.
If the doors cannot be locked/unlocked
using the above methods, use the mechanical key. ( P.512)
If the engine cannot be started using the
smart entry & start system refer to P.512.
■Note for the entr y function (if
equipped)
●Even when the electronic key is within
the effective range (detection areas),
the system may not operate properly in the following cases:
• The electronic key is too close to the
window or outside door handle, near the ground, or in a high place when
the doors are locked or unlocked.
• The electronic key is near the ground or in a high place, or too close to the
center of the rear bumper when the
trunk is opened. • The electronic key is on the instru-
ment panel, rear package tray or floor,
or in the door pockets or glove box when the engine is started or engine
switch modes are changed.
●Do not leave the electronic key on top
of the instrument panel or near the
door pockets when exiting the vehicle. Depending on the radio wave recep-
tion conditions, it may be detected by
the antenna outside the cabin and the door will become lockable from the
outside, possibly trapping the elec-
tronic key inside the vehicle.
●As long as the electronic key is within
the effective range, the doors may be locked or unlocked by anyone. How-
ever, only the doors detecting the
electronic key can be used to unlock the vehicle.
●Even if the electronic key is not inside the vehicle, it may be possible to start
the engine if the electronic key is near
the window.
●The doors may unlock or lock if a
large amount of water splashes on the door handle, such as in the rain or in a
car wash when the electronic key is
within the effective range. (The doors will automatically be locked after
approximately 30 seconds if the doors
are not opened and closed.)
●If the wireless remote control is used
to lock the doors when the electronic
key is near the vehicle, there is a pos- sibility that the door may not be
unlocked by the entry function. (Use
the wireless remote control to unlock the doors.)