2022 TOYOTA COROLLA trunk release
[x] Cancel search: trunk releasePage 113 of 678
111
3
3-1. Key information
Before driving
Opens the trunk ( P. 1 1 9 )
*1: This setting must be customized at
any authorized Toyota retailer or
Toyota authorized repairer, or any
reliable repairer.
*2: If equipped
■Conditions affecting the operation
of the smart entry & start system or wireless remote control
Vehicles without a smart entry & start system
The wireless remote control function
may not operate normally in the follow- ing situations:
●When the wireless key battery is depleted
●Near a TV tower, electric power plant, gas station, radio station, large dis-
play, airport or other facility that gen-
erates strong radio waves or electrical noise
●When carrying a portable radio, cellu-lar phone or other wireless communi-
cation devices
●When the wireless key is in contact
with, or is covered by a metallic object
●When a wireless key (that emits radio
waves) is being used nearby
●If window tint with a metallic content or
metallic objects are attached to the
rear window
Vehicles with a smart entry & start
system
P.122
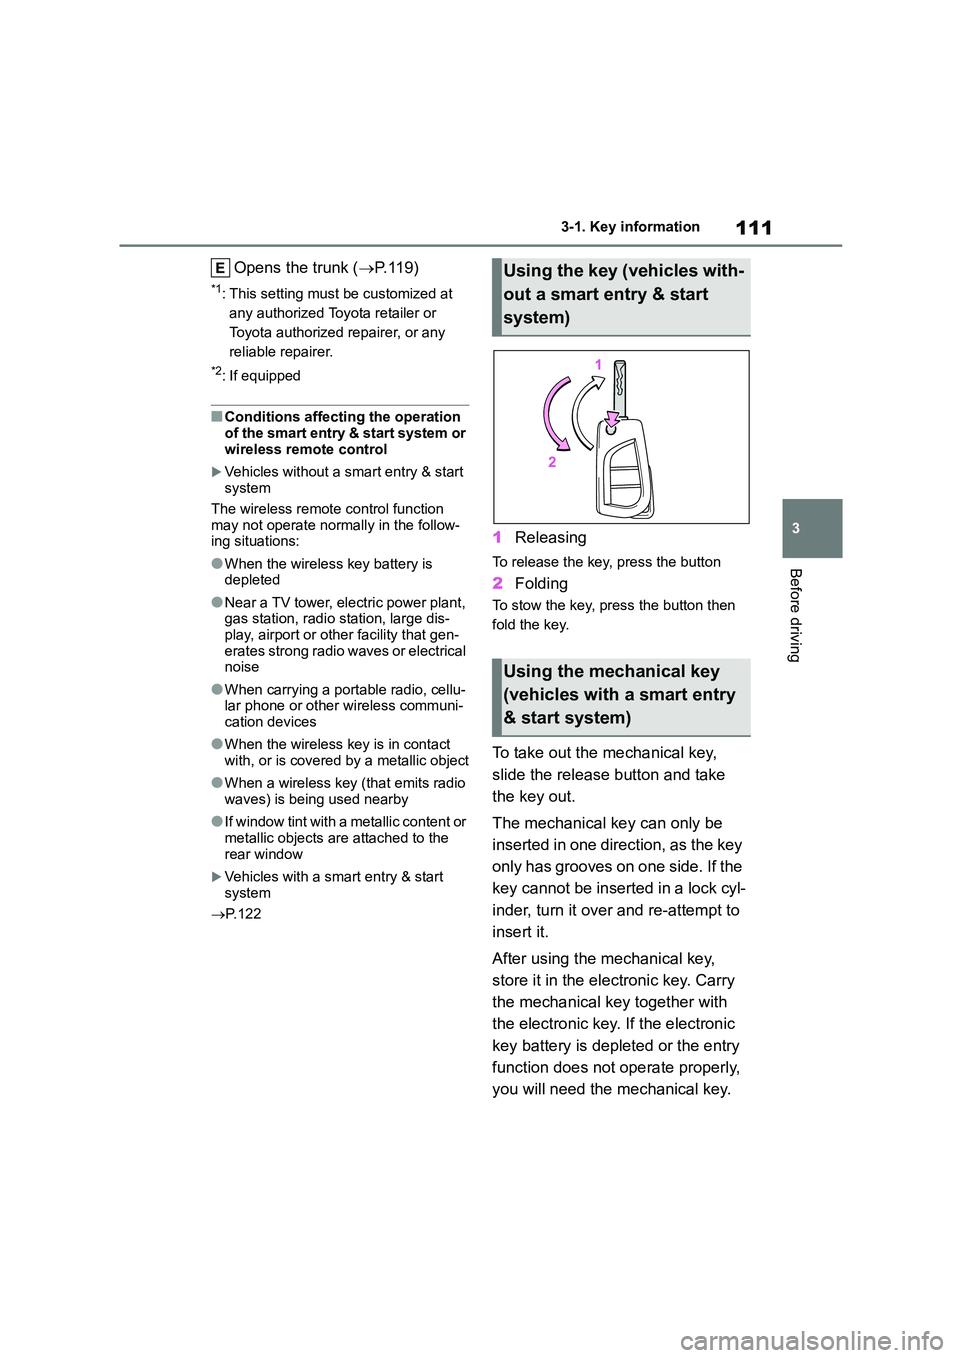
1Releasing
To release the key, press the button
2Folding
To stow the key, press the button then
fold the key.
To take out the mechanical key,
slide the release button and take
the key out.
The mechanical key can only be
inserted in one direction, as the key
only has grooves on one side. If the
key cannot be inserted in a lock cyl-
inder, turn it over and re-attempt to
insert it.
After using the mechanical key,
store it in the electronic key. Carry
the mechanical key together with
the electronic key. If the electronic
key battery is depleted or the entry
function does not operate properly,
you will need the mechanical key.
Using the key (vehicles with-
out a smart entry & start
system)
Using the mechanical key
(vehicles with a smart entry
& start system)
Page 121 of 678
119
3
3-2. Opening, closing and locking the doors
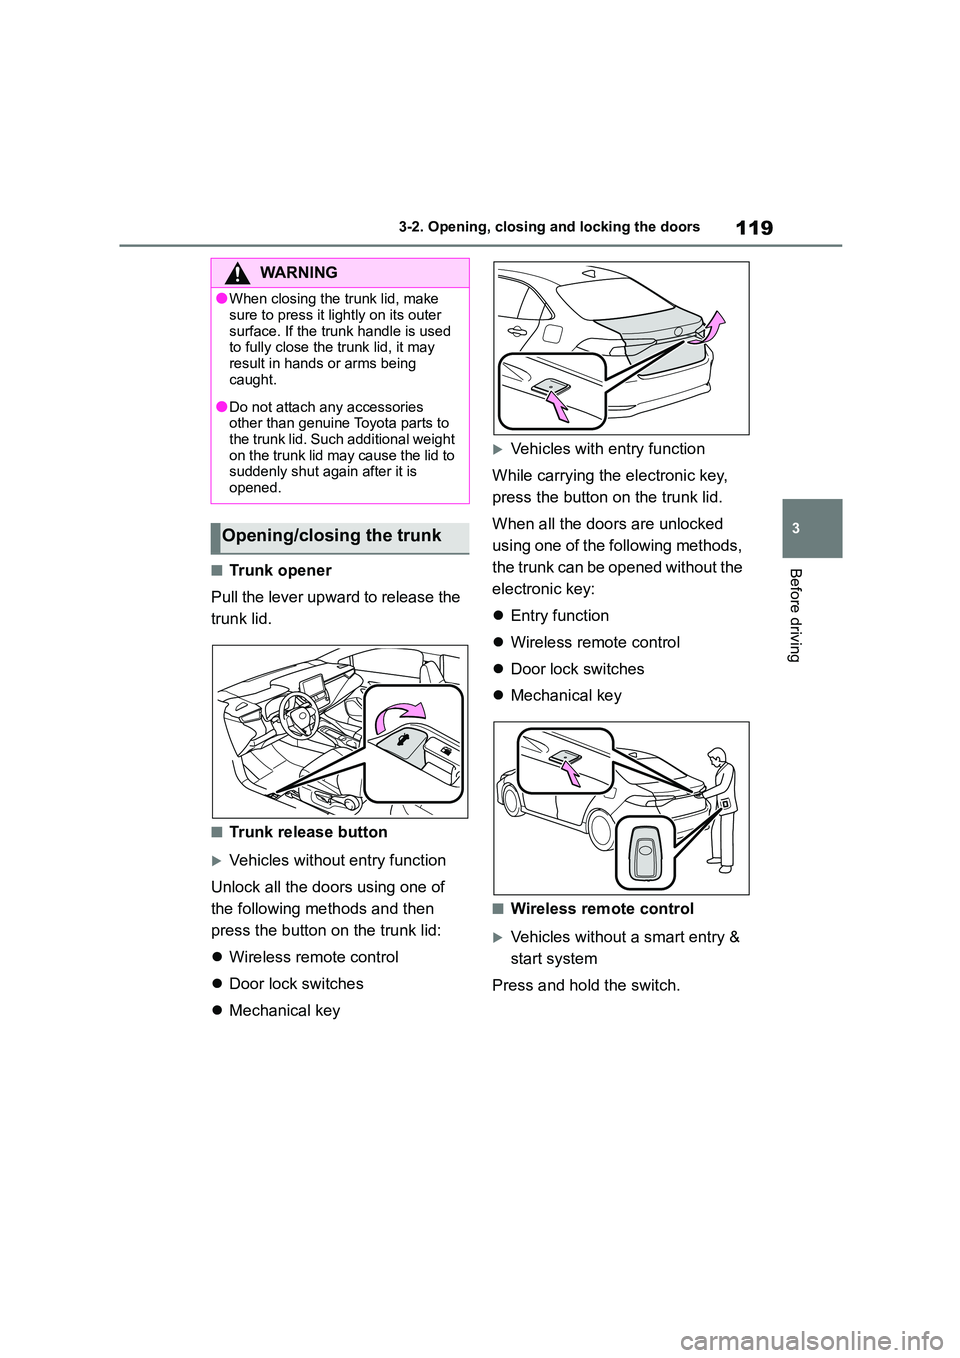
Before driving■Trunk opener
Pull the lever upward to release the
trunk lid.
■Trunk release button
Vehicles without entry function
Unlock all the doors using one of
the following methods and then
press the button on the trunk lid:
Wireless remote control
Door lock switches
Mechanical key
Vehicles with entry function
While carrying the electronic key,
press the button on the trunk lid.
When all the doors are unlocked
using one of the following methods,
the trunk can be opened without the
electronic key:
Entry function
Wireless remote control
Door lock switches
Mechanical key
■Wireless remote control
Vehicles without a smart entry &
start system
Press and hold the switch.
WA R N I N G
●When closing the trunk lid, make
sure to press it lightly on its outer
surface. If the trunk handle is used to fully close the trunk lid, it may
result in hands or arms being
caught.
●Do not attach any accessories
other than genuine Toyota parts to
the trunk lid. Such additional weight on the trunk lid may cause the lid to
suddenly shut again after it is
opened.
Opening/closing the trunk
Page 122 of 678
1203-2. Opening, closing and locking the doors
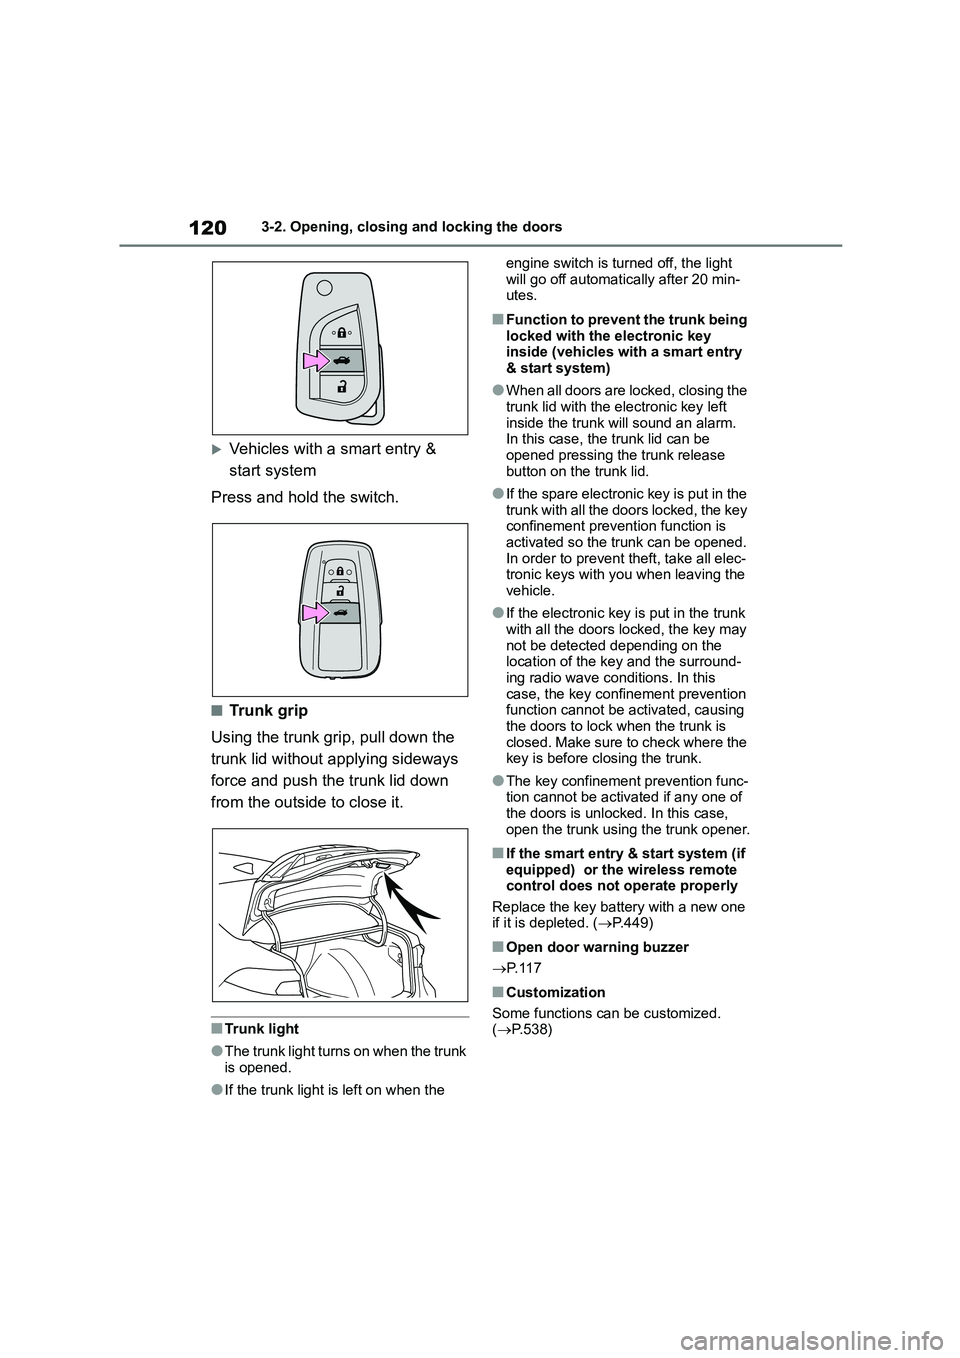
Vehicles with a smart entry &
start system
Press and hold the switch.
■Trunk grip
Using the trunk grip, pull down the
trunk lid without applying sideways
force and push the trunk lid down
from the outside to close it.
■Trunk light
●The trunk light turns on when the trunk
is opened.
●If the trunk light is left on when the
engine switch is turned off, the light
will go off automatically after 20 min- utes.
■Function to prevent the trunk being
locked with the electronic key
inside (vehicles with a smart entry & start system)
●When all doors are locked, closing the trunk lid with the electronic key left
inside the trunk will sound an alarm.
In this case, the trunk lid can be opened pressing the trunk release
button on the trunk lid.
●If the spare electronic key is put in the
trunk with all the doors locked, the key
confinement prevention function is activated so the trunk can be opened.
In order to prevent theft, take all elec-
tronic keys with you when leaving the vehicle.
●If the electronic key is put in the trunk with all the doors locked, the key may
not be detected depending on the
location of the key and the surround- ing radio wave conditions. In this
case, the key confinement prevention
function cannot be activated, causing the doors to lock when the trunk is
closed. Make sure to check where the
key is before closing the trunk.
●The key confinement prevention func-
tion cannot be activated if any one of the doors is unlocked. In this case,
open the trunk using the trunk opener.
■If the smart entry & start system (if
equipped) or the wireless remote control does not operate properly
Replace the key battery with a new one
if it is depleted. ( P.449)
■Open door warning buzzer
P. 1 1 7
■Customization
Some functions can be customized.
( P.538)
Page 123 of 678
121
3
3-2. Opening, closing and locking the doors
Before driving
*: If equipped
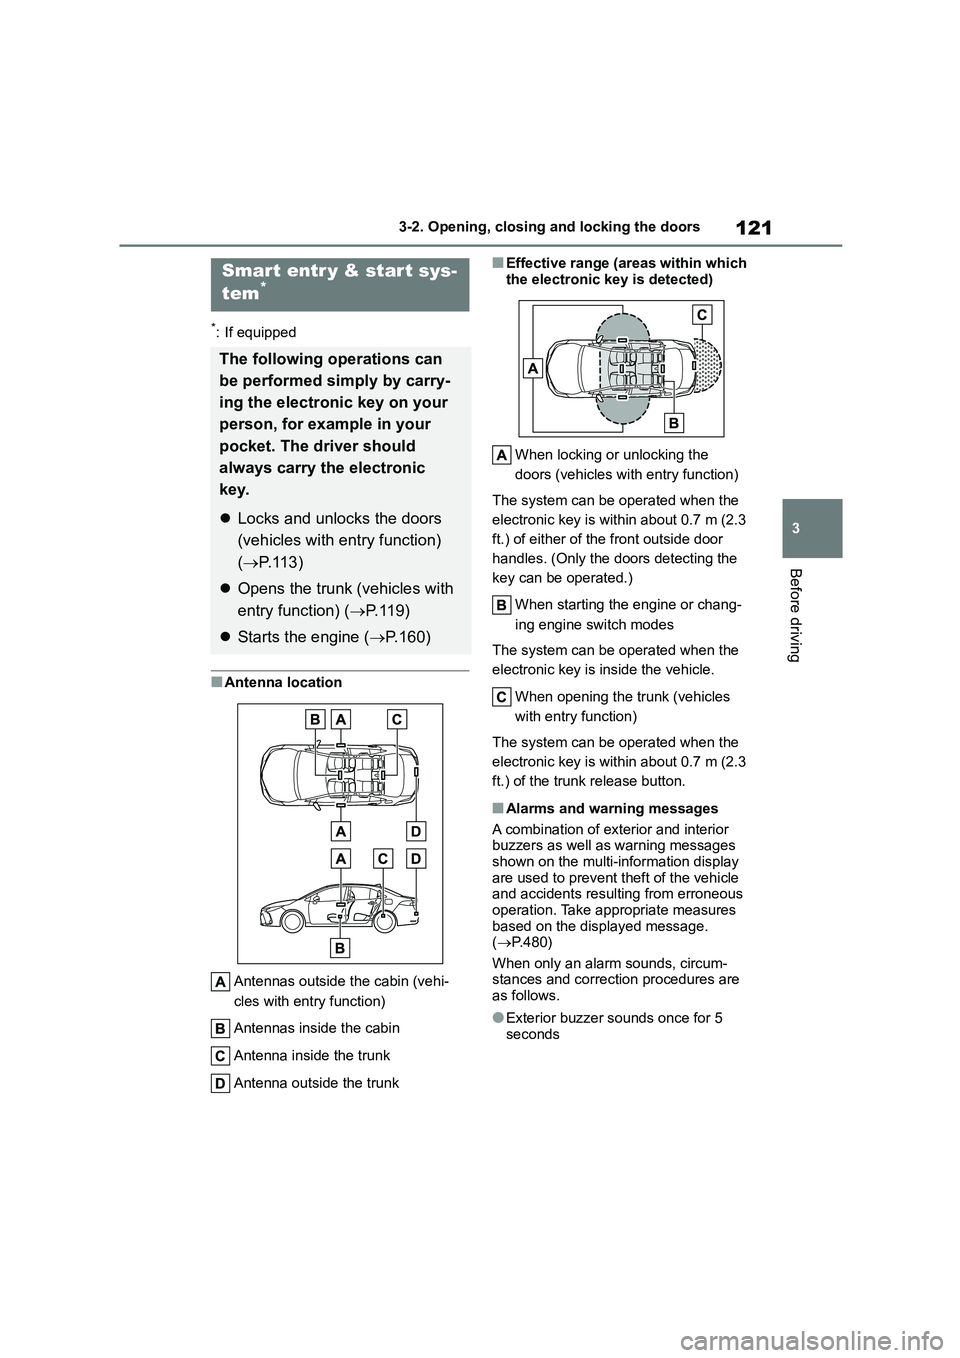
■Antenna location
Antennas outside the cabin (vehi-
cles with entry function)
Antennas inside the cabin
Antenna inside the trunk
Antenna outside the trunk
■Effective range (areas within which
the electronic key is detected)
When locking or unlocking the
doors (vehicles with entry function)
The system can be operated when the
electronic key is within about 0.7 m (2.3
ft.) of either of the front outside door
handles. (Only the doors detecting the
key can be operated.)
When starting the engine or chang-
ing engine switch modes
The system can be operated when the
electronic key is inside the vehicle.
When opening the trunk (vehicles
with entry function)
The system can be operated when the
electronic key is within about 0.7 m (2.3
ft.) of the trunk release button.
■Alarms and warning messages
A combination of exterior and interior buzzers as well as warning messages
shown on the multi-information display
are used to prevent theft of the vehicle and accidents resulting from erroneous
operation. Take appropriate measures
based on the displayed message. ( P.480)
When only an alarm sounds, circum-
stances and correction procedures are as follows.
●Exterior buzzer sounds once for 5 seconds
Smart entr y & start sys-
tem*
The following operations can
be performed simply by carry-
ing the electronic key on your
person, for example in your
pocket. The driver should
always carry the electronic
key.
Locks and unlocks the doors
(vehicles with entry function)
( P.113)
Opens the trunk (vehicles with
entry function) ( P. 1 1 9 )
Starts the engine (P.160)
Page 129 of 678
127
3
3-3. Adjusting the seats
Before driving
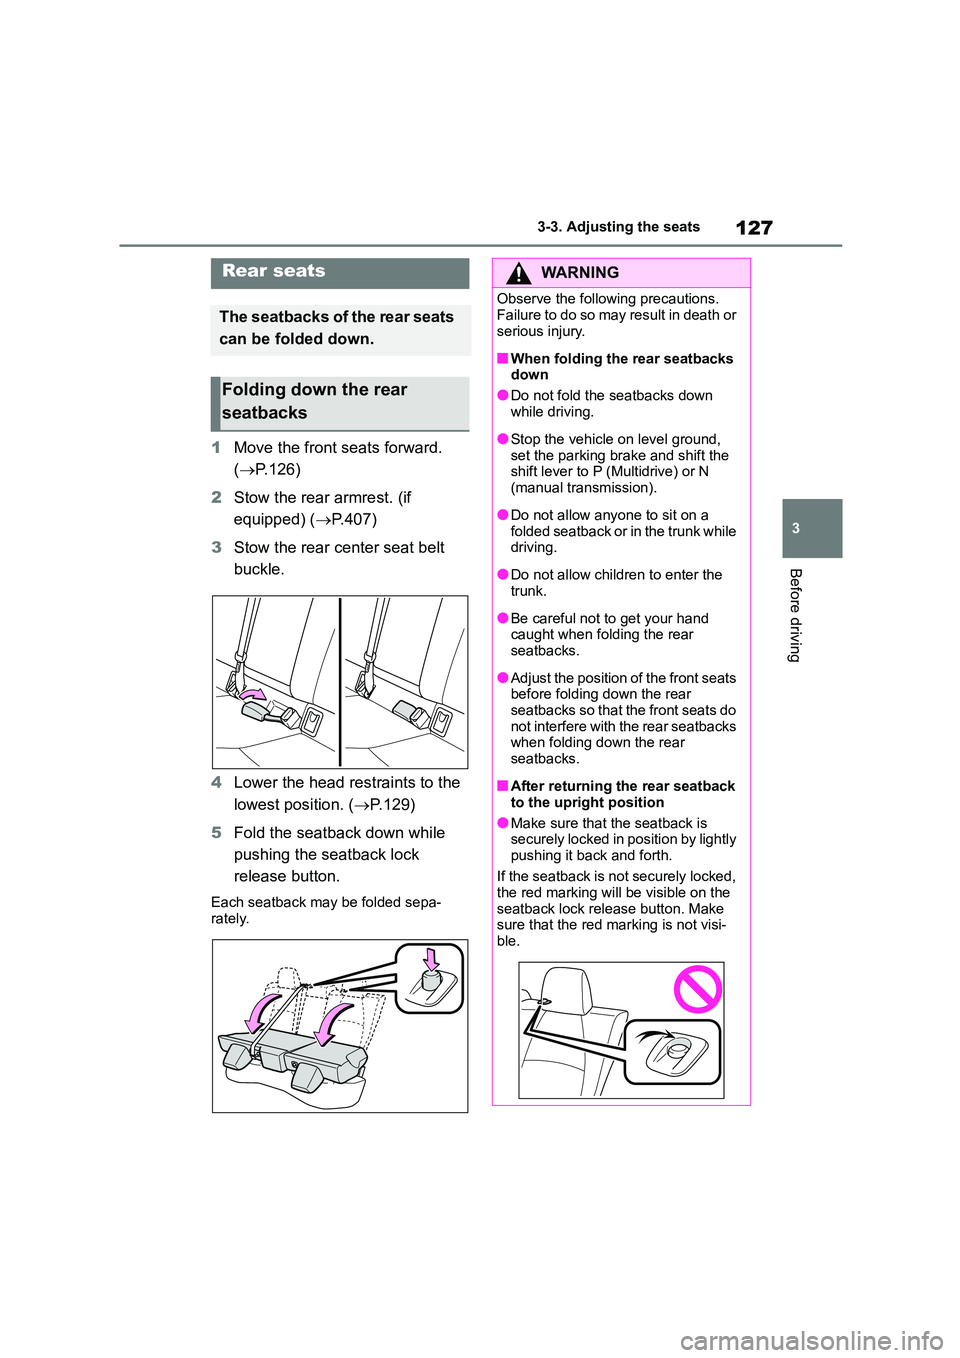
1 Move the front seats forward.
( P.126)
2 Stow the rear armrest. (if
equipped) ( P.407)
3 Stow the rear center seat belt
buckle.
4 Lower the head restraints to the
lowest position. ( P.129)
5 Fold the seatback down while
pushing the seatback lock
release button.
Each seatback may be folded sepa- rately.
Rear seats
The seatbacks of the rear seats
can be folded down.
Folding down the rear
seatbacks
WA R N I N G
Observe the following precautions.
Failure to do so may result in death or
serious injury.
■When folding the rear seatbacks
down
●Do not fold the seatbacks down
while driving.
●Stop the vehicle on level ground, set the parking brake and shift the
shift lever to P (Multidrive) or N
(manual transmission).
●Do not allow anyone to sit on a
folded seatback or in the trunk while driving.
●Do not allow children to enter the trunk.
●Be careful not to get your hand caught when folding the rear
seatbacks.
●Adjust the position of the front seats
before folding down the rear
seatbacks so that the front seats do not interfere with the rear seatbacks
when folding down the rear
seatbacks.
■After returning the rear seatback
to the upright position
●Make sure that the seatback is
securely locked in position by lightly
pushing it back and forth.
If the seatback is not securely locked,
the red marking will be visible on the
seatback lock releas e button. Make sure that the red marking is not visi-
ble.
Page 130 of 678
1283-3. Adjusting the seats
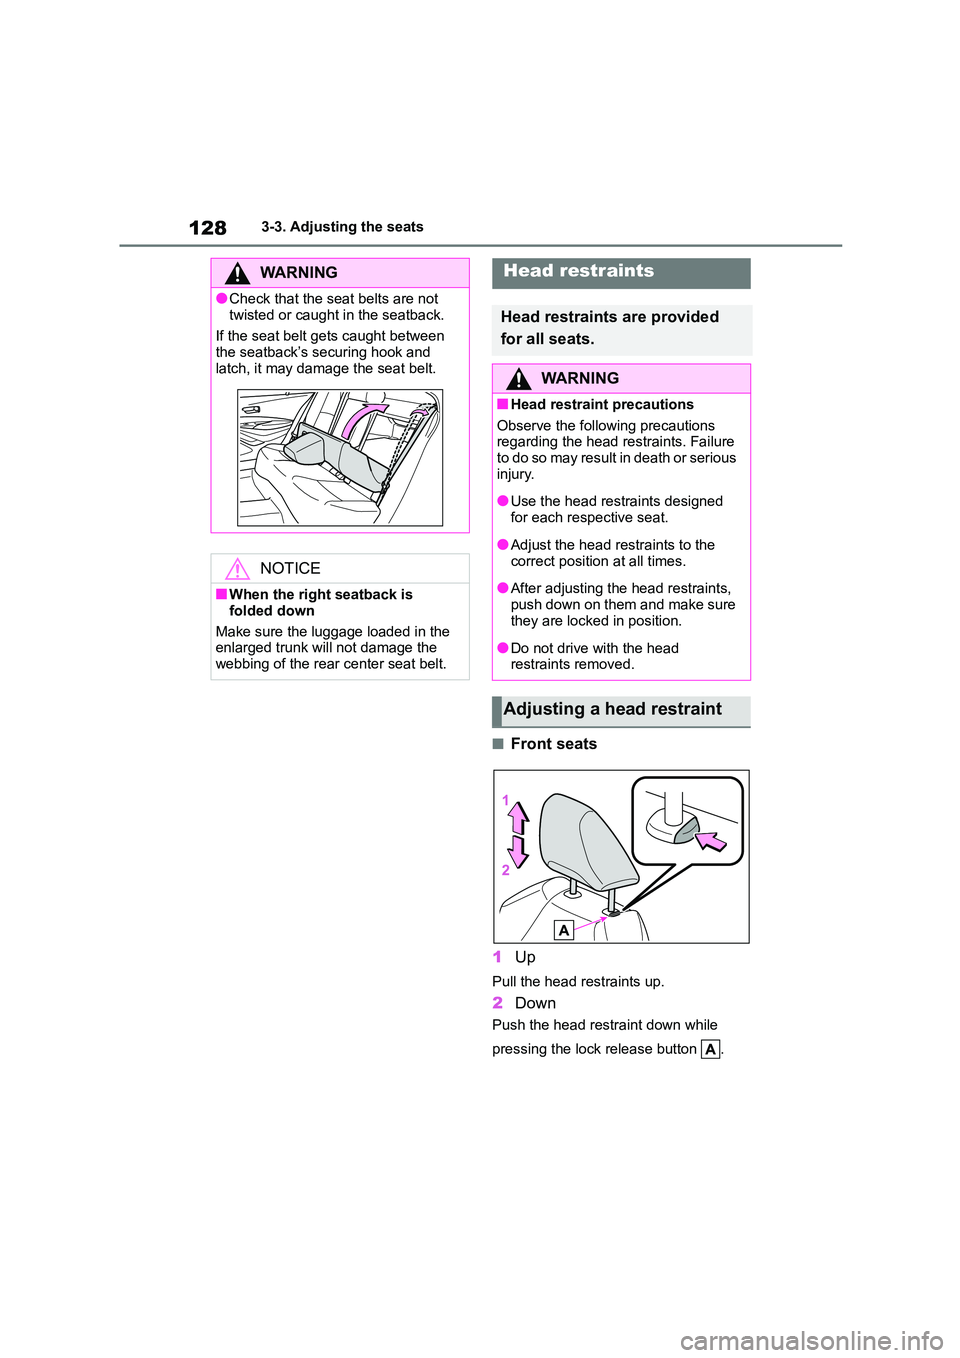
■Front seats
1 Up
Pull the head restraints up.
2Down
Push the head restraint down while
pressing the lock release button .
WA R N I N G
●Check that the seat belts are not
twisted or caught in the seatback.
If the seat belt gets caught between the seatback’s securing hook and
latch, it may damage the seat belt.
NOTICE
■When the right seatback is
folded down
Make sure the luggage loaded in the
enlarged trunk will not damage the
webbing of the rear center seat belt.
Head restraints
Head restraints are provided
for all seats.
WA R N I N G
■Head restraint precautions
Observe the following precautions
regarding the head restraints. Failure to do so may result in death or serious
injury.
●Use the head restraints designed
for each respective seat.
●Adjust the head restraints to the
correct position at all times.
●After adjusting the head restraints,
push down on them and make sure
they are locked in position.
●Do not drive with the head
restraints removed.
Adjusting a head restraint
Page 459 of 678
457
7
7-3. Do-it-yourself maintenance
Maintenance and care
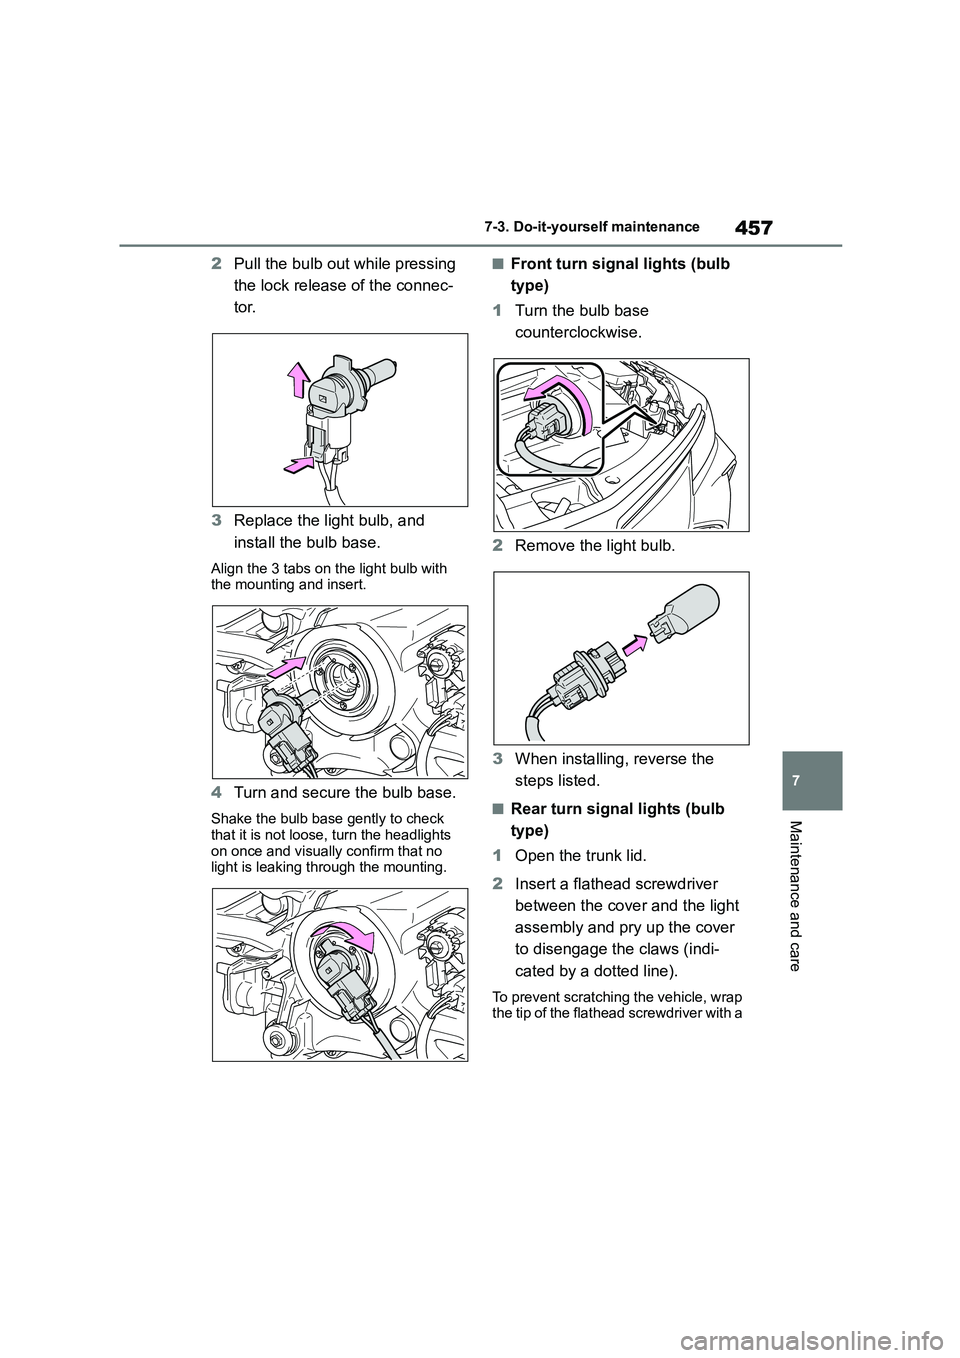
2 Pull the bulb out while pressing
the lock release of the connec-
tor.
3 Replace the light bulb, and
install the bulb base.
Align the 3 tabs on the light bulb with the mounting and insert.
4 Turn and secure the bulb base.
Shake the bulb base gently to check that it is not loose, turn the headlights
on once and visually confirm that no
light is leaking through the mounting.
■Front turn signal lights (bulb
type)
1 Turn the bulb base
counterclockwise.
2 Remove the light bulb.
3 When installing, reverse the
steps listed.
■Rear turn signal lights (bulb
type)
1 Open the trunk lid.
2 Insert a flathead screwdriver
between the cover and the light
assembly and pry up the cover
to disengage the claws (indi-
cated by a dotted line).
To prevent scratching the vehicle, wrap
the tip of the flathead screwdriver with a
Page 470 of 678
4688-2. Steps to take in an emergency
5Securely attach cables or chains
to the towing eyelet.
Take care not to damage the vehicle
body.
6 Enter the vehicle being towed
and start the engine.
If the engine does not start, turn the
engine switch to ON.
7 Shift the shift lever to N and
release the parking brake.
Vehicles with electric parking brake:
Turn automatic mode off. P. 1 7 4
When the shift lever cannot be shifted
(vehicles with a Multidrive): P. 1 6 6
■While towing
If the engine is not running, the power
assist for the brakes and steering will
not function, making steering and brak- ing more difficult.
■Wheel nut wrench
Vehicles with wheel nut wrench: Wheel
nut wrench is installed in trunk. ( P.482, 498)
WA R N I N G
Observe the following precautions.
Failure to do so may result in death or
serious injury.
■While towing
●When towing using cables or chains, avoid sudden starts, etc.
which place excessive stress on the
towing eyelets, cables or chains. The towing eyelets, cables or
chains may become damaged, bro-
ken debris may hit people, and cause serious damage.
●Vehicles without smart entry & start system: Do not tu rn the engine
switch to the “LOCK” position.
There is a possibility that the steer-
ing wheel is locked and cannot be operated.
●Vehicles with smart entry & start system: Do not turn the engine
switch off.
There is a possibility that the steer- ing wheel is locked and cannot be
operated.
■Installing towing eyelets to the
vehicle
Make sure that towing eyelets are installed securely.
If not securely installed, towing eye-
lets may come loose during towing.
NOTICE
■To prevent damage to the vehicle during emergency towing
Do not secure cables or chains to the
suspension components.