2022 RAM PROMASTER CITY hood open
[x] Cancel search: hood openPage 4 of 260

2
INTRODUCTION
SYMBOLS KEY ...........................................................7
VAN CONVERSIONS/CAMPERS ..............................7
VEHICLE MODIFICATIONS/ALTERATIONS .............7
SYMBOL GLOSSARY.................................................8
GETTING TO KNOW YOUR VEHICLE
KEYS ....................................................................... 10 Key Fob .............................................................10
SENTRY KEY ........................................................... 12
IGNITION SWITCH .................................................. 12
DOORS ................................................................... 13
Power Door Locks ............................................13
Auto Unlock Doors ............................................13
Sliding Side Door ..............................................13
Double Rear Swing Doors ................................15
Child-Protection Door Lock System.................15
STEERING WHEEL.................................................. 16
Tilt/Telescoping Steering Column ...................16
SEATS ...................................................................... 16
Manual Adjustment (Front Seats) ...................16
Folding Rear Seat — If Equipped .....................17
Heated Seats — If Equipped ............................18
Head Restraints ...............................................19 UCONNECT VOICE RECOGNITION ........................21
Introducing Voice Recognition.........................21
Basic Voice Commands ...................................21
Get Started .......................................................21
Additional Information .....................................21
MIRRORS ...............................................................22
Inside Rearview Mirror .....................................22
Vanity Mirror .....................................................22
Outside Mirrors ................................................22
EXTERIOR LIGHTS ..................................................24
Multifunction Lever ..........................................24
Headlights ........................................................24
Daytime Running Lights (DRLs) —
If Equipped .......................................................24
High/Low Beam Switch....................................24
Flash-To-Pass ..................................................24
Parking Lights ..................................................24
Follow Me Home/Headlight Delay ..................24
Fog Lights — If Equipped .................................25
Turn Signals ......................................................25
Lane Change Assist..........................................25
INTERIOR LIGHTS ..................................................25
Courtesy/Interior Lights ...................................25
WIPERS AND WASHERS ......................................26
Front Wiper Operation......................................27
Rear Wiper And Washer —If Equipped ............28 CLIMATE CONTROLS ............................................ 28
Manual Climate Control Descriptions And
Functions .......................................................... 28
Operating Tips .................................................. 30
INTERIOR STORAGE AND EQUIPMENT ............... 31
Storage ............................................................. 31
USB Control — If Equipped .............................. 32
Power Outlets .................................................. 32
WINDOWS ............................................................. 34
Power Window Controls —If Equipped ........... 34
Window Bar Grates — If Equipped .................. 35
Wind Buffeting .................................................35
HOOD....................................................................... 36
Opening............................................................. 36
Closing ..............................................................36
CARGO AREA FEATURES ...................................... 37
Rear Cargo Tie-Downs ..................................... 37
ROOF RACK — IF EQUIPPED................................. 37
GETTING TO KNOW YOUR
INSTRUMENT PANEL
INSTRUMENT CLUSTER......................................... 39
Instrument Cluster Descriptions ..................... 40
INSTRUMENT CLUSTER DISPLAY ....................... 40
Location And Controls...................................... 40
Change Engine Oil — If Equipped ................... 41
Instrument Cluster Display Menu Items ......... 42
22_VM_OM_EN_USC_t.book Page 2
Page 38 of 260

36GETTING TO KNOW YOUR VEHICLE
HOOD
OPENING
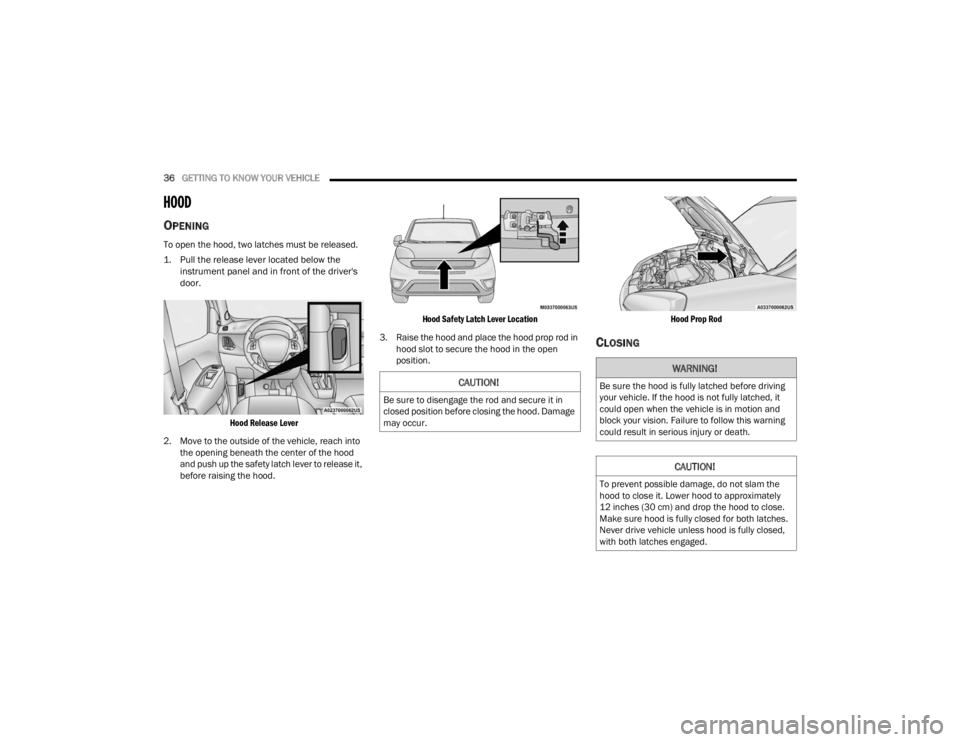
To open the hood, two latches must be released.
1. Pull the release lever located below the
instrument panel and in front of the driver's
door.
Hood Release Lever
2. Move to the outside of the vehicle, reach into the opening beneath the center of the hood
and push up the safety latch lever to release it,
before raising the hood.
Hood Safety Latch Lever Location
3. Raise the hood and place the hood prop rod in hood slot to secure the hood in the open
position.
Hood Prop Rod
CLOSING
CAUTION!
Be sure to disengage the rod and secure it in
closed position before closing the hood. Damage
may occur.
WARNING!
Be sure the hood is fully latched before driving
your vehicle. If the hood is not fully latched, it
could open when the vehicle is in motion and
block your vision. Failure to follow this warning
could result in serious injury or death.
CAUTION!
To prevent possible damage, do not slam the
hood to close it. Lower hood to approximately
12 inches (30 cm) and drop the hood to close.
Make sure hood is fully closed for both latches.
Never drive vehicle unless hood is fully closed,
with both latches engaged.
22_VM_OM_EN_USC_t.book Page 36
Page 55 of 260

STARTING AND OPERATING53
IF ENGINE FAILS TO START
If the engine fails to start after you have followed
the “Normal Starting” or “Extreme Cold Weather”
procedure, and has not experienced an extended
park condition as identified in “Extended Park
Starting” procedure, it may be flooded. Push the
accelerator pedal all the way to the floor and hold
it there. Crank the engine for no more than 10
seconds. This should clear any excess fuel in case
the engine is flooded. Leave the ignition key in the
MAR (ON/RUN) position, release the accelerator
pedal and repeat the “Normal Starting” procedure.
AFTER STARTING
The idle speed is controlled automatically, and it
will decrease as the engine warms up.
ENGINE BLOCK HEATER — IF EQUIPPED
The engine block heater warms the engine and
permits quicker starts in cold weather.
Connect the cord to a 110-115 Volt AC electrical
outlet with a grounded, three-wire extension cord.
For ambient temperatures below 0°F (-18°C), the
engine block heater is recommended. For ambient
temperatures below -20°F (-29°C), the engine
block heater is required.
The engine block heater cord is routed under the
hood, behind to the driver’s side headlamp. Follow
the steps below to properly use the engine block
heater:
1. Locate the engine block heater cord (behind
the driver’s side headlamp).
2. Undo the hook-and-loop strap that secures the heater cord in place. 3. Pull the cord to the front of the vehicle and
plug it into a grounded, three-wire extension
cord.
4. After the vehicle is running, reattach the cord to the hook-and-loop strap and properly stow
away behind the driver’s side headlamp.
NOTE:
The engine block heater cord is a factory
installed option. If your vehicle is not equipped,
heater cords are available from an authorized
dealer.
The engine block heater will require 110 Volts
AC and 6.5 Amps to activate the heater
element.
The engine block heater must be plugged in at
least one hour to have an adequate warming
effect on the engine.
WARNING!
Never pour fuel or other flammable liquid into
the throttle body air inlet opening in an
attempt to start the vehicle. This could result
in flash fire causing serious personal injury.
Do not attempt to push or tow your vehicle to
get it started. Vehicles equipped with an auto -
matic transmission cannot be started this
way. Unburned fuel could enter the catalytic
converter and once the engine has started,
ignite and damage the converter and vehicle.
If the vehicle has a discharged battery,
booster cables may be used to obtain a start
from a booster battery or the battery in
another vehicle. This type of start can be
dangerous if done improperly Ú page 181.
CAUTION!
To prevent damage to the starter, do not
continuously crank the engine for more than 10
seconds at a time. Wait 10 to 15 seconds before
trying again.
WARNING!
Remember to disconnect the engine block
heater cord before driving. Damage to the
110-115 Volt electrical cord could cause
electrocution.
4
22_VM_OM_EN_USC_t.book Page 53
Page 184 of 260

182IN CASE OF EMERGENCY
JUMP STARTING PROCEDURE
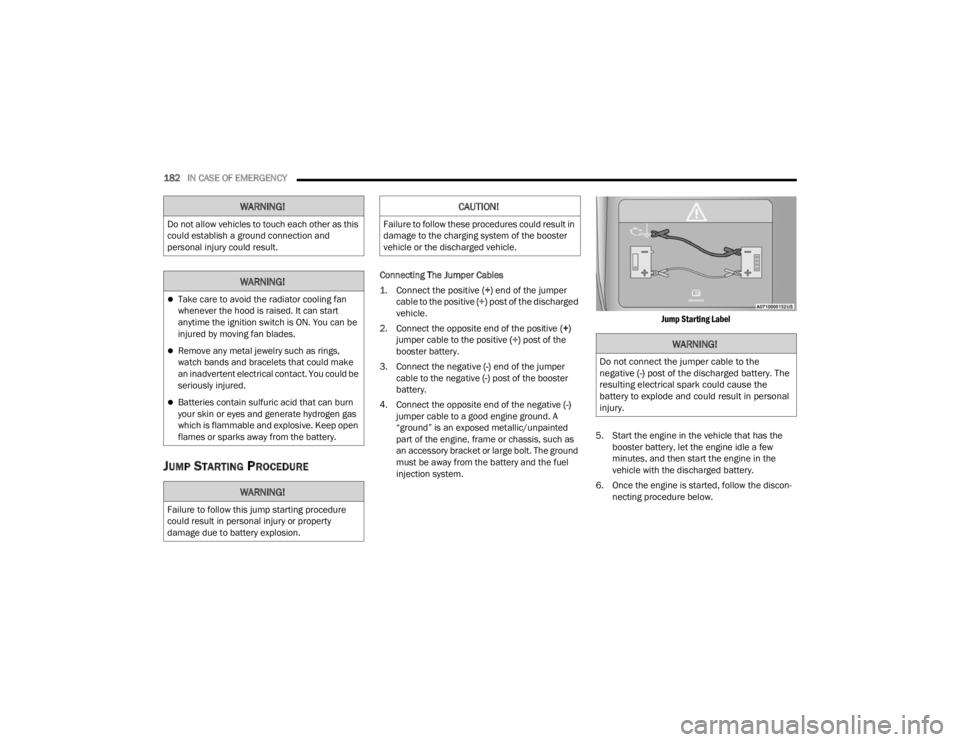
Connecting The Jumper Cables
1. Connect the positive
(+) end of the jumper
cable to the positive (+)
post of the discharged
vehicle.
2. Connect the opposite end of the positive (+)
jumper cable to the positive (+) post of the
booster battery.
3. Connect the negative (-) end of the jumper
cable to the negative (-) post of the booster
battery.
4. Connect the opposite end of the negative (-)
jumper cable to a good engine ground. A
“ground” is an exposed metallic/unpainted
part of the engine, frame or chassis, such as
an accessory bracket or large bolt. The ground
must be away from the battery and the fuel
injection system.
Jump Starting Label
5. Start the engine in the vehicle that has the booster battery, let the engine idle a few
minutes, and then start the engine in the
vehicle with the discharged battery.
6. Once the engine is started, follow the discon -
necting procedure below.
WARNING!
Do not allow vehicles to touch each other as this
could establish a ground connection and
personal injury could result.
WARNING!
Take care to avoid the radiator cooling fan
whenever the hood is raised. It can start
anytime the ignition switch is ON. You can be
injured by moving fan blades.
Remove any metal jewelry such as rings,
watch bands and bracelets that could make
an inadvertent electrical contact. You could be
seriously injured.
Batteries contain sulfuric acid that can burn
your skin or eyes and generate hydrogen gas
which is flammable and explosive. Keep open
flames or sparks away from the battery.
WARNING!
Failure to follow this jump starting procedure
could result in personal injury or property
damage due to battery explosion.
CAUTION!
Failure to follow these procedures could result in
damage to the charging system of the booster
vehicle or the discharged vehicle.
WARNING!
Do not connect the jumper cable to the
negative (-) post of the discharged battery. The
resulting electrical spark could cause the
battery to explode and could result in personal
injury.
22_VM_OM_EN_USC_t.book Page 182
Page 185 of 260

IN CASE OF EMERGENCY183
Disconnecting The Jumper Cables
1. Disconnect the negative
(-)
end of the jumper
cable from the engine ground of the vehicle
with the discharged battery.
2. Disconnect the opposite end of the negative (-)
jumper cable from the negative (-) post of the
booster battery.
3. Disconnect the positive (+) end of the jumper
cable from the positive (+) post of the booster
battery.
4. Disconnect the opposite end of the positive (+)
jumper cable from the positive (+) post of the
vehicle with the discharged battery, and
reinstall the protective cap.
If frequent jump starting is required to start your
vehicle you should have the battery and charging
system inspected at an authorized dealer.
IF YOUR ENGINE OVERHEATS
If the vehicle is overheating, it will need to be
serviced by an authorized dealer.
In any of the following situations, you can reduce
the potential for overheating by taking the
appropriate action.
On the highways — slow down.
In city traffic — while stopped, place the trans -
mission in NEUTRAL (N), but do not increase the
engine idle speed while preventing vehicle
motion with the brakes.
NOTE:There are steps that you can take to slow down an
impending overheat condition:
If your Air Conditioner (A/C) is on, turn it off. The
A/C system adds heat to the engine cooling
system and turning the A/C off can help remove
this heat.
You can also turn the temperature control to
maximum heat, the mode control to floor and
the blower control to high. This allows the heater
core to act as a supplement to the radiator and
aids in removing heat from the engine cooling
system.CAUTION!
Accessories plugged into the vehicle power
outlets draw power from the vehicle’s battery,
even when not in use (i.e., cellular devices, etc.).
Eventually, if plugged in long enough without
engine operation, the vehicle’s battery will
discharge sufficiently to degrade battery life
and/or prevent the engine from starting.
WARNING!
You or others can be badly burned by hot engine
coolant (antifreeze) or steam from your radiator.
If you see or hear steam coming from under the
hood, do not open the hood until the radiator
has had time to cool. Never try to open a cooling
system pressure cap when the radiator or
coolant bottle is hot.
CAUTION!
Driving with a hot cooling system could damage
your vehicle. If the temperature gauge reads
HOT (H), pull over and stop the vehicle. Idle the
vehicle with the air conditioner turned off until
the pointer drops back into the normal range. If
the pointer remains on HOT (H), and you hear
continuous chimes, turn the engine off
immediately and call for service.
7
22_VM_OM_EN_USC_t.book Page 183
Page 201 of 260

SERVICING AND MAINTENANCE199
NOTE:Intentional tampering with emissions control
systems can result in civil penalties being
assessed against you.
In unusual situations involving grossly
malfunctioning engine operation, a scorching odor
may suggest severe and abnormal catalyst
overheating. If this occurs, stop the vehicle, turn off
the engine and allow it to cool. Service, including a
tune-up to manufacturer's specifications, should
be obtained immediately.
To minimize the possibility of catalytic converter
damage:
Do not interrupt the ignition when the transmis -
sion is in gear and the vehicle is in motion.
Do not try to start the vehicle by pushing or
towing the vehicle.
Do not idle the engine with any ignition compo -
nents disconnected or removed, such as when
diagnostic testing, or for prolonged periods
during very rough idle or malfunctioning oper -
ating conditions.
COOLING SYSTEM Engine Coolant Checks
Check the engine coolant (antifreeze) protection
every 12 months (before the onset of freezing
weather, where applicable). If the engine coolant is
dirty, the system should be drained, flushed, and
refilled with fresh Organic Additive Technology
(OAT) coolant (conforming to MS.90032) by an
authorized dealer. Check the front of the A/C
condenser for any accumulation of bugs, leaves,
etc. If dirty, clean by gently spraying water from a
garden hose vertically down the face of the
condenser.
Check the engine cooling system hoses for brittle
rubber, cracking, tears, cuts, and tightness of the
connection at the coolant recovery bottle and
radiator. Inspect the entire system for leaks. DO
NOT REMOVE THE COOLANT PRESSURE CAP
WHEN THE COOLING SYSTEM IS HOT.WARNING!
You or others can be badly burned by hot
engine coolant (antifreeze) or steam from your
radiator. If you see or hear steam coming from
under the hood, do not open the hood until the
radiator has had time to cool. Never open a
cooling system pressure cap when the radi -
ator or coolant bottle is hot.
Keep hands, tools, clothing, and jewelry away
from the radiator cooling fan when the hood is
raised. The fan starts automatically and may
start at any time, whether the engine is
running or not.
When working near the radiator cooling fan,
disconnect the fan motor lead or turn the igni -
tion to the OFF position. The fan is tempera -
ture controlled and can start at any time the
ignition is in the ON position.
8
22_VM_OM_EN_USC_t.book Page 199
Page 204 of 260

202SERVICING AND MAINTENANCE
(Continued)
Cooling System Notes
NOTE:When the vehicle is stopped after a few miles/kilo-
meters of operation, you may observe vapor
coming from the front of the engine compartment.
This is normally a result of moisture from rain,
snow, or high humidity accumulating on the
radiator and being vaporized when the thermostat
opens, allowing hot engine coolant to enter the
radiator.
If an examination of your engine compartment
shows no evidence of radiator or hose leaks, the
vehicle may be safely driven. The vapor will soon
dissipate.
Do not overfill the coolant expansion bottle.
Check the coolant freeze point in the radiator
and in the coolant expansion bottle. If engine
coolant needs to be added, the contents of the
coolant expansion bottle must also be protected
against freezing.
If frequent engine coolant additions are
required, the cooling system should be pressure
tested for leaks.
Maintain engine coolant concentration at a
minimum of 50% OAT coolant (conforming to
MS.90032) and distilled water for proper corro -
sion protection of your engine which contains
aluminum components.
Make sure that the coolant expansion bottle
overflow hoses are not kinked or obstructed.
Keep the front of the radiator clean. If your
vehicle is equipped with air conditioning, keep
the front of the condenser clean.
Do not change the thermostat for Summer or
Winter operation. If replacement is ever neces -
sary, install ONLY the correct type thermostat.
Other designs may result in unsatisfactory
engine cooling performance, poor gas mileage,
and increased emissions.
BRAKE SYSTEM
In order to ensure brake system performance, all
brake system components should be inspected
periodically. For the proper maintenance intervals
Ú page 190.
Brake Master Cylinder
The fluid in the master cylinder should be checked
when performing under hood services or
immediately if the Brake Warning Light is
illuminated.
Be sure to clean the top of the master cylinder area
before removing the cap. If necessary, add fluid to
bring the fluid level up to the requirements
described on the brake fluid reservoir. With disc
brakes, fluid level can be expected to fall as the
brake pads wear. Brake fluid level should be
checked when pads are replaced. However, low
fluid level may be caused by a leak and a checkup
may be needed. Use only the manufacturer
recommended brake fluid Ú page 241.
WARNING!
Riding the brakes can lead to brake failure and
possibly a collision. Driving with your foot resting
or riding on the brake pedal can result in
abnormally high brake temperatures, excessive
lining wear, and possible brake damage. You
would not have your full braking capacity in an
emergency.
WARNING!
Use only the manufacturer recommended
brake fluid Úpage 241. Using the wrong type
of brake fluid can severely damage your brake
system and/or impair its performance. The
proper type of brake fluid for your vehicle is
also identified on the original factory installed
hydraulic master cylinder reservoir.
22_VM_OM_EN_USC_t.book Page 202
Page 254 of 260

252 Speed Control Cancel
......................................................... 62Speed Control (Cruise Control)........................ 60Starting............................................................ 52Automatic Transmission.............................. 52Cold Weather.............................................. 52Engine Fails To Start................................... 53Steering........................................................... 16Power.......................................................... 60Tilt Column.................................................. 16Wheel, Tilt................................................... 16Steering Wheel Audio Controls...................... 128Steering Wheel Mounted Sound
System Controls............................................ 128Storage............................................................ 31Storage, Vehicle...................................... 30, 233Storing Your Vehicle...................................... 233Sun Visor Extension......................................... 22Sway Control, Trailer...................................... 134Symbol Glossary................................................ 8Synthetic Engine Oil....................................... 196
T
Telescoping Steering Column.......................... 16Tie Down Hooks, Cargo.................................... 37Tilt Steering Column........................................ 16Tire And Loading Information Placard........... 221Tire Markings................................................. 217Tire Safety Information.................................. 217Tire Service Kit.............................................. 179
Tires...................................169, 225, 229, 232Aging (Life Of Tires).................................. 227Air Pressure.............................................. 225Chains...................................................... 232Changing.................................................. 171Compact Spare......................................... 229General Information........................ 225, 229High Speed............................................... 226Inflation Pressure..................................... 225Jacking..................................................... 171Life Of Tires.............................................. 227Load Capacity.................................. 221, 222Pressure Monitoring System (TPMS)..47, 135Quality Grading......................................... 232Radial....................................................... 226Replacement............................................ 228Rotation.................................................... 232Safety.............................................. 217, 225Sizes......................................................... 218Snow Tires................................................ 229Spare Tires...................................... 229, 230Spinning................................................... 227Trailer Towing.............................................. 72Tread Wear Indicators.............................. 227Wheel Nut Torque..................................... 236To Open Hood.................................................. 36Tongue Weight/Trailer Weight......................... 71
Towing..............................................................68Disabled Vehicle....................................... 187Guide...........................................................71Recreational................................................75Weight.........................................................71Towing Behind A Motorhome...........................75Traction............................................................76Traction Control............................................ 134Trailer Sway Control (TSC)............................. 134Trailer Towing...................................................68Hitches........................................................70Minimum Requirements..............................71Tips..............................................................74Trailer And Tongue Weight...........................71Wiring..........................................................73Trailer Towing Guide........................................71Trailer Weight...................................................71Transmission....................................................56Automatic................................... 55, 56, 203Fluid.......................................................... 241Maintenance............................................ 203Transporting Pets.......................................... 168Tread Wear Indicators................................... 227Trip Computer..................................................43Turn Signals.....................................................49
22_VM_OM_EN_USC_t.book Page 252