2022 RAM PROMASTER CITY audio
[x] Cancel search: audioPage 6 of 260

4
MULTIMEDIA
UCONNECT SYSTEMS ........................................... 78
CYBERSECURITY ................................................... 78
UCONNECT SETTINGS .......................................... 79 Uconnect 3/3 NAV Settings .............................79
UCONNECT INTRODUCTION.................................. 88
Identifying Your Radio ......................................88
Safety And General Information ......................90
UCONNECT MODES ............................................... 91
Radio Mode ......................................................91
Media Mode......................................................98
Phone Mode ................................................. 100
NAVIGATION MODE — IF EQUIPPED ..................110
Operating Navigation Mode —If Equipped ... 110
STEERING WHEEL AUDIO CONTROLS —
IF EQUIPPED ........................................................ 128
Radio Operation ............................................ 128
Media Mode................................................... 129
RAM TELEMATICS - IF EQUIPPED ...................... 129
Ram Telematics General Information .......... 129
RADIO OPERATION AND MOBILE PHONES ..... 130
Regulatory And Safety Information .............. 130
SAFETY
SAFETY FEATURES .............................................. 131Four-Wheel Anti-Lock Brake System (ABS).. 131
Electronic Brake Control (EBC) System ...... 132
AUXILIARY DRIVING SYSTEMS.......................... 135
Tire Pressure Monitoring System (TPMS) .... 135
OCCUPANT RESTRAINT SYSTEMS ................... 137
Occupant Restraint Systems ........................ 137
Important Safety Precautions ...................... 137Seat Belt Systems ........................................ 138Supplemental Restraint Systems (SRS) ...... 144Child Restraints ............................................. 152
SAFETY TIPS ....................................................... 168
Transporting Passengers .............................. 168Transporting Pets ......................................... 168
Safety Checks You Should Make Inside
The Vehicle ................................................... 168
Periodic Safety Checks You Should Make
Outside The Vehicle ...................................... 169
Exhaust Gas................................................... 170
Carbon Monoxide Warnings ........................ 170
IN CASE OF EMERGENCY
HAZARD WARNING FLASHERS......................... 171
JACKING AND TIRE CHANGING ......................... 171
Preparations For Jacking ............................. 171
Jack Location — If Equipped ......................... 172
Removing The Spare Tire —If Equipped....... 172 Jacking Instructions ...................................... 174
Vehicles With Alloy Wheels ........................... 177
Vehicles Equipped With Wheel Covers ........ 178
TIRE SERVICE KIT — IF EQUIPPED .................... 179
Tire Service Kit Storage ................................ 179Tire Service Kit Usage ................................... 179
JUMP STARTING .................................................. 181
Preparations For Jump Starting ................... 181Jump Starting Procedure .............................. 182
IF YOUR ENGINE OVERHEATS ........................... 183
IGNITION KEY REMOVAL OVERRIDE ................. 184
GEAR SELECTOR OVERRIDE .............................. 184
FREEING A STUCK VEHICLE .............................. 185
TOWING A DISABLED VEHICLE .......................... 187
ENHANCED ACCIDENT RESPONSE SYSTEM
(EARS) .................................................................. 188
EVENT DATA RECORDER (EDR) ......................... 188
SERVICING AND MAINTENANCE
SCHEDULED SERVICING .................................... 189
Maintenance Plan ......................................... 190
ENGINE COMPARTMENT .................................... 193
Engine Compartment — 2.4L ....................... 193
Checking Oil Level ........................................ 194
Adding Washer Fluid .................................... 194
Maintenance-Free Battery ........................... 194
Pressure Washing ......................................... 195
22_VM_OM_EN_USC_t.book Page 4
Page 65 of 260

STARTING AND OPERATING63
PARKSENSE REAR PARK ASSIST
A
LERTS
If an obstacle is behind the vehicle when REVERSE gear is engaged, an audible alert is activated.
The tones emitted by the loudspeaker inform the driver that the vehicle is approaching an obstacle. The pauses between the tones are directly proportional to
the distance from the obstacle. Pulses emitted in quick succession indicate the presence of a very close obstacle. A continuous tone indicates that the obstacle
is less than 12 inches (30 cm) away.
While audible signals are emitted, the audio system is muted.
The audible signal is turned off immediately if the distance increases. The tone cycle remains constant if the distance measured by the inner sensors is constant.
If this condition occurs for the external sensors, the signal is turned off after three seconds (stopping warnings during maneuvers parallel to walls).
Audible And Visual Signals Supplied By The Park Assist System
SIGNAL MEANING INDICATION
Obstacle Distance
An obstacle is present within the sensors' field of view
Audible signal
(dashboard loudspeaker)
• Sound pulses emitted at a rate that increases as
the distance decreases
• Emits continuous tone at 12 inches (30 cm)
• Adjustable volume level programmable through
personal settings in the instrument cluster display
Ú page 40
Failure Sensor or system failuresVisual Signal
(instrument panel)
• Icon appears on display
• Message is displayed on instrument cluster
display (if equipped)4
22_VM_OM_EN_USC_t.book Page 63
Page 67 of 260

STARTING AND OPERATING65
If it’s necessary to keep the ball mount and hitch
ball assembly mounted for a long period, it is
possible to filter out the ball mount and hitch ball
assembly presence in the sensor field of view. The
filtering operation must be performed only by an
authorized dealer.
PARKVIEW REAR BACK UP CAMERA
Your vehicle is equipped with the ParkView Rear
Back Up Camera that allows you to see an
on-screen image of the rear surroundings of your
vehicle whenever the gear selector is put into
REVERSE. The image will be displayed on the
touchscreen display along with a caution note to “Check Entire Surroundings” across the top of the
screen. After five seconds this note will disappear.
The ParkView camera is located on the rear of the
vehicle above the rear license plate.
The Rear Back Up Camera can also be activated
when the vehicle is not in REVERSE through the
Uconnect system Ú
page 79.
NOTE:If one of the rear cargo doors is not completely
closed, the Back Up Camera cannot provide an
accurate image of the area behind the vehicle. A
dedicated message will appear on the Uconnect
display indicating the camera is not in the correct
position.
The Camera Delay setting can be set to on/off in
the rear camera settings menu. When the vehicle
is shifted out of REVERSE and the Camera Delay is
turned off, the rear camera mode is exited and the
navigation or audio screen appears on display
again.
When the transmission is shifted out of REVERSE,
and Camera Delay is activated in the menu screen,
the camera image will continue to be displayed for
up to 10 seconds, unless the speed of the vehicle
is greater than 8 mph (13 km/h), the transmission
is in PARK, or the ignition is placed in the STOP
(OFF/LOCK) position. When displayed, static grid lines will illustrate the
width of the vehicle and will show separate zones
that will help indicate the distance to the rear of
the vehicle. The following table shows the
approximate distances for each zone:
CAUTION!
ParkSense is only a parking aid and it is
unable to recognize every obstacle, including
small obstacles. Parking curbs might be
temporarily detected or not detected at all.
Obstacles located above or below the sensors
will not be detected when they are in close
proximity.
The vehicle must be driven slowly when using
ParkSense in order to be able to stop in time
when an obstacle is detected. It is recom
-
mended that the driver looks over his/her
shoulder when using ParkSense.
Zone Distance To The Rear
Of The Vehicle
Red 0 - 1 ft (0 - 30 cm)
Yellow 1 ft - 3 ft (30 cm - 1 m)
Green 3 ft or greater
(1 m or greater)
WARNING!
Drivers must be careful when backing up even
when using the ParkView Rear Back Up Camera.
Always check carefully behind your vehicle, and
be sure to check for pedestrians, animals, other
vehicles, obstructions, or blind spots before
backing up. You are responsible for the safety of
your surroundings and must continue to pay
attention while backing up. Failure to do so can
result in serious injury or death.
4
22_VM_OM_EN_USC_t.book Page 65
Page 84 of 260

82MULTIMEDIA
Voice
Clock & Date
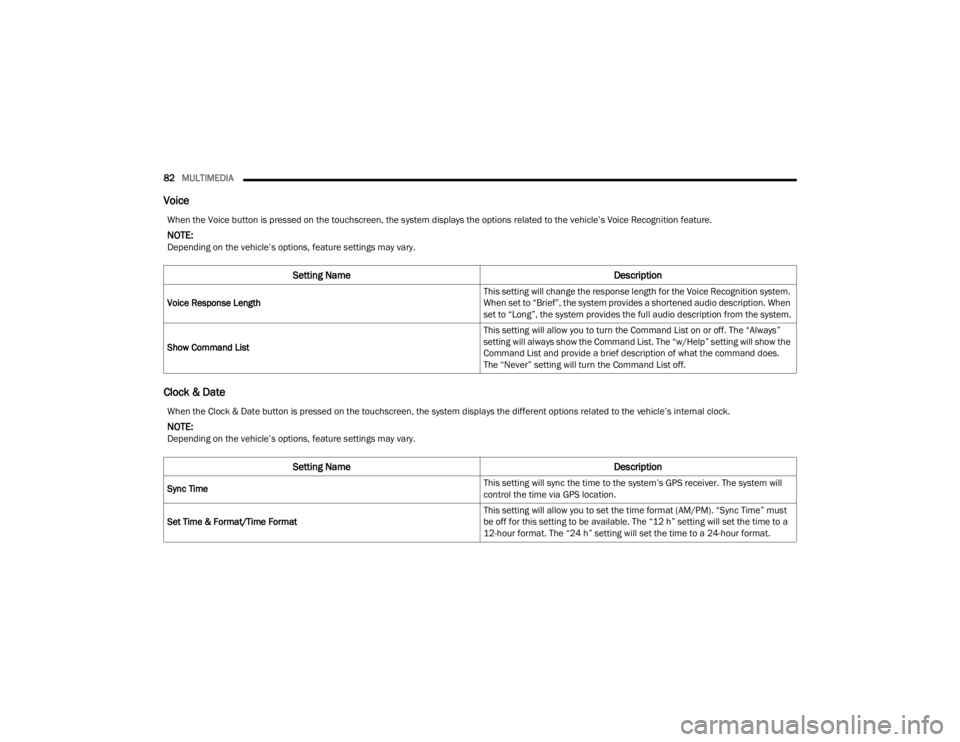
When the Voice button is pressed on the touchscreen, the system displays the options related to the vehicle’s Voice Recognition feature.
NOTE:Depending on the vehicle’s options, feature settings may vary.
Setting Name Description
Voice Response Length This setting will change the response length for the Voice Recognition system.
When set to “Brief”, the system provides a shortened audio description. When
set to “Long”, the system provides the full audio description from the system.
Show Command List This setting will allow you to turn the Command List on or off. The “Always”
setting will always show the Command List. The “w/Help” setting will show the
Command List and provide a brief description of what the command does.
The “Never” setting will turn the Command List off.
When the Clock & Date button is pressed on the touchscreen, the system displays the different options related to the vehicle’s internal clock.
NOTE:Depending on the vehicle’s options, feature settings may vary.
Setting Name
Description
Sync Time This setting will sync the time to the system’s GPS receiver. The system will
control the time via GPS location.
Set Time & Format/Time Format This setting will allow you to set the time format (AM/PM). “Sync Time” must
be off for this setting to be available. The “12 h” setting will set the time to a
12-hour format. The “24 h” setting will set the time to a 24-hour format.
22_VM_OM_EN_USC_t.book Page 82
Page 87 of 260

MULTIMEDIA85
Audio
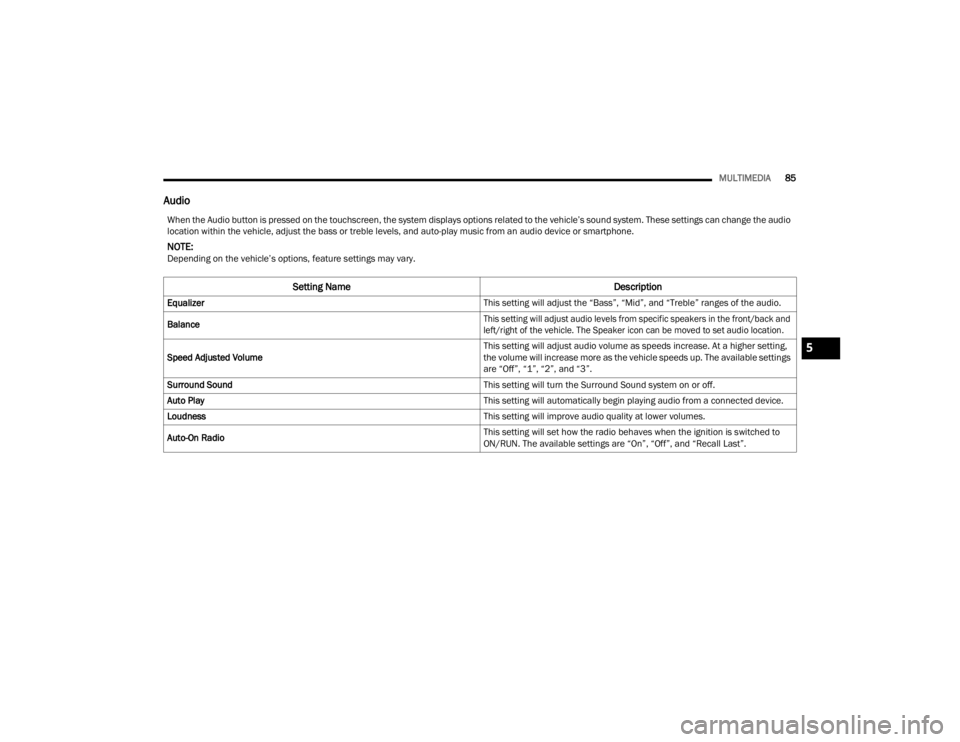
When the Audio button is pressed on the touchscreen, the system displays options related to the vehicle’s sound system. These settings can change the audio
location within the vehicle, adjust the bass or treble levels, and auto-play music from an audio device or smartphone.
NOTE:Depending on the vehicle’s options, feature settings may vary.
Setting Name Description
Equalizer This setting will adjust the “Bass”, “Mid”, and “Treble” ranges of the audio.
Balance
This setting will adjust audio levels from specific speakers in the front/back and
left/right of the vehicle. The Speaker icon can be moved to set audio location.
Speed Adjusted Volume This setting will adjust audio volume as speeds increase. At a higher setting,
the volume will increase more as the vehicle speeds up. The available settings
are “Off”, “1”, “2”, and “3”.
Surround Sound This setting will turn the Surround Sound system on or off.
Auto Play This setting will automatically begin playing audio from a connected device.
Loudness This setting will improve audio quality at lower volumes.
Auto-On Radio This setting will set how the radio behaves when the ignition is switched to
ON/RUN. The available settings are “On”, “Off”, and “Recall Last”.
5
22_VM_OM_EN_USC_t.book Page 85
Page 88 of 260

86MULTIMEDIA
Phone/Bluetooth®
SiriusXM® Setup
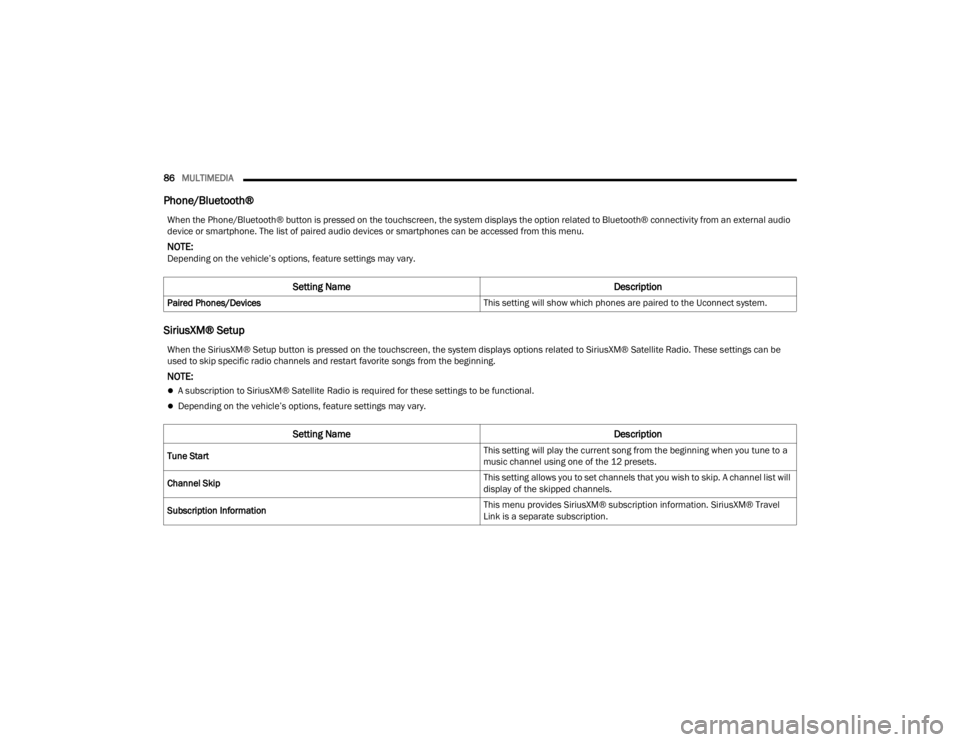
When the Phone/Bluetooth® button is pressed on the touchscreen, the system displays the option related to Bluetooth® connectivity from an external audio
device or smartphone. The list of paired audio devices or smartphones can be accessed from this menu.
NOTE:Depending on the vehicle’s options, feature settings may vary.
Setting Name Description
Paired Phones/Devices This setting will show which phones are paired to the Uconnect system.
When the SiriusXM® Setup button is pressed on the touchscreen, the system displays options related to SiriusXM® Satellite Radio. These settings can be
used to skip specific radio channels and restart favorite songs from the beginning.
NOTE:
A subscription to SiriusXM® Satellite Radio is required for these settings to be functional.
Depending on the vehicle’s options, feature settings may vary.
Setting NameDescription
Tune Start This setting will play the current song from the beginning when you tune to a
music channel using one of the 12 presets.
Channel Skip This setting allows you to set channels that you wish to skip. A channel list will
display of the skipped channels.
Subscription Information This menu provides SiriusXM® subscription information. SiriusXM® Travel
Link is a separate subscription.
22_VM_OM_EN_USC_t.book Page 86
Page 91 of 260

MULTIMEDIA89
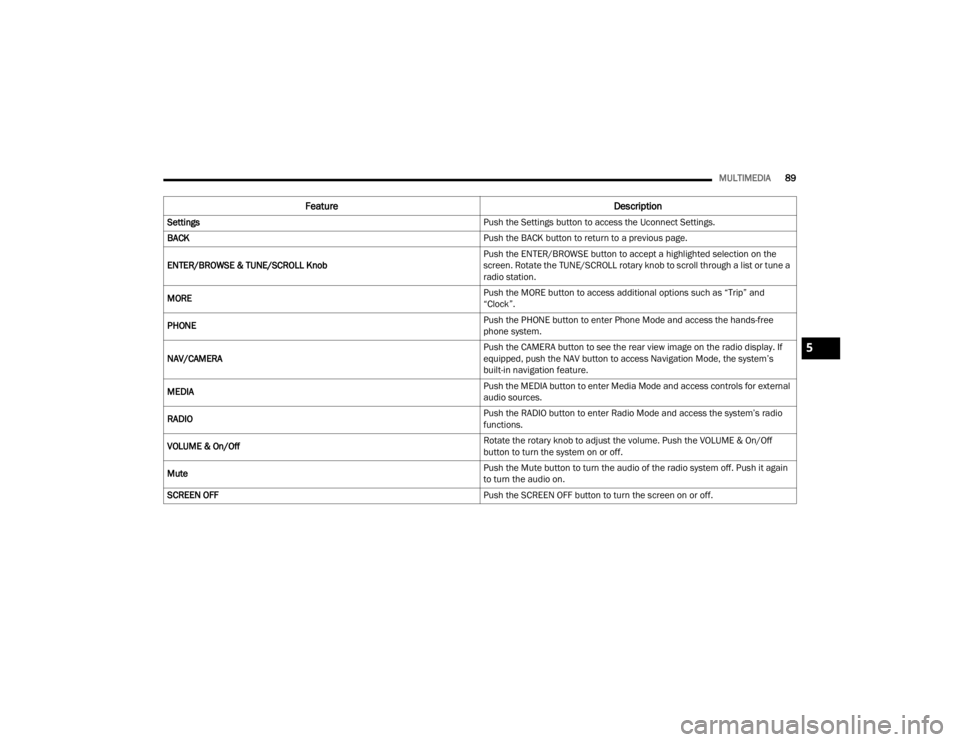
Feature Description
Settings Push the Settings button to access the Uconnect Settings.
BACK Push the BACK button to return to a previous page.
ENTER/BROWSE & TUNE/SCROLL Knob Push the ENTER/BROWSE button to accept a highlighted selection on the
screen. Rotate the TUNE/SCROLL rotary knob to scroll through a list or tune a
radio station.
MORE Push the MORE button to access additional options such as “Trip” and
“Clock”.
PHONE Push the PHONE button to enter Phone Mode and access the hands-free
phone system.
NAV/CAMERA Push the CAMERA button to see the rear view image on the radio display. If
equipped, push the NAV button to access Navigation Mode, the system’s
built-in navigation feature.
MEDIA Push the MEDIA button to enter Media Mode and access controls for external
audio sources.
RADIO Push the RADIO button to enter Radio Mode and access the system’s radio
functions.
VOLUME & On/Off Rotate the rotary knob to adjust the volume. Push the VOLUME & On/Off
button to turn the system on or off.
Mute Push the Mute button to turn the audio of the radio system off. Push it again
to turn the audio on.
SCREEN OFF Push the SCREEN OFF button to turn the screen on or off.
5
22_VM_OM_EN_USC_t.book Page 89
Page 93 of 260

MULTIMEDIA91
UCONNECT MODES
RADIO MODE
Operating Radio Mode
Uconnect 3/3 NAV With 5-inch Display Radio Mode
The radio is equipped with the following modes:
FM
AM
SiriusXM® Radio
Push the Radio button on the faceplate to enter
the Radio Mode. The different tuner modes, FM/
AM/SXM, can then be selected by pressing the
corresponding buttons on the touchscreen in the
Radio mode.
SWITCHING THE SYSTEM ON/OFF
The screen will switch on/off when the Volume &
On/Off button is pushed.
VOLUME/POWER
Rotate the Volume knob to adjust the volume.
When the audio system is turned on, the sound will
be set at the same volume level as last played.
Push the On/Off button to turn the system on or
off.
ENTER/BROWSE AND TUNE/SCROLL
CONTROL
Turn the rotary Tune/Scroll knob clockwise to
increase or counterclockwise to decrease the radio
station frequency.
SEEK FUNCTIONS
Seek Up And Seek Down
Press and release the Seek Up or Seek Down
button on the touchscreen to tune the radio to the
next available station or channel. If the radio
reaches the starting station after passing through
the entire band two times, the radio will stop at the
station where it began.
Fast Seek Up And Fast Seek Down
Press, hold, and then release the Seek Up or
Seek Down button on the touchscreen to
advance the radio through the available stations or
channels at a faster rate. The radio stops at the
next available station or channel when the button
on the touchscreen is released.
NOTE:
Pressing and holding either the Seek Up or
Seek Down button will scan the different
frequency bands at a slower rate.
1 — Preset Buttons
2 — All Presets Button
3 — Seek Down Button
4 — Radio Band Button (FM/AM/SXM)
5 — Direct Tune Button
6 — Info Button
7 — Audio Settings Button
8 — Seek Up Button
5
22_VM_OM_EN_USC_t.book Page 91