Page 27 of 260

GETTING TO KNOW YOUR VEHICLE25
Activation
Remove the key or turn the ignition to the STOP
(OFF/LOCK) position, and pull the multifunction
lever toward the steering wheel within two
minutes. Each time the lever is pulled, the
activation of the lights will be extended by 30
seconds. The activation of the lights can be
extended to a maximum of 210 seconds.
Deactivation
Pull the multifunction lever toward the steering
wheel and hold it for more than two seconds.
FOG LIGHTS — IF EQUIPPED
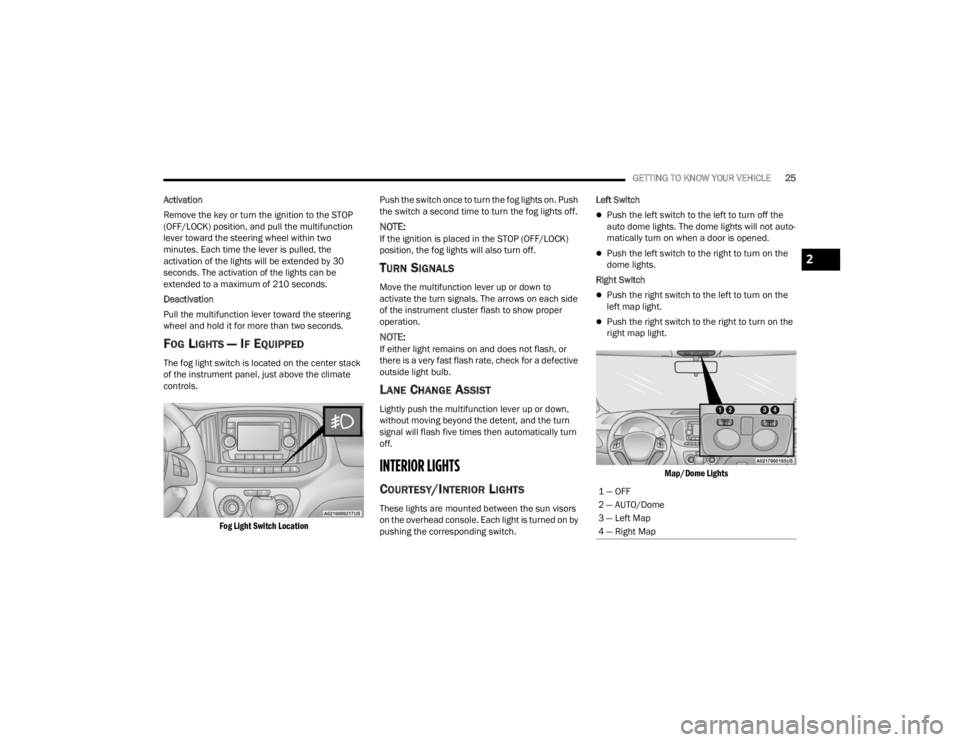
The fog light switch is located on the center stack
of the instrument panel, just above the climate
controls.
Fog Light Switch Location
Push the switch once to turn the fog lights on. Push
the switch a second time to turn the fog lights off.
NOTE:If the ignition is placed in the STOP (OFF/LOCK)
position, the fog lights will also turn off.
TURN SIGNALS
Move the multifunction lever up or down to
activate the turn signals. The arrows on each side
of the instrument cluster flash to show proper
operation.
NOTE:If either light remains on and does not flash, or
there is a very fast flash rate, check for a defective
outside light bulb.
LANE CHANGE ASSIST
Lightly push the multifunction lever up or down,
without moving beyond the detent, and the turn
signal will flash five times then automatically turn
off.
INTERIOR LIGHTS
COURTESY/INTERIOR LIGHTS
These lights are mounted between the sun visors
on the overhead console. Each light is turned on by
pushing the corresponding switch. Left Switch
Push the left switch to the left to turn off the
auto dome lights. The dome lights will not auto -
matically turn on when a door is opened.
Push the left switch to the right to turn on the
dome lights.
Right Switch
Push the right switch to the left to turn on the
left map light.
Push the right switch to the right to turn on the
right map light.
Map/Dome Lights
1 — OFF
2 — AUTO/Dome
3 — Left Map
4 — Right Map
2
22_VM_OM_EN_USC_t.book Page 25
Page 56 of 260

54STARTING AND OPERATING
ENGINE BREAK-IN RECOMMENDATIONS
A long break-in period is not required for the engine
and drivetrain (transmission and axle) in your
vehicle.
Drive moderately during the first 300 miles
(500 km). After the initial 60 miles (100 km),
speeds up to 50 or 55 mph (80 or 90 km/h) are
desirable.
While cruising, brief full-throttle acceleration within
the limits of local traffic laws contributes to a good
break-in. Wide-open throttle acceleration in low
gear can be detrimental and should be avoided.
The engine oil installed in the engine at the factory
is a high-quality energy conserving type lubricant.
Oil changes should be consistent with anticipated
climate conditions under which vehicle operations
will occur. For the recommended viscosity and
quality grades Ú page 240.
NOTE:A new engine may consume some oil during its first
few thousand miles (kilometers) of operation. This
should be considered a normal part of the break-in
and not interpreted as a concern. Please check
your oil level with the engine oil indicator often
during the break-in period. Add oil as required.
PARKING BRAKE
Before leaving the vehicle, make sure that the
parking brake is fully applied. Also, be certain to
leave an automatic transmission in PARK.
The parking brake lever is located in the center
console. To apply the parking brake, pull the lever
up as firmly as possible. To release the parking
brake, pull the lever up slightly, push the center
button, then lower the lever completely.
Parking Brake
When the parking brake is applied with the ignition
switch in the ON position, the Brake Warning Light
in the instrument cluster display will illuminate.
NOTE:
When the parking brake is applied and the auto
-
matic transmission is placed in gear, the Brake
Warning Light will flash. If vehicle speed is
detected, a chime will sound to alert the driver.
Fully release the parking brake before
attempting to move the vehicle.
This light only shows that the parking brake is
applied. It does not show the degree of brake
application.
When parking on a hill, it is important to turn the
front wheels toward the curb on a downhill grade
and away from the curb on an uphill grade. For
vehicles equipped with an automatic transmission,
apply the parking brake before placing the gear
selector in PARK, otherwise the load on the
transmission locking mechanism may make it
difficult to move the gear selector out of PARK. The
parking brake should always be applied whenever
the driver is not in the vehicle.
CAUTION!
Never use Non-Detergent Oil or Straight Mineral
Oil in the engine or damage may result.
22_VM_OM_EN_USC_t.book Page 54
Page 186 of 260

184IN CASE OF EMERGENCY
IGNITION KEY REMOVAL OVERRIDE
This vehicle is equipped with a Key Ignition Park
Interlock which requires the transmission to be in
PARK (P) before the ignition switch can be turned
to the STOP (key removal) position.
To remove the key manually, proceed as follows:
1. Firmly apply the parking brake.
2. Remove the Allen Key located in the rear cargo
area, in the tool bag (if equipped) or on the left
side in the cargo box.
3. Unlock the steering column, pull the tilt/ telescoping control handle down.
4. Pull the steering wheel outward until it is in the end of the travel position, then lock the
steering column in position, push the control
handle up until fully engaged.
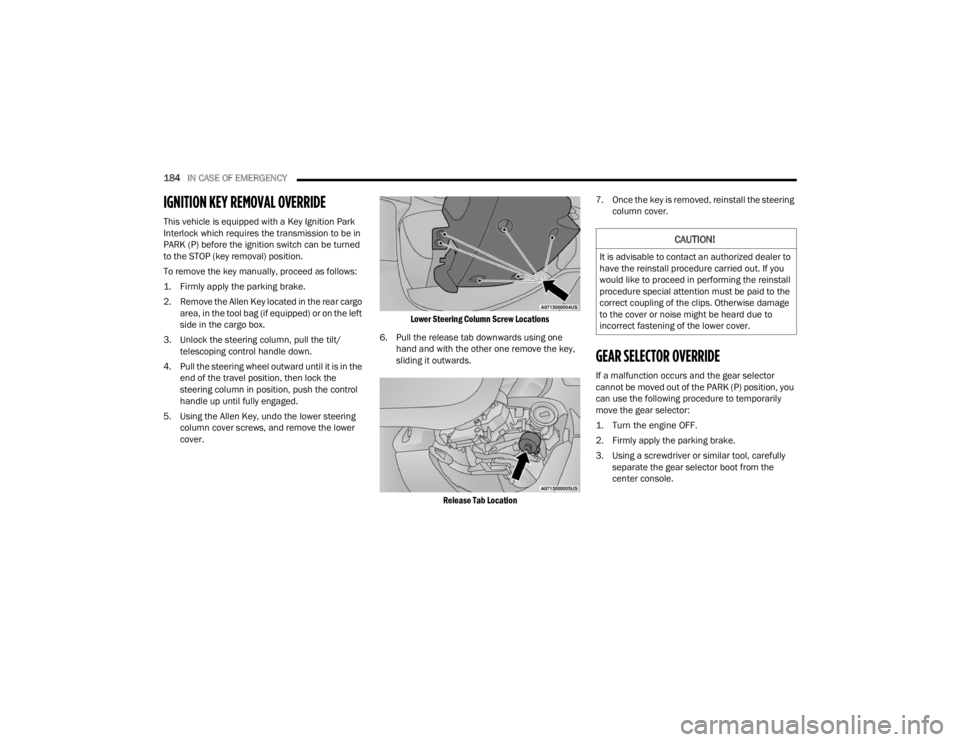
5. Using the Allen Key, undo the lower steering column cover screws, and remove the lower
cover.
Lower Steering Column Screw Locations
6. Pull the release tab downwards using one hand and with the other one remove the key,
sliding it outwards.
Release Tab Location
7. Once the key is removed, reinstall the steering
column cover.
GEAR SELECTOR OVERRIDE
If a malfunction occurs and the gear selector
cannot be moved out of the PARK (P) position, you
can use the following procedure to temporarily
move the gear selector:
1. Turn the engine OFF.
2. Firmly apply the parking brake.
3. Using a screwdriver or similar tool, carefully separate the gear selector boot from the
center console.
CAUTION!
It is advisable to contact an authorized dealer to
have the reinstall procedure carried out. If you
would like to proceed in performing the reinstall
procedure special attention must be paid to the
correct coupling of the clips. Otherwise damage
to the cover or noise might be heard due to
incorrect fastening of the lower cover.
22_VM_OM_EN_USC_t.book Page 184