2022 RAM PROMASTER CITY light
[x] Cancel search: lightPage 76 of 260

74STARTING AND OPERATING
Seven-Pin Connector
TOWING TIPS
Before towing, practice turning, stopping, and
backing up the trailer in an area located away from
heavy traffic.
Automatic Transmission
The DRIVE range can be selected when towing. The
transmission controls include a drive strategy to
avoid frequent shifting when towing. However, if
frequent shifting does occur while in DRIVE, use
the Electronic Range Select (ERS) shift control to
select a lower gear range.
NOTE:Using a lower gear range while operating the
vehicle under heavy loading conditions will
improve performance and extend transmission life
by reducing excessive shifting and heat build up.
This action will also provide better engine braking.
Electronic Range Select (ERS)
When using the ERS shift control, select the
highest gear that allows for adequate perfor -
mance and avoids frequent downshifts. For
example, choose “5” if the desired speed can be
maintained. Choose “4” or “3” if needed to
maintain the desired speed.
To prevent excess heat generation, avoid
continuous driving at high RPM. Reduce vehicle
speed as necessary to avoid extended driving at
high RPM. Return to a higher gear range or
vehicle speed when grade and road conditions
allow.
Cruise Control — If Equipped
Do not use on hilly terrain or with heavy loads.
When using the Cruise Control, if you experience
speed drops greater than 10 mph (16 km/h),
disengage until you can get back to cruising
speed.
Use Cruise Control in flat terrain and with light
loads to maximize fuel efficiency.
1 — Backup Lamps
2 — Running Lamps
3 — Left Stop/Turn
4 — Ground
5 — Battery
6 — Right Stop/Turn
7 — Electric Brakes
22_VM_OM_EN_USC_t.book Page 74
Page 79 of 260

STARTING AND OPERATING77
(Continued)
(Continued)
Flowing/Rising Water
Shallow Standing Water
Although your vehicle is capable of driving through
shallow standing water, consider the following
Cautions and Warnings before doing so.
WARNING!
Do not drive on or across a road or path where
water is flowing and/or rising (as in storm
run-off). Flowing water can wear away the road
or path's surface and cause your vehicle to sink
into deeper water. Furthermore, flowing and/or
rising water can carry your vehicle away swiftly.
Failure to follow this warning may result in
injuries that are serious or fatal to you, your
passengers, and others around you.
WARNING!
Driving through standing water limits your
vehicle’s traction capabilities. Do not exceed
5 mph (8 km/h) when driving through
standing water.
Driving through standing water limits your
vehicle’s braking capabilities, which increases
stopping distances. Therefore, after driving
through standing water, drive slowly and
lightly press on the brake pedal several times
to dry the brakes.
Failure to follow these warnings may result in
injuries that are serious or fatal to you, your
passengers, and others around you.
CAUTION!
Always check the depth of the standing water
before driving through it. Never drive through
standing water that is deeper than the bottom
of the tire rims mounted on the vehicle.
Determine the condition of the road or the
path that is under water and if there are any
obstacles in the way before driving through
the standing water.
WARNING!
Do not exceed 5 mph (8 km/h) when driving through standing water. This will minimize
wave effects.
Driving through standing water may cause
damage to your vehicle’s drivetrain compo -
nents. Always inspect your vehicle’s fluids
(i.e., engine oil, transmission, axle, etc.) for
signs of contamination (i.e., fluid that is milky
or foamy in appearance) after driving through
standing water. Do not continue to operate
the vehicle if any fluid appears contaminated,
as this may result in further damage. Such
damage is not covered by the New Vehicle
Limited Warranty.
Getting water inside your vehicle’s engine can
cause it to lock up and stall out, and cause
serious internal damage to the engine. Such
damage is not covered by the New Vehicle
Limited Warranty.
CAUTION!
4
22_VM_OM_EN_USC_t.book Page 77
Page 82 of 260
80MULTIMEDIA
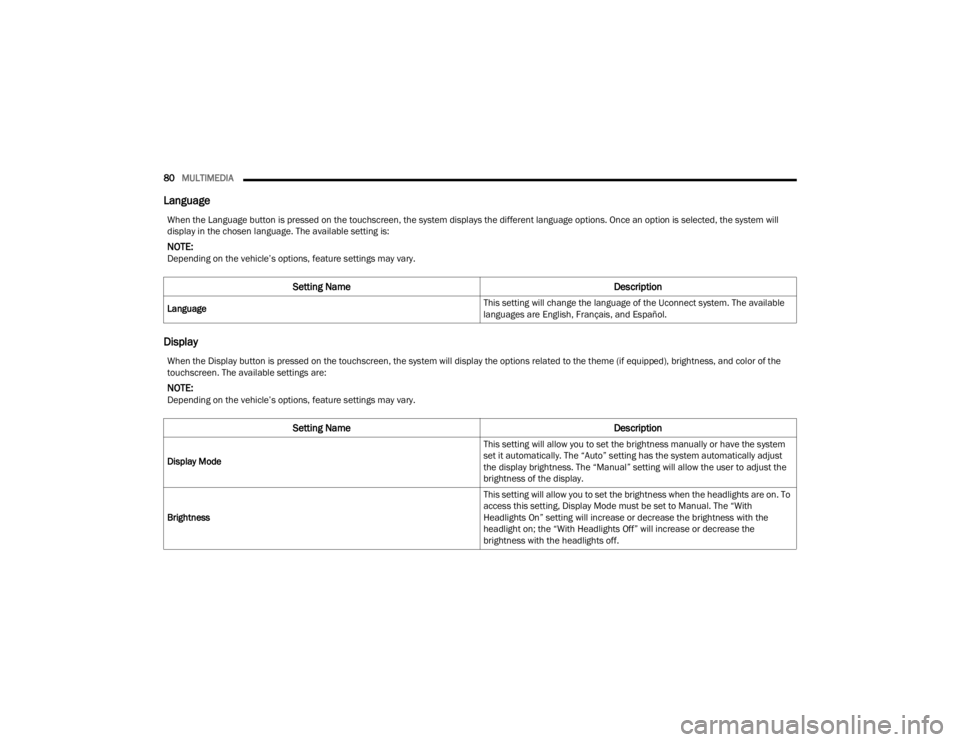
Language
Display
When the Language button is pressed on the touchscreen, the system displays the different language options. Once an option is selected, the system will
display in the chosen language. The available setting is:
NOTE:Depending on the vehicle’s options, feature settings may vary.
Setting Name Description
Language This setting will change the language of the Uconnect system. The available
languages are English, Français, and Español.
When the Display button is pressed on the touchscreen, the system will display the options related to the theme (if equipped), brightness, and color of the
touchscreen. The available settings are:
NOTE:Depending on the vehicle’s options, feature settings may vary.
Setting Name
Description
Display Mode This setting will allow you to set the brightness manually or have the system
set it automatically. The “Auto” setting has the system automatically adjust
the display brightness. The “Manual” setting will allow the user to adjust the
brightness of the display.
Brightness This setting will allow you to set the brightness when the headlights are on. To
access this setting, Display Mode must be set to Manual. The “With
Headlights On” setting will increase or decrease the brightness with the
headlight on; the “With Headlights Off” will increase or decrease the
brightness with the headlights off.
22_VM_OM_EN_USC_t.book Page 80
Page 85 of 260
MULTIMEDIA83
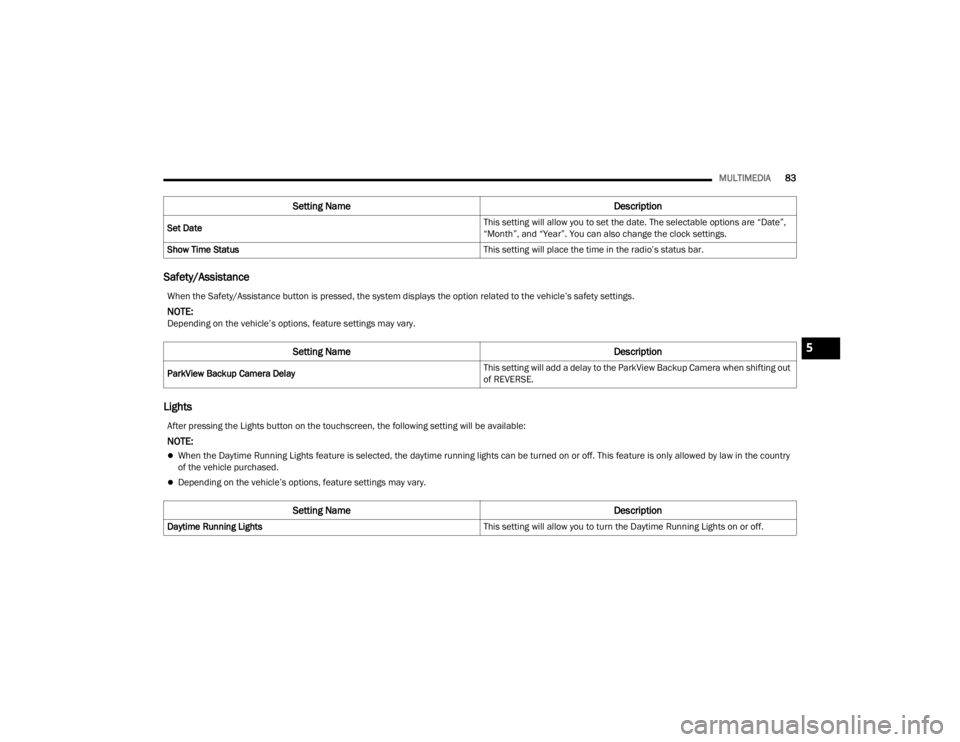
Safety/Assistance
Lights
Set Date This setting will allow you to set the date. The selectable options are “Date”,
“Month”, and “Year”. You can also change the clock settings.
Show Time Status This setting will place the time in the radio’s status bar.
Setting NameDescription
When the Safety/Assistance button is pressed, the system displays the option related to the vehicle’s safety settings.
NOTE:Depending on the vehicle’s options, feature settings may vary.
Setting NameDescription
ParkView Backup Camera Delay This setting will add a delay to the ParkView Backup Camera when shifting out
of REVERSE.
After pressing the Lights button on the touchscreen, the following setting will be available:
NOTE:
When the Daytime Running Lights feature is selected, the daytime running lights can be turned on or off. This feature is only allowed by law in the country
of the vehicle purchased.
Depending on the vehicle’s options, feature settings may vary.
Setting Name
Description
Daytime Running Lights This setting will allow you to turn the Daytime Running Lights on or off.
5
22_VM_OM_EN_USC_t.book Page 83
Page 91 of 260
MULTIMEDIA89
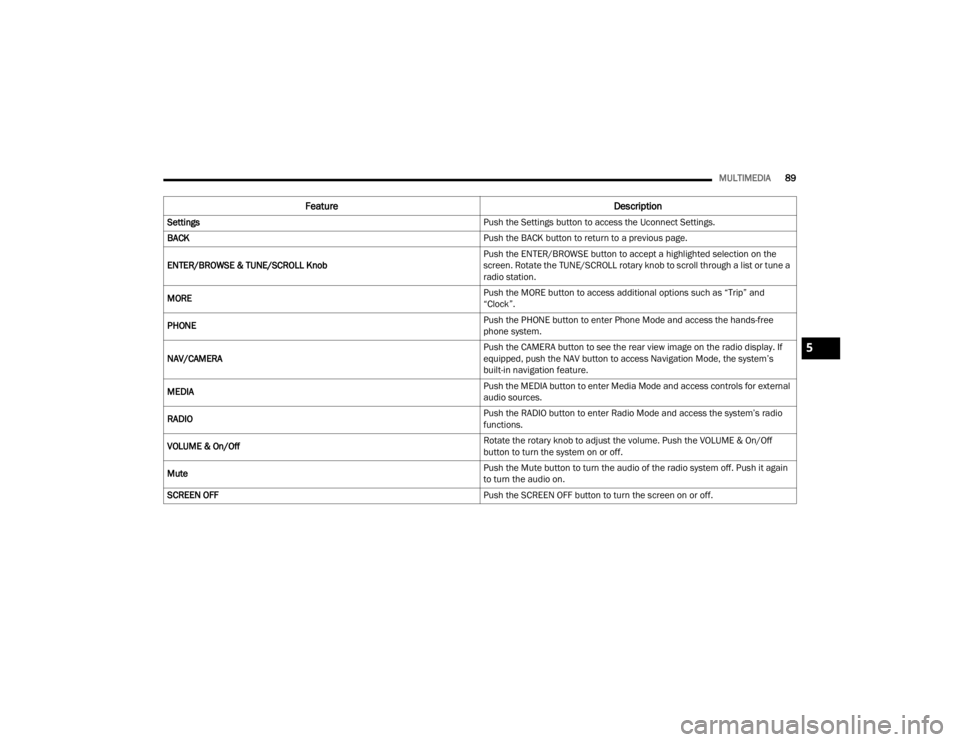
Feature Description
Settings Push the Settings button to access the Uconnect Settings.
BACK Push the BACK button to return to a previous page.
ENTER/BROWSE & TUNE/SCROLL Knob Push the ENTER/BROWSE button to accept a highlighted selection on the
screen. Rotate the TUNE/SCROLL rotary knob to scroll through a list or tune a
radio station.
MORE Push the MORE button to access additional options such as “Trip” and
“Clock”.
PHONE Push the PHONE button to enter Phone Mode and access the hands-free
phone system.
NAV/CAMERA Push the CAMERA button to see the rear view image on the radio display. If
equipped, push the NAV button to access Navigation Mode, the system’s
built-in navigation feature.
MEDIA Push the MEDIA button to enter Media Mode and access controls for external
audio sources.
RADIO Push the RADIO button to enter Radio Mode and access the system’s radio
functions.
VOLUME & On/Off Rotate the rotary knob to adjust the volume. Push the VOLUME & On/Off
button to turn the system on or off.
Mute Push the Mute button to turn the audio of the radio system off. Push it again
to turn the audio on.
SCREEN OFF Push the SCREEN OFF button to turn the screen on or off.
5
22_VM_OM_EN_USC_t.book Page 89
Page 95 of 260
MULTIMEDIA93
Acquiring SiriusXM® Subscription
To activate the SiriusXM® Satellite Radio
subscription, US visit
www.UconnectPhone.com
or call: 1-800-643-2112
Canada visit
www.UconnectPhone.com or call:
1-800-465-2001 (English)or 1-800-387-9983
(French)
NOTE:You will need to provide the SiriusXM® ID (RID)
located at the bottom of the Channel 0 screen.
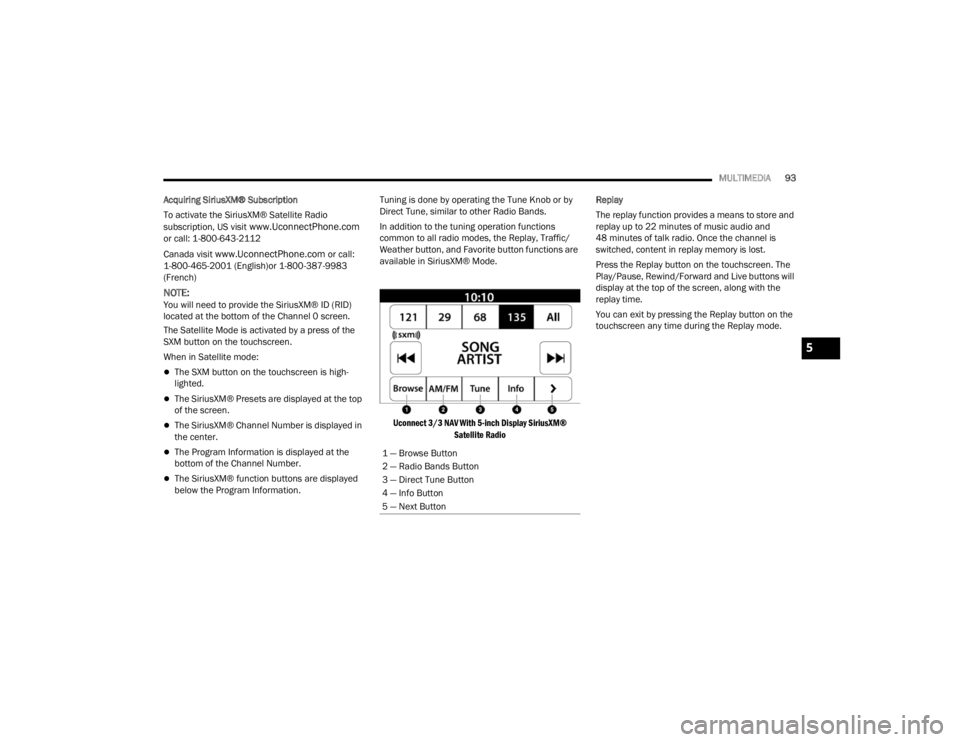
The Satellite Mode is activated by a press of the
SXM button on the touchscreen.
When in Satellite mode:
The SXM button on the touchscreen is high -
lighted.
The SiriusXM® Presets are displayed at the top
of the screen.
The SiriusXM® Channel Number is displayed in
the center.
The Program Information is displayed at the
bottom of the Channel Number.
The SiriusXM® function buttons are displayed
below the Program Information. Tuning is done by operating the Tune Knob or by
Direct Tune, similar to other Radio Bands.
In addition to the tuning operation functions
common to all radio modes, the Replay, Traffic/
Weather button, and Favorite button functions are
available in SiriusXM® Mode.
Uconnect 3/3 NAV With 5-inch Display SiriusXM® Satellite Radio
Replay
The replay function provides a means to store and
replay up to 22 minutes of music audio and
48 minutes of talk radio. Once the channel is
switched, content in replay memory is lost.
Press the Replay button on the touchscreen. The
Play/Pause, Rewind/Forward and Live buttons will
display at the top of the screen, along with the
replay time.
You can exit by pressing the Replay button on the
touchscreen any time during the Replay mode.
1 — Browse Button
2 — Radio Bands Button
3 — Direct Tune Button
4 — Info Button
5 — Next Button
5
22_VM_OM_EN_USC_t.book Page 93
Page 102 of 260
100MULTIMEDIA
Voice Commands Media
Uconnect offers connections via USB and
Bluetooth®. Voice operation is only available for
connected USB devices.
Push the VR button . After the beep, say one of
the following commands and follow the prompts to
switch your media source or choose an artist.
“Change source to Bluetooth®”
“Change source to USB”
“Play artist Beethoven”; “ Play album Greatest
Hits”; “ Play song Moonlight Sonata”; “ Play genre
Classical”
Did You Know: Press the Browse button on the
touchscreen to see all of the music on your USB
device. Your Voice Command must match exactly
how the artist, album, song, and genre information
is displayed.
PHONE MODE
Overview
Uconnect Phone is a voice-activated, hands-free,
in-vehicle communications system. Uconnect
Phone allows you to dial a phone number with your
mobile phone. Uconnect Phone supports the following features:
Voice Activated Features
Hands-Free dialing via Voice (“Call John Smith
Mobile” or “Dial 248-555-1212”).
Hands-Free text-to-speech listening of your
incoming SMS messages.
Hands-Free Text Message Replying: Forward
one of 18 predefined SMS messages to
incoming calls/text messages.
Redialing last dialed numbers (“Redial”).
Calling back the last incoming call number (“Call
Back”).
Viewing call logs on screen (“Show Incoming
Calls,” “Show Outgoing Calls,” “Show Missed
Calls,” or “Show Recent Calls”).
Searching Contacts phone number (“Search for
John Smith Mobile”).
Screen Activated Features
Dialing via Keypad using touchscreen.
Viewing and Calling contacts from Phonebooks
displayed on the touchscreen.
Setting Favorite Contact phone numbers so they
are easily accessible on the Main Phone screen.
Viewing and Calling contacts from recent call
logs.
Reviewing your recent Incoming SMS
Messages.
Pairing up to 10 phones/audio devices for easy
access to connect to them quickly.
NOTE:Your phone must be capable of SMS messaging via
Bluetooth® for messaging features to work
properly.
Your mobile phone’s audio is transmitted through
your vehicle’s audio system; the system will
automatically mute your radio when using the
Uconnect Phone.
For Uconnect customer support:
US — visit UconnectPhone.com or call
877-855-8400
Canada — visit UconnectPhone.com or call
800-465-2001 (English)
800-387-9983 (French)
Visit UconnectPhone.com
Uconnect Phone allows you to transfer calls
between the system and your mobile phone as you
enter or exit your vehicle and enables you to mute
the system's microphone for private conversation.
22_VM_OM_EN_USC_t.book Page 100
Page 133 of 260
131
(Continued)
SAFETY
SAFETY FEATURES
FOUR-WHEEL ANTI-LOCK BRAKE
S
YSTEM (ABS)
The ABS is designed to aid the driver in
maintaining vehicle control under adverse braking
conditions. The system operates with a separate
computer to modulate hydraulic pressure, to
prevent wheel lock-up and to help avoid skidding
on slippery surfaces.
The system's pump motor runs during an ABS stop
to provide regulated hydraulic pressure. The pump
motor makes a low humming noise during
operation, which is normal.
The ABS includes an amber ABS Warning Light.
When the light is illuminated, the ABS is not
functioning. The system reverts to standard
non-Anti-Lock Brakes. Turning the ignition OFF and
ON again may reset the ABS if the fault detected
was only momentary. When you are in a severe braking condition
involving the use of the ABS, you will experience
some pedal drop as the vehicle comes to a stop.
This is the result of the system reverting to the
base brake system.
Engagement of the ABS may be accompanied by a
pulsing sensation. You may also hear a clicking
noise. These occurrences are normal and indicate
that the system is functioning properly.
WARNING!
The ABS contains sophisticated electronic
equipment that may be susceptible to interfer
-
ence caused by improperly installed or high
output radio transmitting equipment. This
interference can cause possible loss of
anti-lock braking capability. Installation of
such equipment should be performed by qual -
ified professionals.
Pumping of the Anti-Lock Brakes will diminish
their effectiveness and may lead to a collision.
Pumping makes the stopping distance longer.
Just press firmly on your brake pedal when you
need to slow down or stop.
The ABS cannot prevent the natural laws of
physics from acting on the vehicle, nor can it
increase braking or steering efficiency beyond
that afforded by the condition of the vehicle
brakes and tires or the traction afforded.
The ABS cannot prevent collisions, including
those resulting from excessive speed in turns,
following another vehicle too closely, or hydro -
planing.
The capabilities of an ABS equipped vehicle
must never be exploited in a reckless or
dangerous manner that could jeopardize the
user’s safety or the safety of others.
WARNING!
6
22_VM_OM_EN_USC_t.book Page 131