Page 209 of 260

SERVICING AND MAINTENANCE207
FUSES
General Information
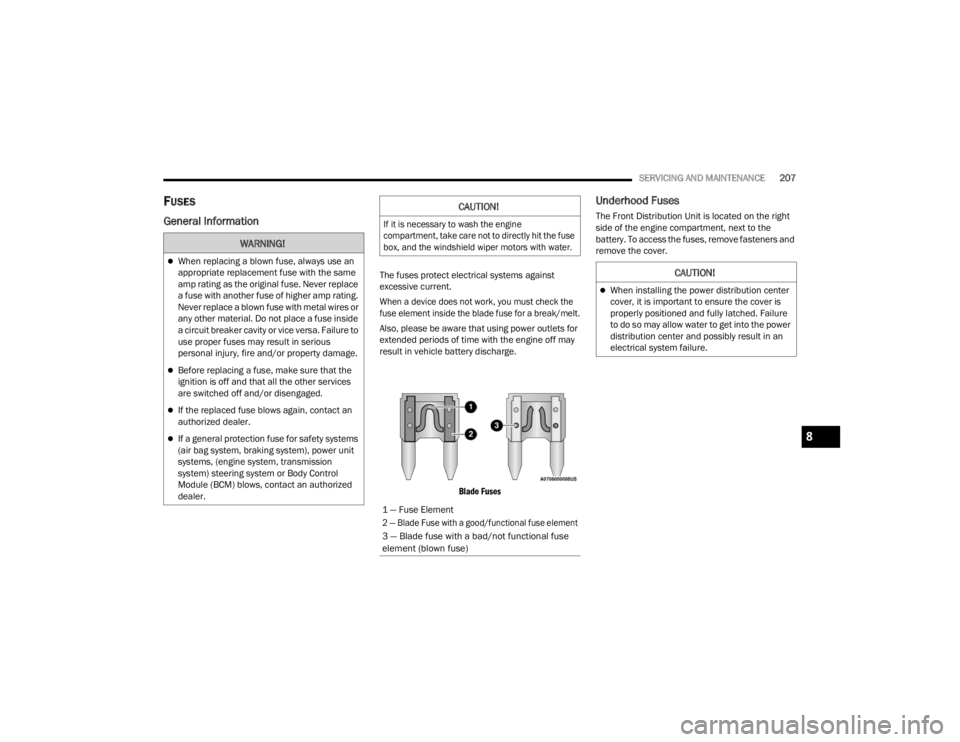
The fuses protect electrical systems against
excessive current.
When a device does not work, you must check the
fuse element inside the blade fuse for a break/melt.
Also, please be aware that using power outlets for
extended periods of time with the engine off may
result in vehicle battery discharge.
Blade Fuses
Underhood Fuses
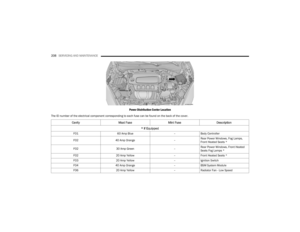
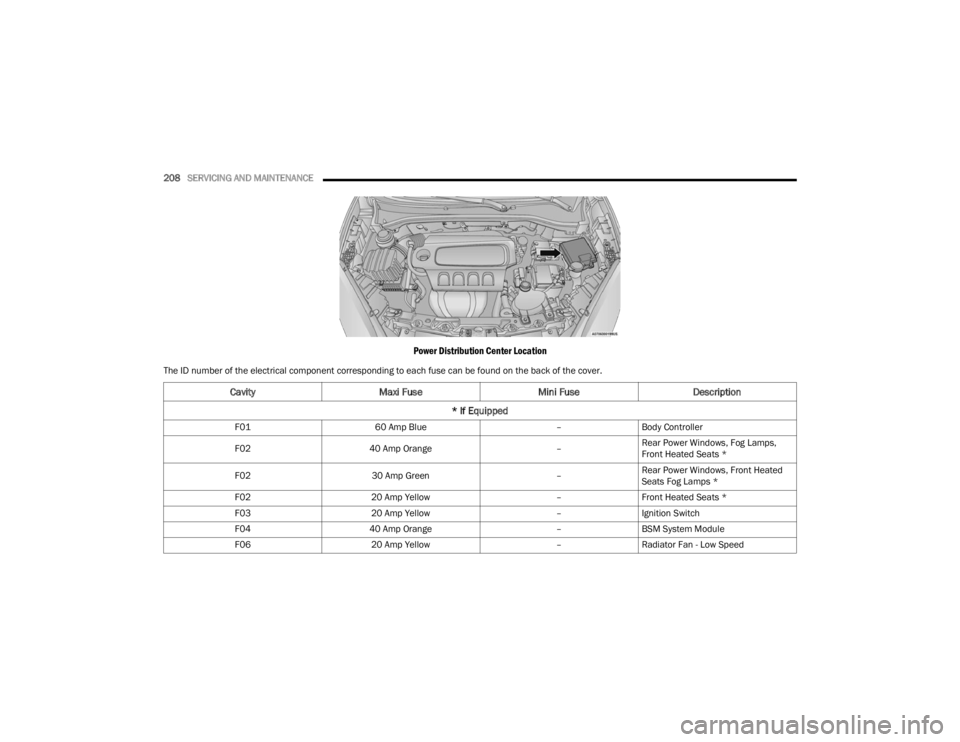
The Front Distribution Unit is located on the right
side of the engine compartment, next to the
battery. To access the fuses, remove fasteners and
remove the cover.
WARNING!
When replacing a blown fuse, always use an
appropriate replacement fuse with the same
amp rating as the original fuse. Never replace
a fuse with another fuse of higher amp rating.
Never replace a blown fuse with metal wires or
any other material. Do not place a fuse inside
a circuit breaker cavity or vice versa. Failure to
use proper fuses may result in serious
personal injury, fire and/or property damage.
Before replacing a fuse, make sure that the
ignition is off and that all the other services
are switched off and/or disengaged.
If the replaced fuse blows again, contact an
authorized dealer.
If a general protection fuse for safety systems
(air bag system, braking system), power unit
systems, (engine system, transmission
system) steering system or Body Control
Module (BCM) blows, contact an authorized
dealer.
CAUTION!
If it is necessary to wash the engine
compartment, take care not to directly hit the fuse
box, and the windshield wiper motors with water.
1 — Fuse Element
2 — Blade Fuse with a good/functional fuse element
3 — Blade fuse with a bad/not functional fuse
element (blown fuse)
CAUTION!
When installing the power distribution center
cover, it is important to ensure the cover is
properly positioned and fully latched. Failure
to do so may allow water to get into the power
distribution center and possibly result in an
electrical system failure.
8
22_VM_OM_EN_USC_t.book Page 207
Page 210 of 260
208SERVICING AND MAINTENANCE
Power Distribution Center Location
The ID number of the electrical component corresponding to each fuse can be found on the back of the cover.
Cavity Maxi Fuse Mini FuseDescription
* If Equipped
F01 60 Amp Blue –Body Controller
F02 40 Amp Orange –Rear Power Windows, Fog Lamps,
Front Heated Seats *
F02 30 Amp Green –Rear Power Windows, Front Heated
Seats Fog Lamps *
F02 20 Amp Yellow –Front Heated Seats *
F03 20 Amp Yellow –Ignition Switch
F04 40 Amp Orange –BSM System Module
F06 20 Amp Yellow –Radiator Fan - Low Speed
22_VM_OM_EN_USC_t.book Page 208
Page 211 of 260
SERVICING AND MAINTENANCE209
F07 50 Amp Red –Radiator Fan - High Speed
F08 40 Amp Orange –Blower Motor
F10 –15 Amp BlueHorn
F11 –10 Amp RedSecondary Loads ECM
F14 –15 Amp BlueHigh Beam
F15 –––
F16 –5 Amp TanECM and Transmission Shifter
F17 –25 Amp ClearECM Power Loads
F18 –5 Amp TanECM Load, Main Relay
F19 –7.5 Amp BrownAir Conditioning
F20 –30 Amp GreenRear Defroster *
F21 –5 Amp TanKey Unlock
F22 –10 Amp RedPrimary ECM Loads
F23 –20 Amp YellowBSM System
F24 –5 Amp TanBSM System, Positive Key and
Steering Angle Sensor
F30 –15 Amp Blue2nd Instrument Panel Power Outlet
(Battery)
F83 20 Amp Yellow –Fuel Pump
F84 –15 Amp BlueAT Module
Cavity Maxi Fuse Mini FuseDescription
* If Equipped
8
22_VM_OM_EN_USC_t.book Page 209
Page 212 of 260
210SERVICING AND MAINTENANCE
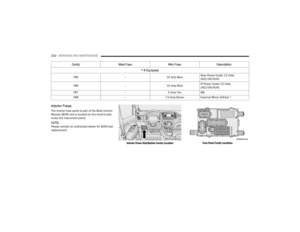
Interior Fuses
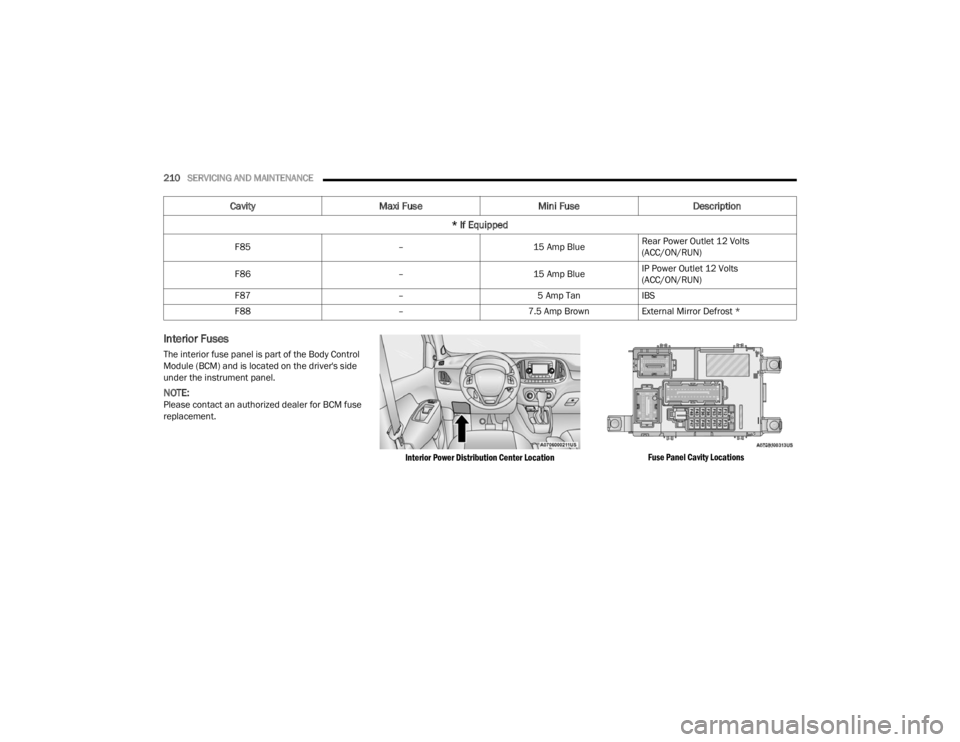
The interior fuse panel is part of the Body Control
Module (BCM) and is located on the driver's side
under the instrument panel.
NOTE:Please contact an authorized dealer for BCM fuse
replacement.
Interior Power Distribution Center Location Fuse Panel Cavity Locations
F85
–15 Amp BlueRear Power Outlet 12 Volts
(ACC/ON/RUN)
F86 –15 Amp BlueIP Power Outlet 12 Volts
(ACC/ON/RUN)
F87 –5 Amp TanIBS
F88 –7.5 Amp BrownExternal Mirror Defrost *
Cavity Maxi Fuse Mini FuseDescription
* If Equipped
22_VM_OM_EN_USC_t.book Page 210
Page 213 of 260
SERVICING AND MAINTENANCE211
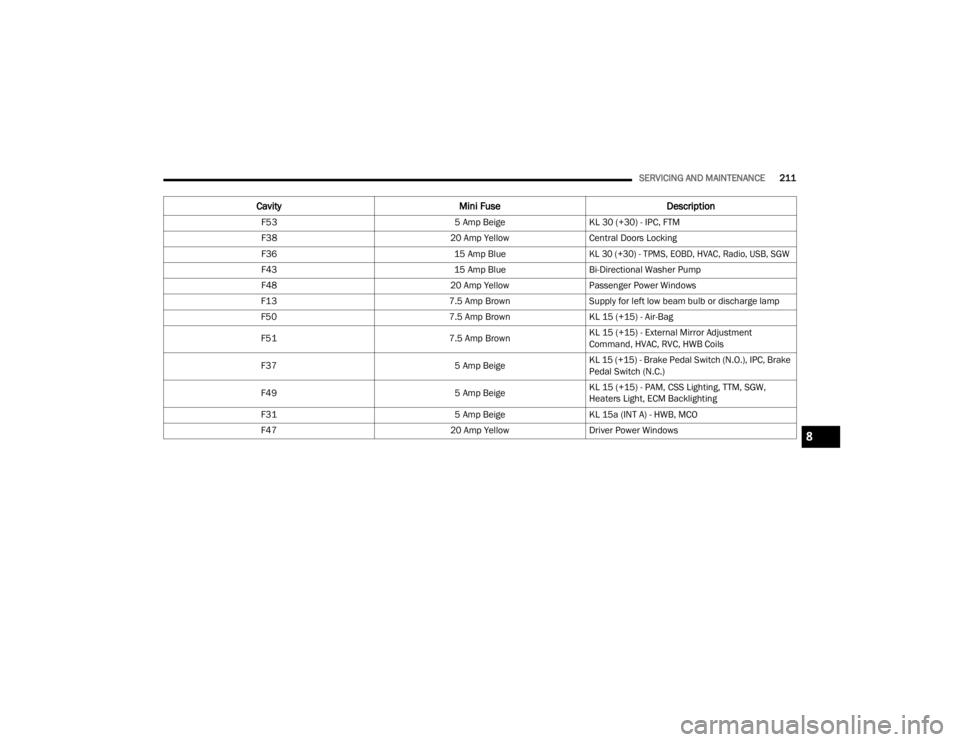
Cavity Mini Fuse Description
F535 Amp BeigeKL 30 (+30) - IPC, FTM
F38 20 Amp YellowCentral Doors Locking
F36 15 Amp Blue
KL 30 (+30) - TPMS, EOBD, HVAC, Radio, USB, SGW
F43 15 Amp BlueBi-Directional Washer Pump
F48 20 Amp YellowPassenger Power Windows
F13 7.5 Amp BrownSupply for left low beam bulb or discharge lamp
F50 7.5 Amp BrownKL 15 (+15) - Air-Bag
F51 7.5 Amp BrownKL 15 (+15) - External Mirror Adjustment
Command, HVAC, RVC, HWB Coils
F37 5 Amp BeigeKL 15 (+15) - Brake Pedal Switch (N.O.), IPC, Brake
Pedal Switch (N.C.)
F49 5 Amp BeigeKL 15 (+15) - PAM, CSS Lighting, TTM, SGW,
Heaters Light, ECM Backlighting
F31 5 Amp BeigeKL 15a (INT A) - HWB, MCO
F47 20 Amp YellowDriver Power Windows
8
22_VM_OM_EN_USC_t.book Page 211
Page 214 of 260
212SERVICING AND MAINTENANCE
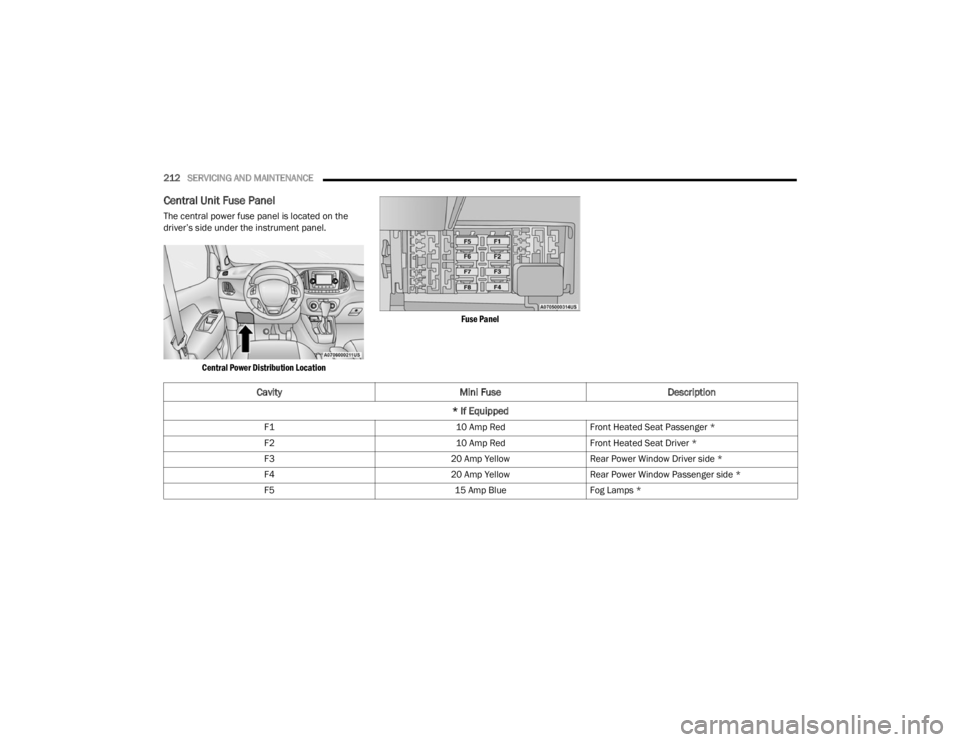
Central Unit Fuse Panel
The central power fuse panel is located on the
driver’s side under the instrument panel.
Central Power Distribution Location Fuse Panel
Cavity
Mini Fuse Description
* If Equipped
F1 10 Amp RedFront Heated Seat Passenger *
F2 10 Amp RedFront Heated Seat Driver *
F3 20 Amp YellowRear Power Window Driver side *
F4 20 Amp YellowRear Power Window Passenger side *
F5 15 Amp BlueFog Lamps *
22_VM_OM_EN_USC_t.book Page 212
Page 215 of 260
SERVICING AND MAINTENANCE213
BULB REPLACEMENT
Replacement Bulbs, Names, And Part Numbers
In the instance a bulb needs to be replaced, this section includes bulb description and replacement part numbers. All of the inside bulbs are brass or glass-wedge
base. Aluminum base bulbs are not approved.
NOTE:See an authorized dealer for LED bulb replacement.
Interior Bulbs
Lamps Bulb Number
Front Courtesy Lamps C10W
Rear Courtesy Lamps C10W
Luggage Lamp C5W
Exterior Bulbs
Lamps Bulb Number
Front Low Beam Headlamp H11
Front High Beam Headlamps HB3
Front Side Marker Lamps LED (Serviced at an authorized dealer)
Front Parking/Daytime Running Lamps W21W
Front Turn Signal Lamps WY21W8
22_VM_OM_EN_USC_t.book Page 213
Page 216 of 260

214SERVICING AND MAINTENANCE
Replacing Exterior Bulbs
HEADLAMPS
See below steps to replace:
1. Remove the plastic cap from the back of the
headlamp housing.
2. Rotate the bulb counterclockwise.
3. Remove the bulb and replace as needed.
4. Install the bulb and rotate clockwise to lock in place.
5. Reinstall the plastic cap.
FRONT TURN SIGNAL LAMPS
See below steps to replace:
1. Remove the cap from the back of the outer upper headlamp housing.
2. Rotate the bulb counterclockwise and remove.
3. Install the bulb into socket.
4. Rotate the bulb/socket clockwise into the lamp locking it in place.
5. Reinstall the plastic cap.
PARKING AND DAYTIME RUNNING LIGHTS
See below steps to replace:
1. Remove the cap from the back of the outer lower headlamp housing.
2. Rotate the bulb counterclockwise and remove.
3. Install the bulb into socket, and rotate bulb/ socket clockwise into lamp locking it in place.
4. Reinstall the plastic cap.
Rear Stop Lamp
P21W
Rear Turn Signal Lamps PY21W
Rear Tail Lamps P21/5W
Rear Side Marker Lamps LED (Serviced at an authorized adealer)
Center Mount Brake Lamp W5W
Reverse Light W16W
Front Fog Lamps H11
NOTE:Numbers refer to commercial bulb types that can be purchased from an authorized dealer. If a bulb needs to be replaced visit an authorized dealer or refer to
the applicable Service Manual.
Exterior Bulbs
Lamps Bulb Number
22_VM_OM_EN_USC_t.book Page 214