2022 PEUGEOT LANDTREK manual transmission
[x] Cancel search: manual transmissionPage 4 of 164

2
Contents
■
Overview
■
Eco-driving
1InstrumentsInstrument panels 7
Warning and indicator lamps 8
Total distance recorder 12
Lighting dimmer 12
Trip computer 12
Monochrome screen 13
Touch screen 14
2AccessElectronic key with remote control function and
built-in key, 16
Keyless Entry and Starting 18
Central locking 19
Back-up procedures 20
Doors 22
Tailgate 22
Alarm 23
Electric windows 24
3Ease of use and comfortFront seats 26
2-seat front bench seat 27
Steering wheel adjustment 28
Mirrors 29
Rear bench seat 30
Heating and Ventilation 32
Heating 33
Manual air conditioning 33
Dual-zone automatic air conditioning 34
Front demisting - defrosting 36
Rear screen demisting/defrosting 36
Front fittings 36
Courtesy lamps 38
Rear fittings 39
Tipper body fittings 40
4Lighting and visibilityLighting control stalk 43
Cornering lighting 44
Direction indicators 45
Headlamp beam height adjustment 45
Automatic illumination of headlamps 45
Guide-me-home and welcome lighting 46
Wiper control stalk 46
Changing a wiper blade 47
Automatic wipers 48
5SafetyGeneral safety recommendations 49
Hazard warning lamps 49
Horn 50
Electronic stability control (ESC) 50
Hill Assist Descent Control 52
Seat belts 53
Airbags 55
Child seats 58
Deactivating the front passenger airbag 59
ISOFIX child seats 60
Child lock 61
6DrivingDriving recommendations 62
Starting / Switching off the engine with the key 64
Starting/Switching off the engine with
Keyless Entry and Starting
66
Manual parking brake 68
Locking the rear differential 68
4-wheel drive transmission selector 69
6-speed manual gearbox 70
6-speed automatic gearbox 71
Driving mode 73
Hill start assist 73
Gear shift indicator 74
Tyre under-inflation detection 74
Driving and manoeuvring aids - General
recommendations
76
Speed limiter 77
Overspeed alert at 75 mph (120
km/h) 78
Cruise control - Specific recommendations 78
Cruise control 78
Lane departure warning system 79
Parking sensors 81
Reversing camera 83
"Off Road" camera 83
360° camera 84
7Practical informationRecommended fuel 89
Refuelling 89
Towing device 90
Snow chains 90
Roof bars 91
Bonnet 91
Engine compartment 92
Checking levels 93
Page 8 of 164

6
Eco-driving
Eco-driving
Eco-driving refers to a range of everyday
practices that allow the motorist to optimise
the vehicle's energy consumption (fuel and/or
electricity) and CO
2 emissions.
Optimise your use of the gearbox
With a manual gearbox, move off gently and
change up promptly. While accelerating, change
up early.
With an automatic gearbox, favour automatic
mode. Do not depress the accelerator pedal
heavily or suddenly.
With a 4-wheel drive vehicle, favour 2H
transmission (standard) mode over 4H mode.
With a manual gearbox, the gear shift indicator
prompts you to engage the most suitable gear.
Whenever this indication is displayed on the
instrument panel, follow it straight away.
Drive smoothly
Maintain a safe distance between vehicles, use
engine braking rather than the brake pedal and
press the accelerator gradually. These practices
help to save on energy consumption, reduce
CO
2 emissions and decrease general traffic
noise.
Favour the use of the "Eco" driving mode.
When the traffic is flowing smoothly, select the
cruise control.
Control the use of electrical equipment
Before moving off, if the passenger compartment
is too warm, ventilate it by opening the windows
and air vents before using the air conditioning.
At speeds above 31
mph (50 km/h), close the
windows and leave the air vents open.
Consider using equipment that can help keep
the temperature in the passenger compartment
down.
Unless automatically regulated, switch off the air
conditioning as soon as the desired temperature
has been reached.
Switch off the demisting and defrosting functions,
if they are not managed automatically.
Switch off the heated seat as soon as possible.
Adapt your use of the headlamps and/or
foglamps to the level of visibility, in accordance
with current legislation in the country in which
you are driving.
Avoid running the engine before moving off,
particularly in winter (other than in severe wintry
conditions: temperature below -23°C). The
vehicle will warm up much faster while driving.
As a passenger, avoid connecting your
multimedia devices (e.g.
film, music, video
game) to help reduce the consumption of energy.
Disconnect all portable devices before leaving
the vehicle.
Limit the causes of excess consumption
Spread loads throughout the vehicle.
Limit the loads carried in the vehicle and
minimise wind resistance (e.g.
roof bars, roof rack, bicycle carrier, trailer). Preferably, use a
roof box.
Remove roof bars and roof racks after use.
At the end of winter, remove snow tyres and refit
summer tyres.
Comply with the servicing instructions
Check tyre pressures regularly, with the tyres
cold, referring to the label in the door aperture on
the left-hand side.
Carry out this check in particular:
–
before a long journey
.
–
at each change of season.
–
after a long period out of use.
Do not forget the spare wheel and, where
applicable, the tyres on your trailer or caravan.
Have your vehicle serviced regularly (e.g.
engine
oil, oil filter, air filter, passenger compartment
filter, etc.). Observe the schedule of operations in
the manufacturer's service schedule.
With an HDi Diesel engine, if the particle filter
is faulty, your vehicle will emit pollution. Visit a
PEUGEOT dealer or a qualified workshop as
soon as possible to restore your vehicle's particle
emissions to legal levels.
When filling the fuel tank, do not continue after
the third cut-out of the nozzle, to avoid overflow.
You will only see the fuel consumption of your
new vehicle settle down to a consistent average
after the first 1,900 miles (3,000 kilometres).
Page 10 of 164
8
Instruments
Warning and indicator
lamps
Displayed as symbols, the warning and indicator
lamps inform the driver of the occurrence of a
malfunction (warning lamps) or of the operating
status of a system (operation or deactivation
indicator lamps). Certain lamps light up in two
ways (fixed or flashing) and/or in several colours.
Associated warnings
The illumination of a lamp may be accompanied
by an audible signal and/or a message displayed
in a screen.
Relating the type of alert to the operating status
of the vehicle allows you to determine whether
the situation is normal or whether a fault has
occurred: refer to the description of each lamp
for further information.
When the ignition is switched on
Certain red or orange warning lamps come on
for a few seconds when the ignition is switched
on. These warning lamps should go off as soon
as the engine is started.
For more information on a system or a function,
refer to the corresponding section.
Persistent warning lamp
If a red or orange warning lamp comes on, there
may be fault which needs further investigation.
If a lamp remains lit
The references (1), (2) and (3) in the warning
and indicator lamp description indicate whether
you should contact a qualified professional in
addition to the immediate recommended actions.
(1): You must stop the vehicle.
Stop as soon as it is safe to do so and switch off
the ignition.
(2): Contact a PEUGEOT dealer or a qualified
workshop.
(3): Go to a PEUGEOT dealer or a qualified
workshop.
List of warning and
indicator lamps
Red warning/indicator lamps
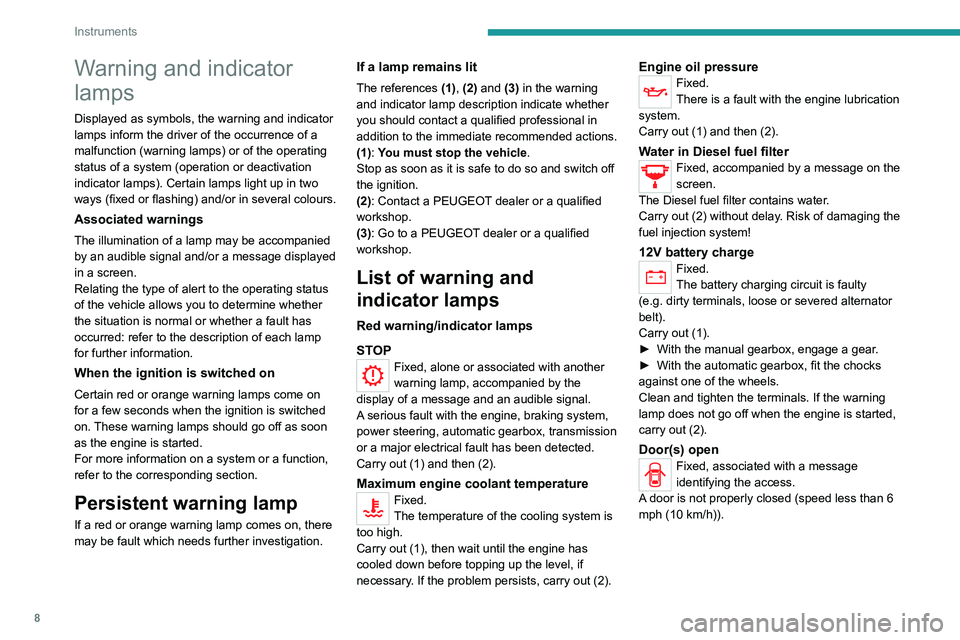
STOP
Fixed, alone or associated with another
warning lamp, accompanied by the
display of a message and an audible signal.
A serious fault with the engine, braking system,
power steering, automatic gearbox, transmission
or a major electrical fault has been detected.
Carry out (1) and then (2).
Maximum engine coolant temperatureFixed.
The temperature of the cooling system is
too high.
Carry out (1), then wait until the engine has
cooled down before topping up the level, if
necessary. If the problem persists, carry out (2).
Engine oil pressureFixed.
There is a fault with the engine lubrication
system.
Carry out (1) and then (2).
Water in Diesel fuel filterFixed, accompanied by a message on the
screen.
The Diesel fuel filter contains water.
Carry out (2) without delay. Risk of damaging the
fuel injection system!
12V battery chargeFixed.
The battery charging circuit is faulty
(e.g.
dirty terminals, loose or severed alternator
belt).
Carry out (1).
►
With the manual gearbox, engage a gear
.
►
With the automatic gearbox, fit the chocks
against one of the wheels.
Clean and tighten the terminals. If the warning
lamp does not go off when the engine is started,
carry out (2).
Door(s) openFixed, associated with a message
identifying the access.
A door is not properly closed (speed less than 6
mph (10 km/h)).
Page 70 of 164
68
Driving
Manual parking brake
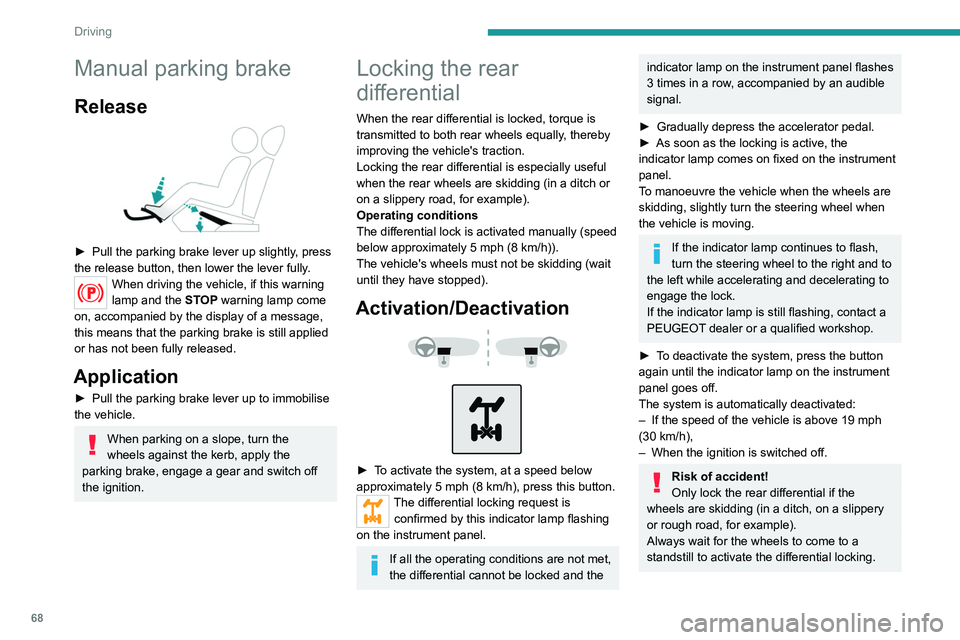
Release
► Pull the parking brake lever up slightly, press
the release button, then lower the lever fully.
When driving the vehicle, if this warning
lamp and the STOP warning lamp come
on, accompanied by the display of a message,
this means that the parking brake is still applied
or has not been fully released.
Application
► Pull the parking brake lever up to immobilise
the vehicle.
When parking on a slope, turn the
wheels against the kerb, apply the
parking brake, engage a gear and switch off
the ignition.
Locking the rear
differential
When the rear differential is locked, torque is
transmitted to both rear wheels equally, thereby
improving the vehicle's traction.
Locking the rear differential is especially useful
when the rear wheels are skidding (in a ditch or
on a slippery road, for example).
Operating conditions
The differential lock is activated manually (speed
below approximately 5 mph (8 km/h)).
The vehicle's wheels must not be skidding (wait
until they have stopped).
Activation/Deactivation
► To activate the system, at a speed below
approximately 5 mph (8 km/h), press this button.
The differential locking request is confirmed by this indicator lamp flashing
on the instrument panel.
If all the operating conditions are not met,
the differential cannot be locked and the
indicator lamp on the instrument panel flashes
3 times in a row , accompanied by an audible
signal.
►
Gradually depress the accelerator pedal.
►
As soon as the locking is active, the
indicator
lamp comes on fixed on the instrument
panel.
To manoeuvre the vehicle when the wheels are
skidding, slightly turn the steering wheel when
the vehicle is moving.
If the indicator lamp continues to flash,
turn the steering wheel to the right and to
the left while accelerating and decelerating to
engage the lock.
If the indicator
lamp is still flashing, contact a
PEUGEOT dealer or a qualified workshop.
►
T
o deactivate the system, press the button
again until the indicator
lamp on the instrument
panel goes off.
The system is automatically deactivated:
–
If the speed of the vehicle is above 19 mph
(30
km/h),
–
When the ignition is switched off.
Risk of accident!
Only lock the rear differential if the
wheels are skidding (in a ditch, on a slippery
or rough road, for example).
Always wait for the wheels to come to a
standstill to activate the differential locking.
Never exceed the speed of 5 mph (8
km/h) with the rear differential locked, and
deactivate the locking as soon as conditions
allow.
4-wheel drive
transmission selector
Manual selector for choosing the most suitable
transmission mode according to the different
driving conditions encountered (low grip, for
example).
Operation
��
��
2H mode: 2-wheel drive at high speed
(standard mode)
Mode suitable for normal driving on dry roads
with hard surface; provides economical, quiet
driving and reduces tyre wear.
4H mode: 4-wheel drive at high speed
Mode to be used only for driving on tracks where
the wheels may slip (off-road or on icy, snowy
Page 71 of 164
69
Driving
6Never exceed the speed of 5 mph (8
km/h) with the rear differential locked, and
deactivate the locking as soon as conditions
allow.
4-wheel drive
transmission selector
Manual selector for choosing the most suitable
transmission mode according to the different
driving conditions encountered (low grip, for
example).
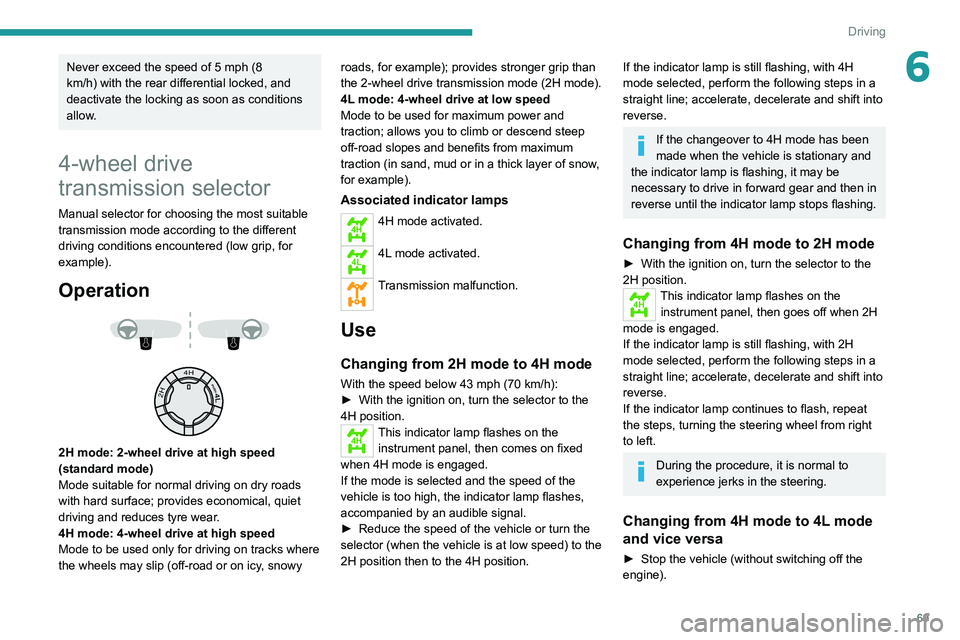
Operation
��
��
2H mode: 2-wheel drive at high speed
(standard mode)
Mode suitable for normal driving on dry roads
with hard surface; provides economical, quiet
driving and reduces tyre wear.
4H mode: 4-wheel drive at high speed
Mode to be used only for driving on tracks where
the wheels may slip (off-road or on icy, snowy roads, for example); provides stronger grip than
the 2-wheel drive transmission
mode (2H mode).
4L mode: 4-wheel drive at low speed
Mode to be used for maximum power and
traction; allows you to climb or descend steep
off-road slopes and benefits from maximum
traction (in sand, mud or in a thick layer of snow,
for example).
Associated indicator lamps
4H4H mode activated.
4L4L mode activated.
Transmission malfunction.
Use
Changing from 2H mode to 4H mode
With the speed below 43 mph (70 km/h):
► With the ignition on, turn the selector to the
4H position.
4HThis indicator lamp flashes on the instrument panel, then comes on fixed
when 4H mode is engaged.
If the mode is selected and the speed of the
vehicle is too high, the indicator
lamp flashes,
accompanied by an audible signal.
►
Reduce the speed of the vehicle or turn the
selector (when the vehicle is at low speed) to the
2H position then to the 4H position.
If the indicator lamp is still flashing, with 4H
mode selected, perform the following steps in a
straight line; accelerate, decelerate and shift into
reverse.
If the changeover to 4H mode has been
made when the vehicle is stationary and
the indicator
lamp is flashing, it may be
necessary to drive in forward gear and then in
reverse until the indicator
lamp stops flashing.
Changing from 4H mode to 2H mode
► With the ignition on, turn the selector to the
2H position.
4HThis indicator lamp flashes on the
instrument panel, then goes off when 2H
mode is engaged.
If the indicator
lamp is still flashing, with 2H
mode selected, perform the following steps in a
straight line; accelerate, decelerate and shift into
reverse.
If the indicator
lamp continues to flash, repeat
the steps, turning the steering wheel from right
to left.
During the procedure, it is normal to
experience jerks in the steering.
Changing from 4H mode to 4L mode
and vice versa
► Stop the vehicle (without switching off the
engine).
Page 72 of 164
70
Driving
► With a manual gearbox, place the gear lever
in neutral, then fully depress the clutch pedal.
►
With an
automatic gearbox, move the gear
selector into position N.
►
From 4H mode, press the selector then turn
it to the 4L
position, or from 4L mode, turn the
selector to the 4H position.
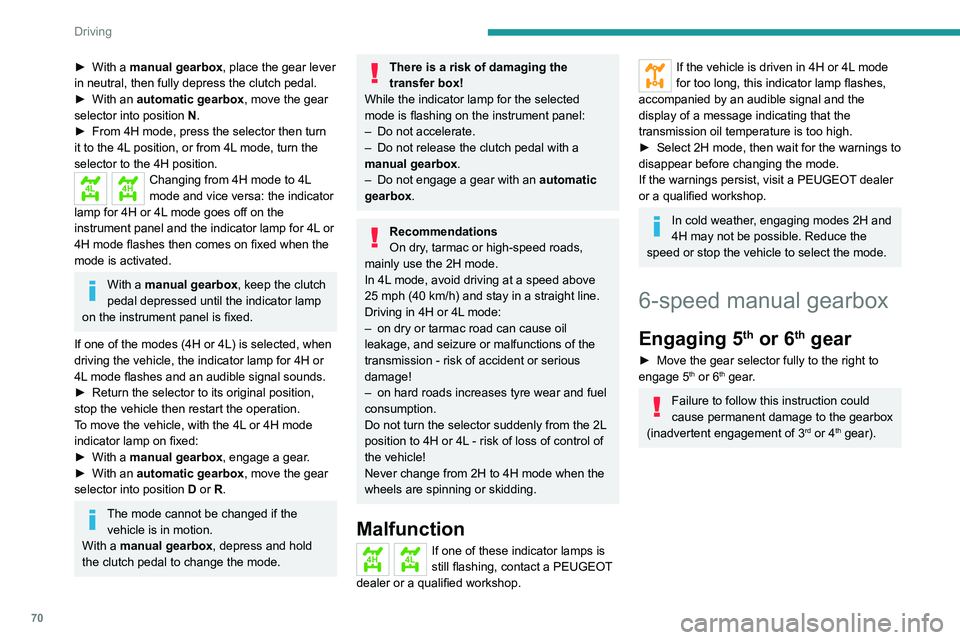
4L4HChanging from 4H mode to 4L
mode and vice versa: the indicator
lamp for 4H or 4L mode goes off on the
instrument panel and the indicator lamp for 4L or
4H mode flashes then comes on fixed when the
mode is activated.
With a manual gearbox, keep the clutch
pedal depressed until the indicator lamp
on the instrument panel is fixed.
If one of the modes (4H or 4L) is selected, when
driving the vehicle, the indicator lamp for 4H or
4L mode flashes and an audible signal sounds.
►
Return the selector to its original position,
stop the vehicle then restart the operation.
T
o move the vehicle, with the 4L or 4H mode
indicator lamp on fixed:
►
With a
manual gearbox, engage a gear.
►
With an
automatic gearbox, move the gear
selector into position D or R.
The mode cannot be changed if the
vehicle is in motion.
With a manual gearbox, depress and hold
the clutch pedal to change the mode.
There is a risk of damaging the
transfer box!
While the indicator lamp for the selected
mode is flashing on the instrument panel:
–
Do not accelerate.
–
Do not release the clutch pedal with a
manual gearbox
.
–
Do not engage a gear with an automatic
gearbox
.
Recommendations
On dry, tarmac or high-speed roads,
mainly use the 2H mode.
In 4L mode, avoid driving at a speed above
25 mph (40 km/h) and stay in a straight line.
Driving in 4H or 4L mode:
–
on dry or tarmac road can cause oil
leakage, and seizure or malfunctions of the
transmission
- risk of accident or serious
damage!
–
on hard roads increases tyre wear and fuel
consumption.
Do not turn the selector suddenly from the 2L
position to 4H or 4L - risk of loss of control of
the vehicle!
Never change from 2H to 4H mode when the
wheels are spinning or skidding.
Malfunction
4H4LIf one of these indicator lamps is
still flashing, contact a PEUGEOT
dealer or a qualified workshop.
If the vehicle is driven in 4H or 4L mode
for too long, this indicator lamp flashes,
accompanied by an audible signal and the
display of a message indicating that the
transmission oil temperature is too high.
►
Select 2H mode, then wait for the warnings to
disappear before changing the mode.
If the warnings persist, visit a PEUGEOT
dealer
or a qualified workshop.
In cold weather, engaging modes 2H and
4H may not be possible. Reduce the
speed or stop the vehicle to select the mode.
6-speed manual gearbox
Engaging 5th or 6th gear
► Move the gear selector fully to the right to
engage 5th or 6th gear.
Failure to follow this instruction could
cause permanent damage to the gearbox
(inadvertent engagement of 3
rd or 4th gear).
Engaging reverse gear
► Raise the trigger under the knob and move
the gear lever to the left, then forwards.
Only engage reverse gear when the
vehicle is stationary with the engine at
idle.
As a safety precaution and to facilitate starting of the engine, always select
neutral and depress the clutch pedal.
6-speed automatic
gearbox
6-speed automatic gearbox which offers a choice
between the comfort of automatic operation or
manual gear changing.
Two driving modes are available:
– Automatic operation for electronic
management of the gears by the gearbox.
– Manual operation for sequential changing of
the gears by the driver.
Page 105 of 164
103
Practical information
7of the throttle body against any projection of
liquid (oil, water, detergent or solvent).
►
Remove grease and carbon deposits from
the surface of the main duct with a specific
"carburettor" type cleaner
.
►
Rotate the throttle valve inside the duct to
clean the seats on each side.
►
Wipe and dry the throttle body with a soft,
lint-free cloth.
If no cleaning has been done for a long
time, deposits may be difficult to remove.
Clean and wipe the throttle body
several
times with a soft, lint-free cloth.
Never immerse the throttle body in a
cleaning liquid or in an ultrasonic tank.
Never use:
–
detergents containing methyl ketone or
other highly corrosive substances as well as
household cleaning detergent;
–
cleaning products directly on the throttle
bearings as well as on the body's connector;
–
hard, sharp or abrasive tools to remove
difficult deposits. Use a soft cloth with a
suitable detergent.
Refitting the throttle body
Before refitting the throttle body, check
the condition of the seal. If it is damaged,
replace it with a new one. ►
Install the seal on the intake manifold and fit
the throttle body
B, making sure that the seal
does not fall.
For reassembly, carry out the operations in the
reverse order to those for removal. Tighten the
screws to the correct tightening torque.
Free-wheeling
In certain situations, you must allow the vehicle
to free-wheel (while being towed, on a rolling
road, in an automatic car wash, or being
transported by rail or sea freight, etc.).
The procedure differs depending on the type of
gearbox and transmission.
/
To release them
► With the vehicle stationary and the engine
running, depress the brake pedal and release
the parking brake.
►
With a manual gearbox, move the gear lever
into neutral.
►
With an automatic gearbox, select position N
.
►
For 4-wheel drive vehicles (4x4), put the
transmission selector in 2H
mode.
►
Switch the ignition off.
Advice on care and maintenance
General recommendations
Observe the following recommendations to avoid
damaging the vehicle.
Exterior
Never use a high-pressure jet wash in
the engine compartment - risk of
damaging the electrical components!
Do not wash the vehicle in bright sunshine or
extremely cold conditions.
When washing the vehicle in an
automatic roller-brush car wash, be sure
to lock the doors and, depending on version,
move the electronic key away.
When using a high-pressure washer, keep
the jet nozzle at a minimum distance of 30
cm from the vehicle (particularly on any stone
chip impacts, sensors or seals).
Promptly clean up any stains containing
chemicals liable to damage the vehicle's
paintwork (including tree resin, bird
droppings, insect secretions, pollen and tar).
Depending on the environment, clean the
vehicle frequently to remove salty deposits
(in coastal areas), soot (in industrial areas)
and mud/salts (in wet or cold areas). These
substances can be highly corrosive.
Page 122 of 164
120
In the event of a breakdown
General recommendations
Observe the legislation in force in the
country where you are driving.
Ensure that the weight of the towing vehicle is
higher than that of the towed vehicle.
The driver must remain at the wheel of the
towed vehicle and must have a valid driving
licence.
When towing a vehicle with all four wheels on
the ground, always use an approved towing
arm; rope and straps are prohibited.
The towing vehicle must move off gently.
When the vehicle is towed with its engine
off, there is no longer braking and steering
assistance.A professional towing service must be
called if:
–
Broken down on a motorway or main road.
–
Not possible to put
the gearbox into neutral,
unlock the steering, or release the parking
brake.
–
Not possible to tow a vehicle with an
automatic gearbox, with the engine running.
–
T
owing with only two wheels on the ground.
–
Four-wheel drive vehicle.
–
No approved towbar available.
Before towing the vehicle, it is essential
to put the vehicle in free-wheeling mode.
For more information on Changing to free-
wheeling , refer to the corresponding section.
With a manual gearbox, place the gear
lever in neutral.
With an automatic gearbox, place the gear
selector in position N.
Failure to adhere to this instruction may lead
to damage to some braking components and
the lack of braking assistance on restarting
the engine.
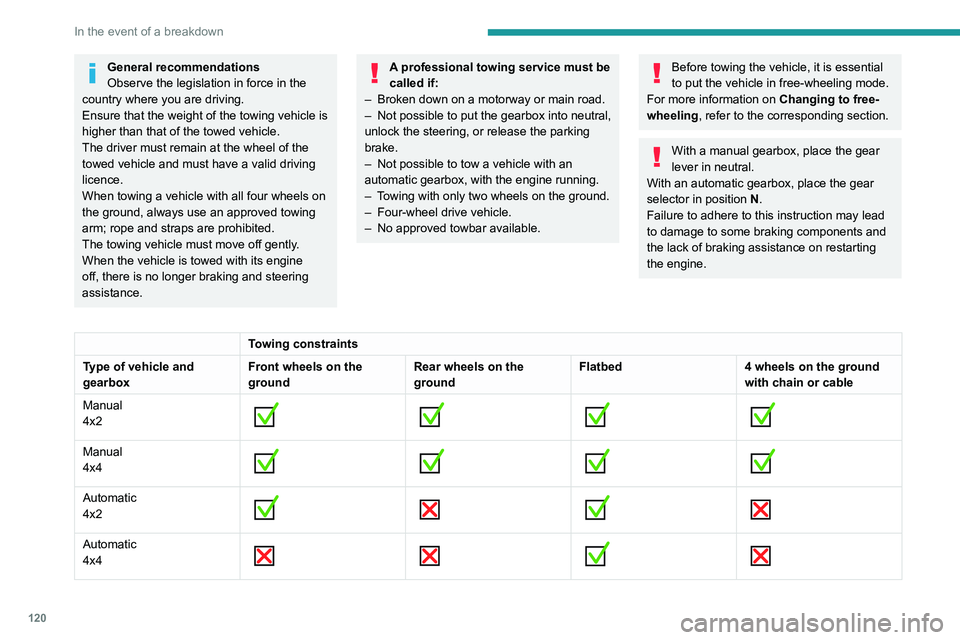
Towing constraints
Type of vehicle and
gearbox Front wheels on the
groundRear wheels on the
groundFlatbed
4 wheels on the ground
with chain or cable
Manual
4x2
Manual
4x4
Automatic
4x2
Automatic
4x4
Towing your vehicle
Access to the front hooks
The tow hooks are located under the front
bumper.
To be towed:
►
Securely install cables or chains to the tow
hooks.
► Put the gearbox into neutral.
Failure to observe this instruction could
result in damage to certain components
(braking, transmission, etc.) and to the
absence of braking assistance the next time
the engine is started.