2022 PEUGEOT LANDTREK clock
[x] Cancel search: clockPage 110 of 164

108
In the event of a breakdown
List of tools
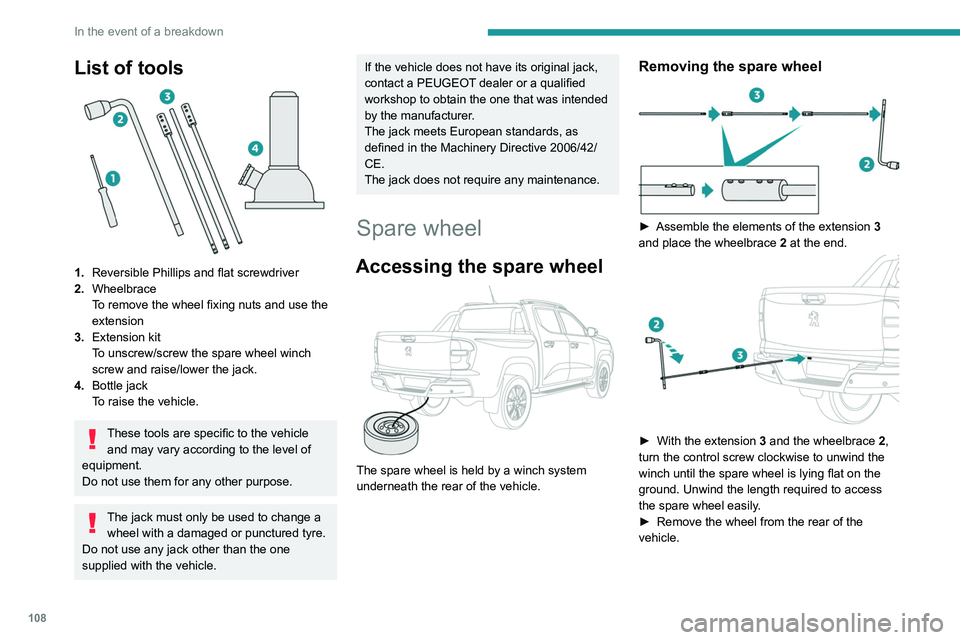
1.Reversible Phillips and flat screwdriver
2. Wheelbrace
To remove the wheel fixing nuts and use the
extension
3. Extension kit
To unscrew/screw the spare wheel winch
screw and raise/lower the jack.
4. Bottle jack
To raise the vehicle.
These tools are specific to the vehicle
and may vary according to the level of
equipment.
Do not use them for any other purpose.
The jack must only be used to change a wheel with a damaged or punctured tyre.
Do not use any jack other than the one
supplied with the vehicle.
If the vehicle does not have its original jack,
contact a PEUGEOT dealer or a qualified
workshop to obtain the one that was intended
by the manufacturer.
The jack meets European standards, as
defined in the Machinery Directive 2006/42/
CE.
The jack does not require any maintenance.
Spare wheel
Accessing the spare wheel
The spare wheel is held by a winch system
underneath the rear of the vehicle.
Removing the spare wheel
► Assemble the elements of the extension 3
and place the wheelbrace 2 at the end.
► With the extension 3 and the wheelbrace 2,
turn the control screw clockwise to unwind the
winch until the spare wheel is lying flat on the
ground. Unwind the length required to access
the spare wheel easily.
►
Remove the wheel from the rear of the
vehicle.
► Pass the connecting piece through the wheel
hub to release it.
Putting the winch and spare wheel
back in place
When the spare wheel is fitted in place of
a wheel with a punctured tyre, the winch
and punctured tyre must be put back in
position underneath the vehicle before
restarting.
► Position the wheel flat, with the valve
upwards.
Page 111 of 164

109
In the event of a breakdown
8
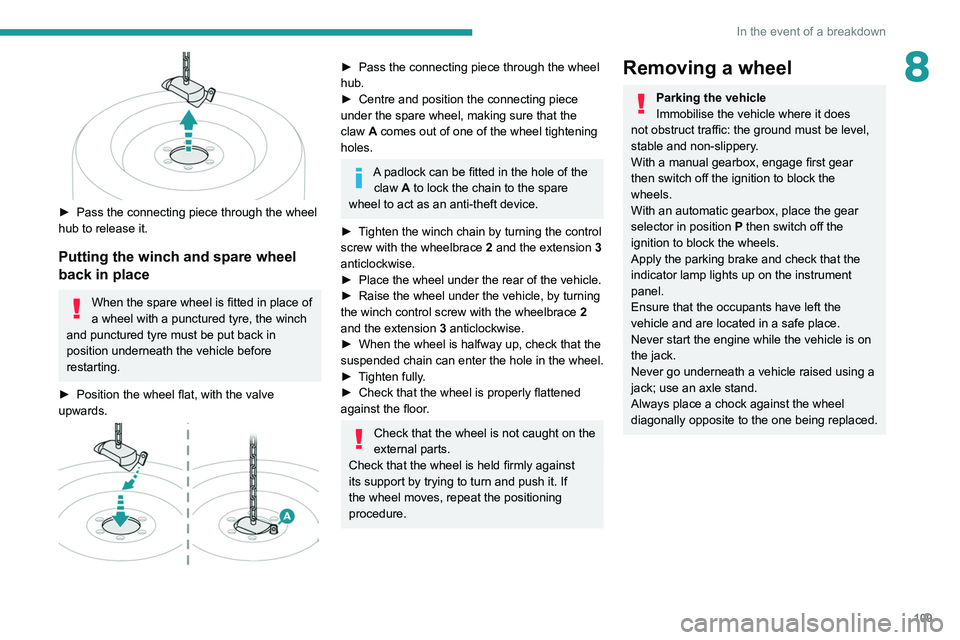
► Pass the connecting piece through the wheel
hub to release it.
Putting the winch and spare wheel
back in place
When the spare wheel is fitted in place of
a wheel with a punctured tyre, the winch
and punctured tyre must be put back in
position underneath the vehicle before
restarting.
►
Position the wheel flat, with the valve
upwards.
► Pass the connecting piece through the wheel
hub.
►
Centre and position the connecting piece
under the spare wheel, making sure that the
claw
A comes out of one of the wheel tightening
holes.
A padlock can be fitted in the hole of the claw A to lock the chain to the spare
wheel to act as an anti-theft device.
►
T
ighten the winch chain by turning the control
screw with the wheelbrace 2 and the extension 3
anticlockwise.
►
Place the wheel under the rear of the vehicle.
►
Raise the wheel under the vehicle, by turning
the winch control screw with the wheelbrace 2
and the extension 3 anticlockwise.
►
When the wheel is halfway up, check that the
suspended
chain can enter the hole in the wheel.
►
T
ighten fully.
►
Check that the wheel is properly flattened
against the floor
.
Check that the wheel is not caught on the
external parts.
Check that the wheel is held firmly against
its support by trying to turn and push it. If
the wheel moves, repeat the positioning
procedure.
Removing a wheel
Parking the vehicle
Immobilise the vehicle where it does
not obstruct traffic: the ground must be level,
stable and non-slippery.
With a manual gearbox, engage first gear
then switch off the ignition to block the
wheels.
With an automatic gearbox, place the gear
selector in position P then switch off the
ignition to block the wheels.
Apply the parking brake and check that the
indicator lamp lights up on the instrument
panel.
Ensure that the occupants have left the
vehicle and are located in a safe place.
Never start the engine while the vehicle is on
the jack.
Never go underneath a vehicle raised using a
jack; use an axle stand.
Always place a chock against the wheel
diagonally opposite to the one being replaced.
Page 116 of 164

11 4
In the event of a breakdown
Dipped beam headlamps
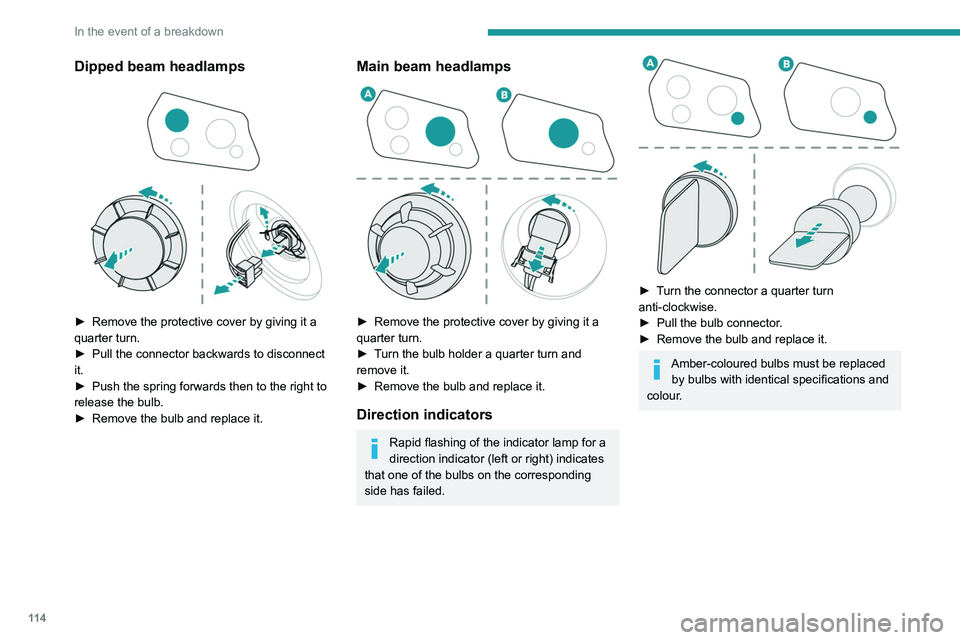
► Remove the protective cover by giving it a
quarter turn.
►
Pull the connector backwards to disconnect
it.
►
Push the spring forwards then to the right to
release the bulb.
►
Remove the bulb and replace it.
Main beam headlamps
► Remove the protective cover by giving it a
quarter turn.
►
T
urn the bulb holder a quarter turn and
remove it.
►
Remove the bulb and replace it.
Direction indicators
Rapid flashing of the indicator lamp for a
direction indicator (left or right) indicates
that one of the bulbs on the corresponding
side has failed.
► Turn the connector a quarter turn
anti-clockwise.
►
Pull the bulb connector
.
►
Remove the bulb and replace it.
Amber-coloured bulbs must be replaced by bulbs with identical specifications and
colour.
Daytime running lamps
► Remove the protective cover by giving it a
quarter turn.
► Pull the bulb holder backwards to remove it.
► Pull out the bulb and replace it.
When refitting the bulb holder in its housing,
press until you hear a click which means it is
locked in place.
Foglamps
To access the foglamps:
► Open the bonnet.
Page 118 of 164

11 6
In the event of a breakdown
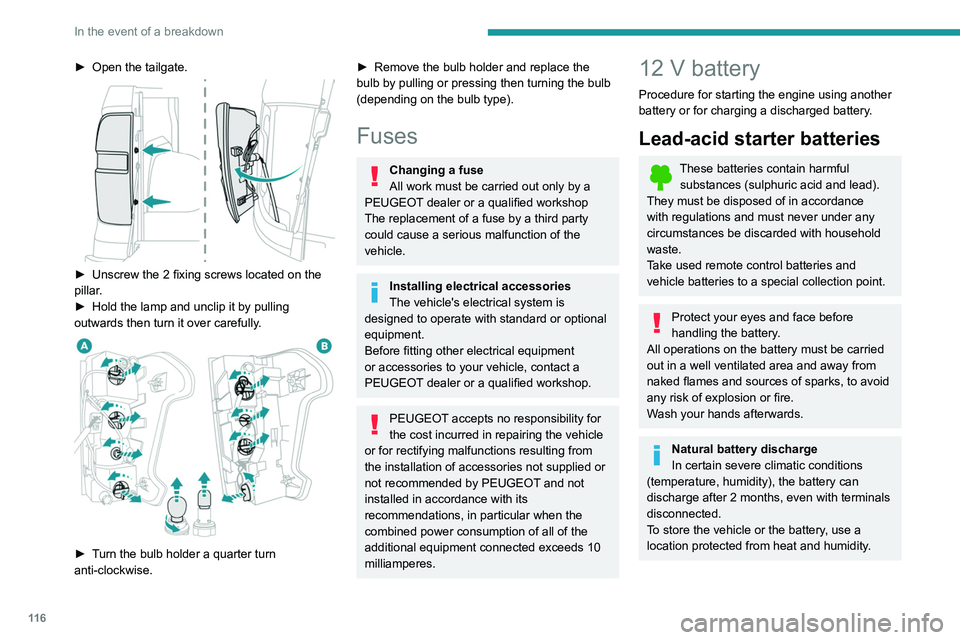
► Open the tailgate.
► Unscrew the 2 fixing screws located on the
pillar .
►
Hold the lamp and unclip it by pulling
outwards then turn it over carefully
.
► Turn the bulb holder a quarter turn
anti-clockwise.
► Remove the bulb holder and replace the
bulb by pulling or pressing then turning the bulb
(depending on the bulb type).
Fuses
Changing a fuse
All work must be carried out only by a
PEUGEOT dealer or a qualified workshop
The replacement of a fuse by a third party
could cause a serious malfunction of the
vehicle.
Installing electrical accessories
The vehicle's electrical system is
designed to operate with standard or optional
equipment.
Before fitting other electrical equipment
or accessories to your vehicle, contact a
PEUGEOT dealer or a qualified workshop.
PEUGEOT accepts no responsibility for
the cost incurred in repairing the vehicle
or for rectifying malfunctions resulting from
the installation of accessories not supplied or
not recommended by PEUGEOT and not
installed in accordance with its
recommendations, in particular when the
combined power consumption of all of the
additional equipment connected exceeds 10
milliamperes.
12 V battery
Procedure for starting the engine using another
battery or for charging a discharged battery.
Lead-acid starter batteries
These batteries contain harmful substances (sulphuric acid and lead).
They must be disposed of in accordance
with regulations and must never under any
circumstances be discarded with household
waste.
Take used remote control batteries and
vehicle batteries to a special collection point.
Protect your eyes and face before
handling the battery.
All operations on the battery must be carried
out in a well ventilated area and away from
naked flames and sources of sparks, to avoid
any risk of explosion or fire.
Wash your hands afterwards.
Natural battery discharge
In certain severe climatic conditions
(temperature, humidity), the battery can
discharge after 2 months, even with terminals
disconnected.
To store the vehicle or the battery, use a
location protected from heat and humidity.
Battery power loss
A battery can be discharged due to
power losses:
– Continuous electrical consumption of a
component (e.g. alarm, anti-theft device).
– Device powered up when the engine is off
(e.g. audio system, USB charger).
– Electrical leakage due to poor insulation of
electrical components.
If the power loss cannot be located, contact a
PEUGEOT dealer or a qualified workshop to
have the vehicle's electrical system checked.
Battery charge check
For batteries with a charge status
indicator, read the value indicated on the
battery directly.
For other types of batteries, the check can be
carried out with a voltmeter:
► Connect the voltmeter to the battery
terminals (respect the polarities).
► Read the voltage value.
► Turn the main beam headlamps on.
If the battery voltage remains at or above 10
V without rapidly decreasing, the charge is
correct.
If the battery voltage drops quickly or is less
than 10 V, the battery must be recharged or
replaced.
Accessing the battery
The battery is located under the bonnet.