2022 PEUGEOT LANDTREK ignition
[x] Cancel search: ignitionPage 70 of 164
68
Driving
Manual parking brake
Release
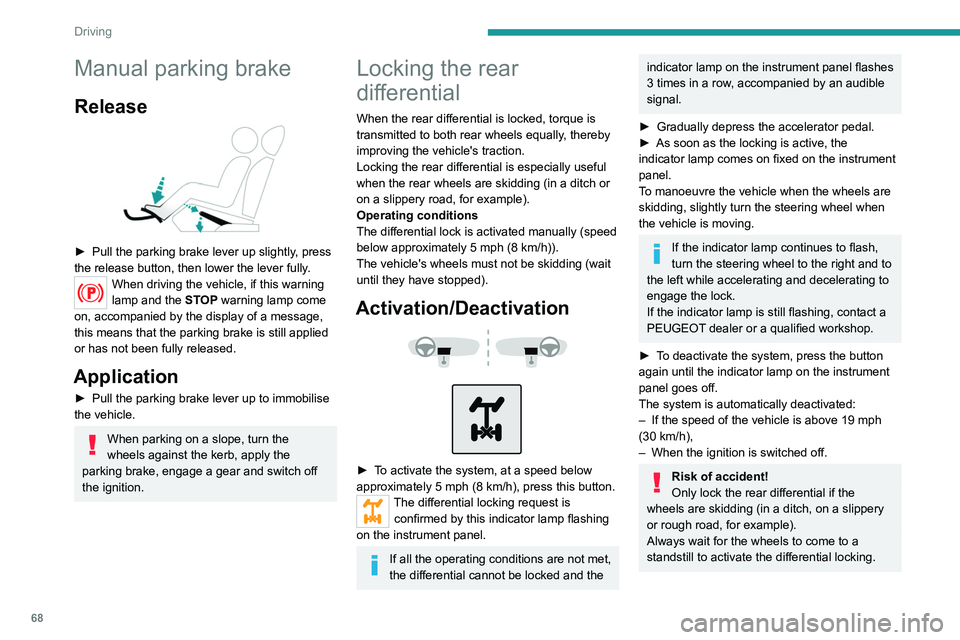
► Pull the parking brake lever up slightly, press
the release button, then lower the lever fully.
When driving the vehicle, if this warning
lamp and the STOP warning lamp come
on, accompanied by the display of a message,
this means that the parking brake is still applied
or has not been fully released.
Application
► Pull the parking brake lever up to immobilise
the vehicle.
When parking on a slope, turn the
wheels against the kerb, apply the
parking brake, engage a gear and switch off
the ignition.
Locking the rear
differential
When the rear differential is locked, torque is
transmitted to both rear wheels equally, thereby
improving the vehicle's traction.
Locking the rear differential is especially useful
when the rear wheels are skidding (in a ditch or
on a slippery road, for example).
Operating conditions
The differential lock is activated manually (speed
below approximately 5 mph (8 km/h)).
The vehicle's wheels must not be skidding (wait
until they have stopped).
Activation/Deactivation
► To activate the system, at a speed below
approximately 5 mph (8 km/h), press this button.
The differential locking request is confirmed by this indicator lamp flashing
on the instrument panel.
If all the operating conditions are not met,
the differential cannot be locked and the
indicator lamp on the instrument panel flashes
3 times in a row , accompanied by an audible
signal.
►
Gradually depress the accelerator pedal.
►
As soon as the locking is active, the
indicator
lamp comes on fixed on the instrument
panel.
To manoeuvre the vehicle when the wheels are
skidding, slightly turn the steering wheel when
the vehicle is moving.
If the indicator lamp continues to flash,
turn the steering wheel to the right and to
the left while accelerating and decelerating to
engage the lock.
If the indicator
lamp is still flashing, contact a
PEUGEOT dealer or a qualified workshop.
►
T
o deactivate the system, press the button
again until the indicator
lamp on the instrument
panel goes off.
The system is automatically deactivated:
–
If the speed of the vehicle is above 19 mph
(30
km/h),
–
When the ignition is switched off.
Risk of accident!
Only lock the rear differential if the
wheels are skidding (in a ditch, on a slippery
or rough road, for example).
Always wait for the wheels to come to a
standstill to activate the differential locking.
Never exceed the speed of 5 mph (8
km/h) with the rear differential locked, and
deactivate the locking as soon as conditions
allow.
4-wheel drive
transmission selector
Manual selector for choosing the most suitable
transmission mode according to the different
driving conditions encountered (low grip, for
example).
Operation
��
��
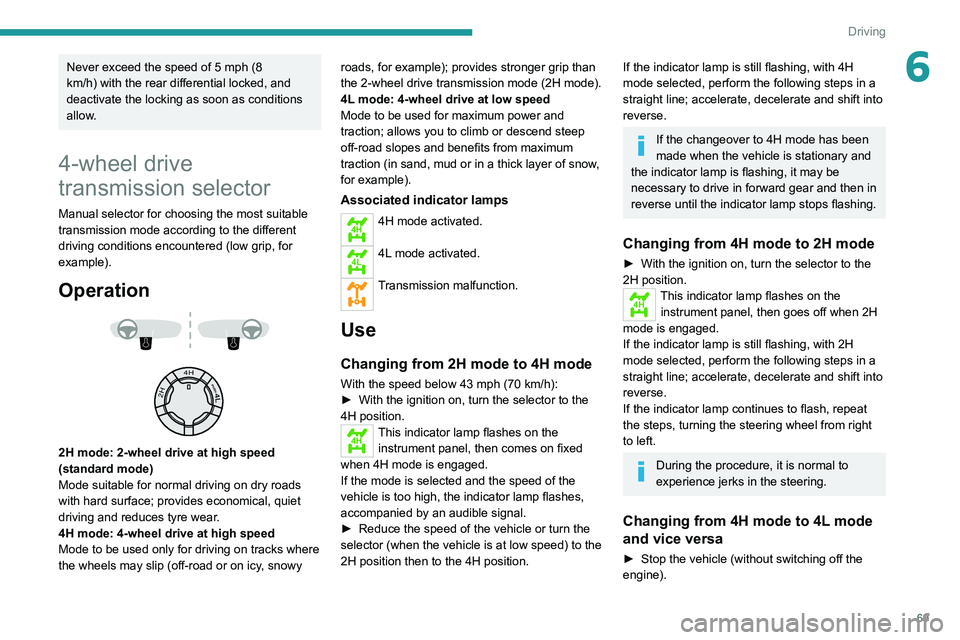
2H mode: 2-wheel drive at high speed
(standard mode)
Mode suitable for normal driving on dry roads
with hard surface; provides economical, quiet
driving and reduces tyre wear.
4H mode: 4-wheel drive at high speed
Mode to be used only for driving on tracks where
the wheels may slip (off-road or on icy, snowy
Page 71 of 164
69
Driving
6Never exceed the speed of 5 mph (8
km/h) with the rear differential locked, and
deactivate the locking as soon as conditions
allow.
4-wheel drive
transmission selector
Manual selector for choosing the most suitable
transmission mode according to the different
driving conditions encountered (low grip, for
example).
Operation
��
��
2H mode: 2-wheel drive at high speed
(standard mode)
Mode suitable for normal driving on dry roads
with hard surface; provides economical, quiet
driving and reduces tyre wear.
4H mode: 4-wheel drive at high speed
Mode to be used only for driving on tracks where
the wheels may slip (off-road or on icy, snowy roads, for example); provides stronger grip than
the 2-wheel drive transmission
mode (2H mode).
4L mode: 4-wheel drive at low speed
Mode to be used for maximum power and
traction; allows you to climb or descend steep
off-road slopes and benefits from maximum
traction (in sand, mud or in a thick layer of snow,
for example).
Associated indicator lamps
4H4H mode activated.
4L4L mode activated.
Transmission malfunction.
Use
Changing from 2H mode to 4H mode
With the speed below 43 mph (70 km/h):
► With the ignition on, turn the selector to the
4H position.
4HThis indicator lamp flashes on the instrument panel, then comes on fixed
when 4H mode is engaged.
If the mode is selected and the speed of the
vehicle is too high, the indicator
lamp flashes,
accompanied by an audible signal.
►
Reduce the speed of the vehicle or turn the
selector (when the vehicle is at low speed) to the
2H position then to the 4H position.
If the indicator lamp is still flashing, with 4H
mode selected, perform the following steps in a
straight line; accelerate, decelerate and shift into
reverse.
If the changeover to 4H mode has been
made when the vehicle is stationary and
the indicator
lamp is flashing, it may be
necessary to drive in forward gear and then in
reverse until the indicator
lamp stops flashing.
Changing from 4H mode to 2H mode
► With the ignition on, turn the selector to the
2H position.
4HThis indicator lamp flashes on the
instrument panel, then goes off when 2H
mode is engaged.
If the indicator
lamp is still flashing, with 2H
mode selected, perform the following steps in a
straight line; accelerate, decelerate and shift into
reverse.
If the indicator
lamp continues to flash, repeat
the steps, turning the steering wheel from right
to left.
During the procedure, it is normal to
experience jerks in the steering.
Changing from 4H mode to 4L mode
and vice versa
► Stop the vehicle (without switching off the
engine).
Page 74 of 164
72
Driving
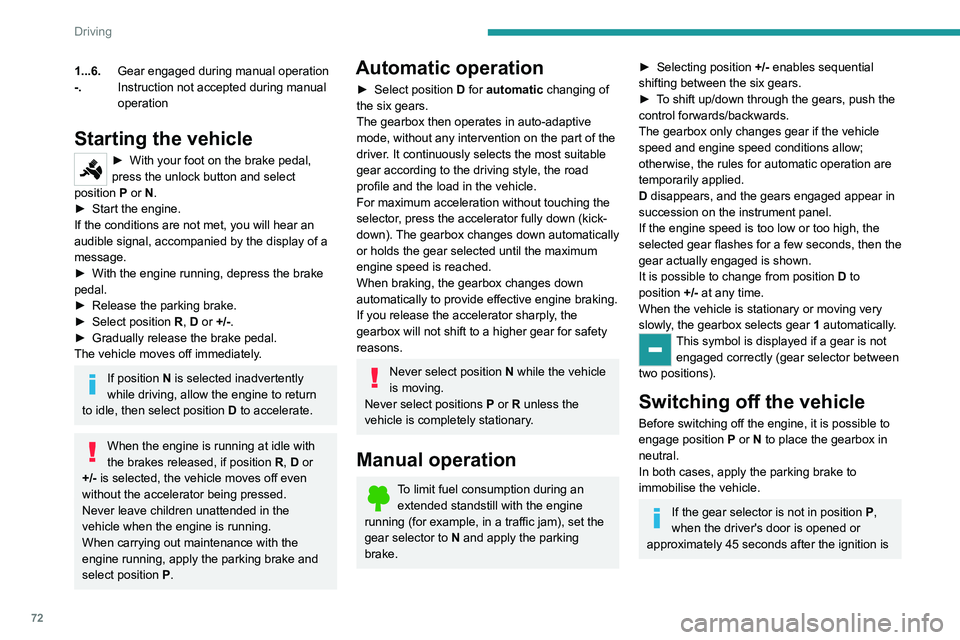
1...6.Gear engaged during manual operation
-. Instruction not accepted during manual
operation
Starting the vehicle
► With your foot on the brake pedal,
press the unlock button and select
position P
or N.
►
Start the engine.
If the conditions are not met, you will hear an
audible signal, accompanied by the display of a
message.
►
With the engine running, depress the brake
pedal.
►
Release the parking brake.
►
Select position R
, D or +/-.
►
Gradually release the brake pedal.
The vehicle moves off immediately
.
If position N is selected inadvertently
while driving, allow the engine to return
to idle, then select position D to accelerate.
When the engine is running at idle with
the brakes released, if position R, D or
+/- is selected, the vehicle moves off even
without the accelerator being pressed.
Never leave children unattended in the
vehicle when the engine is running.
When carrying out maintenance with the
engine running, apply the parking brake and
select position P.
Automatic operation
► Select position D for automatic changing of
the six gears.
The gearbox then operates in auto-adaptive
mode, without any intervention on the part of the
driver. It continuously selects the most suitable
gear according to the driving style, the road
profile and the load in the vehicle.
For maximum acceleration without touching the
selector, press the accelerator fully down (kick-
down). The gearbox changes down automatically
or holds the gear selected until the maximum
engine speed is reached.
When braking, the gearbox changes down
automatically to provide effective engine braking.
If you release the accelerator sharply, the
gearbox will not shift to a higher gear for safety
reasons.
Never select position N while the vehicle
is moving.
Never select positions P or R unless the
vehicle is completely stationary.
Manual operation
To limit fuel consumption during an extended standstill with the engine
running (for example, in a traffic jam), set the
gear selector to N and apply the parking
brake.
► Selecting position +/- enables sequential
shifting between the six gears.
►
T
o shift up/down through the gears, push the
control forwards/backwards.
The gearbox only changes gear if the vehicle
speed and engine speed conditions allow;
otherwise, the rules for automatic operation are
temporarily applied.
D disappears, and the gears engaged appear in
succession on the instrument panel.
If the engine speed is too low or too high, the
selected gear flashes for a few seconds, then the
gear actually engaged is shown.
It is possible to change from position D to
position +/-
at any time.
When the vehicle is stationary or moving very
slowly, the gearbox selects gear 1 automatically.
This symbol is displayed if a gear is not
engaged correctly (gear selector between
two positions).
Switching off the vehicle
Before switching off the engine, it is possible to
engage position P or N to place the gearbox in
neutral.
In both cases, apply the parking brake to
immobilise the vehicle.
If the gear selector is not in position P,
when the driver's door is opened or
approximately 45 seconds after the ignition is
switched off, an audible signal sounds and a
message appears.
► Return the gear selector to P; the audible
signal stops and the message disappears.
Malfunction
In the event of a malfunction, this warning
lamp comes on and a message is
displayed, when the ignition is switched on.
In this case, the gearbox goes into back-up
mode and is locked in 3
rd gear. You may feel a
significant jolt (without risk to the gearbox) when
changing from P to R and from N to R.
Do not exceed 62 mph (100 km/h), local speed
restrictions permitting.
Have the system checked by a PEUGEOT
dealer or a qualified workshop.
There is a risk of damaging the gearbox: – If the accelerator and brake pedals are
depressed simultaneously.
– In the event of a battery failure, forcing the
selector from position P to another position.
Driving mode
Driving modes are selected using one of the
following controls, depending on version:
Page 75 of 164
73
Driving
6switched off, an audible signal sounds and a
message appears.
►
Return the gear selector to P
; the audible
signal stops and the message disappears.
Malfunction
In the event of a malfunction, this warning
lamp comes on and a message is
displayed, when the ignition is switched on.
In this case, the gearbox goes into back-up
mode and is locked in 3
rd gear. You may feel a
significant jolt (without risk to the gearbox) when
changing from
P
to R and from N to R.
Do not exceed 62 mph (100
km/h), local speed
restrictions permitting.
Have the system checked by a PEUGEOT
dealer or a qualified workshop.
There is a risk of damaging the gearbox: – If the accelerator and brake pedals are
depressed simultaneously
.
–
In the event of a battery failure, forcing the
selector from position P
to another position.
Driving mode
Driving modes are selected using one of the
following controls, depending on version:
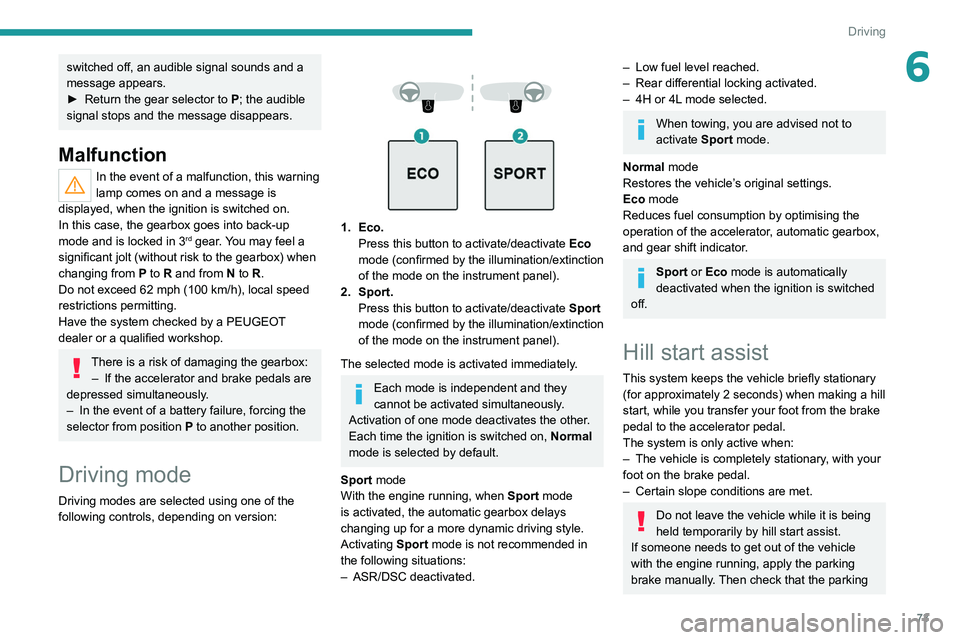
1. Eco. Press this button to activate/deactivate Eco
mode (confirmed by the illumination/extinction
of the mode on the instrument panel).
2. Sport. Press this button to activate/deactivate
Sport
mode (confirmed by the illumination/extinction
of the mode on
the instrument panel).
The selected mode is activated immediately.
Each mode is independent and they
cannot be activated simultaneously.
Activation of one mode deactivates the other.
Each time the ignition is switched on, Normal
mode is selected by default.
Sport mode
With the engine running, when
Sport
mode
is activated, the automatic gearbox delays
changing up for a more dynamic driving style.
Activating
Sport mode is not recommended in
the following situations:
–
ASR/DSC deactivated.
– Low fuel level reached.
– Rear differential locking activated.
–
4H or 4L
mode selected.
When towing, you are advised not to
activate Sport mode.
Normal mode
Restores the vehicle’s original settings.
Eco mode
Reduces fuel consumption by optimising the
operation of the accelerator, automatic gearbox,
and gear shift indicator.
Sport or Eco mode is automatically
deactivated when the ignition is switched
off.
Hill start assist
This system keeps the vehicle briefly stationary
(for approximately 2 seconds) when making a hill
start, while you transfer your foot from the brake
pedal to the accelerator pedal.
The system is only active when:
–
The vehicle is completely stationary
, with your
foot on the brake pedal.
–
Certain slope conditions are met.
Do not leave the vehicle while it is being
held temporarily by hill start assist.
If someone needs to get out of the vehicle
with the engine running, apply the parking
brake manually. Then check that the parking
Page 80 of 164
78
Driving
not be able to prevent the vehicle from
exceeding the speed setting.
If necessary, use the brakes to control the
speed of your vehicle.
Switching off
► Press button 1 (OFF): speed limiter
information is no longer displayed.
Overspeed alert at 75
mph (120 km/h)
(Depending on country of sale)
The overspeed alert system triggers an alert as
soon as it detects that the speed is greater than
75 mph (120 km/h).
This warning lamp flashes on the
instrument panel accompanied by an
audible signal.
The alert is maintained as long as the speed of
the vehicle is above 75 mph (120
km/h).
The overspeed alert system cannot be deactivated.
Cruise control - Specific
recommendations
The cruise control function does not guarantee compliance with the maximum
authorised speed and the safety distance
between vehicles, the driver remains
responsible for their driving.
In the interest of public safety, only use cruise
control if the traffic conditions enable vehicles
to drive at a steady speed and maintain an
adequate safety distance.
Remain vigilant while cruise control is
activated. If you press and hold one of the
speed setting modification buttons, your
vehicle may change speed very abruptly.
When descending a steep hill , the cruise
control system cannot prevent the vehicle
from exceeding the set speed. Brake if
necessary to control the vehicle speed.
On steep climbs or when towing, the set
speed may not be reached or maintained.
Exceeding the programmed speed
setting
You can temporarily exceed the speed
setting by pressing the accelerator pedal (the
programmed speed flashes).
To return to the speed setting, release the
accelerator pedal (when the set speed is
reached again, the displayed speed stops
flashing).
Operating limits
Never use the system in the following
situations:
–
In an urban area with the risk of
pedestrians crossing the road.
– In heavy traffic.
– On winding or steep roads.
–
On slippery or flooded roads.
–
In poor weather conditions.
–
In the event of restricted visibility for the
driver
.
–
Driving on a speed circuit.
–
Driving on a rolling road.
–
When using a non-standard spare wheel.
–
When using snow chains, non-slip covers
or studded tyres.
Cruise control
For more information, refer to the
General recommendations on the use
of driving and manoeuvring aids and the
Cruise control - particular
recommendations.
This system automatically maintains the vehicle’s speed at the value programmed
by the driver (speed setting), without the use of
the accelerator pedal.
Cruise control is switched on manually.
It requires a minimum vehicle speed of 25 mph
(40
km/h).
With a manual gearbox, third gear or higher must
be engaged.
With an automatic gearbox, mode
D
or second
gear or higher in manual mode must be
engaged.
Switching off the ignition cancels any
speed setting.
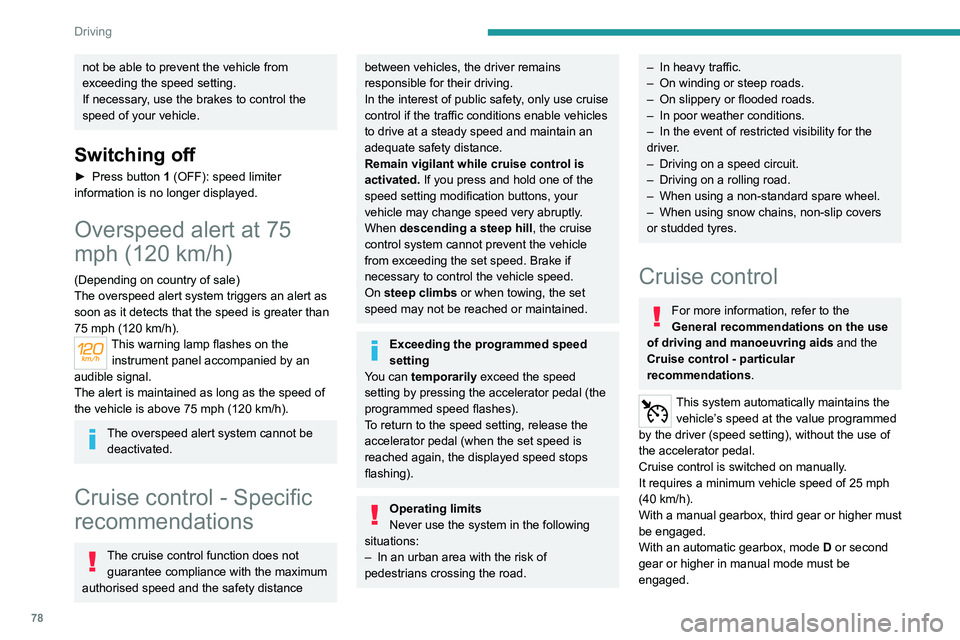
Steering-mounted control
1. Cruise control ON/OFF (CRUISE)
2. Activate cruise control at the current speed/
decrease speed setting
3. Activate cruise control with the speed setting
previously saved/increase speed setting
4. Pause
Information displayed on
the instrument panel
5. Cruise control mode selection indication.
6. Speed setting value.
Page 81 of 164
79
Driving
6Switching off the ignition cancels any
speed setting.
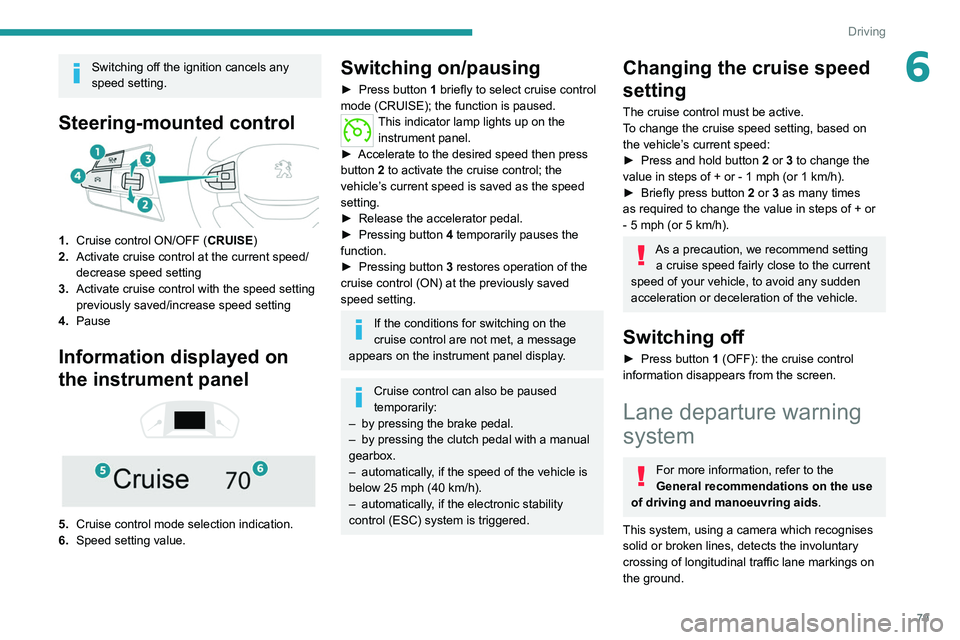
Steering-mounted control
1.Cruise control ON/OFF (CRUISE)
2. Activate cruise control at the current speed/
decrease speed setting
3. Activate cruise control with the speed setting
previously saved/increase speed setting
4. Pause
Information displayed on
the instrument panel
5. Cruise control mode selection indication.
6. Speed setting value.
Switching on/pausing
► Press button 1 briefly to select cruise control
mode (CRUISE); the function is paused.
This indicator lamp lights up on the instrument panel.
►
Accelerate to the desired speed then press
button
2 to activate the cruise control; the
vehicle’s current speed is saved as the speed
setting.
►
Release the accelerator pedal.
►
Pressing button 4
temporarily pauses the
function.
►
Pressing button 3
restores operation of the
cruise control (ON) at the previously saved
speed setting.
If the conditions for switching on the
cruise control are not met, a message
appears on the instrument panel display.
Cruise control can also be paused
temporarily:
–
by pressing the brake pedal.
–
by pressing the clutch pedal with a manual
gearbox.
–
automatically
, if the speed of the vehicle is
below 25 mph (40
km/h).
–
automatically
, if the electronic stability
control (ESC) system is triggered.
Changing the cruise speed
setting
The cruise control must be active.
To change the cruise speed setting, based on
the vehicle’s current speed:
►
Press and hold button
2
or 3 to change the
value in steps of +
or - 1 mph (or 1 km/h).
►
Briefly press button
2 or 3 as many times
as required to change the value in steps of +
or
-
5 mph (or 5 km/h).
As a precaution, we recommend setting a cruise speed fairly close to the current
speed of your vehicle, to avoid any sudden
acceleration or deceleration of the vehicle.
Switching off
► Press button 1 (OFF): the cruise control
information disappears from the screen.
Lane departure warning
system
For more information, refer to the
General recommendations on the use
of driving and manoeuvring aids .
This system, using a camera which recognises
solid or broken lines, detects the involuntary
crossing of longitudinal traffic lane markings on
the ground.
Page 84 of 164
82
Driving
Rear parking sensors
► Engage reverse gear to start the system
(confirmed by an audible signal).
The system is switched off when reverse gear is
disengaged.
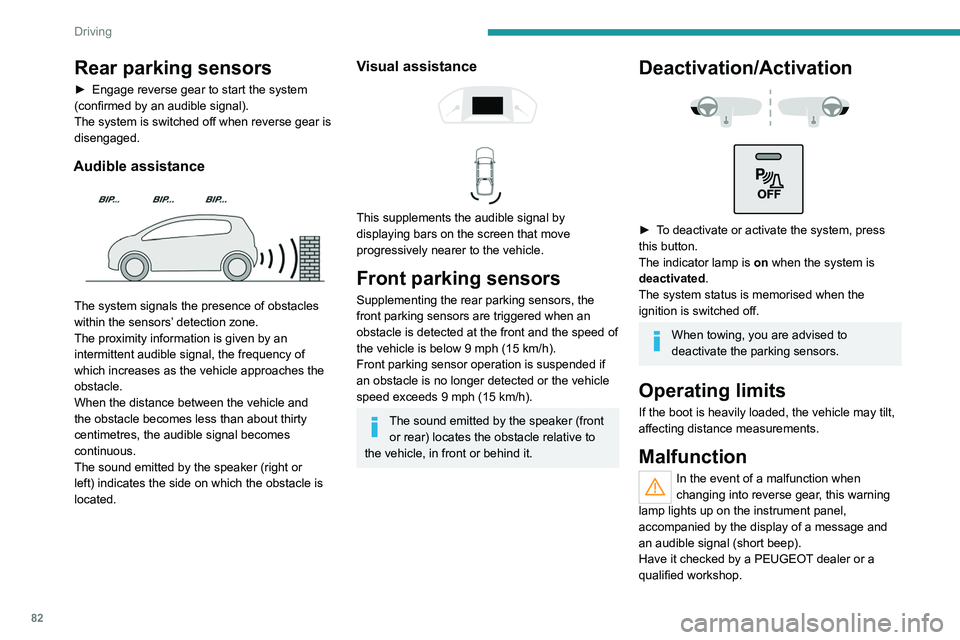
Audible assistance
The system signals the presence of obstacles
within the sensors’ detection zone.
The proximity information is given by an
intermittent audible signal, the frequency of
which increases as the vehicle approaches the
obstacle.
When the distance between the vehicle and
the obstacle becomes less than about thirty
centimetres, the audible signal becomes
continuous.
The sound emitted by the speaker (right or
left) indicates the side on which the obstacle is
located.
Visual assistance
This supplements the audible signal by
displaying bars on the screen that move
progressively nearer to the vehicle.
Front parking sensors
Supplementing the rear parking sensors, the
front parking sensors are triggered when an
obstacle is detected at the front and the speed of
the vehicle is below 9 mph (15 km/h).
Front parking sensor operation is suspended if
an obstacle is no longer detected or the vehicle
speed exceeds 9 mph (15
km/h).
The sound emitted by the speaker (front or rear) locates the obstacle relative to
the vehicle, in front or behind it.
Deactivation/Activation
► To deactivate or activate the system, press
this button.
The indicator lamp is on when the system is
deactivated.
The system status is memorised when the
ignition is switched off.
When towing, you are advised to
deactivate the parking sensors.
Operating limits
If the boot is heavily loaded, the vehicle may tilt,
affecting distance measurements.
Malfunction
In the event of a malfunction when
changing into reverse gear, this warning
lamp lights up on the instrument panel,
accompanied by the display of a message and
an audible signal (short beep).
Have it checked by a PEUGEOT dealer or a
qualified workshop.
Reversing camera
For more information, refer to the
General recommendations on the use
of driving and manoeuvring aids .
The visual reversing assistance camera is
activated automatically when reverse gear is
engaged.
The function may be supplemented by parking
sensors.
The image is displayed on the touch screen.
Page 85 of 164
83
Driving
6Reversing camera
For more information, refer to the
General recommendations on the use
of driving and manoeuvring aids .
The visual reversing assistance camera is
activated automatically when reverse gear is
engaged.
The function may be supplemented by parking
sensors.
The image is displayed on the touch screen.
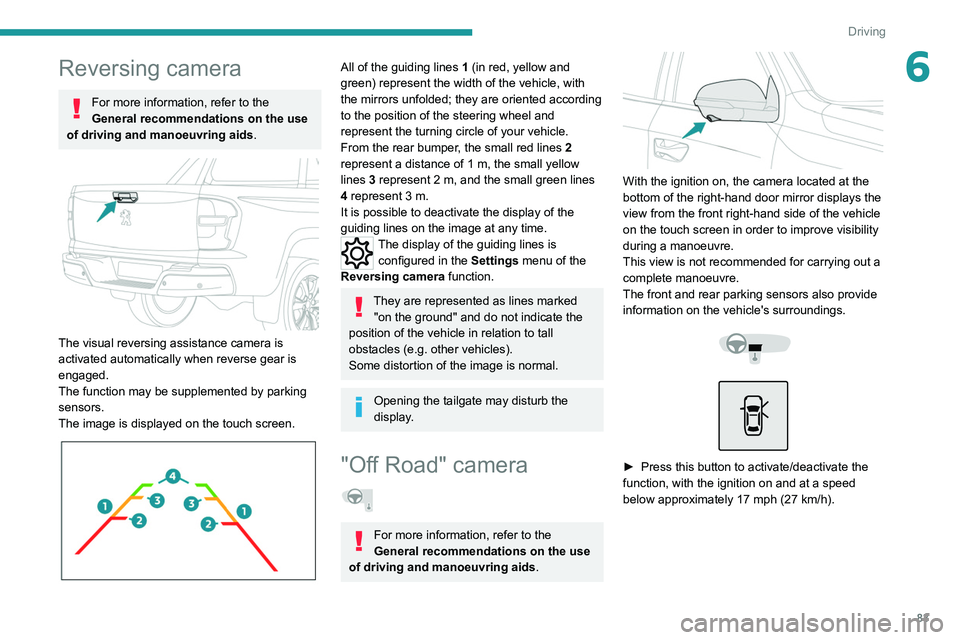
All of the guiding lines 1 (in red, yellow and
green) represent the width of the vehicle, with
the mirrors unfolded; they are oriented according
to the position of the steering wheel and
represent the turning circle of your vehicle.
From the rear bumper, the small red lines 2
represent a distance of 1 m, the small yellow
lines 3
represent 2 m, and the small green lines
4
represent 3 m.
It is possible to deactivate the display of the
guiding
lines on the image at any time.
The display of the guiding lines is
configured in the Settings
menu of the
Reversing camera function.
They are represented as lines marked
"on the ground" and do not indicate the
position of the vehicle in relation to tall
obstacles (e.g. other vehicles).
Some distortion of the image is normal.
Opening the tailgate may disturb the
display.
"Off Road" camera
For more information, refer to the
General recommendations on the use
of driving and manoeuvring aids .
With the ignition on, the camera located at the
bottom of the right-hand door mirror displays the
view from the front right-hand side of the vehicle
on the touch screen in order to improve visibility
during a manoeuvre.
This view is not recommended for carrying out a
complete manoeuvre.
The front and rear parking sensors also provide
information on the vehicle's surroundings.
► Press this button to activate/deactivate the
function, with the ignition on and at a speed
below approximately 17 mph (27
km/h).