2022 PEUGEOT LANDTREK wipers
[x] Cancel search: wipersPage 4 of 164

2
Contents
■
Overview
■
Eco-driving
1InstrumentsInstrument panels 7
Warning and indicator lamps 8
Total distance recorder 12
Lighting dimmer 12
Trip computer 12
Monochrome screen 13
Touch screen 14
2AccessElectronic key with remote control function and
built-in key, 16
Keyless Entry and Starting 18
Central locking 19
Back-up procedures 20
Doors 22
Tailgate 22
Alarm 23
Electric windows 24
3Ease of use and comfortFront seats 26
2-seat front bench seat 27
Steering wheel adjustment 28
Mirrors 29
Rear bench seat 30
Heating and Ventilation 32
Heating 33
Manual air conditioning 33
Dual-zone automatic air conditioning 34
Front demisting - defrosting 36
Rear screen demisting/defrosting 36
Front fittings 36
Courtesy lamps 38
Rear fittings 39
Tipper body fittings 40
4Lighting and visibilityLighting control stalk 43
Cornering lighting 44
Direction indicators 45
Headlamp beam height adjustment 45
Automatic illumination of headlamps 45
Guide-me-home and welcome lighting 46
Wiper control stalk 46
Changing a wiper blade 47
Automatic wipers 48
5SafetyGeneral safety recommendations 49
Hazard warning lamps 49
Horn 50
Electronic stability control (ESC) 50
Hill Assist Descent Control 52
Seat belts 53
Airbags 55
Child seats 58
Deactivating the front passenger airbag 59
ISOFIX child seats 60
Child lock 61
6DrivingDriving recommendations 62
Starting / Switching off the engine with the key 64
Starting/Switching off the engine with
Keyless Entry and Starting
66
Manual parking brake 68
Locking the rear differential 68
4-wheel drive transmission selector 69
6-speed manual gearbox 70
6-speed automatic gearbox 71
Driving mode 73
Hill start assist 73
Gear shift indicator 74
Tyre under-inflation detection 74
Driving and manoeuvring aids - General
recommendations
76
Speed limiter 77
Overspeed alert at 75 mph (120
km/h) 78
Cruise control - Specific recommendations 78
Cruise control 78
Lane departure warning system 79
Parking sensors 81
Reversing camera 83
"Off Road" camera 83
360° camera 84
7Practical informationRecommended fuel 89
Refuelling 89
Towing device 90
Snow chains 90
Roof bars 91
Bonnet 91
Engine compartment 92
Checking levels 93
Page 47 of 164
45
Lighting and visibility
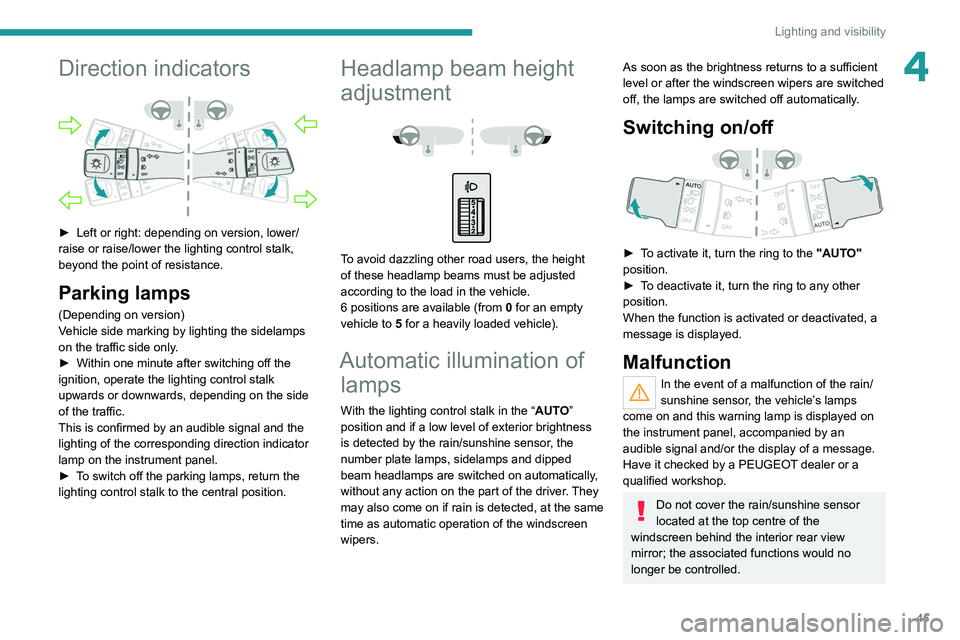
4Direction indicators
► Left or right: depending on version, lower/
raise or raise/lower the lighting control stalk,
beyond the point of resistance.
Parking lamps
(Depending on version)
Vehicle side marking by lighting the sidelamps
on the traffic side only.
►
Within one minute after switching off the
ignition, operate the lighting control stalk
upwards or downwards, depending on the side
of the traffic.
This is confirmed by an audible signal and the
lighting of the corresponding direction indicator
lamp on the instrument panel.
►
T
o switch off the parking lamps, return the
lighting control stalk to the central position.
Headlamp beam height
adjustment
To avoid dazzling other road users, the height
of these headlamp beams must be adjusted
according to the load in the vehicle.
6 positions are available (from 0 for an empty
vehicle to 5 for a heavily loaded vehicle).
Automatic illumination of lamps
With the lighting control stalk in the “ AUTO”
position and if a low level of exterior brightness
is detected by the rain/sunshine sensor, the
number plate lamps, sidelamps and dipped
beam headlamps are switched on automatically,
without any action on the part of the driver. They
may also come on if rain is detected, at the same
time as automatic operation of the windscreen
wipers.
As soon as the brightness returns to a sufficient
level or after the windscreen wipers are switched
off, the lamps are switched off automatically.
Switching on/off
► To activate it, turn the ring to the "AUTO"
position.
►
T
o deactivate it, turn the ring to any other
position.
When the function is activated or deactivated, a
message is displayed.
Malfunction
In the event of a malfunction of the rain/
sunshine sensor, the vehicle’s lamps
come on and this warning lamp is displayed on
the instrument panel, accompanied by an
audible signal and/or the display of a message.
Have it checked by a PEUGEOT dealer or a
qualified workshop.
Do not cover the rain/sunshine sensor
located at the top centre of the
windscreen behind the interior rear view
mirror; the associated functions would no
longer be controlled.
Page 48 of 164
46
Lighting and visibility
Fast wiping.
If the ignition has been switched off with
the windscreen wipers active, you must
operate the control stalk again to reactivate
wiping when the ignition is switched on again
(unless the ignition was off for less than
a minute).
Decreasing or increasing the wiping
frequency
► Rotate the ring to increase/decrease
the wiping frequency (with " INT" or
"AUTO" wiping position).
Windscreen wash
► Pull the wiper control stalk towards you and
hold.
A final wiping cycle is performed when
screenwashing ends.
In fog or snow, the rain/sunshine sensor
may detect sufficient light. For this
reason, the lighting will not come on
automatically.
The inner surface of the windscreen may become misted up and affect the proper
operation of the rain/sunshine sensor.
In humid and cold weather, demist the
windscreen regularly.
Guide-me-home and
welcome lighting
Guide-me-home lighting
Depending on version, when the light is poor, the
dipped beam headlamps come on automatically
when the ignition is switched off.
Guide-me-home lighting goes off automatically
after a period of time.
You can activate/deactivate this function and adjust the guide-me-home lighting
duration in the Vehicle settings
touch screen
menu.
Welcome lighting
When unlocking the vehicle, this system
automatically switches on the dipped beam
headlamps and certain lights in the passenger
compartment.
DOORWhen the front courtesy lamp control is
activated, the front courtesy lamp comes
on automatically when a door is opened.
Depending on version, the front doors have sill
lighting. Each sill light automatically switches on
when a front door is opened to facilitate entry
into the vehicle at night.
You can activate/deactivate this function and adjust the welcome lighting duration
in the Vehicle settings touch screen menu.
Wiper control stalk
Before operating the wipers in wintry
conditions, clear any snow, ice or frost
from the windscreen and around the wiper
arms and blades.
Do not operate the wipers on a dry
windscreen. In extremely hot or cold
weather, check that the wiper blades are not
stuck to the windscreen before operating the
wipers.
After using an automatic car wash, you may temporarily notice abnormal noises
and poorer wiping performance.
You do not
need to replace the wiper blades.
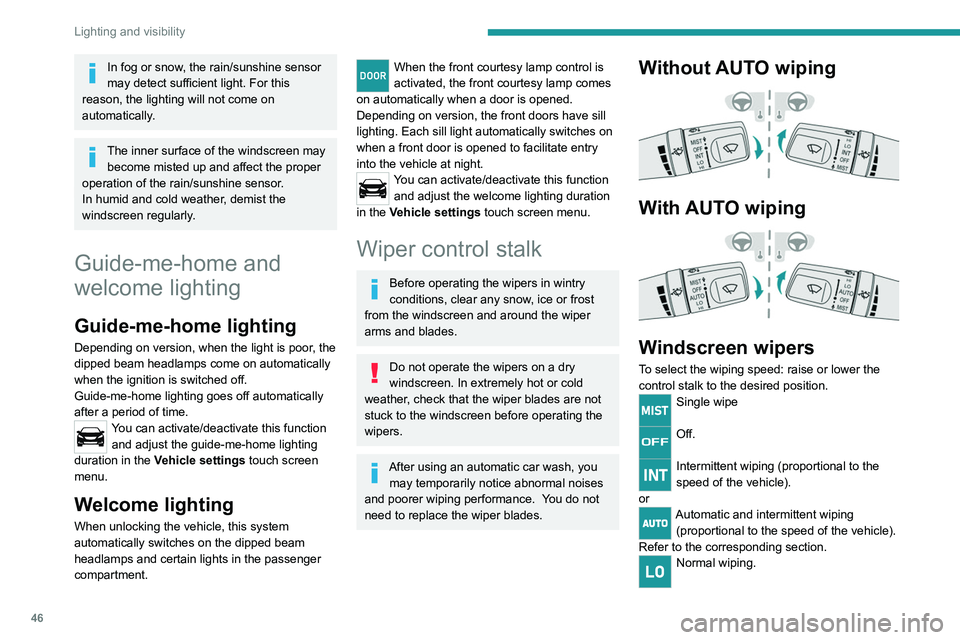
Without AUTO wiping
With AUTO wiping
Windscreen wipers
To select the wiping speed: raise or lower the
control stalk to the desired position.
Single wipe
Off.
Intermittent wiping (proportional to the
speed of the vehicle).
or
Automatic and intermittent wiping (proportional to the speed of the vehicle).
Refer to the corresponding section.
Normal wiping.
Page 49 of 164
47
Lighting and visibility
4Fast wiping.
If the ignition has been switched off with
the windscreen wipers active, you must
operate the control stalk again to reactivate
wiping when the ignition is switched on again
(unless the ignition was off for less than
a
minute).
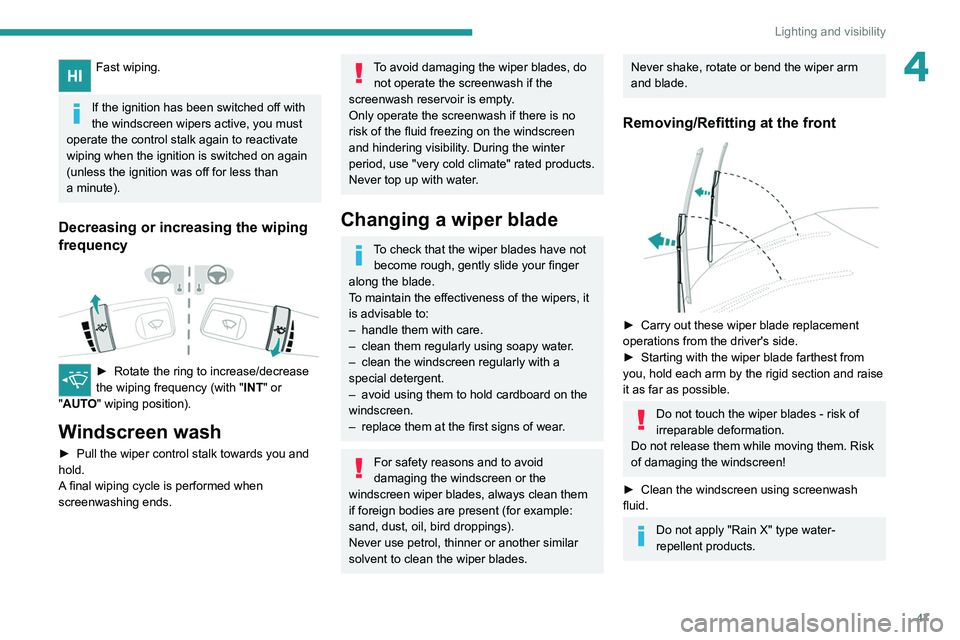
Decreasing or increasing the wiping
frequency
► Rotate the ring to increase/decrease
the wiping frequency (with " INT
" or
"AUTO" wiping position).
Windscreen wash
► Pull the wiper control stalk towards you and
hold.
A
final wiping cycle is performed when
screenwashing ends.
To avoid damaging the wiper blades, do not operate the screenwash if the
screenwash reservoir is empty.
Only operate the screenwash if there is no
risk of the fluid freezing on the windscreen
and hindering visibility. During the winter
period, use "very cold climate" rated products.
Never top up with water.
Changing a wiper blade
To check that the wiper blades have not become rough, gently slide your finger
along the blade.
To maintain the effectiveness of the wipers, it
is advisable to:
–
handle them with care.
–
clean them regularly using soapy water
.
–
clean the windscreen regularly with a
special detergent.
–
avoid using them to hold cardboard on the
windscreen.
–
replace them at the first signs of wear
.
For safety reasons and to avoid
damaging the windscreen or the
windscreen wiper blades, always clean them
if foreign bodies
are present (for example:
sand, dust, oil, bird droppings).
Never use petrol, thinner or another similar
solvent to clean the wiper blades.
Never shake, rotate or bend the wiper arm
and blade.
Removing/Refitting at the front
► Carry out these wiper blade replacement
operations from the driver's side.
►
Starting with the wiper blade farthest from
you, hold each arm by the rigid section and raise
it as far as possible.
Do not touch the wiper blades - risk of
irreparable deformation.
Do not release them while moving them. Risk
of damaging the windscreen!
►
Clean the windscreen using screenwash
fluid.
Do not apply "Rain X" type water-
repellent products.
Page 50 of 164
48
Lighting and visibility
► Unclip the worn wiper blade closest to you
and remove it.
►
Install the new wiper blade and clip it to the
arm.
►
Repeat the procedure for the other wiper
blade.
►
Starting with the wiper blade closest to you,
once again hold each arm by the rigid section,
then guide it carefully onto the windscreen.
Automatic windscreen wipers
In AUTO mode, the windscreen wipers work
automatically and adapt to the intensity of the
rain.
The rainfall detection function uses a rain/
sunshine sensor located at the top centre of the
windscreen, behind the rear view mirror.
Do not cover the rain/sunshine sensor.
When using an automatic car wash,
switch off the automatic wipers and the
ignition.
In winter, wait until the windscreen is
completely clear of ice before activating the
automatic wipers.
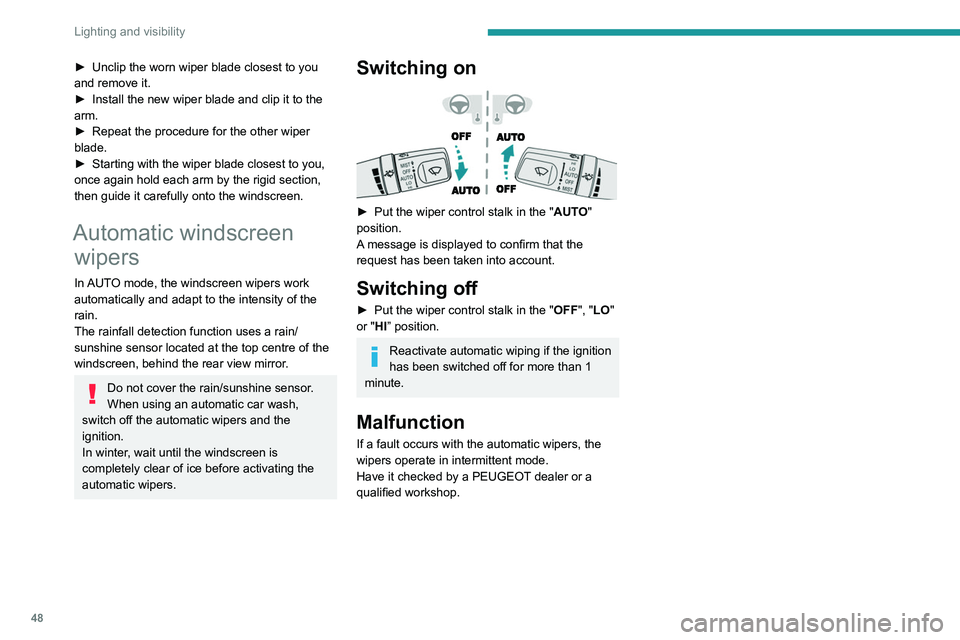
Switching on
► Put the wiper control stalk in the " AUT O"
position.
A message is displayed to confirm that the
request has been taken into account.
Switching off
► Put the wiper control stalk in the " OFF", " LO"
or "HI” position.
Reactivate automatic wiping if the ignition
has been switched off for more than 1
minute.
Malfunction
If a fault occurs with the automatic wipers, the
wipers operate in intermittent mode.
Have it checked by a PEUGEOT dealer or a
qualified workshop.
Page 100 of 164
98
Practical information
Always wear gloves, protective glasses and
suitable clothing to avoid direct contact with
liquids against the skin or eyes.
In the event of contact with the skin, wash
the affected area thoroughly with soap and
running water.
In the event of contact with the eyes,
immediately rinse the eyes with large
amounts of water or with an eye wash
solution for at least 15 minutes. Seek medical
attention if you feel a persistent burning
sensation or irritation.
Never go underneath the vehicle raised
using a jack; always use an axle
stand-type support.
When working on the vehicle's electrical
system, take care not to cause a short circuit -
risk of burns and fire.
Flammable products and all sources of heat
(sparks, for example) must be kept away from
the battery, the fuel tank and all components
of the fuel system.
Never run the engine in a closed space
without sufficient ventilation; always use a
ventilation system such as an exhaust gas
extractor, for example.
Never leave liquids (oil, coolant) unattended.
Keep these liquids out of the reach of children
and animals.
The liquids and components replaced must have the same characteristics and
comply with the manufacturer's
recommendations.
General checks
Check the following components to ensure
proper operation and longevity of the vehicle.
For more information on the components
to be
checked, refer to the Checking levels, Checks
and Advice on care
sections.
Daily checks
Check that all vehicle lamps (front and
rear) are working properly.
Check the condition of the door mirrors and
the adjustment controls.
Check that all the doors can be opened,
closed and locked correctly.
Regularly check all levels, the condition of the
tyres and the bodywork.
Monthly checks
Check:
–
The engine coolant level.
–
The absence of leaks on all the pipes and
hoses visible on the vehicle as well as the
tanks.
–
The proper functioning of the elements of
the: •
Heating and ventilation system.
•
Air conditioning system.
• Parking brake (application and release).
• Horn.
–
The tightening of the wheel nuts (if
necessary
, retighten them to the specific
tightening values).
–
The good condition of the wipers.
–
The absence of significant play in the
steering wheel and steering.
–
The correct travel of the brake pedal as
well as the clutch pedal.
General recommendations
related to maintenance
operations
Electronic engine management
computer
The electronic computer is not completely
waterproof. When performing maintenance
in the rain or washing the engine, it must be
protected from water.
Never remove or disconnect any part of the
electronic injection system to avoid the entry
of moisture, oil or any other foreign body.
Do not install a radio antenna or other
equipment likely to generate interference near
the electronic computer.
Do not expose the electronic computer to a
temperature higher than 105°C.
Before any welding operation on the vehicle,
it is essential to disconnect the electronic
computer - risk of damage to the electronic
system components.
Fuel system
All work on the fuel system must be
carried out only by a PEUGEOT dealer or a
qualified workshop.
Electrical system
Never:
– disconnect the battery cables or the
electrical wiring harness connectors when the
engine is running.
– reverse the polarities when reconnecting
the battery (risk of damage to electronic
components).
– pierce the insulation of the electrical wires
during an electrical check or diagnosis.
Changing the 12 V battery
Petrol engine
Page 119 of 164
11 7
In the event of a breakdown
8Battery power loss
A battery can be discharged due to
power losses:
–
Continuous electrical consumption of a
component (e.g. alarm, anti-theft device).
–
Device powered up when the engine is off
(e.g. audio system, USB charger).
–
Electrical leakage due to poor insulation of
electrical components.
If the power loss cannot be located, contact a
PEUGEOT
dealer or a qualified workshop to
have the vehicle's electrical system checked.
Battery charge check
For batteries with a charge status
indicator, read the value indicated on the
battery directly.
For other types of batteries, the check can be
carried out with a voltmeter:
►
Connect the voltmeter to the battery
terminals (respect the polarities).
►
Read the voltage value.
►
T
urn the main beam headlamps on.
If the battery voltage remains at or above 10
V without rapidly decreasing, the charge is
correct.
If the battery voltage drops quickly or is less
than 10 V, the battery must be recharged or
replaced.
Accessing the battery
The battery is located under the bonnet.
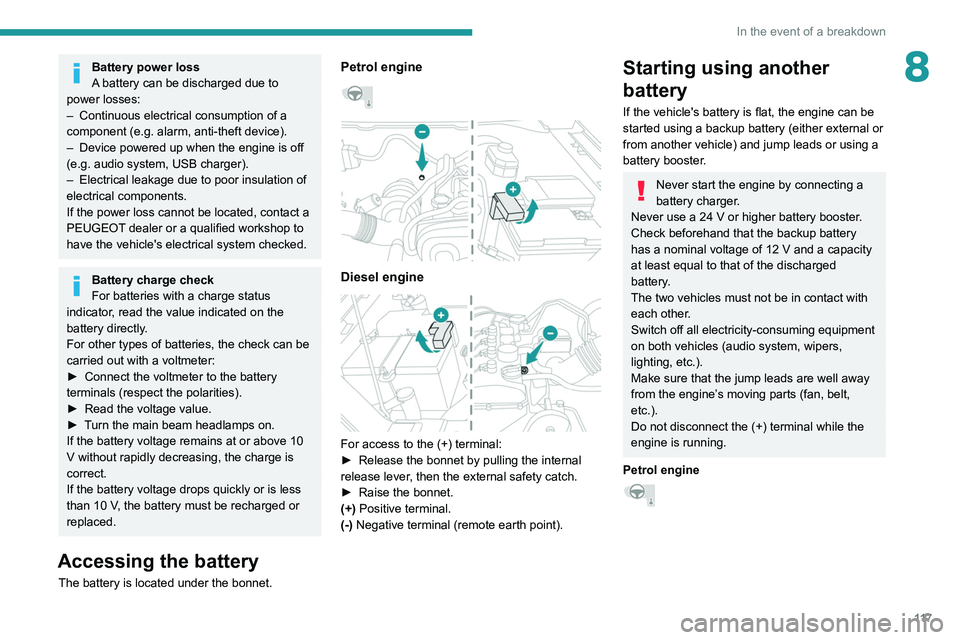
Petrol engine
Diesel engine
For access to the (+) terminal:
► Release the bonnet by pulling the internal
release lever
, then the external safety catch.
►
Raise the bonnet.
(+)
Positive terminal.
(-) Negative terminal (remote earth point).
Starting using another
battery
If the vehicle's battery is flat, the engine can be
started using a backup battery (either external or
from another vehicle) and jump leads or using a
battery booster.
Never start the engine by connecting a
battery charger.
Never use a 24
V or higher battery booster.
Check beforehand that the backup battery
has a nominal voltage of 12
V and a capacity
at least equal to that of the discharged
battery.
The two vehicles must not be in contact with
each other.
Switch off all electricity-consuming equipment
on both vehicles (audio system, wipers,
lighting, etc.).
Make sure that the jump leads are well away
from the engine’s moving parts (fan, belt,
etc.).
Do not disconnect the (+) terminal while the
engine is running.
Petrol engine
Page 120 of 164
11 8
In the event of a breakdown
Diesel engine
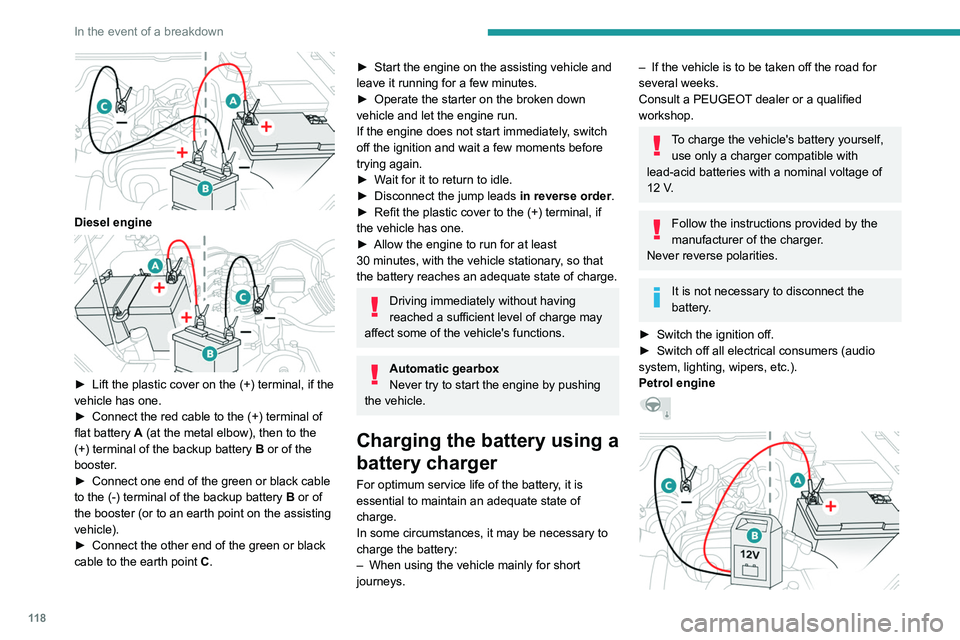
► Lift the plastic cover on the (+) terminal, if the
vehicle has one.
►
Connect the red cable to the (+) terminal of
flat battery
A (at the metal elbow), then to the
(+) terminal of the backup battery
B or of the
booster.
►
Connect one end of the green or black cable
to the (-) terminal of the backup battery
B or of
the booster (or to an earth point on the assisting
vehicle).
►
Connect the other end of the green or black
cable to the earth point
C
.
► Start the engine on the assisting vehicle and
leave it running for a few minutes.
►
Operate the starter on the broken down
vehicle and let the engine run.
If the engine does not start immediately
, switch
off the ignition and wait a few moments before
trying again.
►
W
ait for it to return to idle.
►
Disconnect the jump leads in reverse order.
►
Refit the plastic cover to the (+) terminal, if
the vehicle has one.
►
Allow the engine to run for at least
30
minutes, with the vehicle stationary, so that
the battery reaches an adequate state of charge.
Driving immediately without having
reached a sufficient level of charge may
affect some of the vehicle's functions.
Automatic gearbox
Never try to start the engine by pushing
the vehicle.
Charging the battery using a
battery charger
For optimum service life of the battery, it is
essential to maintain an adequate state of
charge.
In some circumstances, it may be necessary to
charge the battery:
–
When using the vehicle mainly for short
journeys.
– If the vehicle is to be taken off the road for
several weeks.
Consult a PEUGEOT
dealer or a qualified
workshop.
To charge the vehicle's battery yourself, use only a charger compatible with
lead-acid batteries with a nominal voltage of
12
V.
Follow the instructions provided by the
manufacturer of the charger.
Never reverse polarities.
It is not necessary to disconnect the
battery.
►
Switch the ignition off.
►
Switch off all electrical consumers (audio
system, lighting, wipers, etc.).
Petrol engine
Diesel engine
► Switch off charger B before connecting
the cables to the battery, so as to avoid any
dangerous sparks.
► Ensure that the charger cables are in good
condition.
► Lift the plastic cover on the (+) terminal, if the
vehicle has one.
► Connect the cables of charger B as follows:
• the positive (+) red cable to the (+) terminal
of battery A,
• the negative (-) black cable to earth point C
on the vehicle.
► At the end of the charging operation, switch
off charger B before disconnecting the cables
from battery A.
Never try to charge a frozen battery - risk
of explosion!
If the battery has frozen, have it checked by a
PEUGEOT dealer or by a qualified workshop
who will verify that the internal components
have not been damaged and that the case