Page 65 of 148

63
Driving
6– When using a ‘space-saver’ type spare
wheel.
–
When using snow chains, non-slip covers
or studded tyres.
Cruise control
For more information, refer to the
General recommendations on the use
of driving and manoeuvring aids and the
Specific recommendations on cruise
control.
This system automatically maintains the vehicle’s speed at the value programmed
by the driver (speed setting), without the use of
the accelerator pedal.
Cruise control is switched on manually.
It requires a minimum vehicle speed of 25 mph
(40
km/h).
With a manual gearbox, fourth gear must be
engaged.
With an automatic gearbox, mode
D
or second
gear or higher in mode
M
must be engaged.
Cruise control remains active after
changing gear on engines fitted with a
manual gearbox and the Stop & Start
function.
Switching off the ignition cancels any
speed setting.
Steering-mounted control
1. ON (CRUISE position)/OFF (position 0)
2. Activate cruise control at the current speed/
decrease speed setting
3. Activate cruise control at the current speed/
increase speed setting
4. Pause/resume cruise control with the speed
setting previously saved
Information displayed on
the instrument panel
5.Cruise control pause/resume
6. Cruise control mode selection
7. Speed setting value
Switching on/pausing
► Turn thumbwheel 1 to the "CRUISE" position
to select cruise control mode; the function is
paused.
►
Press button
2-SET- or 3-SET+ to activate
cruise control and save a speed setting when
the vehicle has reached the desired speed; the
vehicle’s current speed is saved as the speed
setting.
►
Release the accelerator pedal.
►
Pressing button 4-II
temporarily pauses the
function (pause).
►
Pressing button 4-II
again resumes operation
of the cruise control (ON).
Page 66 of 148
 system is triggered.
Changing the cruis")
64
Driving
Cruise control can also be paused
temporarily:
–
by pressing the brake pedal.
–
automatically
, if the electronic stability
control (ESC) system is triggered.
Changing the cruise speed
setting
The cruise control must be active.
To change the cruise speed setting, based on
the vehicle’s current speed:
►
For steps of +/- 1
mph (1 km/h), briefly
press
2-SET- or 3-SET+ repeatedly.
►
For steps of +/- 5
mph (5 km/h), press and
hold
2-SET- or 3-SET+.
Pressing and holding 2-SET - or 3-SET+
results in a rapid change in the speed of
the vehicle.
As a precaution, we recommend setting a cruise speed fairly close to the current
speed of your vehicle, to avoid any sudden
acceleration or deceleration of the vehicle.
Switching off
► Turn the thumbwheel 1 to the "OFF" position:
the cruise control information disappears from
the screen.
Malfunction
In the event of a malfunction, dashes are
displayed flashing and then fixed instead of the
speed setting.
Have it checked by a PEUGEOT dealer or a
qualified workshop.
Rear parking sensors
For more information, refer to the
General recommendations on the use
of driving and manoeuvring aids .
This system detects and signals the proximity of
obstacles (e.g.
pedestrian, vehicle, tree, gate)
entering the field of detection of sensors located
in the bumper.
Due to blind spots, obstacles of certain types
(posts, roadworks cones, etc.) which were
detected initially won't be any longer by the end
of the operation.
Audible assistance
The system signals the presence of obstacles
within the sensors’ detection zone.
The proximity information is given by an
intermittent audible signal, the frequency of
which increases as the vehicle approaches the
obstacle.
When the distance between the vehicle and
the obstacle becomes less than about thirty
centimetres, the audible signal becomes
continuous.
The sound emitted by the speaker (right or
left) indicates the side on which the obstacle is
located.
Visual assistance
Page 67 of 148

65
Driving
6
This supplements the audible signal by
displaying bars on the screen whose location
represents the distance between the obstacle
and the vehicle (white: more distant, orange:
close, red: very close).
When the obstacle is very close, the "Danger"
symbol is displayed on the screen.
Deactivation/Activation
The function is deactivated or activated via the
vehicle configuration menu.
With audio system
The parking sensors can be configured in the "Personalisation - Configuration "
menu.
With touch screen
The parking sensors can be configured in the Driving/Vehicle
menu.
The function will be deactivated automatically if a trailer is being towed or
a bicycle carrier is fitted (vehicle fitted with a
tow bar or bicycle carrier recommended by
PEUGEOT).
Malfunction
In the event of a malfunction when
changing into reverse gear, this warning
lamp lights up on the instrument panel and/or a
message appears in the screen, accompanied
by an audible signal (short beep).
Have it checked by a PEUGEOT dealer or a
qualified workshop.
Reversing Camera
For more information, refer to the
General recommendations on the use
of driving and manoeuvring aids .
The reversing camera is automatically activated
when reverse gear is engaged.
The image is displayed on the touch screen.
The reversing camera function may be
supplemented with parking sensors.
The representation with overlaid lines helps with
the manoeuvre.
They are represented as lines marked "on the ground" and do not indicate the
position of the vehicle in relation to tall
obstacles (e.g. other vehicles).
Some distortion of the image is normal.
It is normal to have a part of the number plate
showing at the bottom of the screen.
The blue lines
1
represent the general direction
of the vehicle (the gap represents the width of
your vehicle without the mirrors).
The red line
2
represents a distance of about
30
cm beyond the edge of your vehicle's rear
bumper.
The green lines
3
represent distances of about 1
and 2
metres beyond the edge of your vehicle's
rear bumper.
The turquoise blue curves
4
represent the
maximum turning circle.
Opening the tailgate causes the display
to disappear.
Page 68 of 148

Peugeot & TotalEnergies,
a partnership in performance !
For more than 25 years of partnership, TotalEnergies and Peugeot have
pushed the limits of performance in sports competition with historic
victories, in endurance races or in rallies. Today, the two brands continue
their common motorsport adventure by setting out to conquer the 24h
of Le Mans and the FIA World Endurance Championship in the Hybrid
Hypercar category. So many challenges for which Peugeot exclusively
recommends high-tech Quartz lubricants for the protection of its
engines throughout their life. TotalEnergies therefore equips Peugeot
vehicles with Quartz lubricants from their fi rst fi lling in the factory to the
approved maintenance networks to guarantee them optimal day-to-
day operation. Peugeot & TotalEnergies: offi cial partners in performance !
Keep your engine younger for longer !
Quartz Ineo Xtra First 0W-20 is a very high performance lubricant
resulting from the joint work of the Peugeot and TotalEnergies R&D
teams. Its innovative technology extends your engine’s life while
reaching signifi cant fuel savings and thus limiting CO
2 emissions. The
product is now available in new packaging* made of 50% recycled
material and 100% recyclable.
* 1L & 5L produced in Europe
Page 69 of 148

67
Practical information
Peugeot & TotalEnergies,
a partnership in performance !
For more than 25 years of partnership, TotalEnergies and Peugeot have
pushed the limits of performance in sports competition with historic
victories, in endurance races or in rallies. Today, the two brands continue
their common motorsport adventure by setting out to conquer the 24h
of Le Mans and the FIA World Endurance Championship in the Hybrid
Hypercar category. So many challenges for which Peugeot exclusively
recommends high-tech Quartz lubricants for the protection of its
engines throughout their life. TotalEnergies therefore equips Peugeot
vehicles with Quartz lubricants from their fi rst fi lling in the factory to the
approved maintenance networks to guarantee them optimal day-to-
day operation. Peugeot & TotalEnergies: offi cial partners in performance !
Keep your engine younger for longer !
Quartz Ineo Xtra First 0W-20 is a very high performance lubricant
resulting from the joint work of the Peugeot and TotalEnergies R&D
teams. Its innovative technology extends your engine’s life while
reaching signifi cant fuel savings and thus limiting CO
2 emissions. The
product is now available in new packaging* made of 50% recycled
material and 100% recyclable.
* 1L & 5L produced in Europe
7Compatibility of fuels
Petrol fuels conforming to the EN228 standard
containing up to 5% and 10% ethanol
respectively.
Diesel fuels conforming to the EN590, EN16734
and EN16709 standards and containing up to
7%, 10%, 20% and 30% fatty acid methyl ester
respectively. The use of B20 or B30 fuels, even
occasionally, imposes special maintenance
conditions referred to as "Arduous conditions".
Paraffinic Diesel fuel conforming to the EN15940
standard.
The use of any other type of (bio) fuel (e.g. pure or diluted vegetable or animal
oils, domestic fuel) is strictly prohibited - risk
of damaging the engine and fuel system!
The only fuel additives authorised for use are those that meet the B715001 (Petrol)
or B715000 (Diesel) standards.
Diesel at low temperature
At temperatures below 0 °C (+32 °F), the
formation of paraffins in summer-type Diesel fuels could prevent the engine from operating
correctly
. In these temperature conditions, use
winter-type Diesel fuel and keep the fuel tank
more than 50 % full.
At temperatures below -15 °C (+5 °F) to avoid
problems starting, it is best to park the vehicle
under shelter (heated garage).
Travelling abroad
Certain fuels could damage your vehicle’s
engine.
In certain countries, the use of a particular
fuel may be required (specific octane rating,
specific trade name, etc.) to ensure correct
operation of the engine.
For all additional information, consult a dealer.
Refuelling
Fuel tank capacity: approximately 50 litres.
Reserve level: approximately 5 litres.
Low fuel level
When the low fuel level is reached, this
warning lamp lights up on the instrument
panel. When it first comes on, about 5 litres of
fuel remain.
You must refuel as soon as possible to avoid
running out of fuel.
For more information on Running out of fuel
(Diesel), refer to the corresponding section.
A small arrow by the warning lamp indicates which side of the vehicle the
fuel filler flap is located on.
Stop & Start
Never refuel with the engine in STOP
mode; you must switch off the ignition.
Refuelling
Additions of fuel must be of at least 5 litres, in
order to be registered by the fuel gauge.
Opening the filler flap may create a noise caused
by an inrush of air
. This vacuum is entirely
normal, resulting from the sealing of the fuel
system.
To refuel in complete safety:
►
Y
ou must switch off the engine.
► Raise the lever .
Page 70 of 148
.
►
Open the fi")
68
Practical information
► Take care to select the pump that delivers the
correct fuel type for the vehicle's engine (see a
reminder label on the inside of the filler flap).
►
Open the filler cap by turning it a 1/4 turn to
the left.
► Remove the filler cap and hang it on its
carrier (on the filler flap).
►
Introduce the filler nozzle and push it in as
far as possible before starting to refuel (risk of
blowback).
►
Fill the tank.
Do not continue past the 3rd cut-off of the
nozzle; as this may cause malfunctions.
►
Push the filler flap to close it.
The vehicle is fitted with a catalytic converter, a
device which helps to reduce the level of harmful
emissions in the exhaust gases.
For petrol engines, you must use unleaded
fuel.
The filler neck is narrower, allowing only
unleaded petrol nozzles to be introduced.
If you have put in the wrong fuel for
the vehicle, you must have the fuel
tank drained and filled with the correct fuel
before starting the engine.
Misfuel prevention (Diesel)
(Depending on country of sale.)
This mechanical device prevents filling the tank
of a Diesel vehicle with petrol.
Located in the filler neck, the misfuel prevention
device is visible when the filler cap is removed.
Operation
When a petrol filler nozzle is introduced into the
fuel filler neck of a Diesel vehicle, it comes into
contact with the flap. The system remains closed
and prevents filling.
Do not persist but introduce a Diesel type
filler nozzle.
The misfuel prevention device does not prevent filling with a jerrycan, regardless
of the fuel type.
Travelling abroad
As Diesel fuel pump nozzles may be
different in other countries, the presence
of the misfuel prevention device may make
refuelling impossible.
Before travelling abroad, it is advisable to
check with a PEUGEOT dealer if the vehicle
is suitable for the distribution equipment of the
countries visited.
Snow chains
In wintry conditions, snow chains improve
traction as well as the behaviour of the vehicle
when braking.
Snow chains must be fitted only to the
front wheels. They must never be fitted to
"space-saver" type spare wheels.
Page 71 of 148

69
Practical information
7Observe the legislation in force in your
country relating to the use of snow
chains and maximum authorised speeds.
Use only the chains designed to be fitted to the
type of wheel fitted to your vehicle :
Original tyre size Maximum link size 185/65 R15 9 mm
195/55 R16
For more information on snow chains, contact a
PEUGEOT dealer or a qualified workshop.
Installation tips
► To fit the snow chains during a journey, stop
the vehicle on a flat surface at the side of the
road.
►
Apply the parking brake and position any
wheel chocks under the wheels to prevent
movement of the vehicle.
►
Fit the snow chains following the instructions
provided by the manufacturer
.
►
Move off gently and drive for a few moments,
without exceeding 31
mph (50 km/h).
►
Stop the vehicle and check that the snow
chains are correctly tightened.
It is strongly recommended that you
practise fitting the snow chains on a level
and dry surface before setting off.
Avoid driving with snow chains on roads that have been cleared of snow to avoid
damaging the vehicle's tyres and the road
surface. If the vehicle is fitted with alloy
wheels, check that no part of the chain or its
fixings is in contact with the wheel rim.
Energy economy mode
This system manages the duration of use of
certain functions, in order to conserve a sufficient
level of charge in the battery with the ignition off.
After switching off the engine and for a maximum
cumulative period of around 30 minutes, you can
continue to use functions such as the audio and
telematics system, dipped beam headlamps or
courtesy lamps.
Selecting the mode
A confirmation message is displayed when
energy economy mode is entered, and the active
functions are placed on standby.
If a telephone call is in progress at the
time, it will be maintained for around 10
minutes via the audio system’s hands-free
system.
Exiting the mode
These functions are automatically reactivated the
next time the vehicle is used.
To restore the use of these functions
immediately, start the engine and let it run:
– For less than 10 minutes, to use the
equipment for approximately 5 minutes.
–
For more than 10 minutes, to use the
equipment for approximately 30 minutes.
Let the engine run for the specified duration to
ensure that the battery charge is sufficient.
T
o recharge the battery, avoid repeatedly or
continuously restarting the engine.
A flat battery prevents the engine from starting.
For more information on the 12
V battery,
refer to the corresponding section.
Load reduction mode
This system manages the use of certain
functions according to the level of charge
remaining in the battery.
When the vehicle is being driven, the load
reduction function temporarily deactivates certain
functions, such as the air conditioning and the
heated rear screen.
The deactivated functions are reactivated
automatically as soon as conditions permit.
Towing device
Load distribution
► Distribute the load in the trailer so that the
heaviest items are as close as possible to the
axle, and the nose weight approaches the
maximum permitted without exceeding it.
Page 72 of 148

70
Practical information
Air density decreases with altitude, thus reducing
engine performance. The maximum towable load
must be reduced by 10% per 1,000 metres of
altitude.
Use genuine towing devices and wiring
harnesses approved by PEUGEOT. We
recommend having them fitted by a
PEUGEOT dealer or a qualified workshop.
If not fitted by a PEUGEOT dealer, they must
still be fitted in accordance with the vehicle
manufacturer's instructions.
Certain driving or manoeuvring aid functions
are automatically deactivated while an
approved towing system is in use.
For more information about driving with a
towing device fitted to a trailer and associated
with the Trailer stability assist, refer to the
corresponding section.
Comply with the maximum authorised
towable weight, as indicated on your
vehicle's registration certificate, on the
manufacturer's label and in the Technical
data section of this guide.
If using accessories attached to the
towing device (e.g. bicycle carriers, tow
boxes):
–
Comply with the maximum authorised nose
weight.
–
Do not transport more than 4 conventional
bicycles or 2 electric bicycles.
When loading bicycles onto a bicycle carrier
on a towball, be sure to place the heaviest
bicycles as close as possible to the vehicle.
Observe the legislation in force in the
country where you are driving.
Very cold climate screen
(Depending on country of sale)
This removable device prevents the
accumulation of snow around the radiator
cooling fan.
In case of difficulty with installation/
removal
Contact a PEUGEOT dealer or a qualified
workshop.
Before any operation, ensure that the
engine is off and the cooling fan has
stopped.
It is essential to remove them when:
– the outside temperature exceeds
10°C.
–
recovery is in progress.
–
the speed is above 75 mph (120
km/h).
Fitting/Removing
► Place the screen in front of the front bumper .
► Insert the two lower fixing brackets 1
into the
bumper.
►
T
ilt the screen upwards, press on the two
upper fixing brackets 2 and insert them into the
bumper.
►
Check that the unit is firmly held by pressing
its edge.
T
o remove it, carry out these operations in
reverse order.
Roof bars
As a safety measure and to avoid damaging the roof, it is essential to use
transverse roof bars approved for your
vehicle.
Observe the instructions on fitting and use
contained in the guide supplied with the roof
bars.
 1
1 2
2 3
3 4
4 5
5 6
6 7
7 8
8 9
9 10
10 11
11 12
12 13
13 14
14 15
15 16
16 17
17 18
18 19
19 20
20 21
21 22
22 23
23 24
24 25
25 26
26 27
27 28
28 29
29 30
30 31
31 32
32 33
33 34
34 35
35 36
36 37
37 38
38 39
39 40
40 41
41 42
42 43
43 44
44 45
45 46
46 47
47 48
48 49
49 50
50 51
51 52
52 53
53 54
54 55
55 56
56 57
57 58
58 59
59 60
60 61
61 62
62 63
63 64
64 65
65 66
66 67
67 68
68 69
69 70
70 71
71 72
72 73
73 74
74 75
75 76
76 77
77 78
78 79
79 80
80 81
81 82
82 83
83 84
84 85
85 86
86 87
87 88
88 89
89 90
90 91
91 92
92 93
93 94
94 95
95 96
96 97
97 98
98 99
99 100
100 101
101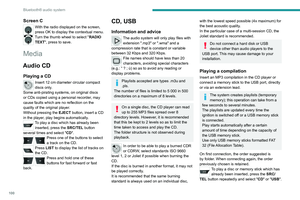 102
102 103
103 104
104 105
105 106
106 107
107 108
108 109
109 110
110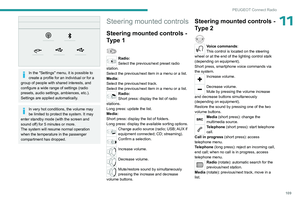 111
111 112
112 113
113 114
114 115
115 116
116 117
117 118
118 119
119 120
120 121
121 122
122 123
123 124
124 125
125 126
126 127
127 128
128 129
129 130
130 131
131 132
132 133
133 134
134 135
135 136
136 137
137 138
138 139
139 140
140 141
141 142
142 143
143 144
144 145
145 146
146 147
147