2022 HYUNDAI KONA EV brake light
[x] Cancel search: brake lightPage 409 of 548
Driver assistance system
7-76
•
The vehicle in front is bent out of shape
• The front vehicle’s speed is fast or slow
• With a vehicle in front, your vehicle
changes lane at low speed
• The vehicle in front is covered with
snow
• Unstable driving
• You are on a roundabout and the
vehicle in front is not detected
• You are continuously driving in a circle
• Driving in a parking lot
• Driving through a construction area,
unpaved road, partial paved road,
uneven road, speed bumps, etc.
• Driving on an incline road, curved
road, etc.
• Driving through a roadside with trees
or streetlights
• The adverse road conditions cause
excessive vehicle vibrations while driving
• Your vehicle height is low or high
due to heavy loads, abnormal tire
pressure, etc.
• Driving through a narrow road where
trees or grass are overgrown
• There is interference by
electromagnetic waves, such as
driving in an area with strong radio
waves or electrical noise •
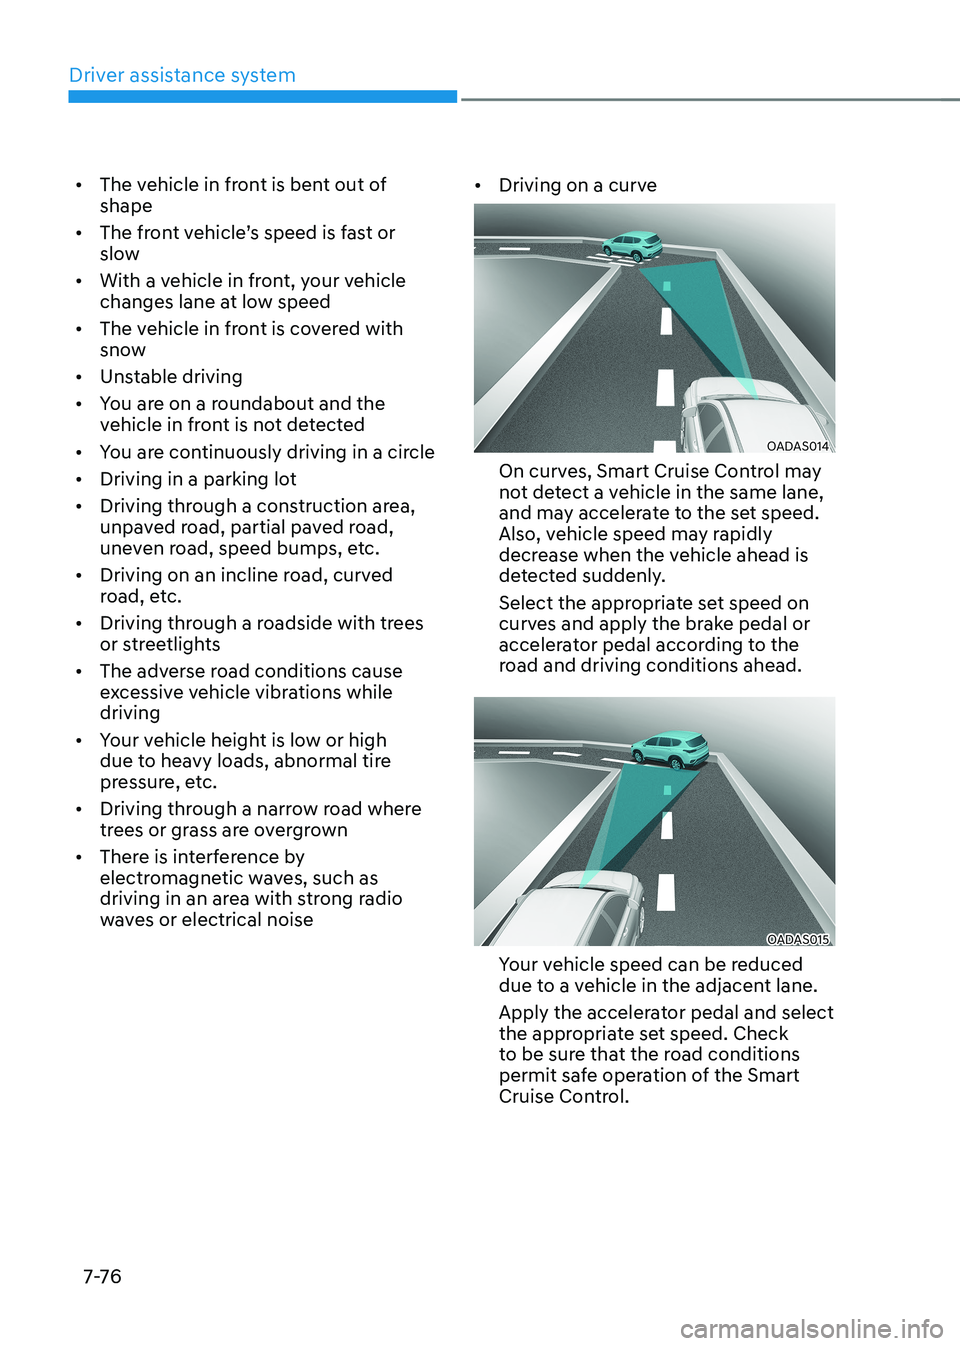
Driving on a curve
OADAS014
On curves, Smart Cruise Control may
not detect a vehicle in the same lane,
and may accelerate to the set speed.
Also, vehicle speed may rapidly
decrease when the vehicle ahead is
detected suddenly.
Select the appropriate set speed on
curves and apply the brake pedal or
accelerator pedal according to the
road and driving conditions ahead.
OADAS015
Your vehicle speed can be reduced
due to a vehicle in the adjacent lane.
Apply the accelerator pedal and select
the appropriate set speed. Check
to be sure that the road conditions
permit safe operation of the Smart
Cruise Control.
Page 436 of 548
07
7-103
OOS070110N
Warning Volume
With the vehicle on, select ‘Driver
Assistance → Warning volume’ or ‘Sound
→ Driver Assist Warning → Warning
Volume’ from the Settings menu to
change the Warning Volume to ‘High’,
‘Medium’, or ‘Low’ for Rear Cross-Traffic
Collision-Avoidance Assist.
If you change the Warning Volume,
the warning volume of other Driver
Assistance systems may change.
CAUTION
• The setting of the Warning Timing
and warning volume applies to
all functions of the Rear Collision-
Avoidance Assist.
• even though ‘standard’ is selected
for Warning Timing, if the vehicles
from the left and right side
approaches at high speed, the initial
warning activation time may seem
late.
• Select ‘Late’ for Warning Timing
when traffic is light and when driving
speed is slow.
Information
If the vehicle is restarted, Warning Timing
and Warning Volume will maintain the last setting.
Rear Cross-Traffic Collision-
Avoidance Assist operation
Warning and control
Rear Cross-Traffic Collision-Avoidance
Assist will warn and control the vehicle
depending on collision level: ‘Collision
Warning’, ‘Emergency Braking’ and
‘Stopping vehicle and ending brake
control’.
OHY059005OTM070168
OOS070019K
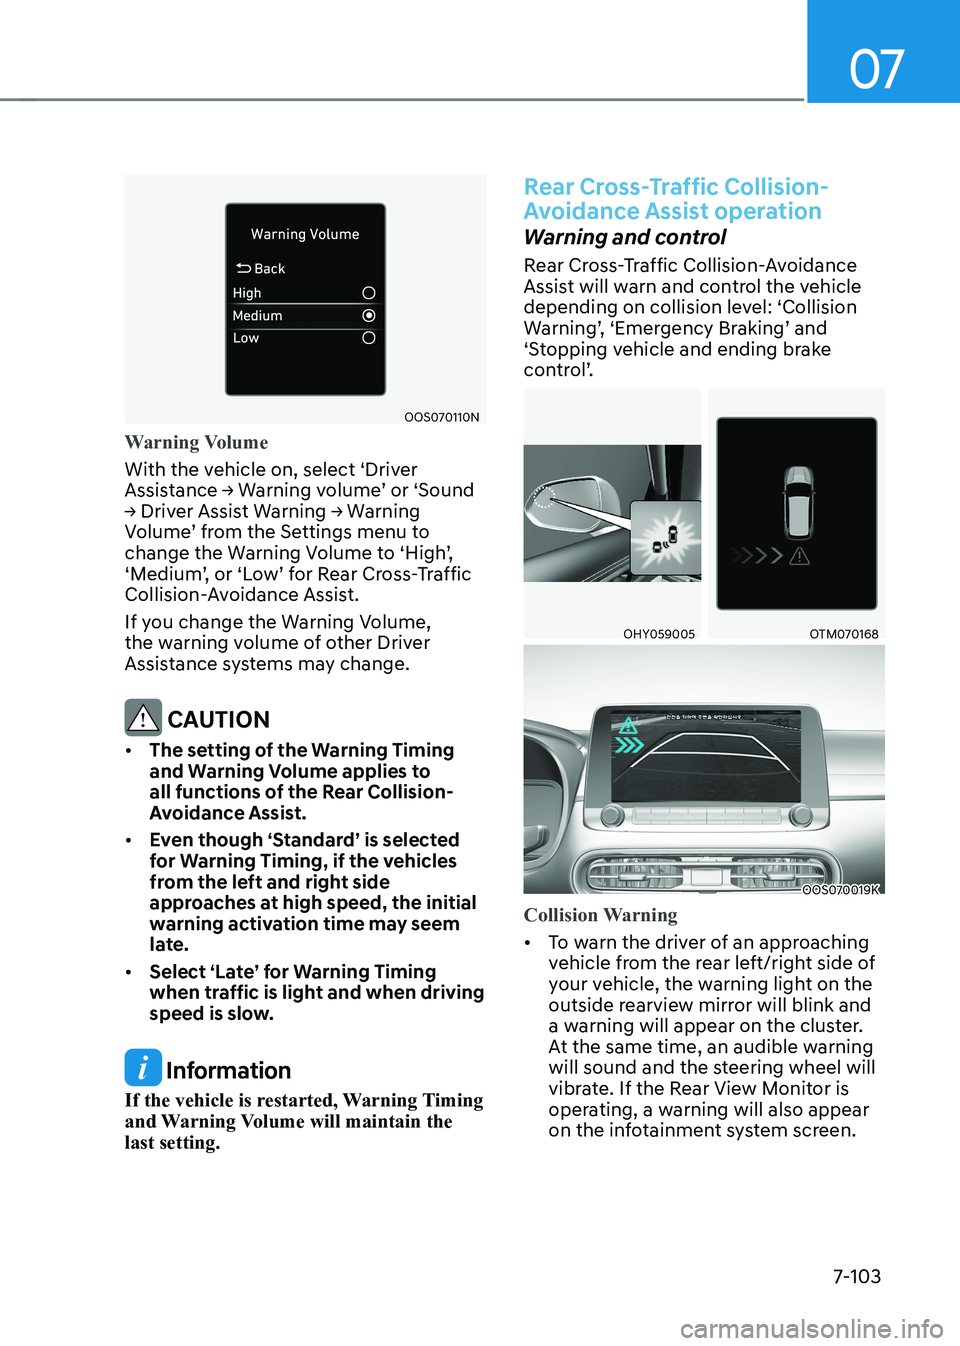
Collision Warning
• To warn the driver of an approaching
vehicle from the rear left/right side of
your vehicle, the warning light on the
outside rearview mirror will blink and
a warning will appear on the cluster.
At the same time, an audible warning
will sound and the steering wheel will
vibrate. If the Rear View Monitor is
operating, a warning will also appear
on the infotainment system screen.
Page 439 of 548
Driver assistance system
7-106
warning
Take the following precautions when
using Rear Cross-Traffic Collision-
Avoidance Assist: • For your safety, change the Settings
after parking the vehicle at a safe
location.
• If any other system’s warning
message is displayed or audible
warning is generated, Rear Cross-
Traffic Collision-Avoidance Assist’s
warning message may not be
displayed and audible warning may
not be generated.
• You may not hear the warning sound
of Rear Cross-Traffic Collision-
Avoidance Assist if the surrounding
is noisy.
• Rear Rear Cross-Traffic Collision-
Avoidance Assist may not operate if
the driver applies the brake pedal to
avoid collision.
• During Rear Cross-Traffic Collision-
Avoidance Assist operation, the
vehicle may stop suddenly injuring
passengers and shifting loose
objects. Always have the seat belt on
and keep loose objects secured.
• even if there is a problem with rear
Cross-Traffic Collision-Avoidance
Assist, the vehicle’s basic braking
performance will operate normally.
• When Rear Cross-Traffic Collision-
Avoidance Assist is operating,
braking control by the function
will automatically cancel when the
driver excessively depresses the
accelerator pedal.
• Rear Cross-Traffic Collision-
Avoidance Assist does not operate
in all situations or cannot avoid all
collisions.
• Rear Cross-Traffic Collision-
Avoidance Assist may warn the
driver late or may not warn the driver
depending on the road and driving
conditions. •
The driver should hold the
responsibility to control the vehicle.
Do not solely depend on Rear Cross-
Traffic Collision-Avoidance Assist.
Rather, maintain a safe braking
distance, and if necessary, depress
the brake pedal to reduce driving
speed or to stop the vehicle.
• Never deliberately operate Rear
Cross-Traffic Collision-Avoidance
Assist on people, animal, objects,
etc. It may cause serious injury or
death.
CAUTION
The brake control may not operate
properly depending on the status of
esC (electronic stability Control).
There will only be a warning when: - the esC (electronic stability Control)
warning light is on
- esC (electronic stability Control) is
engaged in a different function
Information
If braking is assisted by Rear Cross-
Traffic Collision-Avoidance Assist, the
drivers needs to depress the brake pedal
and check vehicle surroundings. • Brake control will end when the
driver depresses the brake pedal with
sufficient power.
• After shifting the gear to R (Reverse),
braking control will operate once for
left and right vehicle approach.
Page 458 of 548
08
8-3
If you have a flat tire while driving
If a tire goes flat while you are driving: • Take your foot off the accelerator
pedal and let the vehicle slow down
while driving straight ahead. Do not
apply the brakes immediately or
attempt to pull off the road as this
may cause loss of vehicle control
resulting in an accident. When the
vehicle has slowed to such a speed
that it is safe to do so, brake carefully
and pull off the road. Drive off the
road as far as possible and park on
firm, level ground. If you are on a
divided highway, do not park in the
median area between the two traffic lanes.
• When the vehicle is stopped, press the
hazard warning flasher button, shift to
P (Park), apply the parking brake, and
place the START/STOP button in the OFF position.
• Have all passengers get out of the
vehicle. Be sure they all get out on the
side of the vehicle that is away from
traffic.
• When changing a flat tire, follow the
instructions provided later in this
chapter.
if tHe veHicle will not
s ta rt
Confirm the EV battery is not low
on the charge gauge
• Be sure the gear is in P (Park). The
vehicle starts only when the gear is in
P (Park).
• Check the 12-volt battery connections
to be sure they are clean and tight.
• Turn on the interior light. If the light
dims or goes out when you operate
the starter, the 12V battery is drained.
Do not push or pull the vehicle to start it.
This could cause damage to your vehicle.
See instructions for “Jump Starting”
provided in this chapter.
Page 460 of 548
08
8-5
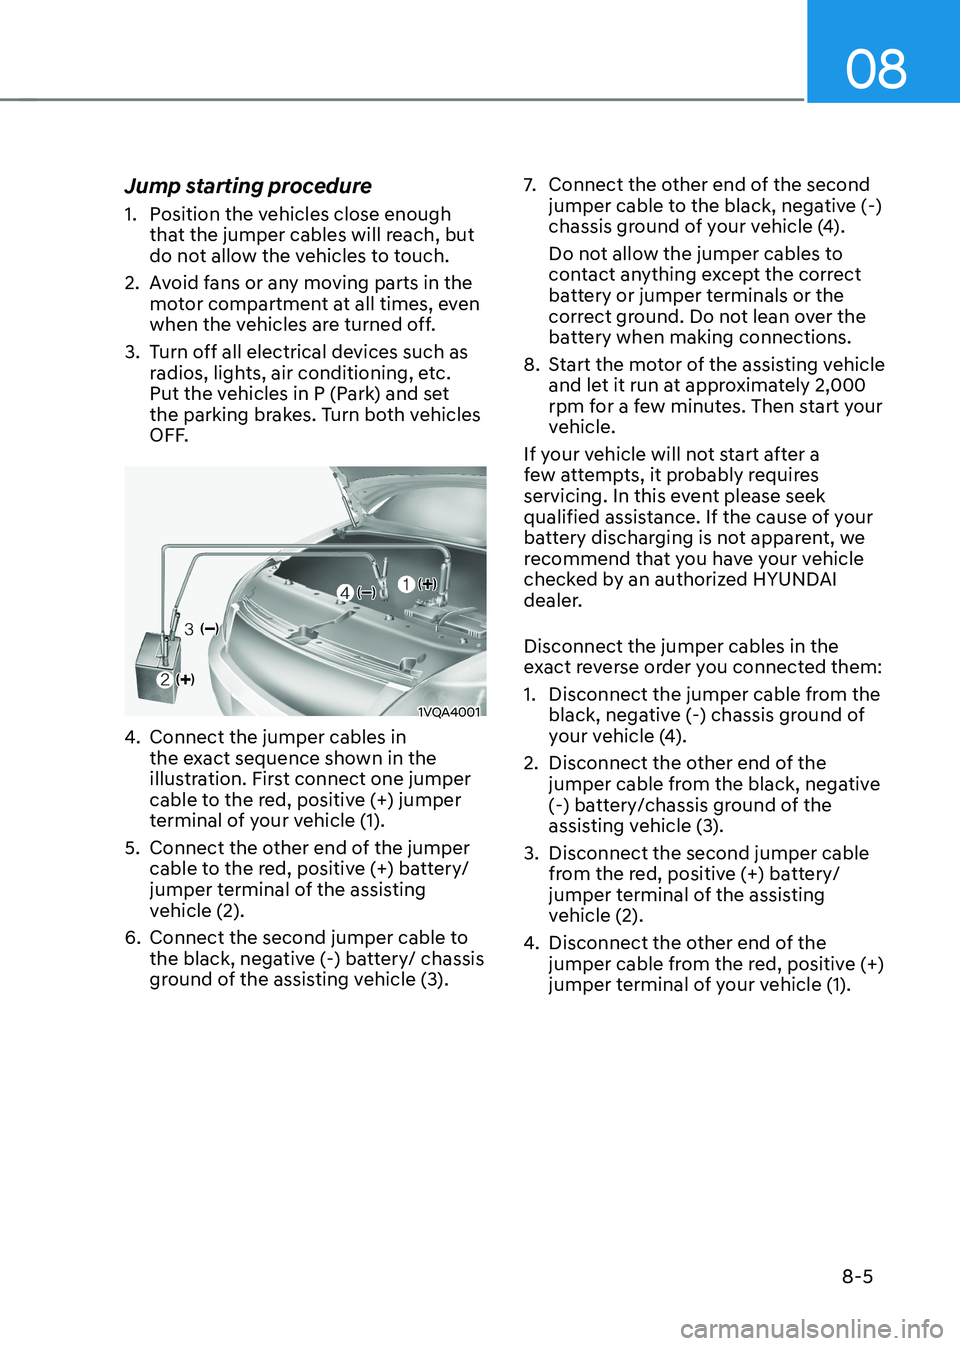
Jump starting procedure
1. Position the vehicles close enough
that the jumper cables will reach, but
do not allow the vehicles to touch.
2. Avoid fans or any moving parts in the motor compartment at all times, even
when the vehicles are turned off.
3. Turn off all electrical devices such as radios, lights, air conditioning, etc.
Put the vehicles in P (Park) and set
the parking brakes. Turn both vehicles
OFF.
1VQA4001
4. Connect the jumper cables in
the exact sequence shown in the
illustration. First connect one jumper
cable to the red, positive (+) jumper
terminal of your vehicle (1).
5. Connect the other end of the jumper cable to the red, positive (+) battery/
jumper terminal of the assisting
vehicle (2).
6. Connect the second jumper cable to the black, negative (-) battery/ chassis
ground of the assisting vehicle (3). 7.
Connect the other end of the second
jumper cable to the black, negative (-)
chassis ground of your vehicle (4).
Do not allow the jumper cables to
contact anything except the correct
battery or jumper terminals or the
correct ground. Do not lean over the
battery when making connections.
8. Start the motor of the assisting vehicle and let it run at approximately 2,000
rpm for a few minutes. Then start your
vehicle.
If your vehicle will not start after a
few attempts, it probably requires
servicing. In this event please seek
qualified assistance. If the cause of your
battery discharging is not apparent, we
recommend that you have your vehicle
checked by an authorized HYUNDAI
dealer. Disconnect the jumper cables in the
exact reverse order you connected them:
1. Disconnect the jumper cable from the black, negative (-) chassis ground of
your vehicle (4).
2. Disconnect the other end of the jumper cable from the black, negative
(-) battery/chassis ground of the
assisting vehicle (3).
3. Disconnect the second jumper cable from the red, positive (+) battery/
jumper terminal of the assisting
vehicle (2).
4. Disconnect the other end of the
jumper cable from the red, positive (+)
jumper terminal of your vehicle (1).
Page 465 of 548
Emergency situations
8-10
WARNING
• The TPMS cannot alert you to severe
and sudden tire damage caused by
external factors such as nails or road debris.
• If you feel any vehicle instability,
immediately take your foot off
the accelerator, apply the brakes
gradually and with light force, and
slowly move to a safe position off the
road.
WARNING
Tampering with, modifying, or disabling
the Tire Pressure Monitoring System
(TPMS) components may interfere
with the system’s ability to warn the
driver of low tire pressure conditions
and/or TPMS malfunctions. Tampering
with, modifying, or disabling the Tire
Pressure Monitoring System (TPMS)
components may void the warranty for
that portion of the vehicle.
WARNING
This device complies with Industry
Canada RSS-210 standard.
Operation is subject to the following
three conditions: 1. This device may not cause harmful
interference.
2. This device must accept any
interference received, including
interference that may cause
undesired operation.
3. Changes or modifications not
expressly approved by the party
responsible for compliance could
void the user’s authority to operate
the equipment.
Page 482 of 548
Maintenance
9-6
While operating your vehicle: •
Check for vibrations in the steering
wheel. Notice if there is any increased
steering effort or looseness in the
steering wheel, or change in its
straight-ahead position.
• Notice if your vehicle constantly turns
slightly or “pulls” to one side when
traveling on smooth, level road.
• When stopping, listen and check for
unusual sounds, pulling to one side,
increased brake pedal travel or “hard-
to-push” brake pedal.
• If any slipping or changes in the
operation of your reduction gear
occurs, check the reduction gear fluid
level.
• Check the reduction gear p (park) function.
• Check the parking brake.
• Check for fluid leaks under your
vehicle (water dripping from the air
conditioning system during or after use is normal).
At least monthly: • Check coolant level in the coolant
reservoir.
• Check the operation of all exterior
lights, including the stoplights, turn
signals and hazard warning flashers.
• Check the inflation pressures of all
tires including the spare for tires that
are worn, show uneven wear, or are damaged.
• Check for loose wheel lug nuts.
• Do not add regular green coolant. •
At least twice a year:
(i.e., every Spring and Autumn)
• Check radiator, heater and air
conditioning hoses for leaks or damage.
• Check windshield washer spray and
wiper operation. Clean wiper blades
with a clean cloth dampened with
washer fluid.
• Check headlamp alignment.
• Check the seat belts for wear and function.
At least once a year: • Clean body and door drain holes.
• Lubricate door hinges and hood hinges.
• Lubricate door and hood locks and
latches.
• Lubricate door rubber weather strips.
• Check the air conditioning system.
• Inspect and lubricate reduction gear
linkage and controls.
• Clean the battery and terminals.
• Check the brake fluid level.
Page 520 of 548
Maintenance
9-44
LIgHT BULBS
We recommend to consult an authorized
dealer to replace most vehicle light
bulbs. It is difficult to replace vehicle
light bulbs because other parts of the
vehicle must be removed before you can
get to the bulb. This is especially true for
removing the headlamp assembly to get
to the bulb(s).
Removing/installing the headlamp
assembly can result in damage to the
vehicle.
WARNING
• Prior to working on a light, depress
the foot brake, shift to P (Park), apply
the parking brake, place the START/
STOP button in the OFF position
and take the key with you when
leaving the vehicle to avoid sudden
movement of the vehicle and to
prevent possible electric shock.
• Be aware the bulbs may be hot and
may burn your fingers.
NOTICE
Be sure to replace the burned-out bulb
with one of the same wattage rating.
Otherwise, it may cause damage to the
fuse or electrical wiring system.
NOTICE
To prevent damage, do not clean the
headlamp lens with chemical solvents
or strong detergents.
Information
The headlamp and tail lamp lenses could
appear frosty if the vehicle is washed after
driving or the vehicle is driven at night
in wet weather. This condition is caused
by temperature difference between the lamp inside and outside and, it does not
indicate a problem with your vehicle.
When moisture condenses in the lamp,
it will be removed after driving with the
headlamp on. The removable level may
differ depending on lamp size, lamp
position and environmental condition.
However, if moisture is not removed, we
recommend that your vehicle is inspected
by an authorized HYUNDAI dealer.
Information
• A normally functioning lamp may
flicker momentarily to stabilize the
vehicle’s electrical control system.
However, if the lamp goes out after
flickering momentarily, or continues to
flicker, we recommend the system be checked by an authorized HYUNDAI
dealer.
• The position lamp may not turn on when the position lamp switch is turned on, but the position lamp and headlamp switch may turn on when the headlamp
switch is turned on. This may be caused
by network failure or vehicle electrical
control system malfunction. If this
occurs, we recommend the system be checked by an authorized HYUNDAI
dealer.
Information
After an accident or head lamp
replacement we recommend to consult an
authorized HYUNDAI dealer to perform the headlamp aiming.