Page 25 of 276
 23
Instruments
1Distance that can still be travelled with the
fuel remaining in the tank (based on the
average fuel consumption over the last few miles
(kilometres) travelled).
This value may vary")
23
Instruments
1Distance that can still be travelled with the
fuel remaining in the tank (based on the
average fuel consumption over the last few miles
(kilometres) travelled).
This value may vary following a change in driving
style or terrain, leading to a significant change in
current fuel consumption.
When the range falls below 19 miles (30
km),
dashes are displayed.
After filling with at least 5 litres of fuel, the range
is recalculated and is displayed if it exceeds 62
miles (100
km).
If dashes instead of figures continue to be
displayed while driving, contact a CITROËN
dealer or a qualified workshop.
Current consumption
(mpg or l/100 km or km/l)Calculated during the last few seconds.
This function is only displayed at speeds above
19 mph (30
km/h).
Average consumption
(mpg or l/100 km or km/l)Calculated since the last trip computer
reset.
Average speed
(mph or km/h)Calculated since the last trip computer
reset.
Distance travelled
(miles or km)Calculated since the last trip computer
reset.
Stop & Start time counter
(minutes/seconds or hours/minutes)
If your vehicle is equipped with Stop & Start, a
time counter calculates the time spent in STOP
mode during a journey.
It resets to zero every time the ignition is
switched on.
Touch screen
This system gives access to the following elements:
–
Permanent display of the time and the exterior
temperature (a blue warning lamp appears if
there is a risk of ice).
–
Heating/air conditioning controls.
–
V
ehicle functions and equipment setting
menus.
–
Audio system and telephone controls and
display of related information.
–
Display of visual manoeuvring aid functions
(visual parking sensor information, Park
Assist,
etc.).
–
Internet services and display of
related
information.
–
Front seat massage mode and intensity
settings (depending on version).
– Navigation system controls and
display of related information (depending on
version).
For safety reasons, always stop the
vehicle before performing operations
that require sustained attention.
Some functions are not accessible while
driving.
Principles
► Use the buttons arranged below the touch
screen for access to the menus, then press the
virtual buttons on the touch screen.
Some menus may display across two pages:
press the "OPTIONS" button to access the
second page.
After a few moments with no action on the second page, the first page is
displayed automatically.
To deactivate/activate a function, select " OFF"
or "ON".
Settings for a function
Access to additional information on the function
Confirm
Return to the previous page or confirm
Page 26 of 276
 24
Instruments
Menus
Press the touch screen with three fingers
to show all of the menu buttons.
For more information about the menus,
refer to the sections describing the audio
and telematics sy")
24
Instruments
Menus
Press the touch screen with three fingers
to show all of the menu buttons.
For more information about the menus,
refer to the sections describing the audio
and telematics systems.
Radio/Media
Climate
Settings for temperature, air flow, etc.
For more information on Manual air
conditioning and Dual-zone automatic air
conditioning , refer to the corresponding
sections.
Navigation (Depending on equipment)
Driving or Vehicle (Depending on
equipment)
Activation, deactivation and settings for certain
functions.
The functions are organised in 2 tabs: " Driving
functions" and "Vehicle settings".
Telephone
Applications
Display of available connected services
and access to the Eco-coaching function.
Settings
Main settings for the audio system, touch
screen and digital instrument panel.
Energy
Access to the rechargeable hybrid system
features (energy flow, consumption statistics,
deferred charging, eSave function).
Energy menu
Flow
The page shows the operation of the
rechargeable hybrid system in real time.
1. Active driving mode 2.
Petrol engine
3. Electric motor
4. Traction battery charge level
The energy flows have a specific colour for each
type of driving:
–
Blue: 100% electrical energy
.
–
Orange: energy from the petrol engine.
–
Green: energy recovery
.
Statistics
This page shows electrical energy and fuel
consumption statistics.
1. Average electrical consumption for the current
trip (kWh/100
km) and historical values:
–
Blue bar chart: directly consumed energy
supplied by the traction battery
.
–
Green bar chart: energy recovered during
deceleration and braking, used to recharge the
battery
.
2. Average fuel consumption for the current trip
(kWh/100
km) and historical values (orange bar
chart).
►
Y
ou can change the displayed time scale by
pressing the
-
or + buttons.
Page 27 of 276
 25
Instruments
1A current trip is any trip of more than 20 minutes without switching off the ignition.
Deferred charging
By default, charging begins when the nozzle is
connected.
Deferred charging ma")
25
Instruments
1A current trip is any trip of more than 20 minutes without switching off the ignition.
Deferred charging
By default, charging begins when the nozzle is
connected.
Deferred charging may be programmed via the
touch screen.
Deferred charging is then activated by a button
located in the charging flap.
You can also programme the deferred charging function using a smartphone, via
the MyCitroën application.
For more information on Charging the traction
battery (Rechargeable hybrid), refer to the
corresponding section.
eSave
The eSave function makes it possible to reserve
all or part of the electrical energy in the traction
battery for later use during a journey (e.g. driving
in an urban area or in an area reserved for
electric vehicles).
►
Select the electric range to be reserved ( 10
km
, 20 km or the full range MAX) then activate
the function by pressing ON.
Activation of the function is confirmed by
the lighting of this indicator lamp on the
instrument panel and the
indication of the energy
reserve in miles or kms.
►
T
o use the energy reserve, choose the
Electric driving mode in the mode selector.
If the requested range exceeds the
available range (not recommended), the
internal combustion engine starts to recharge
the traction battery up to the requested
threshold. This leads to excessive fuel
consumption.
Information banner(s)
Certain information is displayed permanently in
the touch screen banner(s).
Upper banner of the CITROËN Connect
Radio and CITROËN Connect Nav
– Time and outside temperature (a blue warning
lamp appears if there is a risk of ice).
–
Reminder of the air conditioning information,
and direct access to the corresponding menu.
–
Reminder of the information in the
Radio
Media and Telephone menus.
–
Notifications.
–
Access to the
Settings for the touch screen
and the digital instrument panel (date/time,
languages, units, etc.).
Date and time adjustment
With CITROËN Connect
Radio
► Select the Settings menu in the upper
banner of the touch screen.
►
Select "
Configuration ".
► Select "Date and time".
►
Select "
Date" or "Time".
►
Choose the display formats.
►
Change the date and/or time using the
numeric keypad.
►
Confirm with "
OK".
With CITROËN Connect Nav
Time and date settings are only available if GPS
synchronisation is deactivated.
► Select the Settings menu in the
banner of the touch screen.
►
Press the "
OPTIONS " button to access the
secondary page.
► Select " Setting the time-date".
►
Select the "
Date:" or "Time" tab.
►
Set the date and/or time using the numeric
keypad.
►
Confirm with "
OK".
Additional settings
You can choose:
– T o change the time zone.
–
T
o change the display format of the date and
time (12h/24h).
–
T
o activate or deactivate the summer time
management function (+1 hour).
–
T
o activate or deactivate GPS synchronisation
(UTC).
Page 28 of 276
 26
Instruments
The system does not automatically change between winter and summer time
(depending on the country of sale).
Remote functions
(Rechargeable hybrid)
These features are accessible
u")
26
Instruments
The system does not automatically change between winter and summer time
(depending on the country of sale).
Remote functions
(Rechargeable hybrid)
These features are accessible
using a smartphone, via the
MyCitroën
application:
–
Battery charge management (deferred
charging).
–
T
emperature pre-conditioning management.
–
Consultation of the state of charge and range
of the vehicle.
Installation procedure
► Download the MyCitroën app from the
appropriate online store for your smartphone.
►
Create an account.
►
Enter the vehicle’
s VIN (code beginning with
"VF" on the vehicle registration document).
For more information on Identification
markings, refer to the corresponding section.
Network coverage
In order to be able to use the various
remotely operable features, ensure that your
vehicle is located in an area covered by the
mobile network.
A lack of network coverage may prevent
communication with the vehicle (for example,
if it is in an underground car park). In such
cases, the application will display a message
indicating that the connection with the vehicle
could not be established.
Page 29 of 276
 27
Access
2Electronic key with
remote control function
and built-in key,
Remote control function
The remote control can be used for the following
remote functions, depending on version:
–
Unl")
27
Access
2Electronic key with
remote control function
and built-in key,
Remote control function
The remote control can be used for the following
remote functions, depending on version:
–
Unlocking / Locking / Deadlocking the vehicle.
–
Unlocking - Opening / Closing the boot.
–
Remote operation of lighting.
–
Activating / Deactivating the alarm.
–
Locating the vehicle.
–
Opening / Closing the windows.
–
Closing the sunroof.
–
Activating the vehicle’
s electronic immobiliser.
The remote control includes a conventional key
that allows the central unlocking / locking of the
vehicle using the door lock, as well as starting
and switching off the engine.
Back-up procedures allow the vehicle to be
locked / unlocked in the event of a failure of the
remote control, the central locking, the battery,
etc. For more information on the Back-up procedures, please refer to the corresponding
section.
Integral key
The key built into the remote control can be
used for the following operations, depending on
version:
–
Unlocking/Locking/Deadlocking the vehicle.
–
Activation/Deactivation of the manual child
lock.
–
Activation/Deactivation of the front passenger
airbag.
–
Back-up Unlocking/Locking of the doors.
W
ithout Keyless Entry and Starting
► To unfold or fold the key, press the button.
With Keyless Entry and Starting
► To eject the key or put it back in place, pull
and hold the button.
Unlocking the vehicle
With the remote control
► Press this button to unlock the vehicle.
Unlocking is signalled by rapid flashing of
the direction indicators for a few seconds.
Depending on version, the door mirrors unfold
and the welcome lighting comes on.
Selective unlocking
Driver’s door and fuel filler/charging flap
► Press the unlocking button.
►
Press it
again to unlock the other doors and
the boot.
The charging nozzle can be unplugged on the
second press.
Page 30 of 276
 28
Access
illumination of the direction indicators for a
few seconds.
With the remote control
► Within 5 seconds of locking the
vehicle, press the button again to
deadlock it.
With the key
►")
28
Access
illumination of the direction indicators for a
few seconds.
With the remote control
► Within 5 seconds of locking the
vehicle, press the button again to
deadlock it.
With the key
► Within 5 seconds of locking the vehicle, turn
the key to the rear again to deadlock it.
Locating your vehicle
This function allows you to identify your vehicle
from a distance, particularly in poor light. Your
vehicle must be locked.
► Press this button. The courtesy lamps
will come on and the direction indicators
will flash for a few seconds.
Remote lighting of the
lamps
Availability of this function depends on version.► Press this button. The sidelamps,
dipped beam headlamps, number plate
lamps and door mirror spotlamps come on for 30
seconds.
Pressing again before the end of the timed
period switches off the lamps immediately.
Complete or selective unlocking, and alarm
deactivation (depending on version), is confirmed
by the flashing of the direction indicators.
Depending on version, the door mirrors unfold.
Opening the windows
Depending on version, holding the
unlocking button pressed for more than 3
seconds opens the windows.
The windows stop when the button is released.
With the key
► Turn the key in the front left-hand door lock
towards the front of the vehicle to unlock it.
Selective unlocking and opening of
the tailgate
The settings for the selective tailgate unlocking
and motorised operation are made in the vehicle
configuration menu.
By default, selective tailgate unlocking is
activated and and motorised operation is
deactivated.
► Make a long press on the button to
unlock the boot and trigger the motorised
opening of the tailgate.
The doors and fuel filler flap remain locked.
If selective unlocking of the tailgate is
deactivated, pressing the button unlocks
the whole vehicle.
If motorised operation of the tailgate is
deactivated, pressing the button releases
the tailgate.
To lock the vehicle, it is necessary to close
the tailgate again.
Locking the vehicle
With the remote control
► Press this button to lock the vehicle.
Locking is confirmed by fixed illumination of
the direction indicators for approximately two
seconds. Depending on version, the door mirrors
fold.
If one of the doors or the boot is still open, the
central locking does not work; the vehicle locks,
then immediately unlocks, identifiable by the
locks making a rebound sound.
When the vehicle is locked, if it is
unlocked without the opening of a door
or the boot, it will automatically lock itself
again after thirty seconds.
The automatic folding and unfolding of the door mirrors can be deactivated via
the vehicle's configuration menu.
With the key
► Turn the key in the front left-hand door lock
towards the rear of the vehicle to unlock it.
Check that the doors and boot are fully
closed.
Closing the windows and sunroof
Maintaining pressure on the locking button
allows the windows and, depending on version,
the sunroof to be closed to the desired position.
This operation also closes the sunroof blind.
Ensure that no person or object could
prevent the correct closing of the
windows and sunroof.
If, on versions with alarm, you want to leave
the windows and/or sunroof partly open, you
must first deactivate the volumetric alarm
protection.
For more information on the Alarm, refer to
the corresponding section.
Deadlocking
Deadlocking deactivates the exterior and
interior door controls, as well as the
central locking button on the dashboard.
The horn remains operational.
You must therefore never leave anyone inside
the vehicle when it is deadlocked.
If your vehicle is fitted with an alarm,
activation is confirmed by fixed
Page 31 of 276
 29
Access
2illumination of the direction indicators for a
few seconds.
With the remote control
► Within 5 seconds of locking the
vehicle, press the button again to
deadlock it.
With the key
►")
29
Access
2illumination of the direction indicators for a
few seconds.
With the remote control
► Within 5 seconds of locking the
vehicle, press the button again to
deadlock it.
With the key
► Within 5 seconds of locking the vehicle, turn
the key to the rear again to deadlock it.
Locating your vehicle
This function allows you to identify your vehicle
from a distance, particularly in poor light. Your
vehicle must be locked.
► Press this button. The courtesy lamps
will come on and the direction indicators
will flash for a few seconds.
Remote lighting of the
lamps
Availability of this function depends on version.► Press this button. The sidelamps,
dipped beam headlamps, number plate
lamps and door mirror spotlamps come on for 30
seconds.
Pressing again before the end of the timed
period switches off the lamps immediately.
Keyless Entry and
Starting
This system allows the unlocking, locking
and starting of the vehicle, while carrying the
electronic key in the “ A” recognition zone.
The electronic key is also used as a
remote control. For more information on
the Remote Control, refer to the
corresponding section.
Unlocking the vehicle
Complete unlocking
► With the electronic key in recognition zone A ,
pass your hand behind the door handle of one
of the front doors or press the tailgate opening
control (at the left of the control).
If the motorised tailgate opening control is
activated, this action triggers its automatic
opening.
Opening the windows
Depending on version, keeping your hand
behind the door handle or maintaining the
press on the tailgate opening control allows the
windows to be opened to the desired position.
Flashing of the direction indicators for a few
seconds signals:
–
unlocking of the vehicle for versions without
alarm,
–
deactivation of the alarm for other versions.
Page 32 of 276
 30
Access
Closing the windows and the sunroof
Maintaining pressure on the door handle or
the tailgate control allows the windows and,
depending on version, the sunroof to be closed
to the desired p")
30
Access
Closing the windows and the sunroof
Maintaining pressure on the door handle or
the tailgate control allows the windows and,
depending on version, the sunroof to be closed
to the desired position.
This operation also closes the sunroof blind.
Make sure that no item or person could
prevent the correct closing of the
windows and sunroof.
Be particularly aware of children when
operating the windows.
Illumination of the direction indicators for a few
seconds signals:
– the locking of the vehicle for versions without
alarm,
– the activation of the alarm for other versions.
Depending on version, the door mirrors fold.
For safety and theft protection reasons,
never leave the electronic key in the
vehicle, even when you are close to it.
Accumulations (water, dust, grime, salt etc.) on the inner surface of the door
handle may affect detection.
If cleaning the inner surface of the door
handle using a cloth does not restore
detection, contact a CITROËN dealer or a
qualified workshop.
A sudden splash of water (stream of water,
high pressure jet washer, etc.) may be
Depending on version, the door mirrors unfold.
Selective unlocking
Driver door and fuel flap
► Pass your hand behind the driver door
handle.
►
T
o unlock the complete vehicle, pass your
hand behind the handle of one of the passenger
doors, with the electronic key close to the
passenger door, or press the tailgate opening
control with the electronic key close to the rear of
the vehicle.
The setting for selective unlocking of the driver
door is done in the vehicle configuration menu.
When unlocking the driver's door, flashing of the
direction indicators for a few seconds signals:
–
the selective unlocking of the vehicle for
versions without alarm,
–
the deactivation of the alarm for other
versions.
Depending on version, the door mirrors unfold.
Selective unlocking of the tailgate
► Press the tailgate opening control to unlock
just the boot.
The doors remain locked.
If selective unlocking of the tailgate is
deactivated, pressing this control also
unlocks the doors.
Selective unlocking of the tailgate can be
activated or deactivated via the Driving/
Vehicle menu of the touch screen.
If one of the doors or the boot is still open
or if the electronic key for the Keyless
Entry and Starting
system has been left inside
the vehicle, central locking will not take place.
However
, if the vehicle is fitted with an alarm,
it will be activated after 45
seconds.
If the vehicle is unlocked but the doors or
boot are not subsequently opened, the
vehicle will automatically lock itself again after
about 30
seconds. If the vehicle is fitted with
an alarm, it will be reactivated automatically.
The automatic door mirror folding/ unfolding function is configured via the
touch screen's
Driving / Vehicle menu.
As a safety measure, never leave the vehicle, even for a short time, without
taking the Keyless Entry and Starting
system’s electronic key with you.
Be aware of the risk of theft of the vehicle if
the key is present in one of the defined areas
while the vehicle is unlocked.
To preserve the battery charge in the electronic key and the vehicle's battery,
the "hands-free" functions are set to
hibernation mode after 21 days without use.
To restore these functions, press one of the
remote control buttons or start the engine with
the electronic key against the back-up reader.
For more information on starting with the
Keyless Entry and Starting system, refer to
the corresponding section.
Electrical interference
The electronic key may not operate if
close to certain electronic devices such as
telephones (switched on or on standby) or
laptop computers, strong magnetic fields, etc.
Locking the vehicle
Normal locking
► With the electronic key in recognition zone
A , press on the door handle of one of the front
doors (at the markings) or on the locking control
located on the tailgate (on the right of the
control).
It is not possible to lock the vehicle if one of the
electronic keys is left inside the vehicle.
 1
1 2
2 3
3 4
4 5
5 6
6 7
7 8
8 9
9 10
10 11
11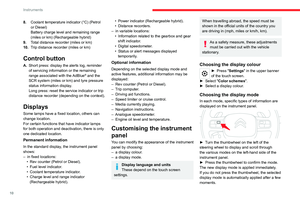 12
12 13
13 14
14 15
15 16
16 17
17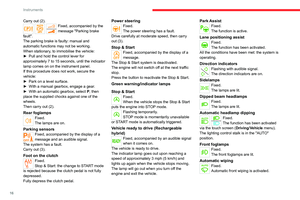 18
18 19
19 20
20 21
21 22
22 23
23 24
24 25
25 26
26 27
27 28
28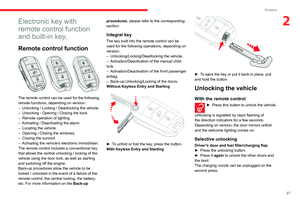 29
29 30
30 31
31 32
32 33
33 34
34 35
35 36
36 37
37 38
38 39
39 40
40 41
41 42
42 43
43 44
44 45
45 46
46 47
47 48
48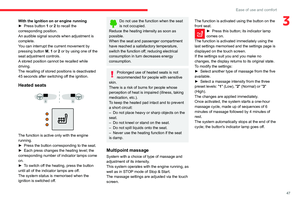 49
49 50
50 51
51 52
52 53
53 54
54 55
55 56
56 57
57 58
58 59
59 60
60 61
61 62
62 63
63 64
64 65
65 66
66 67
67 68
68 69
69 70
70 71
71 72
72 73
73 74
74 75
75 76
76 77
77 78
78 79
79 80
80 81
81 82
82 83
83 84
84 85
85 86
86 87
87 88
88 89
89 90
90 91
91 92
92 93
93 94
94 95
95 96
96 97
97 98
98 99
99 100
100 101
101 102
102 103
103 104
104 105
105 106
106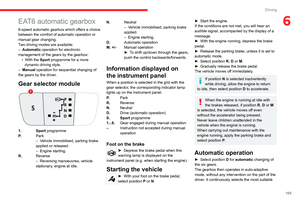 107
107 108
108 109
109 110
110 111
111 112
112 113
113 114
114 115
115 116
116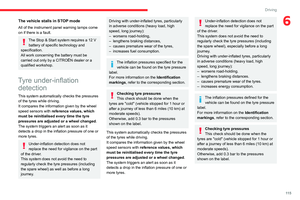 117
117 118
118 119
119 120
120 121
121 122
122 123
123 124
124 125
125 126
126 127
127 128
128 129
129 130
130 131
131 132
132 133
133 134
134 135
135 136
136 137
137 138
138 139
139 140
140 141
141 142
142 143
143 144
144 145
145 146
146 147
147 148
148 149
149 150
150 151
151 152
152 153
153 154
154 155
155 156
156 157
157 158
158 159
159 160
160 161
161 162
162 163
163 164
164 165
165 166
166 167
167 168
168 169
169 170
170 171
171 172
172 173
173 174
174 175
175 176
176 177
177 178
178 179
179 180
180 181
181 182
182 183
183 184
184 185
185 186
186 187
187 188
188 189
189 190
190 191
191 192
192 193
193 194
194 195
195 196
196 197
197 198
198 199
199 200
200 201
201 202
202 203
203 204
204 205
205 206
206 207
207 208
208 209
209 210
210 211
211 212
212 213
213 214
214 215
215 216
216 217
217 218
218 219
219 220
220 221
221 222
222 223
223 224
224 225
225 226
226 227
227 228
228 229
229 230
230 231
231 232
232 233
233 234
234 235
235 236
236 237
237 238
238 239
239 240
240 241
241 242
242 243
243 244
244 245
245 246
246 247
247 248
248 249
249 250
250 251
251 252
252 253
253 254
254 255
255 256
256 257
257 258
258 259
259 260
260 261
261 262
262 263
263 264
264 265
265 266
266 267
267 268
268 269
269 270
270 271
271 272
272 273
273 274
274 275
275