Page 185 of 272

185
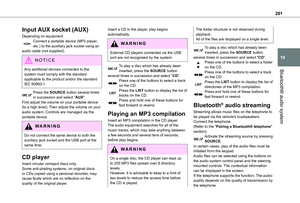
In the event of a breakdown
8
WARNI NG
Versions equipped with Stop & Start are fitted with a 12 V lead-acid battery with special technology and specifications.It should only be replaced by a TOYOTA dealer or a qualified workshop.
Access to the battery
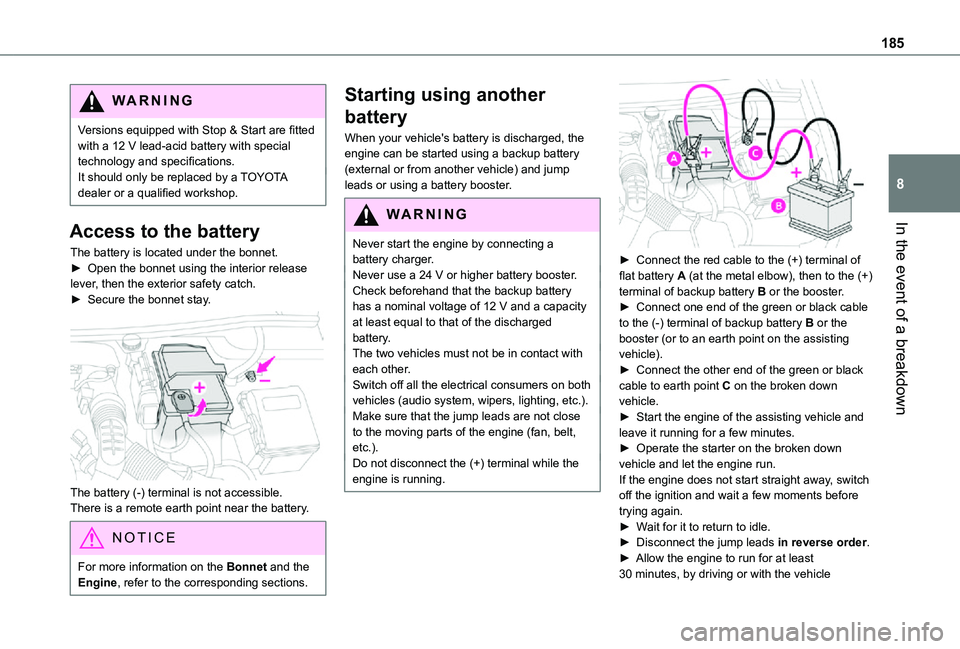
The battery is located under the bonnet.► Open the bonnet using the interior release lever, then the exterior safety catch.► Secure the bonnet stay.
The battery (-) terminal is not accessible.There is a remote earth point near the battery.
NOTIC E
For more information on the Bonnet and the Engine, refer to the corresponding sections.
Starting using another
battery
When your vehicle's battery is discharged, the engine can be started using a backup battery (external or from another vehicle) and jump leads or using a battery booster.
WARNI NG
Never start the engine by connecting a battery charger.Never use a 24 V or higher battery booster.Check beforehand that the backup battery has a nominal voltage of 12 V and a capacity at least equal to that of the discharged battery.The two vehicles must not be in contact with each other.Switch off all the electrical consumers on both vehicles (audio system, wipers, lighting, etc.).Make sure that the jump leads are not close to the moving parts of the engine (fan, belt, etc.).Do not disconnect the (+) terminal while the engine is running.
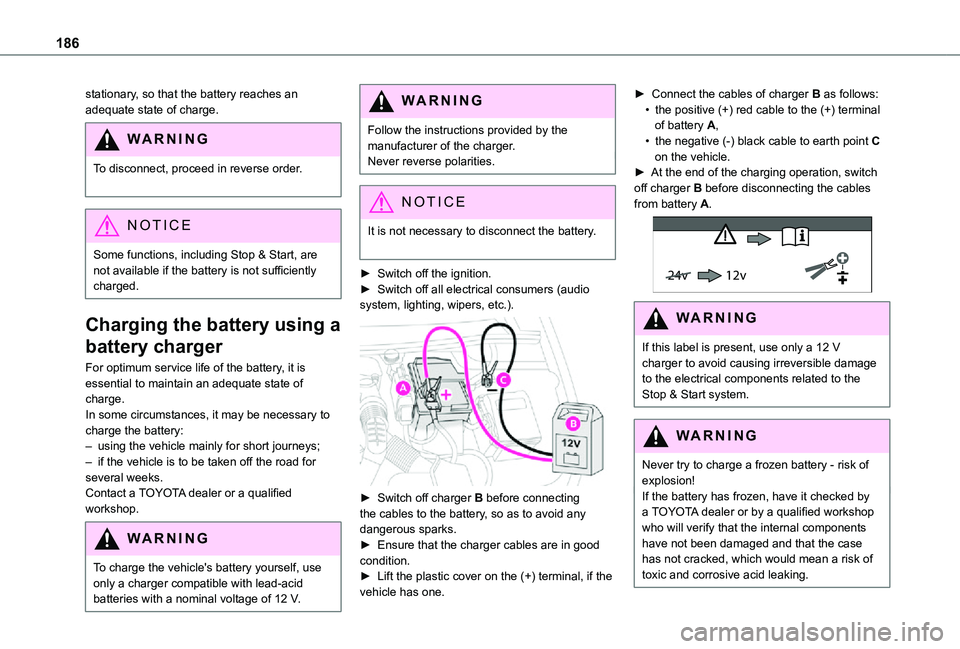
► Connect the red cable to the (+) terminal of flat battery A (at the metal elbow), then to the (+) terminal of backup battery B or the booster.► Connect one end of the green or black cable to the (-) terminal of backup battery B or the booster (or to an earth point on the assisting vehicle).► Connect the other end of the green or black cable to earth point C on the broken down vehicle.► Start the engine of the assisting vehicle and leave it running for a few minutes.► Operate the starter on the broken down vehicle and let the engine run.If the engine does not start straight away, switch off the ignition and wait a few moments before trying again.► Wait for it to return to idle.► Disconnect the jump leads in reverse order.► Allow the engine to run for at least 30 minutes, by driving or with the vehicle
Page 186 of 272

186
stationary, so that the battery reaches an adequate state of charge.
WARNI NG
To disconnect, proceed in reverse order.
NOTIC E
Some functions, including Stop & Start, are not available if the battery is not sufficiently charged.
Charging the battery using a
battery charger
For optimum service life of the battery, it is essential to maintain an adequate state of charge.In some circumstances, it may be necessary to charge the battery:– using the vehicle mainly for short journeys;– if the vehicle is to be taken off the road for several weeks.Contact a TOYOTA dealer or a qualified workshop.
WARNI NG
To charge the vehicle's battery yourself, use only a charger compatible with lead-acid batteries with a nominal voltage of 12 V.
WARNI NG
Follow the instructions provided by the manufacturer of the charger.Never reverse polarities.
NOTIC E
It is not necessary to disconnect the battery.
► Switch off the ignition.► Switch off all electrical consumers (audio system, lighting, wipers, etc.).
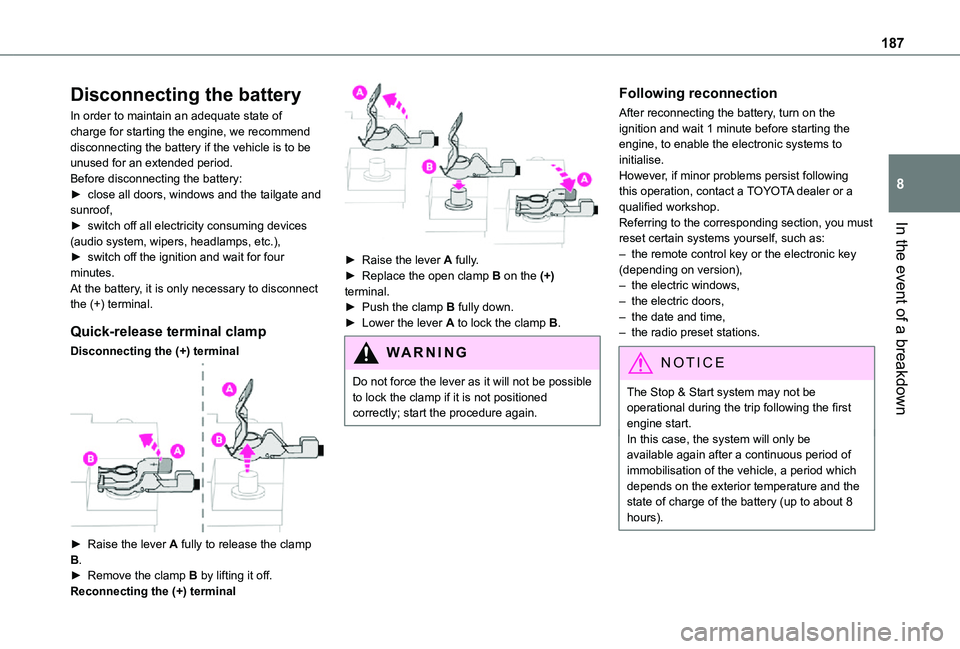
► Switch off charger B before connecting the cables to the battery, so as to avoid any dangerous sparks.
► Ensure that the charger cables are in good condition.► Lift the plastic cover on the (+) terminal, if the vehicle has one.
► Connect the cables of charger B as follows:• the positive (+) red cable to the (+) terminal of battery A,• the negative (-) black cable to earth point C on the vehicle.► At the end of the charging operation, switch off charger B before disconnecting the cables from battery A.
24v 12v
WARNI NG
If this label is present, use only a 12 V charger to avoid causing irreversible damage to the electrical components related to the Stop & Start system.
WARNI NG
Never try to charge a frozen battery - risk of explosion!If the battery has frozen, have it checked by a TOYOTA dealer or by a qualified workshop who will verify that the internal components have not been damaged and that the case has not cracked, which would mean a risk of toxic and corrosive acid leaking.
Page 187 of 272

187
In the event of a breakdown
8
Disconnecting the battery
In order to maintain an adequate state of charge for starting the engine, we recommend disconnecting the battery if the vehicle is to be unused for an extended period.Before disconnecting the battery:► close all doors, windows and the tailgate and sunroof,► switch off all electricity consuming devices (audio system, wipers, headlamps, etc.),► switch off the ignition and wait for four minutes.At the battery, it is only necessary to disconnect the (+) terminal.
Quick-release terminal clamp
Disconnecting the (+) terminal
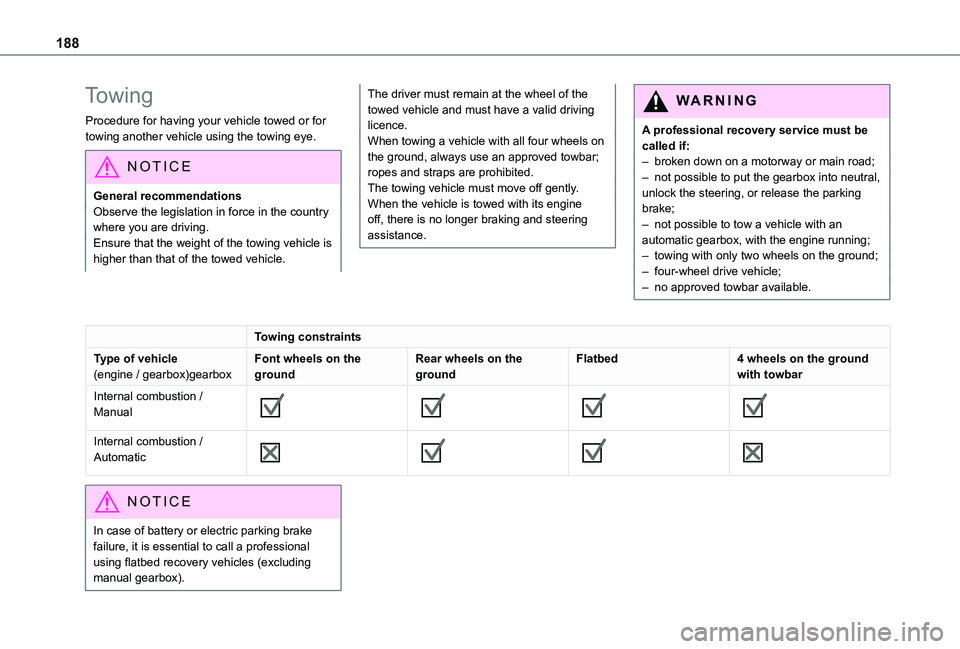
► Raise the lever A fully to release the clamp B.► Remove the clamp B by lifting it off.Reconnecting the (+) terminal
► Raise the lever A fully.► Replace the open clamp B on the (+) terminal.► Push the clamp B fully down.► Lower the lever A to lock the clamp B.
WARNI NG
Do not force the lever as it will not be possible to lock the clamp if it is not positioned correctly; start the procedure again.
Following reconnection
After reconnecting the battery, turn on the ignition and wait 1 minute before starting the engine, to enable the electronic systems to initialise.However, if minor problems persist following this operation, contact a TOYOTA dealer or a qualified workshop.Referring to the corresponding section, you must reset certain systems yourself, such as:– the remote control key or the electronic key (depending on version),– the electric windows,– the electric doors,– the date and time,– the radio preset stations.
NOTIC E
The Stop & Start system may not be operational during the trip following the first engine start.In this case, the system will only be
available again after a continuous period of immobilisation of the vehicle, a period which depends on the exterior temperature and the state of charge of the battery (up to about 8 hours).
Page 188 of 272

188
Towing
Procedure for having your vehicle towed or for towing another vehicle using the towing eye.
NOTIC E
General recommendationsObserve the legislation in force in the country where you are driving.Ensure that the weight of the towing vehicle is higher than that of the towed vehicle.
The driver must remain at the wheel of the towed vehicle and must have a valid driving licence.When towing a vehicle with all four wheels on the ground, always use an approved towbar; ropes and straps are prohibited.The towing vehicle must move off gently.When the vehicle is towed with its engine off, there is no longer braking and steering assistance.
WARNI NG
A professional recovery service must be called if:– broken down on a motorway or main road;– not possible to put the gearbox into neutral, unlock the steering, or release the parking brake;– not possible to tow a vehicle with an automatic gearbox, with the engine running;– towing with only two wheels on the ground;– four-wheel drive vehicle;– no approved towbar available.
Towing constraints
Type of vehicle(engine / gearbox)gearboxFont wheels on the groundRear wheels on the groundFlatbed4 wheels on the ground with towbar
Internal combustion / Manual
Internal combustion / Automatic
NOTIC E
In case of battery or electric parking brake failure, it is essential to call a professional using flatbed recovery vehicles (excluding manual gearbox).
Page 189 of 272

189
In the event of a breakdown
8
Access to the eye
NOTIC E
For more information on the Tool kit, refer to the corresponding section.
WARNI NG
With a manual gearbox, move the gear lever into neutral.With an automatic gearbox, place the gear selector into position N.Failure to adhere to this instruction may lead to damage to braking system components and the lack of braking assistance on restarting the engine.
Towing your vehicle
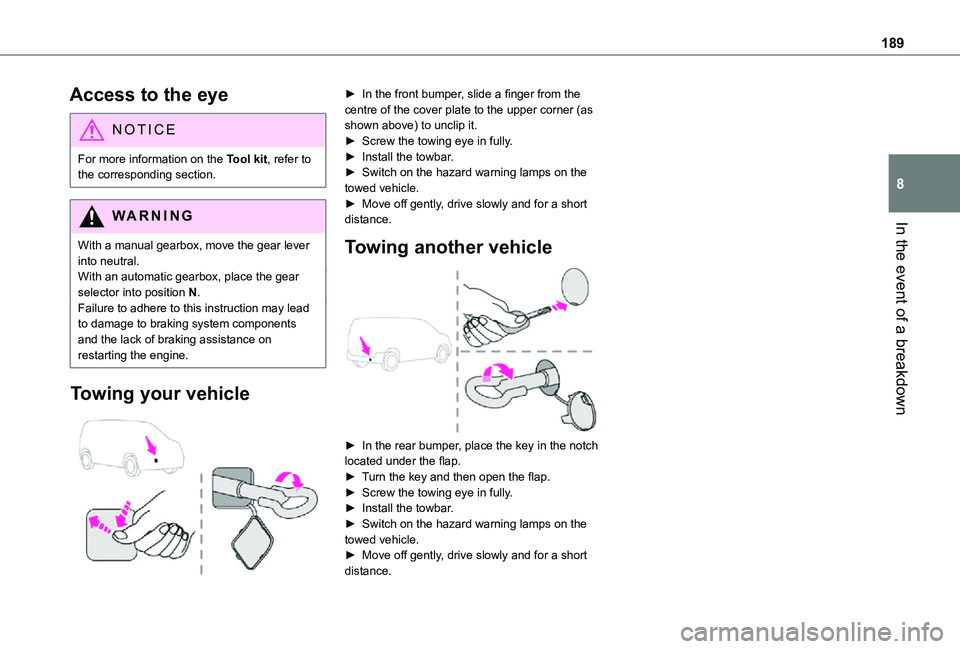
► In the front bumper, slide a finger from the centre of the cover plate to the upper corner (as shown above) to unclip it.► Screw the towing eye in fully.► Install the towbar.► Switch on the hazard warning lamps on the towed vehicle.► Move off gently, drive slowly and for a short distance.
Towing another vehicle
► In the rear bumper, place the key in the notch located under the flap.► Turn the key and then open the flap.► Screw the towing eye in fully.► Install the towbar.► Switch on the hazard warning lamps on the towed vehicle.► Move off gently, drive slowly and for a short distance.
Page 190 of 272
190
Dimensions (mm)
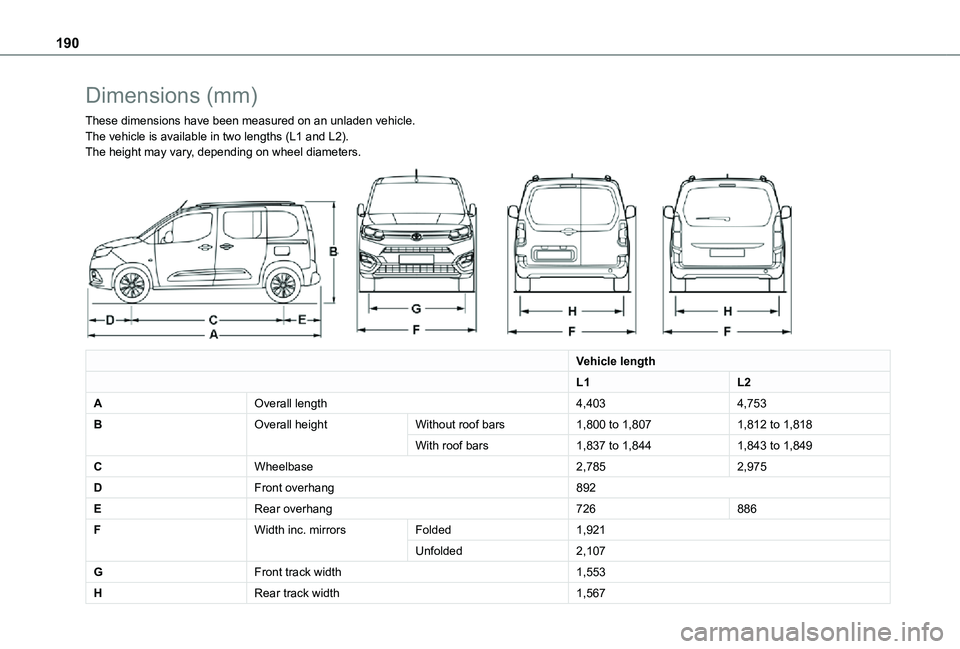
These dimensions have been measured on an unladen vehicle.The vehicle is available in two lengths (L1 and L2).The height may vary, depending on wheel diameters.
Vehicle length
L1L2
AOverall length4,4034,753
BOverall heightWithout roof bars1,800 to 1,8071,812 to 1,818
With roof bars1,837 to 1,8441,843 to 1,849
CWheelbase2,7852,975
DFront overhang892
ERear overhang726886
FWidth inc. mirrorsFolded1,921
Unfolded2,107
GFront track width1,553
HRear track width1,567
Page 191 of 272

191
Technical data
9
Engine technical data and
towed loads
Engines
The engine characteristics are given in the vehicle's registration document, as well as in sales brochures.
NOTIC E
The maximum power corresponds to the value type-approved on a test bed, under conditions defined in European legislation (Directive 1999/99/EC).
For more information, contact a TOYOTA dealer or a qualified workshop.
Weights and towed loads
The weights and towed loads relating to your vehicle are indicated on the registration document, as well as in sales brochures.These values are also indicated on the manufacturer's plate or label.For more information, contact a TOYOTA dealer or a qualified workshop.The GTW (Gross Train Weight) and towed load values indicated are valid up to a maximum altitude of 1,000 metres (3,280 ft). The towed load value must be reduced by 10% for each additional 1,000 metres (3,280 ft) of altitude.
The maximum authorised nose weight corresponds to the weight permitted on the towball.
WARNI NG
When exterior temperatures are high, the vehicle performance may be limited in order to protect the engine. When the exterior temperature is higher than 37°C, limit the
towed weight.
WARNI NG
Towing even with a lightly loaded vehicle can adversely affect its road holding.Braking distances are increased when towing a trailer.When using a vehicle to tow, never exceed a speed of 100 km/h (62 mph) (observe the local legislation in force).
NOTIC E
If the exterior temperature is high, it is recommended that the engine is allowed to idle for 1 to 2 minutes after the vehicle comes to a stop, to facilitate its cooling.
Page 192 of 272
192
Engines and towed loads - PETROL EURO 6.3
Engine1.2Turbo 110HP1.2Turbo 130HP
GearboxManual 6-speedAutomatic 8-speed
CodeEB2ADT MB6 STTDEB2ADTS ATN8 STTD
LengthL1L2L1L2
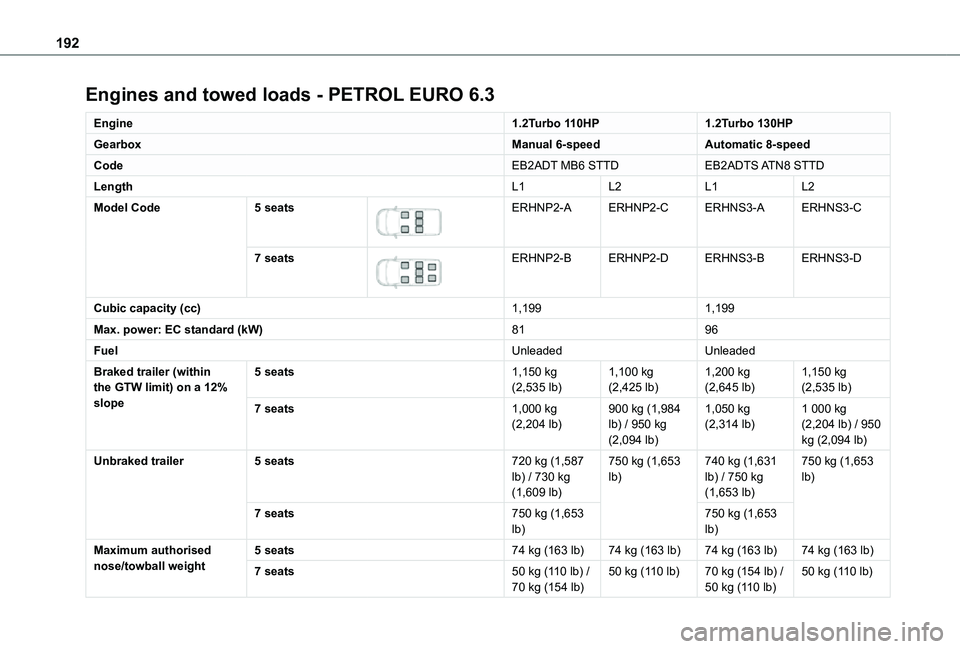
Model Code5 seats
ERHNP2-AERHNP2-CERHNS3-AERHNS3-C
7 seats
ERHNP2-BERHNP2-DERHNS3-BERHNS3-D
Cubic capacity (cc)1,1991,199
Max. power: EC standard (kW)8196
FuelUnleadedUnleaded
Braked trailer (within the GTW limit) on a 12% slope
5 seats1,150 kg (2,535 lb)1,100 kg (2,425 lb)1,200 kg (2,645 lb)1,150 kg (2,535 lb)
7 seats1,000 kg (2,204 lb)900 kg (1,984 lb) / 950 kg (2,094 lb)
1,050 kg (2,314 lb)1 000 kg (2,204 lb) / 950 kg (2,094 lb)
Unbraked trailer5 seats720 kg (1,587 lb) / 730 kg (1,609 lb)
750 kg (1,653 lb)740 kg (1,631 lb) / 750 kg (1,653 lb)
750 kg (1,653 lb)
7 seats750 kg (1,653 lb)750 kg (1,653 lb)
Maximum authorised nose/towball weight5 seats74 kg (163 lb)74 kg (163 lb)74 kg (163 lb)74 kg (163 lb)
7 seats50 kg (110 lb) / 70 kg (154 lb)50 kg (110 lb)70 kg (154 lb) / 50 kg (110 lb)50 kg (110 lb)