2021 TOYOTA PROACE CITY VERSO weight
[x] Cancel search: weightPage 34 of 272
34
Doors and door clearances
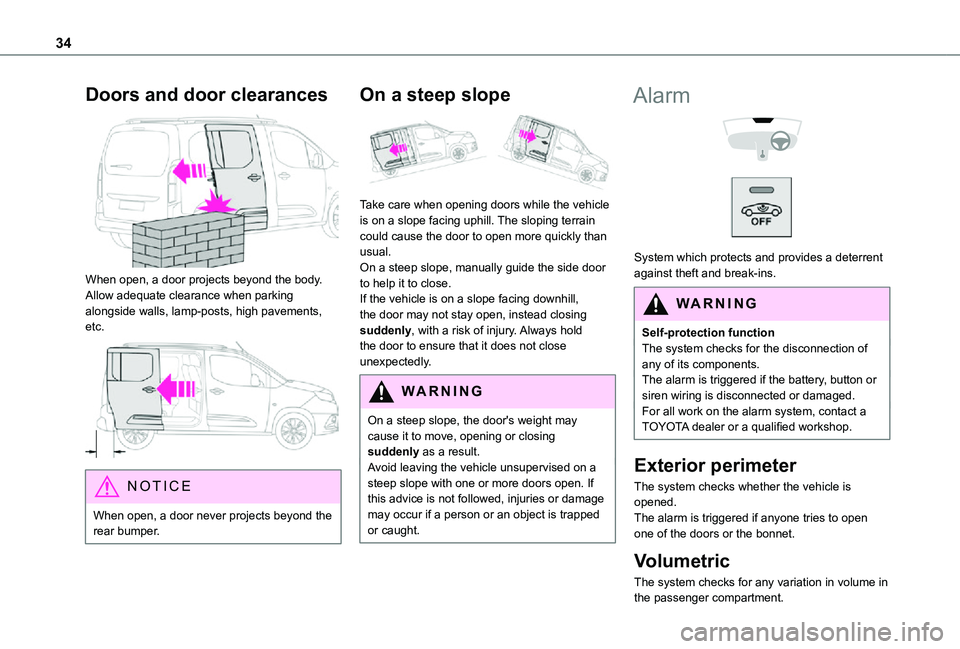
When open, a door projects beyond the body. Allow adequate clearance when parking alongside walls, lamp-posts, high pavements, etc.
NOTIC E
When open, a door never projects beyond the rear bumper.
On a steep slope
Take care when opening doors while the vehicle is on a slope facing uphill. The sloping terrain could cause the door to open more quickly than usual.On a steep slope, manually guide the side door to help it to close.If the vehicle is on a slope facing downhill, the door may not stay open, instead closing suddenly, with a risk of injury. Always hold the door to ensure that it does not close unexpectedly.
WARNI NG
On a steep slope, the door's weight may cause it to move, opening or closing suddenly as a result.Avoid leaving the vehicle unsupervised on a steep slope with one or more doors open. If this advice is not followed, injuries or damage may occur if a person or an object is trapped or caught.
Alarm
System which protects and provides a deterrent against theft and break-ins.
WARNI NG
Self-protection functionThe system checks for the disconnection of any of its components.The alarm is triggered if the battery, button or siren wiring is disconnected or damaged.For all work on the alarm system, contact a TOYOTA dealer or a qualified workshop.
Exterior perimeter
The system checks whether the vehicle is opened.The alarm is triggered if anyone tries to open one of the doors or the bonnet.
Volumetric
The system checks for any variation in volume in the passenger compartment.
Page 40 of 272
40
WARNI NG
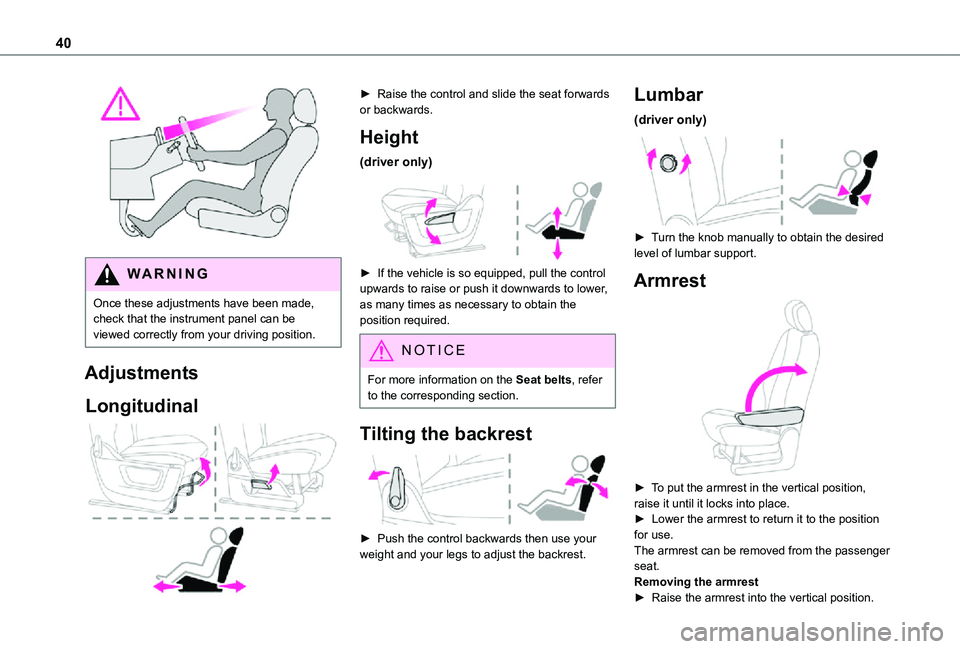
Once these adjustments have been made, check that the instrument panel can be viewed correctly from your driving position.
Adjustments
Longitudinal
► Raise the control and slide the seat forwards or backwards.
Height
(driver only)
► If the vehicle is so equipped, pull the control upwards to raise or push it downwards to lower, as many times as necessary to obtain the position required.
NOTIC E
For more information on the Seat belts, refer to the corresponding section.
Tilting the backrest
► Push the control backwards then use your weight and your legs to adjust the backrest.
Lumbar
(driver only)
► Turn the knob manually to obtain the desired level of lumbar support.
Armrest
► To put the armrest in the vertical position, raise it until it locks into place.► Lower the armrest to return it to the position for use.The armrest can be removed from the passenger seat.Removing the armrest
► Raise the armrest into the vertical position.
Page 41 of 272
41
Ease of use and comfort
3
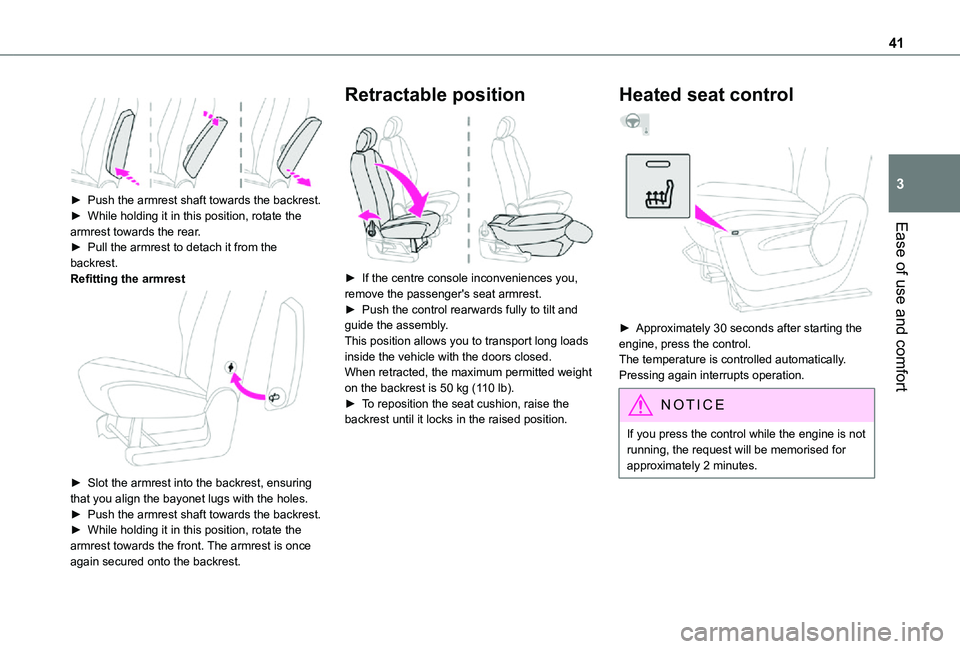
► Push the armrest shaft towards the backrest.► While holding it in this position, rotate the armrest towards the rear.
► Pull the armrest to detach it from the backrest.Refitting the armrest
► Slot the armrest into the backrest, ensuring that you align the bayonet lugs with the holes.► Push the armrest shaft towards the backrest.► While holding it in this position, rotate the armrest towards the front. The armrest is once again secured onto the backrest.
Retractable position
► If the centre console inconveniences you, remove the passenger's seat armrest.► Push the control rearwards fully to tilt and guide the assembly.This position allows you to transport long loads inside the vehicle with the doors closed.When retracted, the maximum permitted weight on the backrest is 50 kg (110 lb).► To reposition the seat cushion, raise the backrest until it locks in the raised position.
Heated seat control
► Approximately 30 seconds after starting the engine, press the control.The temperature is controlled automatically.Pressing again interrupts operation.
NOTIC E
If you press the control while the engine is not running, the request will be memorised for approximately 2 minutes.
Page 54 of 272
54
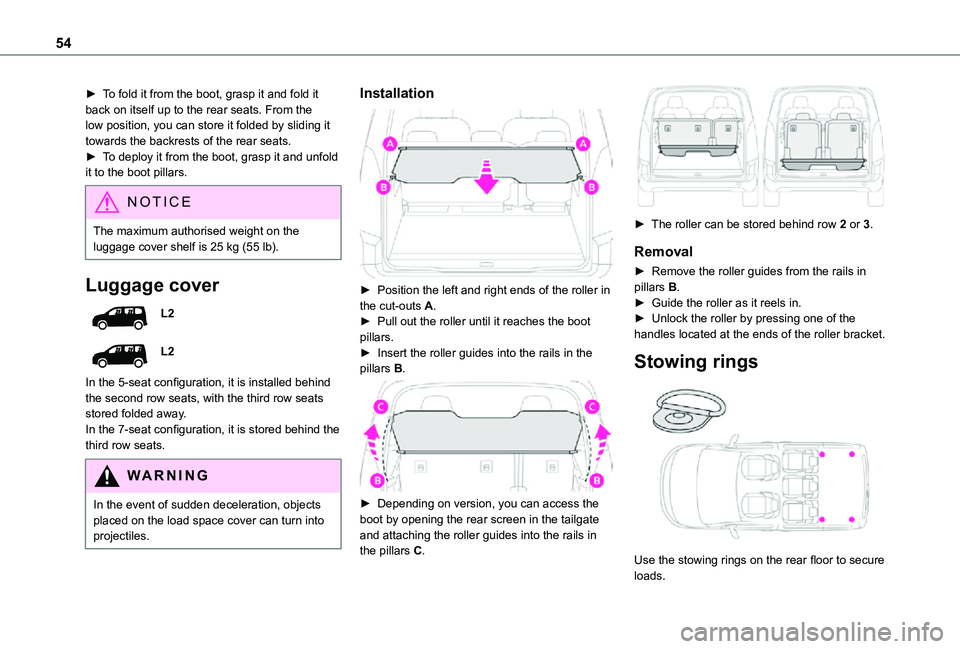
► To fold it from the boot, grasp it and fold it back on itself up to the rear seats. From the low position, you can store it folded by sliding it towards the backrests of the rear seats.► To deploy it from the boot, grasp it and unfold it to the boot pillars.
NOTIC E
The maximum authorised weight on the
luggage cover shelf is 25 kg (55 lb).
Luggage cover
L2
L2
In the 5-seat configuration, it is installed behind the second row seats, with the third row seats stored folded away.In the 7-seat configuration, it is stored behind the third row seats.
WARNI NG
In the event of sudden deceleration, objects placed on the load space cover can turn into projectiles.
Installation
► Position the left and right ends of the roller in the cut-outs A.► Pull out the roller until it reaches the boot pillars.► Insert the roller guides into the rails in the pillars B.
► Depending on version, you can access the boot by opening the rear screen in the tailgate and attaching the roller guides into the rails in the pillars C.
► The roller can be stored behind row 2 or 3.
Removal
► Remove the roller guides from the rails in pillars B.► Guide the roller as it reels in.► Unlock the roller by pressing one of the handles located at the ends of the roller bracket.
Stowing rings
Use the stowing rings on the rear floor to secure loads.
Page 80 of 272
80
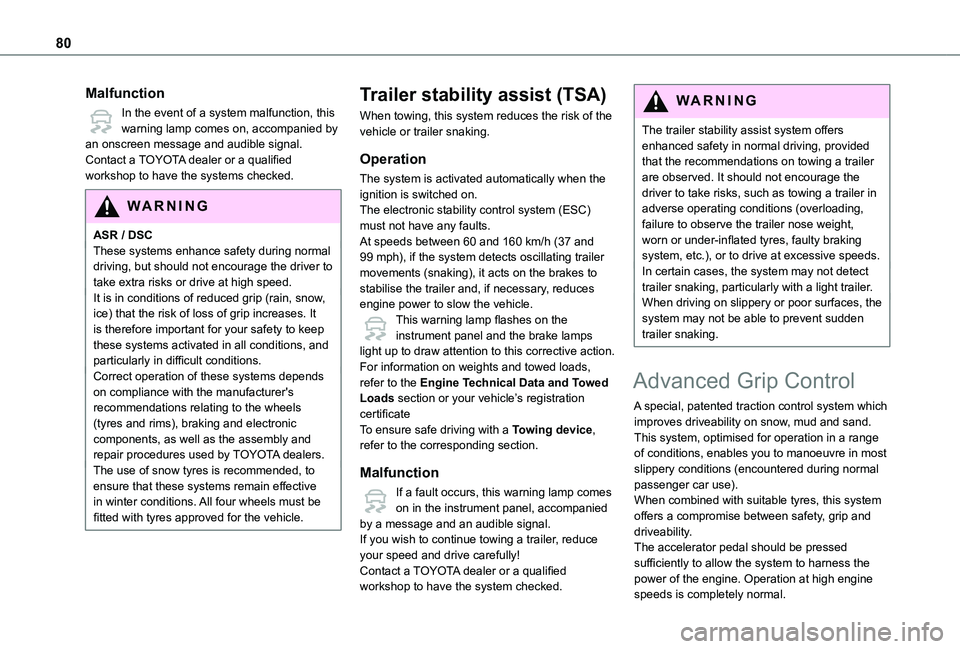
Malfunction
In the event of a system malfunction, this warning lamp comes on, accompanied by an onscreen message and audible signal.Contact a TOYOTA dealer or a qualified workshop to have the systems checked.
WARNI NG
ASR / DSCThese systems enhance safety during normal driving, but should not encourage the driver to take extra risks or drive at high speed.It is in conditions of reduced grip (rain, snow, ice) that the risk of loss of grip increases. It is therefore important for your safety to keep these systems activated in all conditions, and particularly in difficult conditions.Correct operation of these systems depends on compliance with the manufacturer's recommendations relating to the wheels (tyres and rims), braking and electronic components, as well as the assembly and
repair procedures used by TOYOTA dealers.The use of snow tyres is recommended, to ensure that these systems remain effective in winter conditions. All four wheels must be fitted with tyres approved for the vehicle.
Trailer stability assist (TSA)
When towing, this system reduces the risk of the vehicle or trailer snaking.
Operation
The system is activated automatically when the ignition is switched on.The electronic stability control system (ESC) must not have any faults.At speeds between 60 and 160 km/h (37 and 99 mph), if the system detects oscillating trailer movements (snaking), it acts on the brakes to stabilise the trailer and, if necessary, reduces engine power to slow the vehicle.This warning lamp flashes on the instrument panel and the brake lamps light up to draw attention to this corrective action.For information on weights and towed loads, refer to the Engine Technical Data and Towed Loads section or your vehicle’s registration certificateTo ensure safe driving with a Towing device,
refer to the corresponding section.
Malfunction
If a fault occurs, this warning lamp comes on in the instrument panel, accompanied by a message and an audible signal.If you wish to continue towing a trailer, reduce your speed and drive carefully!Contact a TOYOTA dealer or a qualified workshop to have the system checked.
WARNI NG
The trailer stability assist system offers enhanced safety in normal driving, provided that the recommendations on towing a trailer are observed. It should not encourage the driver to take risks, such as towing a trailer in adverse operating conditions (overloading, failure to observe the trailer nose weight, worn or under-inflated tyres, faulty braking system, etc.), or to drive at excessive speeds.In certain cases, the system may not detect trailer snaking, particularly with a light trailer.When driving on slippery or poor surfaces, the system may not be able to prevent sudden trailer snaking.
Advanced Grip Control
A special, patented traction control system which improves driveability on snow, mud and sand.This system, optimised for operation in a range
of conditions, enables you to manoeuvre in most slippery conditions (encountered during normal passenger car use).When combined with suitable tyres, this system offers a compromise between safety, grip and driveability.The accelerator pedal should be pressed sufficiently to allow the system to harness the power of the engine. Operation at high engine speeds is completely normal.
Page 89 of 272
89
Safety
5
WARNI NG
Curtain airbagsDo not fix or attach anything to the roof, as this could cause head injuries when the curtain airbag is deployed.Do not remove the grab handles installed on the roof, as they play a part in securing the curtain airbags.
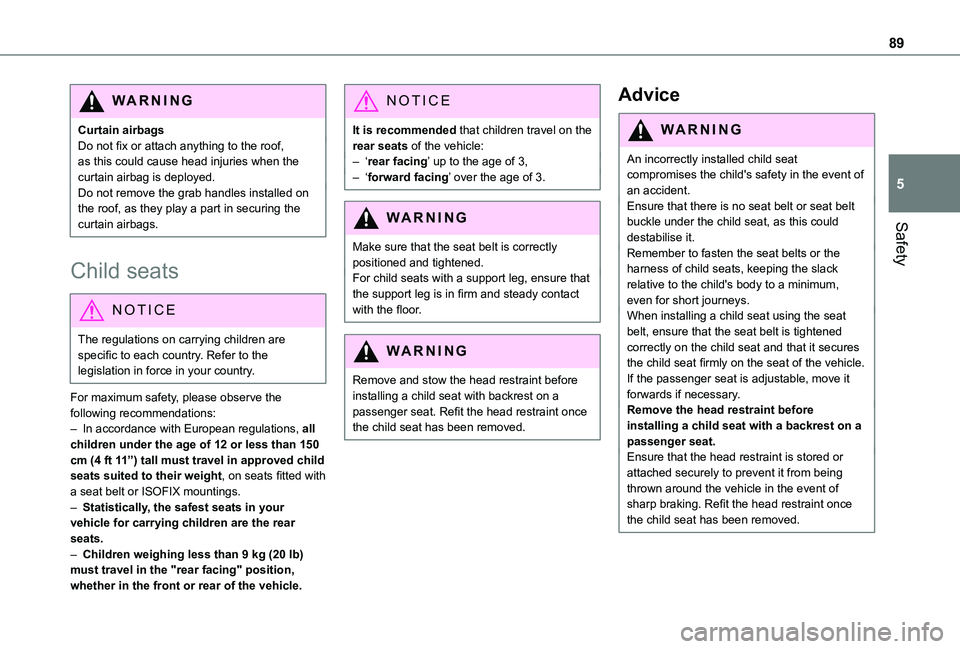
Child seats
NOTIC E
The regulations on carrying children are specific to each country. Refer to the legislation in force in your country.
For maximum safety, please observe the following recommendations:– In accordance with European regulations, all children under the age of 12 or less than 150 cm (4 ft 11”) tall must travel in approved child seats suited to their weight, on seats fitted with a seat belt or ISOFIX mountings.– Statistically, the safest seats in your vehicle for carrying children are the rear seats.– Children weighing less than 9 kg (20 lb) must travel in the "rear facing" position, whether in the front or rear of the vehicle.
NOTIC E
It is recommended that children travel on the rear seats of the vehicle:– ‘rear facing’ up to the age of 3,– ‘forward facing’ over the age of 3.
WARNI NG
Make sure that the seat belt is correctly positioned and tightened.For child seats with a support leg, ensure that the support leg is in firm and steady contact with the floor.
WARNI NG
Remove and stow the head restraint before installing a child seat with backrest on a passenger seat. Refit the head restraint once the child seat has been removed.
Advice
WARNI NG
An incorrectly installed child seat compromises the child's safety in the event of an accident.Ensure that there is no seat belt or seat belt buckle under the child seat, as this could destabilise it.
Remember to fasten the seat belts or the harness of child seats, keeping the slack relative to the child's body to a minimum, even for short journeys.When installing a child seat using the seat belt, ensure that the seat belt is tightened correctly on the child seat and that it secures the child seat firmly on the seat of the vehicle. If the passenger seat is adjustable, move it forwards if necessary.Remove the head restraint before installing a child seat with a backrest on a passenger seat.Ensure that the head restraint is stored or attached securely to prevent it from being thrown around the vehicle in the event of sharp braking. Refit the head restraint once the child seat has been removed.
Page 93 of 272
93
Safety
5
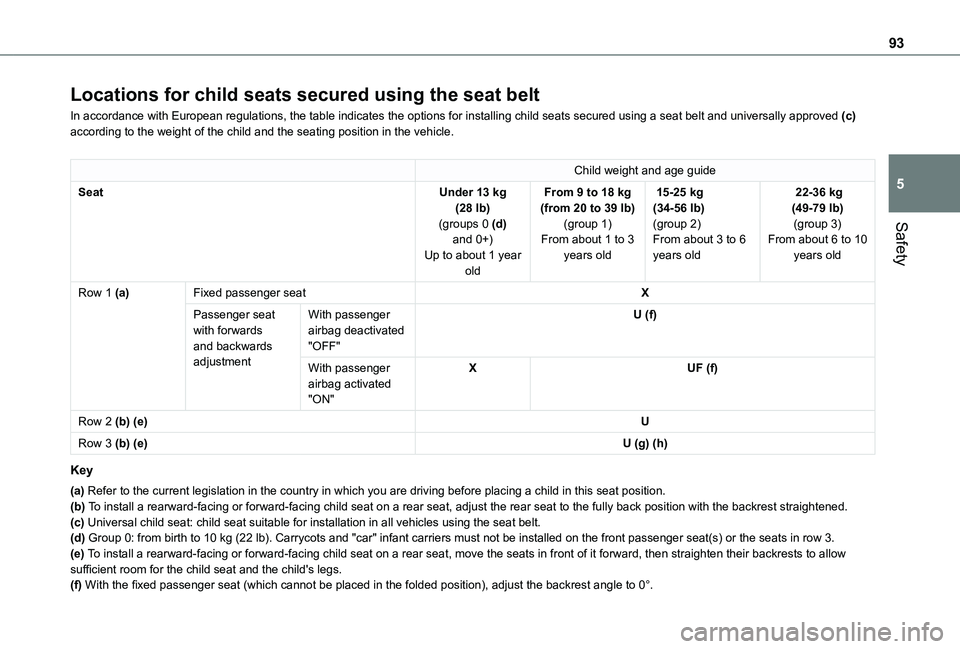
Locations for child seats secured using the seat belt
In accordance with European regulations, the table indicates the options\
for installing child seats secured using a seat belt and universally ap\
proved (c) according to the weight of the child and the seating position in the veh\
icle.
Child weight and age guide
SeatUnder 13 kg (28 lb)(groups 0 (d) and 0+)
Up to about 1 year old
From 9 to 18 kg (from 20 to 39 lb)(group 1)From about 1 to 3
years old
15-25 kg (34-56 lb)(group 2)From about 3 to 6
years old
22-36 kg (49-79 lb)(group 3)From about 6 to 10
years old
Row 1 (a)Fixed passenger seatX
Passenger seat with forwards and backwards adjustment
With passenger airbag deactivated "OFF"
U (f)
With passenger airbag activated "ON"
XUF (f)
Row 2 (b) (e)U
Row 3 (b) (e)U (g) (h)
Key
(a) Refer to the current legislation in the country in which you are drivin\
g before placing a child in this seat position.(b) To install a rearward-facing or forward-facing child seat on a rear seat,\
adjust the rear seat to the fully back position with the backrest strai\
ghtened.(c) Universal child seat: child seat suitable for installation in all vehic\
les using the seat belt.(d) Group 0: from birth to 10 kg (22 lb). Carrycots and "car" infant carriers must not be installed on the f\
ront passenger seat(s) or the seats in row 3.
(e) To install a rearward-facing or forward-facing child seat on a rear seat,\
move the seats in front of it forward, then straighten their backrests \
to allow sufficient room for the child seat and the child's legs.(f) With the fixed passenger seat (which cannot be placed in the folded position), adjust the backrest angle to 0°.
Page 96 of 272
96
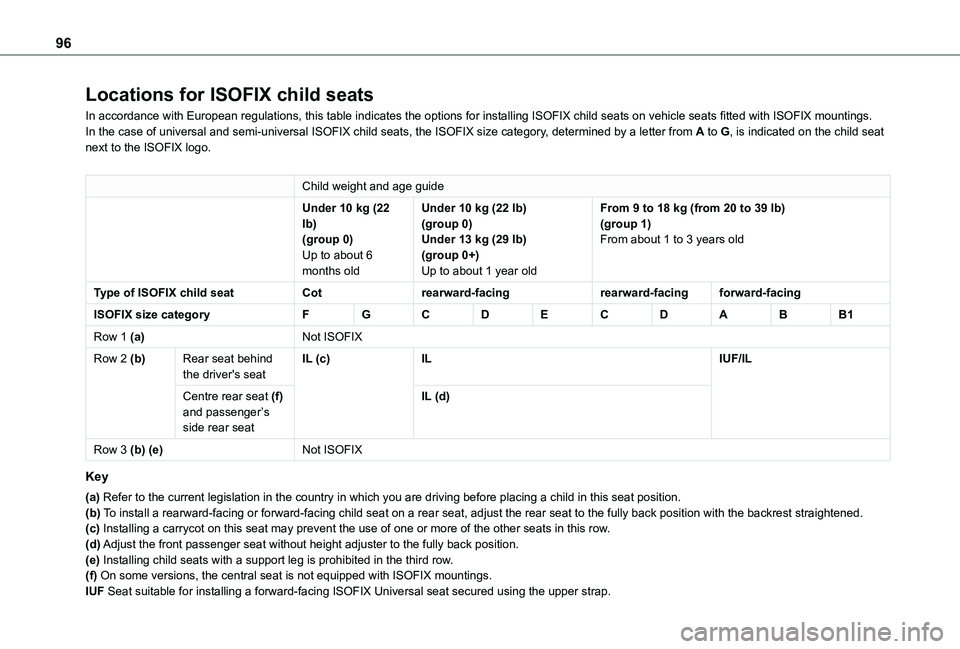
Locations for ISOFIX child seats
In accordance with European regulations, this table indicates the options for installing ISOFIX child seats on vehicle seats fitted with ISOFIX mountings.In the case of universal and semi-universal ISOFIX child seats, the ISOF\
IX size category, determined by a letter from A to G, is indicated on the child seat next to the ISOFIX logo.
Child weight and age guide
Under 10 kg (22 lb)(group 0)
Up to about 6 months old
Under 10 kg (22 lb)(group 0)Under 13 kg (29 lb)
(group 0+)Up to about 1 year old
From 9 to 18 kg (from 20 to 39 lb)(group 1)From about 1 to 3 years old
Type of ISOFIX child seatCotrearward-facingrearward-facingforward-facing
ISOFIX size categoryFGCDECDABB1
Row 1 (a)Not ISOFIX
Row 2 (b)Rear seat behind the driver's seatIL (c)ILIUF/IL
Centre rear seat (f) and passenger’s side rear seat
IL (d)
Row 3 (b) (e)Not ISOFIX
Key
(a) Refer to the current legislation in the country in which you are drivin\
g before placing a child in this seat position.(b) To install a rearward-facing or forward-facing child seat on a rear seat,\
adjust the rear seat to the fully back position with the backrest strai\
ghtened.(c) Installing a carrycot on this seat may prevent the use of one or more o\
f the other seats in this row.(d) Adjust the front passenger seat without height adjuster to the fully bac\
k position.(e) Installing child seats with a support leg is prohibited in the third ro\
w.(f) On some versions, the central seat is not equipped with ISOFIX mounting\
s.IUF Seat suitable for installing a forward-facing ISOFIX Universal seat sec\
ured using the upper strap.