2021 RAM PROMASTER CITY warning light
[x] Cancel search: warning lightPage 62 of 280

60STARTING AND OPERATING
1. Locate the engine block heater cord
(behind the driver’s side headlamp).
2. Undo the hook-and-loop strap that secures the heater cord in place.
3. Pull the cord to the front of the vehicle and plug it into a grounded, three-wire extension
cord.
4. After the vehicle is running, reattach the cord to the hook-and-loop strap and
properly stow away behind the driver’s side
headlamp.
NOTE:
The engine block heater cord is a factory
installed option. If your vehicle is not
equipped, heater cords are available from an
authorized Mopar dealer.
The engine block heater will require 110 Volts
AC and 6.5 Amps to activate the heater
element.
The engine block heater must be plugged in
at least one hour to have an adequate
warming effect on the engine.
ENGINE BREAK-IN RECOMMENDATIONS
A long break-in period is not required for the
engine and drivetrain (transmission and axle) in
your vehicle.
Drive moderately during the first 300 miles
(500 km). After the initial 60 miles (100 km),
speeds up to 50 or 55 mph (80 or 90 km/h) are
desirable.
While cruising, brief full-throttle acceleration
within the limits of local traffic laws contributes
to a good break-in. Wide-open throttle
acceleration in low gear can be detrimental and
should be avoided.
The engine oil installed in the engine at the
factory is a high-quality energy conserving type
lubricant. Oil changes should be consistent with
anticipated climate conditions under which
vehicle operations will occur. For the
recommended viscosity and quality grades
Ú page 259. NOTE:
A new engine may consume some oil during its
first few thousand miles (kilometers) of opera
-
tion. This should be considered a normal part of
the break-in and not interpreted as a concern.
Please check your oil level with the engine oil
indicator often during the break in period. Add
oil as required.
PARKING BRAKE
Before leaving the vehicle, make sure that the
parking brake is fully applied. Also, be certain to
leave an automatic transmission in PARK.
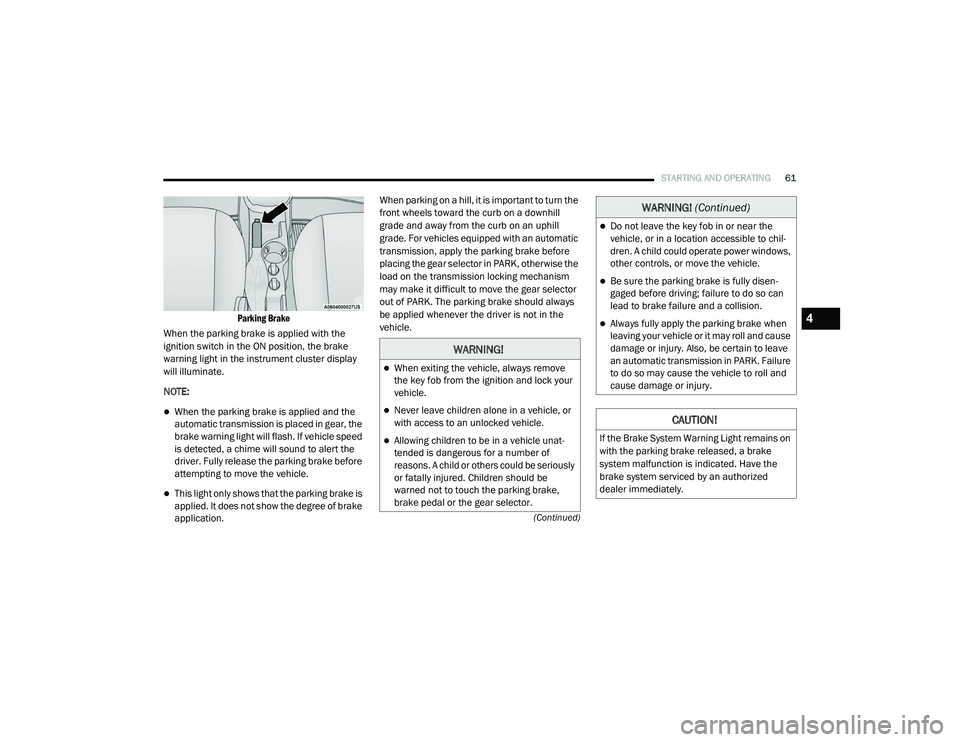
The parking brake lever is located in the center
console. To apply the parking brake, pull the
lever up as firmly as possible. To release the
parking brake, pull the lever up slightly, push
the center button, then lower the lever
completely.
WARNING!
Remember to disconnect the engine block
heater cord before driving. Damage to the
110-115 Volt electrical cord could cause
electrocution.
CAUTION!
Never use Non-Detergent Oil or Straight
Mineral Oil in the engine or damage may
result.
21_VM_OM_EN_USC_t.book Page 60
Page 63 of 280
STARTING AND OPERATING61
(Continued)
Parking Brake
When the parking brake is applied with the
ignition switch in the ON position, the brake
warning light in the instrument cluster display
will illuminate.
NOTE:
When the parking brake is applied and the
automatic transmission is placed in gear, the
brake warning light will flash. If vehicle speed
is detected, a chime will sound to alert the
driver. Fully release the parking brake before
attempting to move the vehicle.
This light only shows that the parking brake is
applied. It does not show the degree of brake
application. When parking on a hill, it is important to turn the
front wheels toward the curb on a downhill
grade and away from the curb on an uphill
grade. For vehicles equipped with an automatic
transmission, apply the parking brake before
placing the gear selector in PARK, otherwise the
load on the transmission locking mechanism
may make it difficult to move the gear selector
out of PARK. The parking brake should always
be applied whenever the driver is not in the
vehicle.
WARNING!
When exiting the vehicle, always remove
the key fob from the ignition and lock your
vehicle.
Never leave children alone in a vehicle, or
with access to an unlocked vehicle.
Allowing children to be in a vehicle unat
-
tended is dangerous for a number of
reasons. A child or others could be seriously
or fatally injured. Children should be
warned not to touch the parking brake,
brake pedal or the gear selector.
Do not leave the key fob in or near the
vehicle, or in a location accessible to chil -
dren. A child could operate power windows,
other controls, or move the vehicle.
Be sure the parking brake is fully disen -
gaged before driving; failure to do so can
lead to brake failure and a collision.
Always fully apply the parking brake when
leaving your vehicle or it may roll and cause
damage or injury. Also, be certain to leave
an automatic transmission in PARK. Failure
to do so may cause the vehicle to roll and
cause damage or injury.
CAUTION!
If the Brake System Warning Light remains on
with the parking brake released, a brake
system malfunction is indicated. Have the
brake system serviced by an authorized
dealer immediately.
WARNING! (Continued)
4
21_VM_OM_EN_USC_t.book Page 61
Page 68 of 280
66STARTING AND OPERATING
DRIVE (D)
This range should be used for most city and
highway driving. It provides the smoothest
upshifts and downshifts, and the best fuel
economy. The transmission automatically
upshifts through all forward gears.
When frequent transmission shifting occurs
(such as when operating the vehicle under
heavy loading conditions, in hilly terrain,
traveling into strong head winds, or while towing
a heavy trailer), use the Electronic Range Select
(ERS) shift control to select a lower gear range
Úpage 67. Under these conditions, using a
lower gear range will improve performance and
extend transmission life by reducing excessive
shifting and heat buildup.
If the transmission temperature exceeds
normal operating limits, the transmission
controller may modify the transmission shift
schedule, reduce engine torque, and/or expand
the range of torque converter clutch
engagement. This is done to prevent
transmission damage due to overheating.
If the transmission becomes extremely hot, the
“Transmission Temperature Warning Light” may
illuminate and the transmission may operate
differently until the transmission cools down. During cold temperatures, transmission
operation may be modified depending on
engine and transmission temperature as well
as vehicle speed. This feature improves warm
up time of the engine and transmission to
achieve maximum efficiency. Engagement of
the torque converter clutch, and shifts into
8th or 9th gear, are inhibited until the
transmission fluid is warm Ú
page 67. Normal
operation will resume once the transmission
temperature has risen to a suitable level.
Transmission Limp Home Mode
Transmission function is monitored
electronically for abnormal conditions. If a
condition is detected that could result in
transmission damage, Transmission Limp
Home Mode is activated. In this mode, the
transmission may operate only in a fixed gear,
or may remain in NEUTRAL. The Malfunction
Indicator Light (MIL) may be illuminated. Limp
Home Mode may allow the vehicle to be driven
to an authorized dealer for service without
damaging the transmission. In the event of a momentary problem, the
transmission can be reset to regain all forward
gears by performing the following steps:
1. Stop the vehicle.
2. Shift the transmission into PARK.
3. Turn the ignition OFF.
4. Wait approximately 10 seconds.
5. Restart the engine.
6. Shift into the desired gear range. If the
problem is no longer detected, the
transmission will return to normal
operation.
NOTE:
Even if the transmission can be reset, we
recommend that you visit an authorized dealer
at your earliest possible convenience. An autho -
rized dealer has diagnostic equipment to
assess the condition of your transmission. If the
transmission cannot be reset, authorized dealer
service is required.
21_VM_OM_EN_USC_t.book Page 66
Page 69 of 280
STARTING AND OPERATING67
Torque Converter Clutch
A feature designed to improve fuel economy
has been included in the automatic
transmission on your vehicle. A clutch within the
torque converter engages automatically at
calibrated speeds. This may result in a slightly
different feeling or response during normal
operation in the upper gears. When the vehicle
speed drops or during some accelerations, the
clutch automatically disengages.
NOTE:
The torque converter clutch will not engage until
the transmission fluid is warm [usually after 1 to
3 miles (2 to 5 km) of driving]. Because the
engine speed is higher when the torque
converter clutch is not engaged, it may seem as
if the transmission is not shifting properly when
cold. This is normal. The torque converter clutch
will function normally once the transmission is
sufficiently warm.
Electronic Range Select (ERS) Operation
The Electronic Range Select (ERS) shift control
allows the driver to limit the highest available
gear. For example, if you set the transmission
gear limit to fifth gear, the transmission will not
shift above fifth gear, but will shift through the
lower gears normally. You can switch between DRIVE and ERS mode
at any vehicle speed. When the gear selector is
in the DRIVE position, the transmission will
operate automatically, shifting between all
available gears.
Moving the gear selector to the ERS position
(beside DRIVE) will activate ERS mode, display
the current gear in the instrument cluster, and
set that gear as the top available gear. Once in
ERS mode, moving the gear selector forward (-)
or rearward (+) will change the top available
gear, which will be displayed in the instrument
cluster.
To exit ERS mode, simply return the gear
selector to the DRIVE position.
NOTE:
To select the proper gear position for maximum
deceleration (engine braking), move the gear
selector into the ERS position, then simply press
and hold it forward (-). The transmission will
shift to the range from which the vehicle can
best be slowed down.
POWER STEERING
The standard power steering system will give
you good vehicle response and increased ease
of maneuverability in tight spaces. The system
will provide mechanical steering capability if
power assist is lost.
If for some reason the power assist is
interrupted, it will still be possible to steer your
vehicle. Under these conditions, you will
observe a substantial increase in steering
effort, especially at very low vehicle speeds and
during parking maneuvers.
WARNING!
Do not downshift for additional engine
braking on a slippery surface. The drive
wheels could lose their grip and the vehicle
could skid, causing a collision or personal
injury.
4
21_VM_OM_EN_USC_t.book Page 67
Page 71 of 280
STARTING AND OPERATING69
To Activate
Push the on/off button to activate the Cruise
Control. The cruise indicator light in the
instrument cluster display will illuminate. To
turn the system off, push the on/off button a
second time. The cruise indicator light will turn
off. The system should be turned off when not in
use.
To Set A Desired Speed
Turn the Cruise Control on. When the vehicle
has reached the desired speed greater than
25 mph (40 km/h), push the SET (-) button and
release. Release the accelerator and the
vehicle will operate at the selected speed.
NOTE:
The vehicle should be traveling at a steady
speed and on level ground before pushing the
SET (-) button.
To Vary The Speed Setting
To Increase Or Decrease The Set Speed
When the Cruise Control is set, you can increase
speed by pushing the RES (+) button, or
decrease the speed by pushing the SET (-)
button.
U.S. Speed (mph)
Pushing the RES (+) or SET (-) button once will
result in a 1 mph speed adjustment. Each
subsequent tap of the button results in an
adjustment of 1 mph.
If the button is continually pushed, the set
speed will continue to adjust until the button
is released, then the new set speed will be
established.
Metric Speed (km/h)
Pushing the RES (+) or SET (-) button once will
result in a 1 km/h speed adjustment. Each
subsequent tap of the button results in an
adjustment of 1 km/h.
If the button is continually pushed, the set
speed will continue to adjust until the button
is released, then the new set speed will be
established.
To Accelerate For Passing
Press the accelerator as you would normally.
When the pedal is released, the vehicle will
return to the set speed.
Using Cruise Control On Hills
The transmission may downshift on hills to
maintain the vehicle set speed.
NOTE:
The Cruise Control system maintains speed up
and down hills. A slight speed change on
moderate hills is normal.
On steep hills, a greater speed loss or gain may
occur so it may be preferable to drive without
Cruise Control.
WARNING!
Leaving the Cruise Control system on when
not in use is dangerous. You could
accidentally set the system or cause it to go
faster than you want. You could lose control
and have an accident. Always leave the
system off when you are not using it.
WARNING!
Cruise Control can be dangerous where the
system cannot maintain a constant speed.
Your vehicle could go too fast for the
conditions, and you could lose control and
have an accident. Do not use Cruise Control
in heavy traffic or on roads that are winding,
icy, snow-covered or slippery.
4
21_VM_OM_EN_USC_t.book Page 69
Page 77 of 280
STARTING AND OPERATING75
4. Fill the vehicle with fuel.
NOTE:
When the fuel nozzle “clicks” or shuts off, the
fuel tank is full.
5. Remove gasoline nozzle, reinstall fuel cap
and close fuel filler door.
NOTE:
Tighten the fuel filler cap until you hear a
“clicking” sound. This is an indication that the
fuel filler cap is properly tightened.
If the gas cap is not tightened properly, the
MIL may come on. Be sure the gas cap is
tightened every time the vehicle is refueled.
VEHICLE LOADING
As required by National Highway Traffic Safety
Administration regulations, your vehicle has a
certification label affixed to the driver's side
door or B-Pillar. If seats are removed for carrying cargo, do not
exceed the specified GVWR and GAWR.
Vehicle Certification Label
Your vehicle has a Vehicle Certification Label
affixed to the driver’s side B-Pillar or the rear of
the driver’s door.
The label contains the following information:
Name of manufacturer
Month and year of manufacture
Gross Vehicle Weight Rating (GVWR)
Gross Axle Weight Rating (GAWR) front and
rear
Vehicle Identification Number (VIN)
Type of vehicle
Month, Day, and Hour of manufacture (MDH)
The bar code allows a computer scanner to read
the VIN.
WARNING!
Never have any smoking materials lit in or
near the vehicle when the gas cap is
removed or the tank is being filled.
Never add fuel when the engine is running.
This is in violation of most state and federal
fire regulations and may cause the
“Malfunction Indicator Light (MIL)”to turn
on.
A fire may result if gasoline is pumped into
a portable container that is inside of a
vehicle. You could be burned. Always place
gas containers on the ground while filling.
CAUTION!
Damage to the fuel system or emissions
control system could result from using an
improper fuel tank filler tube cap. A poorly
fitting cap could let impurities into the fuel
system and may cause the “Malfunction
Indicator Light (MIL)” to turn on, due to fuel
vapors escaping from the system.
To avoid fuel spillage and overfilling, do not
“top off” the fuel tank after filling.4
21_VM_OM_EN_USC_t.book Page 75
Page 80 of 280
78STARTING AND OPERATING
(Continued)
Weight-Distributing Hitch
The weight-distributing hitch works by applying
leverage through spring (load) bars. They are
typically used for heavier loads to distribute
trailer tongue weight to the tow vehicle's front
axle and the trailer axle(s). When used in
accordance with the manufacturer's directions,
it provides for a more level ride, offering more
consistent steering and brake control thereby
enhancing towing safety. The addition of a
friction/hydraulic sway control also dampens
sway caused by traffic and crosswinds and
contributes positively to tow vehicle and trailer
stability. Trailer Sway Control (TSC) and a weight
distributing (load equalizing) hitch are recommended for heavier Tongue Weights (TW)
and may be required depending on vehicle and
trailer configuration/loading to comply with
Gross Axle Weight Rating (GAWR) requirements.
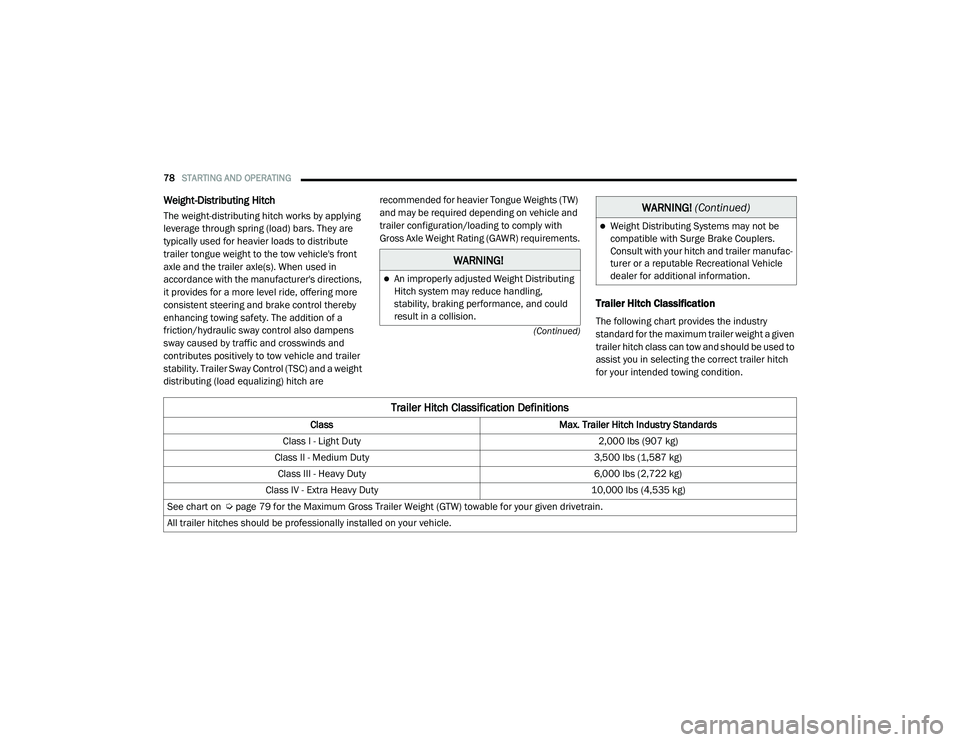
Trailer Hitch Classification
The following chart provides the industry
standard for the maximum trailer weight a given
trailer hitch class can tow and should be used to
assist you in selecting the correct trailer hitch
for your intended towing condition.
WARNING!
An improperly adjusted Weight Distributing
Hitch system may reduce handling,
stability, braking performance, and could
result in a collision.
Weight Distributing Systems may not be
compatible with Surge Brake Couplers.
Consult with your hitch and trailer manufac
-
turer or a reputable Recreational Vehicle
dealer for additional information.
WARNING! (Continued)
Trailer Hitch Classification Definitions
Class Max. Trailer Hitch Industry Standards
Class I - Light Duty 2,000 lbs (907 kg)
Class II - Medium Duty 3,500 lbs (1,587 kg)
Class III - Heavy Duty 6,000 lbs (2,722 kg)
Class IV - Extra Heavy Duty 10,000 lbs (4,535 kg)
See chart on Ú page 79 for the Maximum Gross Trailer Weight (GTW) towable for your given drivetrain.
All trailer hitches should be professionally installed on your vehicle.
21_VM_OM_EN_USC_t.book Page 78
Page 83 of 280
STARTING AND OPERATING81
Towing Requirements — Trailer Brakes
Do not interconnect the hydraulic brake
system or vacuum system of your vehicle
with that of the trailer. This could cause inad -
equate braking and possible personal injury.
An electronically actuated trailer brake
controller is required when towing a trailer
with electronically actuated brakes. When
towing a trailer equipped with a hydraulic
surge actuated brake system, an electronic
brake controller is not required.
Trailer brakes are recommended for trailers
over 1,000 lbs (453 kg) and required for
trailers in excess of 2,000 lbs (907 kg).
Towing Requirements — Trailer Lights And
Wiring
Whenever you pull a trailer, regardless of the
trailer size, stoplights and turn signals on the
trailer are required for motoring safety.
The Trailer Tow Package may include a four- and
seven-pin wiring harness. Use a factory
approved trailer harness and connector.
NOTE:
Do not cut or splice wiring into the vehicle’s
wiring harness.
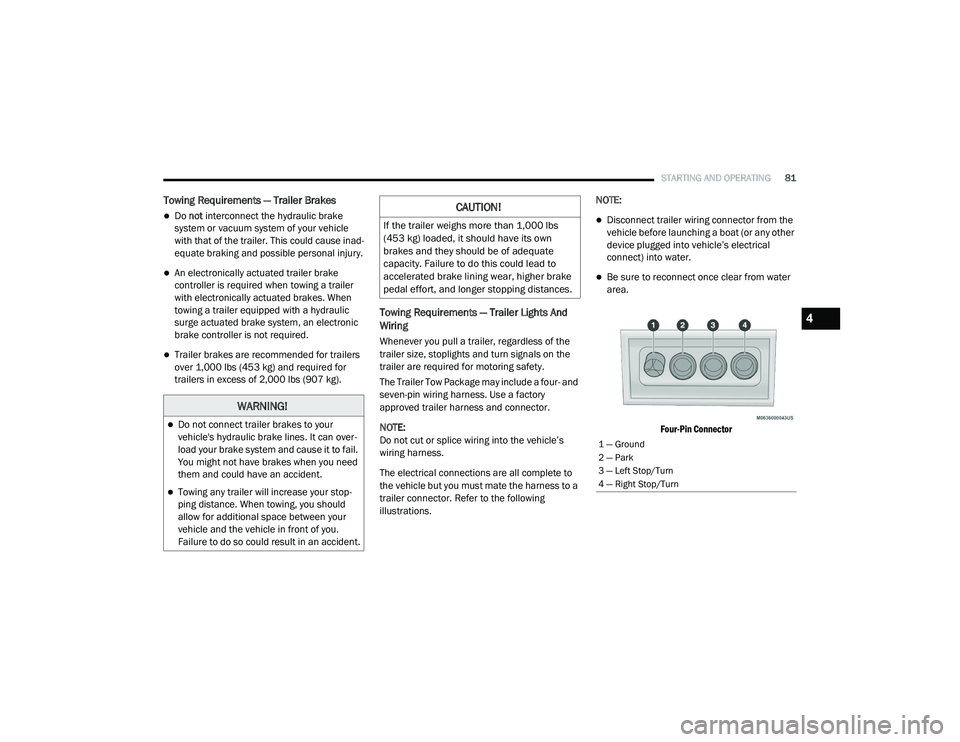
The electrical connections are all complete to
the vehicle but you must mate the harness to a
trailer connector. Refer to the following
illustrations. NOTE:
Disconnect trailer wiring connector from the
vehicle before launching a boat (or any other
device plugged into vehicle’s electrical
connect) into water.
Be sure to reconnect once clear from water
area.
Four-Pin Connector
WARNING!
Do not connect trailer brakes to your
vehicle's hydraulic brake lines. It can over -
load your brake system and cause it to fail.
You might not have brakes when you need
them and could have an accident.
Towing any trailer will increase your stop -
ping distance. When towing, you should
allow for additional space between your
vehicle and the vehicle in front of you.
Failure to do so could result in an accident.
CAUTION!
If the trailer weighs more than 1,000 lbs
(453 kg) loaded, it should have its own
brakes and they should be of adequate
capacity. Failure to do this could lead to
accelerated brake lining wear, higher brake
pedal effort, and longer stopping distances.
1 — Ground
2 — Park
3 — Left Stop/Turn
4 — Right Stop/Turn
4
21_VM_OM_EN_USC_t.book Page 81