2021 RAM PROMASTER CITY ad blue
[x] Cancel search: ad bluePage 120 of 280

118MULTIMEDIA
Place/Retrieve A Call From Hold
During an active call, press the Hold or Call On
Hold button on the Phone main screen.
Making A Second Call While Current Call Is In
Progress
You can place a call on hold by pressing the
Hold button on the Phone main screen, then
dial a number from the keypad, recent calls,
SMS Inbox or from the phonebooks.
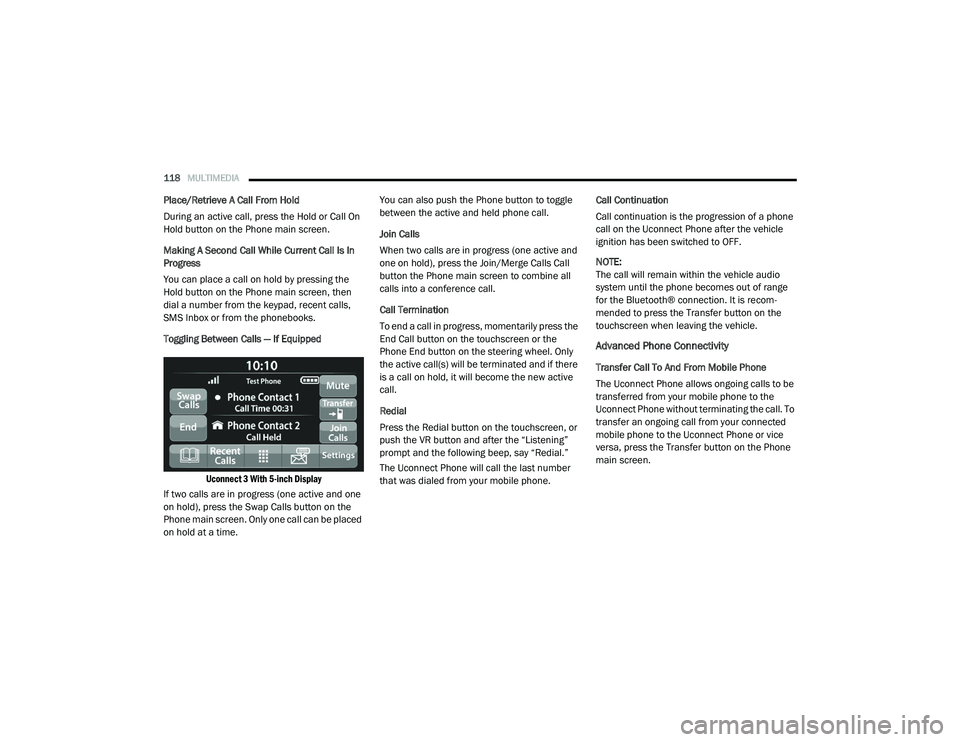
Toggling Between Calls — If Equipped
Uconnect 3 With 5-inch Display
If two calls are in progress (one active and one
on hold), press the Swap Calls button on the
Phone main screen. Only one call can be placed
on hold at a time. You can also push the Phone button to toggle
between the active and held phone call.
Join Calls
When two calls are in progress (one active and
one on hold), press the Join/Merge Calls Call
button the Phone main screen to combine all
calls into a conference call.
Call Termination
To end a call in progress, momentarily press the
End Call button on the touchscreen or the
Phone End button on the steering wheel. Only
the active call(s) will be terminated and if there
is a call on hold, it will become the new active
call.
Redial
Press the Redial button on the touchscreen, or
push the VR button and after the “Listening”
prompt and the following beep, say “Redial.”
The Uconnect Phone will call the last number
that was dialed from your mobile phone.
Call Continuation
Call continuation is the progression of a phone
call on the Uconnect Phone after the vehicle
ignition has been switched to OFF.
NOTE:
The call will remain within the vehicle audio
system until the phone becomes out of range
for the Bluetooth® connection. It is recom
-
mended to press the Transfer button on the
touchscreen when leaving the vehicle.
Advanced Phone Connectivity
Transfer Call To And From Mobile Phone
The Uconnect Phone allows ongoing calls to be
transferred from your mobile phone to the
Uconnect Phone without terminating the call. To
transfer an ongoing call from your connected
mobile phone to the Uconnect Phone or vice
versa, press the Transfer button on the Phone
main screen.
21_VM_OM_EN_USC_t.book Page 118
Page 123 of 280

MULTIMEDIA121
Siri® Eyes Free — If Equipped
When used with your Apple® iPhone®
connected to your vehicle, Siri lets you use your
voice to send text messages, select media,
place phone calls and much more. Siri uses
your natural language to understand what you
mean and responds back to confirm your
requests. The system is designed to keep your
eyes on the road and your hands on the wheel
by letting Siri help you perform useful tasks.
To enable Siri, push and hold, then release the
Uconnect Voice Recognition (VR) button on the
steering wheel. After you hear a double beep,
you can ask Siri to play podcasts and music, get
directions, read text messages, and many other
useful requests.
Bluetooth® Communication Link
Mobile phones may lose connection to the
Uconnect Phone. When this happens, the
connection can generally be re-established by
restarting the mobile phone. Your mobile phone
is recommended to remain in Bluetooth® ON
mode. Power-Up
After switching the ignition key from OFF to
either the ON/RUN or ACC position, or after a
language change, you must wait at least
15 seconds prior to using the system
Ú
page 265.
NAVIGATION MODE — IF EQUIPPED
Operating Navigation Mode — If Equipped
Planning A Route
Using the search bar provides a wide range of
ways to find places and then navigate to them.
You can search for your destination in different
ways:
A specific address
A partial address
A type of place
A zip code
A city to navigate to a city center
A Point of Interest (POI) near your current
location
Latitude and longitude coordinates Using Search
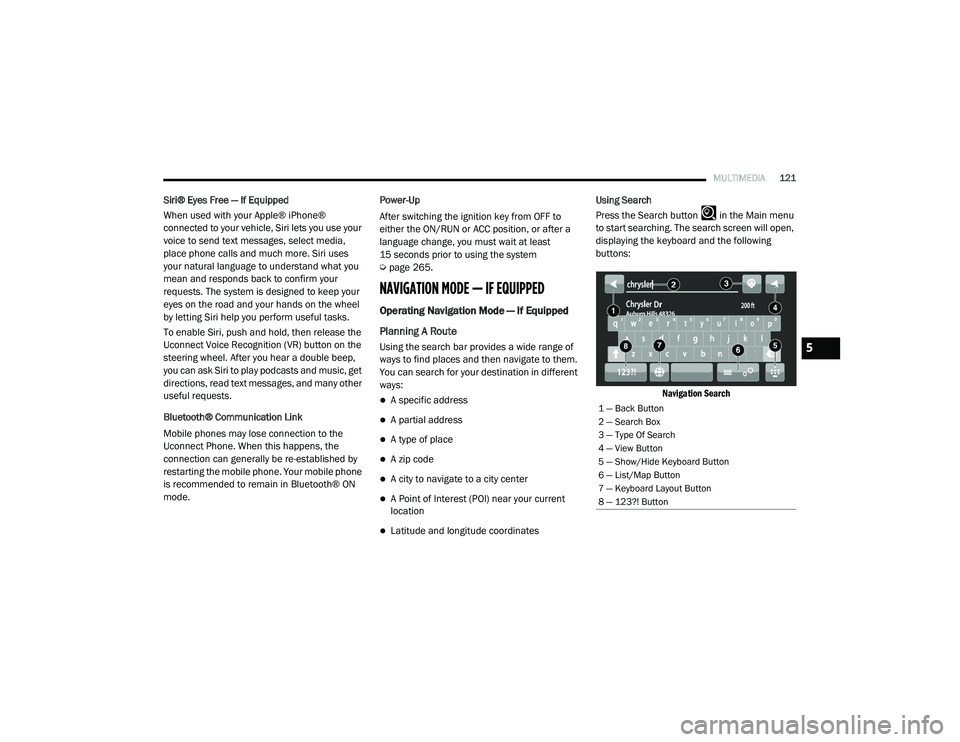
Press the Search button in the Main menu
to start searching. The search screen will open,
displaying the keyboard and the following
buttons:
Navigation Search
1 — Back Button
2 — Search Box
3 — Type Of Search
4 — View Button
5 — Show/Hide Keyboard Button
6 — List/Map Button
7 — Keyboard Layout Button
8 — 123?! Button
5
21_VM_OM_EN_USC_t.book Page 121
Page 144 of 280

142MULTIMEDIA
STEERING WHEEL AUDIO CONTROLS — IF
EQUIPPED
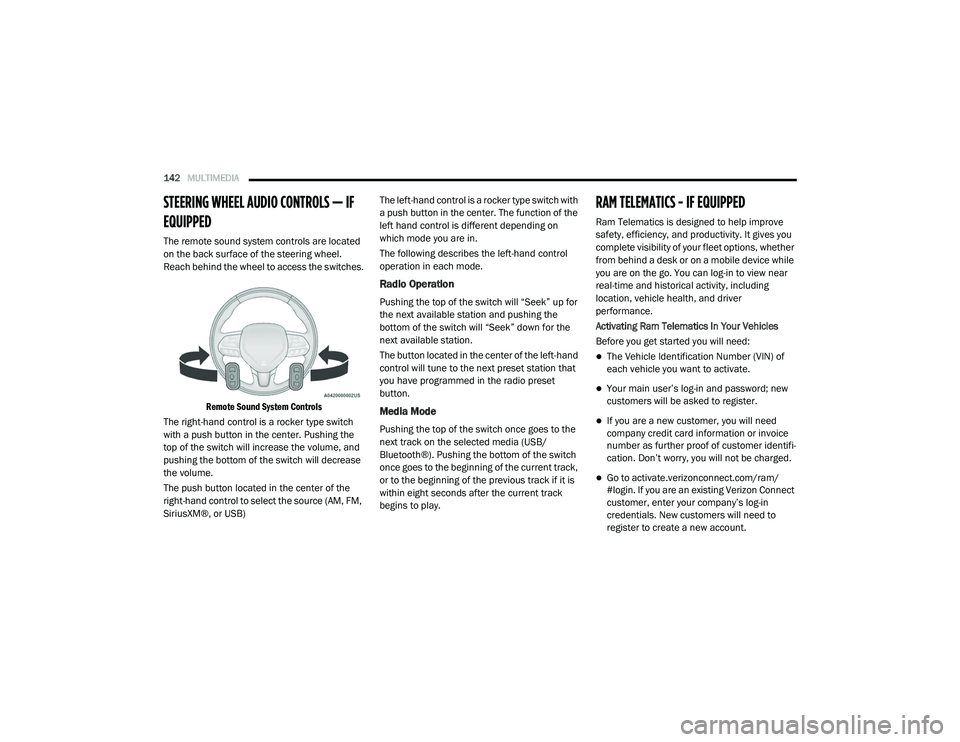
The remote sound system controls are located
on the back surface of the steering wheel.
Reach behind the wheel to access the switches.
Remote Sound System Controls
The right-hand control is a rocker type switch
with a push button in the center. Pushing the
top of the switch will increase the volume, and
pushing the bottom of the switch will decrease
the volume.
The push button located in the center of the
right-hand control to select the source (AM, FM,
SiriusXM®, or USB) The left-hand control is a rocker type switch with
a push button in the center. The function of the
left hand control is different depending on
which mode you are in.
The following describes the left-hand control
operation in each mode.
Radio Operation
Pushing the top of the switch will “Seek” up for
the next available station and pushing the
bottom of the switch will “Seek” down for the
next available station.
The button located in the center of the left-hand
control will tune to the next preset station that
you have programmed in the radio preset
button.
Media Mode
Pushing the top of the switch once goes to the
next track on the selected media (USB/
Bluetooth®). Pushing the bottom of the switch
once goes to the beginning of the current track,
or to the beginning of the previous track if it is
within eight seconds after the current track
begins to play.
RAM TELEMATICS - IF EQUIPPED
Ram Telematics is designed to help improve
safety, efficiency, and productivity. It gives you
complete visibility of your fleet options, whether
from behind a desk or on a mobile device while
you are on the go. You can log-in to view near
real-time and historical activity, including
location, vehicle health, and driver
performance.
Activating Ram Telematics In Your Vehicles
Before you get started you will need:
The Vehicle Identification Number (VIN) of
each vehicle you want to activate.
Your main user’s log-in and password; new
customers will be asked to register.
If you are a new customer, you will need
company credit card information or invoice
number as further proof of customer identifi
-
cation. Don’t worry, you will not be charged.
Go to activate.verizonconnect.com/ram/
#login. If you are an existing Verizon Connect
customer, enter your company’s log-in
credentials. New customers will need to
register to create a new account.
21_VM_OM_EN_USC_t.book Page 142
Page 192 of 280

190IN CASE OF EMERGENCY
CavityMaxi Fuse Mini Fuse Description
F0160 Amp Blue –Body Controller
F02 40 Amp Orange –Rear Power Windows, Fog Lamps, Front Heated Seats
(If Equipped)
F02 30 Amp Green –Rear Power Windows, Front Heated Seats (If Equipped)
F02 30 Amp Green –Fog Lamps, Front Heated Seats (If Equipped)
F02 20 Amp Yellow –Front Heated Seats (If Equipped)
F03 20 Amp Yellow –Ignition Switch
F04 40 Amp Orange –BSM System Module
F06 20 Amp Yellow –Radiator Fan - Low Speed
F07 50 Amp Red –Radiator Fan - High Speed
F08 40 Amp Orange –Blower Motor
F10 –15 Amp BlueHorn
F11 –10 Amp RedSecondary Loads ECM
F14 –15 Amp BlueHigh Beam
F15 –15 Amp BlueIP Power Outlet 12 Volt
F16 –5 Amp TanECM and Transmission Shifter
F17 –25 Amp ClearECM Power Loads
F18 –5 Amp TanECM Load, Main Relay
F19 –7.5 Amp Brown Air Conditioning
21_VM_OM_EN_USC_t.book Page 190
Page 193 of 280

IN CASE OF EMERGENCY191
F20 –30 Amp Green Rear Defroster (If Equipped)
F21 –5 Amp TanKey Unlock
F22 –10 Amp RedPrimary ECM Loads
F23 –20 Amp Yellow BSM System
F24 –5 Amp TanBSM System, Positive Key and Steering Angle Sensor
F30 –15 Amp Blue2nd Instrument Panel Power Outlet (Battery)
F83 20 Amp Yellow –Fuel Pump
F84 –15 Amp BlueAT Module
F85 –15 Amp BlueRear Power Outlet 12 Volts (ACC/ON/RUN)
F86 –15 Amp BlueIP Power Outlet 12 Volts (ACC/ON/RUN)
F87 –5 Amp TanIBS
F88 –7.5 Amp Brown External Mirror Defrost (If Equipped)
CavityMaxi Fuse Mini Fuse Description
7
21_VM_OM_EN_USC_t.book Page 191
Page 194 of 280

192IN CASE OF EMERGENCY
Interior Fuses
The interior fuse panel is part of the Body
Control Module (BCM) and is located on the
driver's side under the instrument panel.
Fuse Panel CoverFuse Panel Cavity Locations
CavityMini Fuse Description
F535 Amp Beige KL 30 (+30) - IPC, FTM
F38 20 Amp Yellow Central Doors Locking
F36 15 Amp Blue KL 30 (+30) - TPMS, EOBD, HVAC, Radio, USB, SGW
F43 15 Amp Blue Bi-Directional Washer Pump
F48 20 Amp Yellow Passenger Power Windows
F50 7.5 Amp Brown KL 15 (+15) - Air-Bag
F51 7.5 Amp Brown KL 15 (+15) - External Mirror Adjustment Command, HVAC, RVC, HWB Coils
F37 5 Amp Beige KL 15 (+15) - Brake Pedal Switch (N.O.), IPC, Brake Pedal Switch (N.C.)
F49 5 Amp Beige KL 15 (+15) - PAM, CSS Lighting, TTM, SGW, and Heaters Light, ECM Backlighting
F31 5 Amp Beige KL 15a (INT A) - HWB, MCO
F47 20 Amp Yellow Driver Power Windows
21_VM_OM_EN_USC_t.book Page 192
Page 195 of 280

IN CASE OF EMERGENCY193
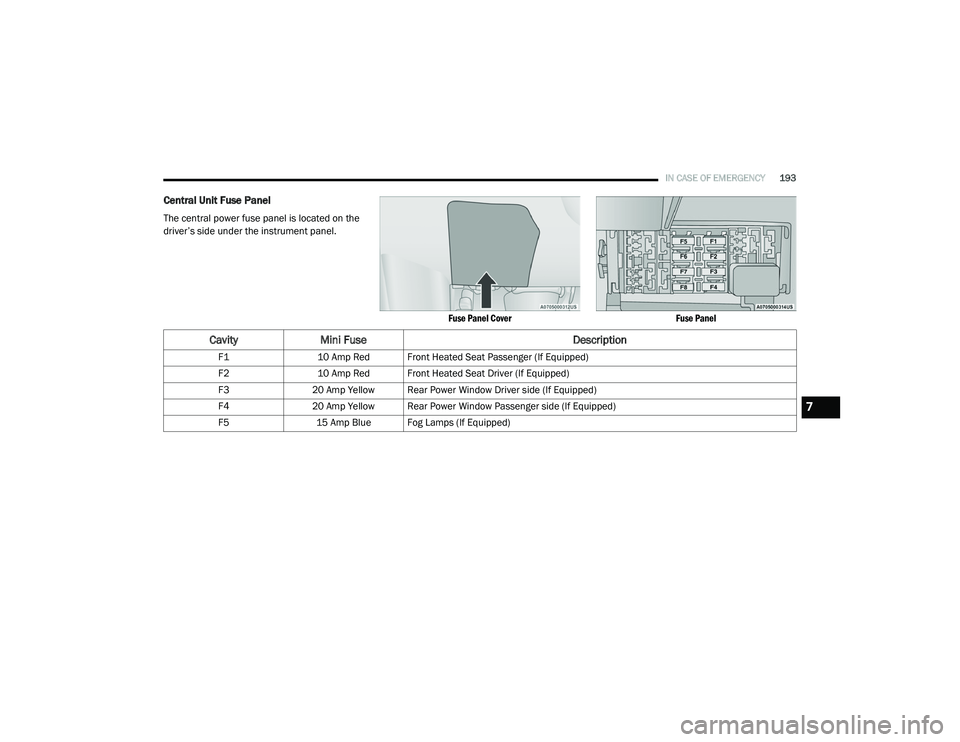
Central Unit Fuse Panel
The central power fuse panel is located on the
driver’s side under the instrument panel.
Fuse Panel CoverFuse Panel
CavityMini Fuse Description
F110 Amp Red Front Heated Seat Passenger (If Equipped)
F2 10 Amp Red Front Heated Seat Driver (If Equipped)
F3 20 Amp Yellow Rear Power Window Driver side (If Equipped)
F4 20 Amp Yellow Rear Power Window Passenger side (If Equipped)
F5 15 Amp Blue Fog Lamps (If Equipped)
7
21_VM_OM_EN_USC_t.book Page 193
Page 268 of 280

266
INDEX
A
Adding Engine Coolant (Antifreeze)............... 228Additives, Fuel............................................... 257Advance Phone Connectivity......................... 118Air BagAir Bag Operation...................................... 163Driver Knee Air Bag................................... 164Enhanced Accident Response......... 168, 212Event Data Recorder (EDR)....................... 212Front Air Bag............................................. 162If Deployment Occurs................................ 167Knee Impact Bolsters................................ 164Maintaining Your Air Bag System.............. 169Maintenance............................................. 169Transporting Pets...................................... 184Air Bag Light........................................... 49, 186Air Cleaner, Engine (Engine Air Cleaner
Filter)............................................................. 224Air Conditioner Maintenance......................... 225Air Conditioner Refrigerant............................ 225Air Conditioner System.................................. 225Air Conditioning Filter...................................... 34Air Conditioning, Operating Tips................ 33, 34Air Filter......................................................... 224
Air PressureTires......................................................... 242AlarmSecurity Alarm............................................. 13Alterations/ModificationsVehicle........................................................... 8Antifreeze (Engine Coolant)................. 228, 259Disposal................................................... 229Anti-Lock Brake System (ABS)...................... 145Anti-Lock Warning Light................................... 52Assist, Hill Start............................................. 148Audio Settings............................................... 105Audio Systems (Radio)..................................... 86Auto Down Power Windows............................. 35Automatic Transmission........................... 62, 63Adding Fluid..................................... 232, 261Fluid And Filter Change............................ 232Fluid Change............................................ 232Fluid Level Check............................ 231, 232Fluid Type........................................ 231, 261Special Additives...................................... 232Auxiliary Electrical Outlet (Power Outlet).......... 40Axle Fluid...................................................... 261
B
Battery................................................... 50, 222Charging System Light.................................50Keyless Key Fob Replacement....................11Belts, Seat.................................................... 185BluetoothConnecting To A Particular Mobile Phone Or Audio Device After Pairing
................ 114Body Builders Guide........................................... 7Body Mechanism Lubrication........................ 225B-Pillar Location............................................ 239Brake Assist System..................................... 146Brake Fluid.................................................... 261Brake System....................................... 230, 255Anti-Lock (ABS)......................................... 145Fluid Check...................................... 231, 261Master Cylinder........................................ 231Parking........................................................60Warning Light...............................................49Brake, Parking.................................................60Brake/Transmission Interlock..........................63Bulb Replacement........................................ 213Bulbs, Light.......................................... 187, 213
21_VM_OM_EN_USC_t.book Page 266